Page 13 of 502
�Occupant Restraints ..................... 38
▫ Lap/Shoulder Belts .................... 39
▫ Rear Center Lap/Shoulder Belt Retractor
Lockout (Four-Door Models Only) ......... 44
▫ Adjustable Upper Shoulder Belt
Anchorage .......................... 45
▫ Seat Belt Pretensioners ................. 46
▫ Enhanced Seat Belt Use Reminder System
(BeltAlert�) ......................... 46
▫ Seat Belts And Pregnant Women .......... 48
▫ Seat Belt Extender ..................... 48 ▫
Supplemental Restraint Systems (SRS) ...... 48
▫ Child Restraint ....................... 61
� Engine Break-In Recommendations .......... 73
� Safety Tips ........................... 74
▫ Transporting Passengers ................ 74
▫ Exhaust Gas ......................... 74
▫ Safety Checks You Should Make Inside The
Vehicle ............................. 75
▫ Periodic Safety Checks You Should Make
Outside The Vehicle ................... 76
2
THINGS TO KNOW BEFORE STARTING YOUR VEHICLE 11
Page 75 of 502

WARNING!
An incorrectly anchored tether strap could lead to
increased head motion and possible injury to the
child. Use only the anchor positions directly behind
the child seat to secure a child restraint top tether
strap.
Transporting Pets
Airbags deploying in the front seat could harm your pet.
An unrestrained pet will be thrown about and possibly
injured, or injure a passenger during panic braking or in
a collision.
Pets should be restrained in the rear seat in pet harnesses
or pet carriers that are secured by seat belts.
ENGINE BREAK-IN RECOMMENDATIONS
A long break-in period is not required for the engine in
your vehicle.
Drive moderately during the first 300 miles (500 km).
After the initial 60 miles (100 km), speeds up to 50 or
55 mph (80 or 90 km/h) are desirable.
While cruising, brief full-throttle acceleration within the
limits of local traffic laws, contributes to a good break-in.
Wide-open throttle acceleration in low gear can be detri-
mental and should be avoided.
The engine oil installed in the engine at the factory is a
high-quality energy conserving type lubricant. Oil
changes should be consistent with anticipated climate
conditions under which vehicle operations will occur.
The recommended viscosity and quality grades are
shown in “Engine Oil”, under “Maintenance Procedures”
in section 7 of this manual. NON-DETERGENT OR
STRAIGHT MINERAL OILS MUST NEVER BE USED.
2
THINGS TO KNOW BEFORE STARTING YOUR VEHICLE 73
Page 115 of 502
1. Locate and remove the following items prior to hard
top removal:
•Right and left door frames
•Door frame attachment knobs (four for two-door
models, six for four-door models)
•Right and left quarter windows
•Rear window
2. Remove the hard top. Refer to “Freedom Top Three-
Piece Modular Hard Top — Front/Rear Panel Removal”
later in this section.
3. Install the door frames. Refer to “Door Frame” in this
section.
4. If the soft top has been removed, follow these steps to
reinstall the soft top. If the soft top is on the vehicle,
proceed to step #5. a. If the pivot brackets have been removed, unzip the
sport bar covers and attach the pivot brackets to the
sports bar with the four screws that were removed
using a #T30 Torx�
head driver. Re-cover and re-zip
the sport bar covers.
3
UNDERSTANDING THE FEATURES OF YOUR VEHICLE 113
Page 131 of 502
WARNING!
Never store the door frames in your vehicle. In an
event of an accident, a loose door frame many cause
personal injury. If removed, always store the door
frames outside of the vehicle.
Door Frame Installation — Four-Door Models
1. Install the rear door frame first.
2. Set the door frame pin into the hole on top of the body
side, just behind the rear door opening.3. Position the top of the door frame against the metal
sport bar and press onto the side bar making sure not to
pinch the material of the sports bar covers and to ensure
it is properly positioned on the seal above the front of the
rear door.
4. Loosely install the rear knob (long knob) to hold the
door rail in position.
3
UNDERSTANDING THE FEATURES OF YOUR VEHICLE 129
Page 147 of 502
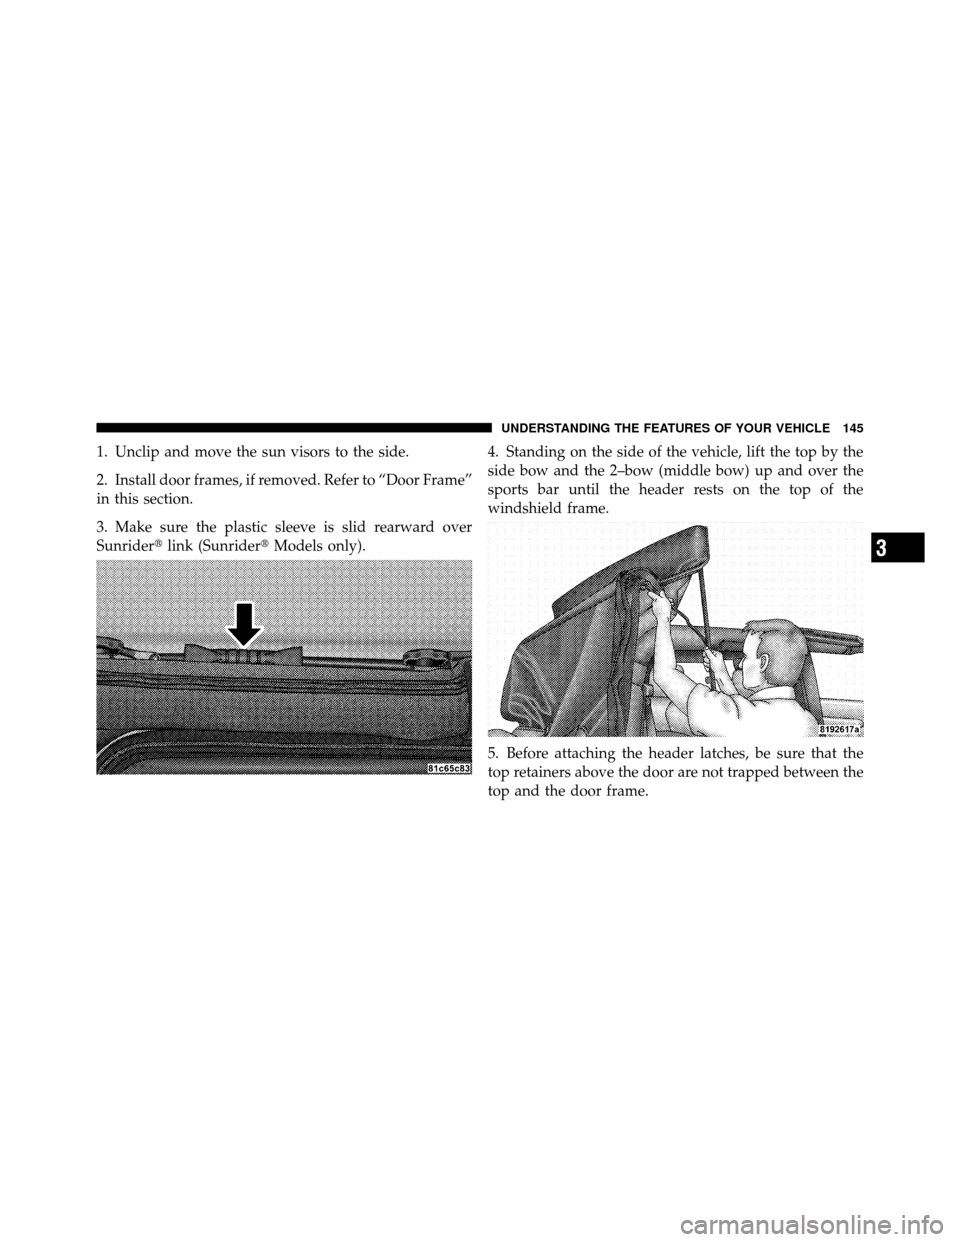
1. Unclip and move the sun visors to the side.
2. Install door frames, if removed. Refer to “Door Frame”
in this section.
3. Make sure the plastic sleeve is slid rearward over
Sunrider�link (Sunrider� Models only). 4. Standing on the side of the vehicle, lift the top by the
side bow and the 2–bow (middle bow) up and over the
sports bar until the header rests on the top of the
windshield frame.
5. Before attaching the header latches, be sure that the
top retainers above the door are not trapped between the
top and the door frame.
3
UNDERSTANDING THE FEATURES OF YOUR VEHICLE 145
Page 225 of 502

Program Type16-Digit Character
Display
Personality Persnlty
Public Public
Rhythm and Blues R & B
Religious Music Rel Musc
Religious Talk Rel Talk
Rock Rock
Soft Soft
Soft Rock Soft Rck
Soft Rhythm and Blues SoftR&B Sports Sports
Talk Talk
Top 40 Top 40
Weather Weather
By pressing the SEEK button when the Music Type icon
is displayed, the radio will be tuned to the next frequency station with the same selected Music Type name. The
Music Type function only operates when in the FM
mode.
If a preset button is activated while in the Music Type
(Program Type) mode, the Music Type mode will be
exited and the radio will tune to the preset station.
SETUP Button
Pressing the SETUP button allows you to select between
the following items:
NOTE:
Turn the TUNE/SCROLL control knob to scroll
through the entries. Push the AUDIO/SELECT button to
select an entry and make changes.
•DVD Enter - When the disc is in DVD Menu mode,
selecting DVD Enter will allow you to play the current
highlighted selection. Use the remote control to scroll
up and down the menu (if equipped).
4
UNDERSTANDING YOUR INSTRUMENT PANEL 223
Page 252 of 502

Program Type16-Digit Character
Display
Personality Persnlty
Public Public
Rhythm and Blues R & B
Religious Music Rel Musc
Religious Talk Rel Talk
Rock Rock
Soft Soft
Soft Rock Soft Rck
Soft Rhythm and Blues Soft R&B
Sports Sports
Talk Talk
Top 40 Top 40
Weather WeatherBy pressing the SEEK button when the Music Type icon is
displayed, the radio will be tuned to the next frequency
station with the same selected Music Type name. The
Music Type function only operates when in the FM mode.
If a preset button is activated while in the Music Type
(Program Type) mode, the Music Type mode will be
exited and the radio will tune to the preset station.
SETUP Button
Pressing the SETUP button allows you to select between
the following items:
•Set Clock— Pressing the SELECT button will allow
you to set the clock. Adjust the hours by turning the
TUNE/SCROLL control knob. After adjusting the
hours, press the TUNE/SCROLL control knob to set
the minutes. The minutes will begin to blink. Adjust
the minutes using the right side TUNE/SCROLL
control knob. Press the TUNE/SCROLL control knob
to save time change.
250 UNDERSTANDING YOUR INSTRUMENT PANEL
Page 302 of 502
.
Driving faster than 18 mph (29 km/")
WARNING!
If the stabilizer/sway bar will not return to on-road
mode, vehicle stability is greatly reduced. Do not
attempt to drive the vehicle over 18 mph (29 km/h).
Driving faster than 18 mph (29 km/h) may cause loss
of control of the vehicle, which could result in
serious injury. Contact your local authorized dealer
for assistance.
ON-ROAD DRIVING TIPS
Utility vehicles have higher ground clearance and a
narrower track to make them capable of performing in a
wide variety of off-road applications. Specific design
characteristics give them a higher center of gravity than
ordinary cars.An advantage of the higher ground clearance is a better
view of the road, allowing you to anticipate problems.
They are not designed for cornering at the same speeds as
conventional two-wheel drive vehicles any more than
low-slung sports cars are designed to perform satisfacto-
rily in off-road conditions. If at all possible, avoid sharp
turns or abrupt maneuvers. As with other vehicles of this
type, failure to operate this vehicle correctly may result in
loss of control or vehicle rollover.
OFF-ROAD DRIVING TIPS
Side Step Removal — If Equipped
NOTE:
Prior to off-road usage, the side steps should be
removed to prevent damage.
1. Remove the two nuts from the bodyside.
300 STARTING AND OPERATING

•Right and left")