Page 129 of 457

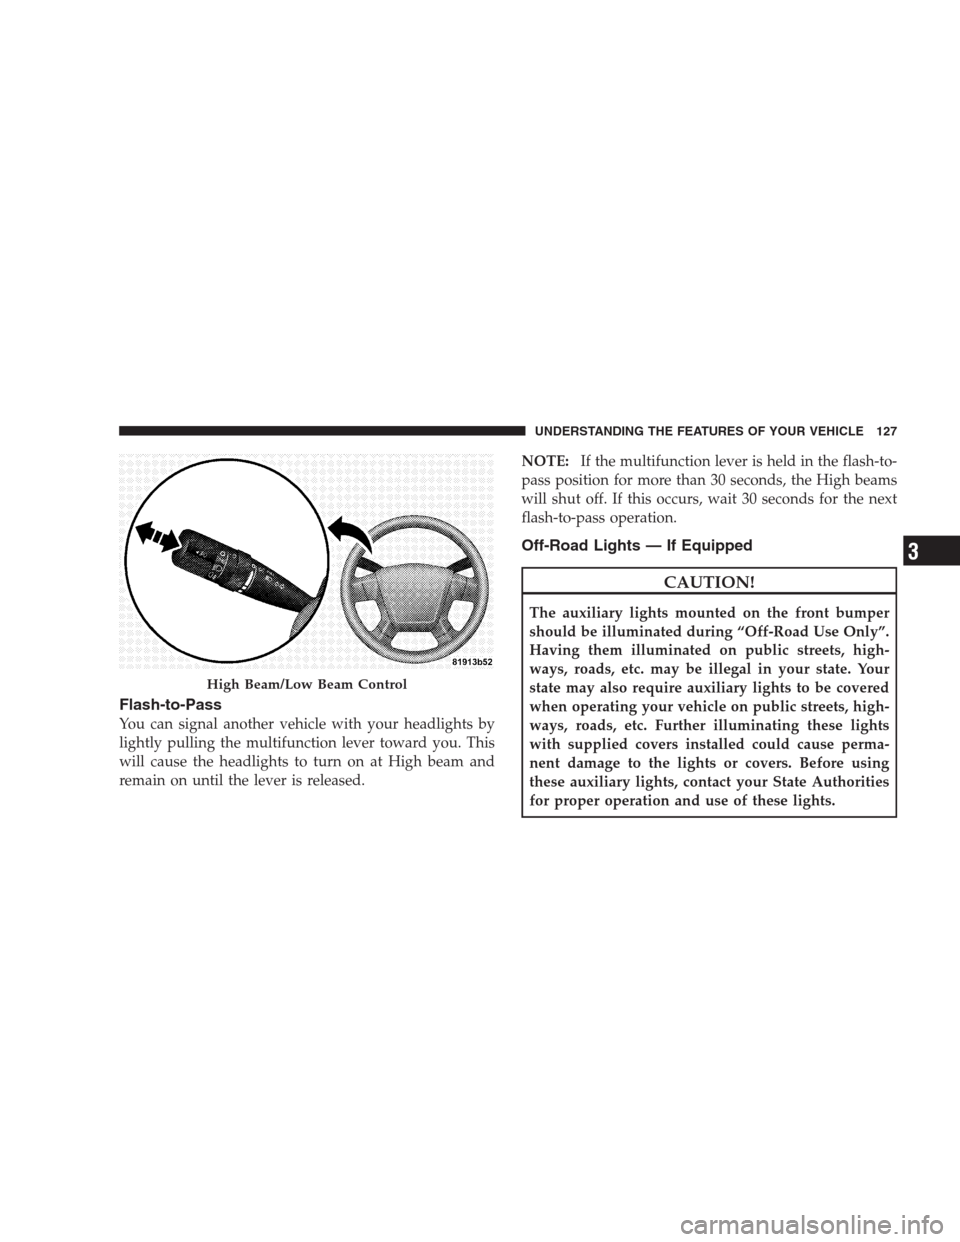
Flash-to-Pass
You can signal another vehicle with your headlights by
lightly pulling the multifunction lever toward you. This
will cause the headlights to turn on at High beam and
remain on until the lever is released.NOTE:If the multifunction lever is held in the flash-to-
pass position for more than 30 seconds, the High beams
will shut off. If this occurs, wait 30 seconds for the next
flash-to-pass operation.
Off-Road Lights — If Equipped
CAUTION!
The auxiliary lights mounted on the front bumper
should be illuminated during “Off-Road Use Only”.
Having them illuminated on public streets, high-
ways, roads, etc. may be illegal in your state. Your
state may also require auxiliary lights to be covered
when operating your vehicle on public streets, high-
ways, roads, etc. Further illuminating these lights
with supplied covers installed could cause perma-
nent damage to the lights or covers. Before using
these auxiliary lights, contact your State Authorities
for proper operation and use of these lights.
High Beam/Low Beam Control
UNDERSTANDING THE FEATURES OF YOUR VEHICLE 127
3
Page 130 of 457
The auxiliary Off-Road lights can be turned on when
off-road conditions require additional lighting. To turn
the auxiliary Off-Road light on, turn on the High beam
headlights and press the top of the switch. To turn off the
auxiliary Off-Road lights press the bottom of the switch.
NOTE:The High beam headlights must be on for the
auxiliary Off-Road lights to operate.
Off-Road Light Switch
128 UNDERSTANDING THE FEATURES OF YOUR VEHICLE
Page 131 of 457
Map/Reading Lights
These lights are mounted between the sun visors above
the rear view mirror. Each light is turned on by pressing
the button. Press the button a second time to turn the
light off. The lights also come on when a door is opened
or the dimmer control is turned fully upward, past the
second detent.
NOTE:The lights will remain on until the switch is
pressed a second time, so be sure they have been turned
off before leaving the vehicle. They will not turn off
automatically.
Map/Reading Lights
UNDERSTANDING THE FEATURES OF YOUR VEHICLE 129
3
Page 149 of 457

WARNING!
To avoid serious injury or death:
•Do not use a three-prong adapter.
•Do not insert any objects into the receptacles.
•Do not touch with wet hands.
•Close the lid when not in use and while driving
the vehicle.
•If this outlet is mishandled, it may cause an
electric shock and failure.
CAUTION!
•Many accessories that can be plugged in draw
power from the vehicle’s battery, even when not in
use (i.e., cellular phones, etc.). Eventually, if
plugged in long enough, the vehicle’s battery will
discharge sufficiently to degrade battery life
and/or prevent engine starting.
•Accessories that draw higher power (i.e., coolers,
vacuum cleaners, lights, etc.) will degrade the
battery even more quickly. Only use these inter-
mittently and with great caution.
•After the use of high power draw accessories, or
long periods of the vehicle not being started (with
accessories still plugged in), the vehicle must be
driven a sufficient length of time to allow the
generator to recharge the vehicle’s battery.
UNDERSTANDING THE FEATURES OF YOUR VEHICLE 147
3
Page 151 of 457

WARNING!
To avoid serious injury or death:
•Do not use a three-prong adaptor.
•Do not insert any objects into the receptacles.
•Do not touch with wet hands.
•Close the lid when not in use.
•If this outlet is mishandled, it may cause an
electric shock and failure.
CAUTION!
•Many accessories that can be plugged in draw
power from the vehicle’s battery, even when not in
use (i.e., cellular phones, etc.). Eventually, if
plugged in long enough, the vehicle’s battery will
discharge sufficiently to degrade battery life
and/or prevent engine starting.
•Accessories that draw higher power (i.e., coolers,
vacuum cleaners, lights, etc.) will degrade the
battery even more quickly. Only use these inter-
mittently and with great caution.
•After the use of high power draw accessories, or
long periods of the vehicle not being started (with
accessories still plugged in), the vehicle must be
driven a sufficient length of time to allow the
generator to recharge the vehicle’s battery.
UNDERSTANDING THE FEATURES OF YOUR VEHICLE 149
3
Page 170 of 457

4. Oil Pressure Warning Light
This light indicates low engine oil pressure. The
light should turn on momentarily when the engine
is started. If the light turns on while driving, stop the
vehicle and shut off the engine as soon as possible. A
chime will sound for four minutes when this light turns
on.
Do not operate the vehicle until the cause is corrected.
This light does not show how much oil is in the engine.
The engine oil level must be checked under the hood.
5. Low Fuel Light
When the fuel level reaches approximately 2.0 gal
(7.8 L) this light will turn on, and remain on until
fuel is added.
6. Speedometer
Indicates vehicle speed.7. Airbag Warning Light
This light turns on and remains on for seven
seconds as a bulb check, when the ignition
switch is first turned ON. If the light is not on
during starting, stays on, or turns on while
driving, have the system inspected by an authorized
dealer as soon as possible.
8. Turn Signal Indicators
The arrow will flash with the exterior turn signal
when the turn signal lever is operated.
9. High Beam Indicator
This indicator shows that the headlights are on
high beam. Push the multifunction lever forward
to switch the headlights to high beam, and pull toward
yourself (normal position) to return to low beam.
168 UNDERSTANDING YOUR INSTRUMENT PANEL
Page 179 of 457

the key is in the ON/RUN position before engine start. If
the light does not come on when turning the key from
OFF to ON/RUN, have the condition checked promptly.
Certain conditions such as a loose or missing gas cap,
poor fuel quality, etc., may illuminate the light after
engine start. The vehicle should be serviced if the light
stays on through several of your typical driving cycles. In
most situations the vehicle will drive normally and will
not require towing.
If the MIL flashes when the engine is running, serious
conditions may exist that could lead to immediate loss of
power or severe catalytic converter damage. The vehicle
should be serviced as soon as possible if this occurs.
27. Hill Descent Indicator — If Equipped
The symbol illuminates (is armed) when the
4WD Lock switch is activated and the trans-
mission range indicator is in LOW or REVERSE
position (Off-Road Mode).28. Front Fog Light Indicator — If Equipped
This light shows when the front fog lights are on.
29. Electronic Stability Program (ESP) Indicator
Light/Traction Control System (TCS) Indicator Light
If this indicator light flashes during accelera-
tion, apply as little throttle as possible. While
driving, ease up on the accelerator. Adapt your
speed and driving to the prevailing road con-
ditions, and do not switch off the Electronic Stability
Program (ESP), or Traction Control System (TCS).
30. Electronic Stability Program (ESP) Indicator Light
The malfunction lamp for the Electronic Stabil-
ity Program (ESP) is combined with Brake
Assist System (BAS). The yellow “ESP/BAS
Warning Lamp” comes on when the ignition
switch is turned to the “ON” position. They should go
out with the engine running. If the “ESP/BAS Warning
UNDERSTANDING YOUR INSTRUMENT PANEL 177
4
Page 182 of 457

When the appropriate conditions exist, the EVIC displays
the following messages:
•Turn Signal On (with a continuous warning chime
after one mile traveled)
•Left Front Turn Signal Light Out (with a single chime)
•Left Rear Turn Signal Light Out (with a single chime)
•Right Front Turn Signal Light Out (with a single chime)
•Right Rear Turn Signal Light Out (with a single chime)
•RKE Battery Low (with a single chime)
•Personal Settings Not Available – Vehicle not in PARK
(automatic transmissions) or vehicle is in motion
(manual transmissions).
•Left/Right Front Door Ajar (one or more, with a single
chime if speed is above 1 mph (1 km/h)
•Left/Right Rear Door Ajar (one or more, with a single
chime if speed is above 1 mph (1 km/h)
•Door(s) Ajar (with a single chime if vehicle is in
motion)
•Gate Ajar (with a single chime)
•Headlights On
•Key In Ignition
•Check TPM System
Engine Oil Change Indicator System
Oil Change Required
Your vehicle is equipped with an engine oil change
indicator system. The “Oil Change Required” message
will flash in the EVIC display for approximately five
seconds after a single chime has sounded, to indicate the
next scheduled oil change interval. The engine oil change
indicator system is duty-cycle based, which means the
engine oil change interval may fluctuate dependent upon
your personal driving style.
180 UNDERSTANDING YOUR INSTRUMENT PANEL