Page 346 of 439
.............. 366
▫Manual Transaxle.................... 366
▫Rear Drive Assembly (RDA) – AWD/4WD
Models Only..............")
▫Brake System....................... 364
▫Automatic Transaxle (CVT).............. 366
▫Manual Transaxle.................... 366
▫Rear Drive Assembly (RDA) – AWD/4WD
Models Only........................ 367
▫Power Transfer Unit (PTU) – AWD/4WD
Models Only........................ 368
▫Appearance Care And Protection From
Corrosion.......................... 368
�Fuses.............................. 374
▫Integrated Power Module (IPM).......... 374
�Vehicle Storage....................... 377
�Replacement Bulbs..................... 377�Bulb Replacement..................... 378
▫Headlamps......................... 378
▫Fog Lights......................... 380
▫Tail Lights, Rear Turn Signals And Backup
Lights — Replacement................. 381
▫License Lights....................... 382
▫Center High-Mounted Stoplight.......... 384
▫Off-Road Light...................... 384
�Fluids And Capacities................... 386
�Fluids, Lubricants, And Genuine Parts....... 387
▫Engine............................ 387
▫Chassis............................ 388
344 MAINTAINING YOUR VEHICLE
Page 347 of 439
ENGINE COMPARTMENT — 2.0L/2.4L
1 — Washer Fluid Reservoir 6 — Battery
2 — Power Steering Fluid Reservoir 7 — Air Cleaner Filter
3 — Engine Oil Fill 8 — Coolant Pressure Cap
4 — Brake Fluid Reservoir 9 — Engine Oil Dipstick
5 — Integrated Power Module 10 — Engine Coolant ReservoirMAINTAINING YOUR VEHICLE 3457
Page 366 of 439

performance, poor gas mileage, and increased
emissions.
Brake System
In order to assure brake s")
ONLY the correct type thermostat. Other designs may
result in unsatisfactory engine coolant (antifreeze)
performance, poor gas mileage, and increased
emissions.
Brake System
In order to assure brake system performance, all brake
system components should be inspected periodically.
Refer to the “Maintenance Schedule” in Section 8 for
proper maintenance intervals.
WARNING!
Riding the brakes can lead to brake failure and
possibly an accident. Driving with your foot resting
or riding on the brake pedal can result in abnormally
high brake temperatures, excessive lining wear, and
possible brake damage. You would not have your full
braking capacity in an emergency.
Brake Master Cylinder
The fluid level in the master cylinder should be checked
when performing under hood services, or immediately if
the brake system warning light is on.
Be sure to clean the top of the master cylinder area before
removing the cap. If necessary, add fluid to bring the
fluid level up to the requirements described on the brake
fluid reservoir. Fluid level can be expected to fall as the
brake pads wear. The brake fluid level should be checked
when the pads are replaced. However, low fluid level
may be caused by a leak and a checkup may be needed.
NOTE:If your vehicle is equipped with amanual
transaxle, the brake fluid reservoir supplies fluid to both
the brake system and the clutch release system. The two
systems are separated in the reservoir, and a leak in one
system will not affect the other system. Themanual
transaxleclutch release system should not require fluid
replacement during the life of the vehicle. If the brake
364 MAINTAINING YOUR VEHICLE
Page 367 of 439

fluid reservoir is low and the brake system does not
indicate any leaks or other problems, it may be a result of
a leak in the hydraulic clutch release system. See your
local authorized dealer for service.
Use only manufacturer’s recommended brake fluid. Re-
fer to “Fluids, Lubricants, and Genuine Parts” in this
section for the correct fluid type.
WARNING!
•Use of a brake fluid that may have a lower initial
boiling point or is unidentified as to specification,
may result in sudden brake failure during hard
prolonged braking. You could have an accident.
•Overfilling the brake fluid reservoir can result in
spilling brake fluid on hot engine parts and the
brake fluid catching fire.
CAUTION!
Use of improper brake fluids will affect overall
clutch system performance. Improper brake fluids
may damage the clutch system resulting in loss of
clutch function and the ability to shift the transaxle.
Use only brake fluid that has been in a tightly closed
container to avoid contamination from foreign matter.
NOTE:Do not allow petroleum-based fluid to contami-
nate the brake fluid as seal damage will result!
MAINTAINING YOUR VEHICLE 365
7
Page 376 of 439
FUSES
Integrated Power Module (IPM)
The Integrated Power Module (IPM) is located in the
engine compartment near the air cleaner assembly. This
center contains cartridge fuses and mini-fuses. A label
that identifies each component may be printed on the
inside of the cover. Refer to “Engine Compartment” in
this section of the Owner’s Manual for the underhood
location of the IPM.
Cavity Cartridge
FuseMini-
FuseDescription
1 Empty Empty
2 15 Amp
Lt BlueAWD/4WD ECU
Feed
3 10 Amp
RedCHMSL Brake Switch
Feed
4 10 Amp
RedIgnition Switch Feed/
OCM
Cavity Cartridge
FuseMini-
FuseDescription
5 20 Amp
YellowTrailer Tow
6 10 Amp
RedIOD Sw/Pwr Mir/
Steering Cntrl Sdar/
Hands-Free Phone
7 30 Amp
GreenIOD Sense1
8 30 Amp
GreenIOD Sense2
9 40 Amp
GreenPower Seats
10 20 Amp
YellowCCN Power Locks/
Interior Lighting
11 15 Amp
Lt BluePower Outlet
12 20 Amp
YellowIgn Run/Acc Inverter
374 MAINTAINING YOUR VEHICLE
Page 390 of 439
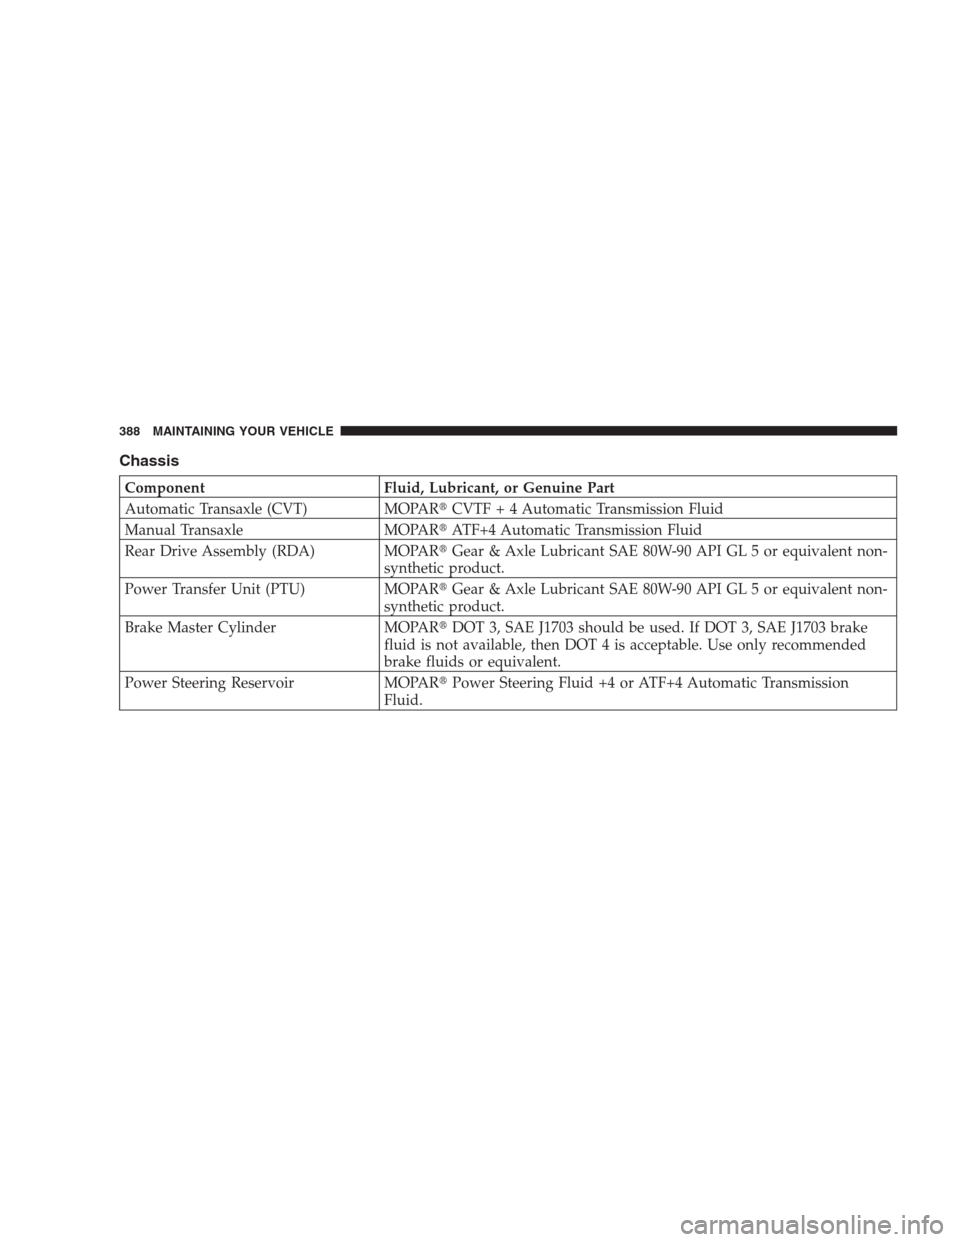
Chassis
Component Fluid, Lubricant, or Genuine Part
Automatic Transaxle (CVT) MOPAR�CVTF + 4 Automatic Transmission Fluid
Manual Transaxle MOPAR�ATF+4 Automatic Transmission Fluid
Rear Drive Assembly (RDA) MOPAR�Gear & Axle Lubricant SAE 80W-90 API GL 5 or equivalent non-
synthetic product.
Power Transfer Unit (PTU) MOPAR�Gear & Axle Lubricant SAE 80W-90 API GL 5 or equivalent non-
synthetic product.
Brake Master Cylinder MOPAR�DOT 3, SAE J1703 should be used. If DOT 3, SAE J1703 brake
fluid is not available, then DOT 4 is acceptable. Use only recommended
brake fluids or equivalent.
Power Steering Reservoir MOPAR�Power Steering Fluid +4 or ATF+4 Automatic Transmission
Fluid.
388 MAINTAINING YOUR VEHICLE
Page 394 of 439
Once a Month
•Check the tire pressure and look for unusual wear or
damage.
•Inspect the battery and clean and tighten the terminals
as required.
•Check the fluid levels of coolant reservoir, brake
master cylinder, power steering and transmission and
add as needed.
•Check all lights and other electrical items for correct
operation.At Each Oil Change
•Change the engine oil filter.
•Inspect the brake hoses and lines.
•Check the manual transmission fluid level.
CAUTION!
Failure to perform the required maintenance items
may result in damage to the vehicle.
Required Maintenance Intervals
Refer to the Maintenance Schedules on the following
pages for the required maintenance intervals.
392 MAINTENANCE SCHEDULES
8
M
A
I
N
T
E
N
A
N
C
E
S
C
H
E
D
U
L
E
S
Page 395 of 439
6,000 Miles (10,000 km) or
6 Months Maintenance Service
Schedule
❏Change the engine oil and engine oil
filter.
❏Rotate tires.
Odometer Reading Date
Repair Order # Dealer Code
Signature Authorized Chrysler Dealer
12,000 Miles (20,000 km) or 12 Months Maintenance Service
Schedule
❏Change the engine oil and engine oil filter.
❏Rotate tires.
❏If using your vehicle for any of the following: Dusty or off-road conditions. Inspect the
engine air cleaner filter; replace if necessary.
❏Inspect the brake linings; replace if necessary.
❏Replace the air conditioning filter.
❏Inspect the CV joints. Perform the first inspection at 12,000 miles (20 000 km) or
12 months.
❏Inspect exhaust system. Perform the first inspection at 12,000 miles (20 000 km) or
12 months.
Odometer Reading Date
Repair Order # Dealer Code
Signature Authorized Chrysler Dealer
MAINTENANCE SCHEDULES 393
8
M
A
I
N
T
E
N
A
N
C
E
S
C
H
E
D
U
L
E
S


The Integrated Power Module (IPM) is located in the
engine compartment near the air cleaner assembly. This
center contains cartridge fuses and mini-fuses. A label
t")

 or
6 Months Maintenance Service
Schedule
❏Change the engine oil and engine oil
filter.
❏Rotate tires.
Odometer Reading Date
Repair Order # Dealer Code
Signature Authorized")