2009 JAGUAR XF Tyres
[x] Cancel search: TyresPage 5 of 391

Contents
5
FUEL QUALITY .............................................. 174
ALTERNATIVE FUELS FOR PETROL ENGINES .....
175
DIESEL ENGINED VEHICLES......................... 176
RUNNING OUT OF FUEL ............................... 177
FUEL CUT-OFF .............................................. 177
FUEL FILLER FLAP........................................ 178
REFUELLING ................................................. 179
DIESEL MISFUELLING PROTECTION DEVICE......
180
FUEL CONSUMPTION ................................... 181
Load carrying
GENERAL INFORMATION ............................. 182
LUGGAGE ANCHOR POINTS ......................... 182
REAR UNDER FLOOR STORAGE ................... 182
Towing
TOWING A TRAILER (V6 petrol and diesel
vehicles only) ................................................ 183
LEVELLING ................................................... 184
RECOMMENDED TOWING WEIGHTS ........... 185
ESSENTIAL TOWING CHECKS ...................... 185
TOW BAR ...................................................... 186
Vehicle care
CLEANING THE ALLOY WHEELS .................. 187
CLEANING THE EXTERIOR ........................... 187
CLEANING THE INTERIOR ............................ 189
REPAIRING MINOR PAINT DAMAGE ............ 191
Maintenance
GENERAL INFORMATION ............................. 192
OPENING AND CLOSING THE BONNET ........ 195
ENGINE COMPARTMENT OVERVIEW ........... 196
ENGINE OIL CHECK - V6 Petrol engines ....... 197
ENGINE OIL CHECK - V8 Petrol engines ....... 199
ENGINE OIL CHECK - V6 Diesel engines ....... 201
ENGINE OIL SPECIFICATION ........................ 203
ENGINE COOLANT CHECK ............................ 204
BRAKE FLUID CHECK ................................... 206
POWER STEERING FLUID CHECK ................ 208
WASHER FLUID CHECK ................................ 209
TECHNICAL SPECIFICATIONS ...................... 210
Vehicle battery
BATTERY WARNING SYMBOLS ................... 212 BATTERY CARE ............................................ 212
USING BOOSTER CABLES ............................ 214
CHARGING THE VEHICLE BATTERY ............. 215
CHANGING THE VEHICLE BATTERY ............. 215
Wheels and tyres
GENERAL INFORMATION ............................. 216
TYRE CARE................................................... 217
USING WINTER TYRES ................................ 223
USING SNOW CHAINS ................................. 223
RUN FLAT TYRES ......................................... 224
TOOL KIT ...................................................... 224
CHANGING A ROAD WHEEL ......................... 225
TYRE REPAIR KIT......................................... 229
TYRE PRESSURE MONITORING SYSTEM.... 234
TYRE GLOSSARY ......................................... 238
TYRE SPECIFICATIONS - ARDUOUS TERRAIN ...
239
Fuses
CHANGING A FUSE....................................... 241
FUSE BOX LOCATIONS................................. 242
FUSE SPECIFICATION CHART ...................... 245
Emergency equipment
HAZARD WARNING FLASHERS.................... 250
WARNING TRIANGLE ................................... 250
FIRST AID KIT .............................................. 250
FIRE EXTINGUISHER .................................... 250
Status after a collision
DRIVING AFTER A COLLISION ..................... 251
INSPECTING SAFETY SYSTEM COMPONENTS ...
252
Vehicle recovery
TOWING POINTS .......................................... 253
TRANSPORTING THE VEHICLE .................... 254
TOWING THE VEHICLE ON FOUR WHEELS .. 256
Vehicle identification
VEHICLE IDENTIFICATION PLATE ................ 257
ENGINE NUMBER ......................................... 257
TRANSMISSION NUMBER ........................... 257
VEHICLE IDENTIFICATION
NUMBER (VIN)... 257
VEHICLE BUILD DATE PLATE ....................... 257
Page 103 of 391

103
Instruments
Tyre Pressure Monitoring System -
Yellow
Illuminates when one or more tyres
are significantly under-inflated. The
vehicle should be stopped as soon
as possible and the tyres checked and inflated
to the recommended pressure.
High beam - Blue
Illuminates when the high beam
headlamps are switched on or
flashed.
Automatic Speed Limiter - Green
Illuminates when Automatic Speed
Limiter is active.
Side lamps - Green
Illuminates when the side (parking)
lamps are switched on.
Direction indicators - Green
The appropriate indicator will flash
when the column stalk is moved up
or down to signal a turn. If a
direction indicator bulb fails, the audible ticking
and warning indicator wi ll sound and flash at
twice the normal rate, when that direction
indicator is selected.
Hazard warning indicators
When the hazard warning lamps are switched
on, both direction indica tor warning indicators
flash simultaneously.
Page 163 of 391

163
Adaptive cruise control (ACC)
Detection beam issues
Detection issues can occur:
1.When driving on a different line to the
vehicle in front.
2. When a vehicle edges into your lane. The
vehicle will only be detected once it has
moved fully into your lane.
3. There may be issues with the detection of
vehicles in front when going into and
coming out of a bend.
In these cases ACC may brake late or
unexpectedly. The driver should stay alert and
intervene if necessary.
ACC malfunction
If a malfunction occurs during operation of the
system in cruise or follow modes, the ACC
system will switch off a nd cannot be used until
the fault is cleared. The message DRIVER
INTERVENE appears briefly and is then
replaced by the message CRUISE NOT
AVAILABLE . If malfunction of the ACC or any
related system occurs at any other time, the
message CRUISE NOT AVAILABLE will be
displayed. It will not be possible to activate the
ACC system in any mode.
Accumulations of dirt, snow or ice on the
sensor or cover may inhibit ACC operation.
Fitting of a vehicle front protector or metallised
badges may also affect ACC operation.
The ACC system relies on its radar to detect
objects and constantly scans ahead. If the
radar detects no objects ahead in ACC or follow
mode , then the ACC will be deactivated, the
audible alarm sounds and the message
DRIVER INTERVENE displays briefly. The
message ACC SENSOR BLOCKED will then be
displayed.
The same messages may also be displayed
while driving on open roads with few objects
for the radar to detect.
Clearing the obstruction allows the system to
return to normal operation. If the obstruction is
present when ACC is inac tive, e.g. on initial
starting or with the ACC system switched off,
the message ACC SENSOR BLOCKED will be
displayed.
Tyres other than those recommended may
have different sizes. This can affect the correct
operation of the ACC.1
2
3
E91498
Page 173 of 391

173
Driving dynamics
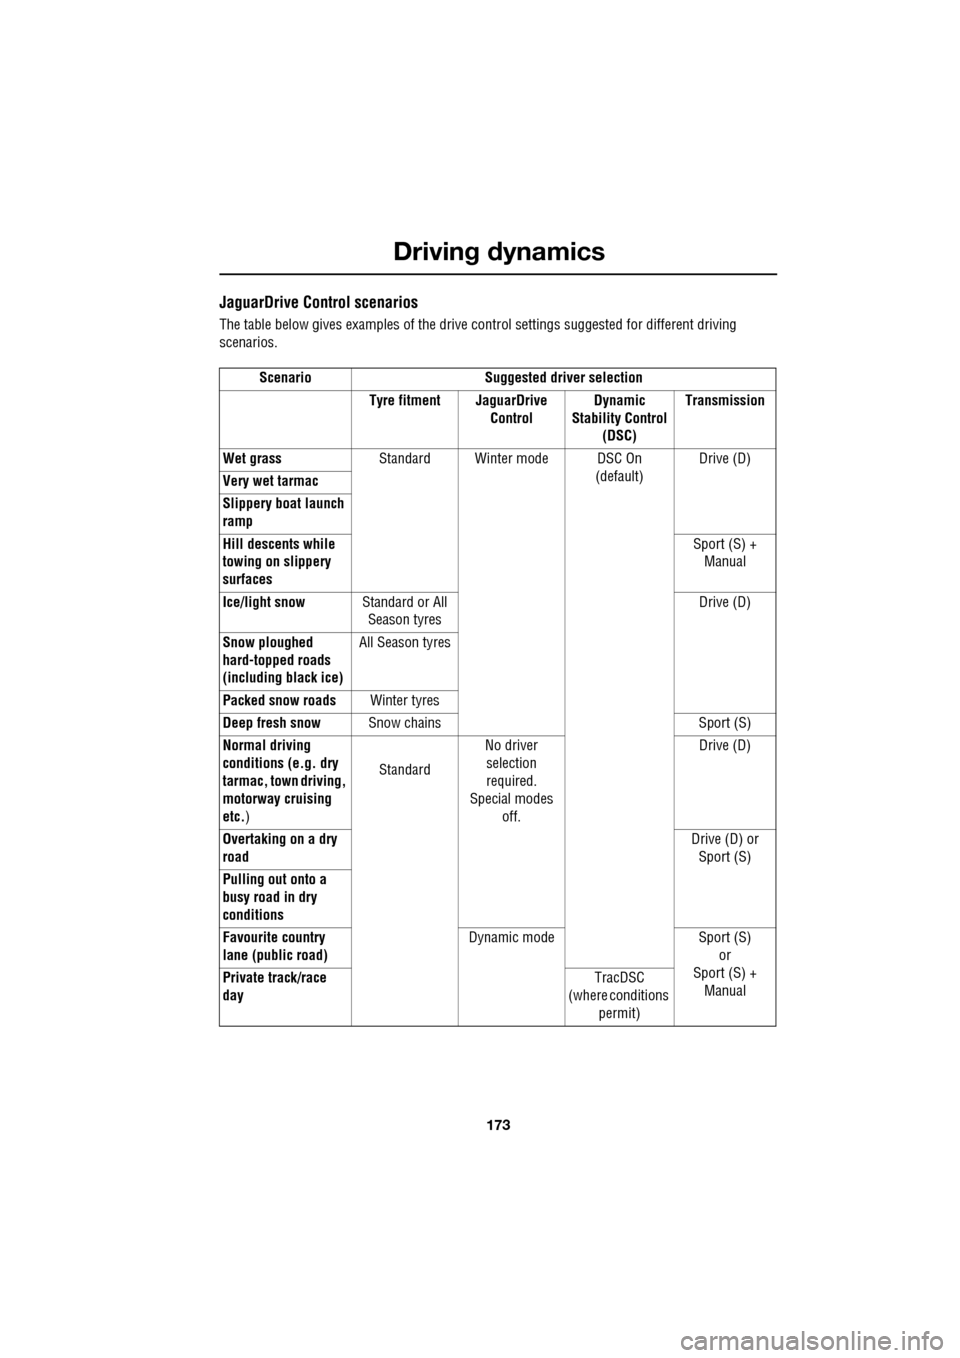
JaguarDrive Control scenarios
The table below gives examples of the drive control settings suggested for different driving
scenarios.
Scenario Suggested driver selection Tyre fitment JaguarDrive ControlDynamic
Stability Control (DSC) Transmission
Wet grass Standard Winter mode DSC On
(default)Drive (D)
Very wet tarmac
Slippery boat launch
ramp
Hill descents while
towing on slippery
surfaces Sport (S) +
Manual
Ice/light snow Standard or All
Season tyres Drive (D)
Snow ploughed
hard-topped roads
(including black ice) All Season tyres
Packed snow roads Winter tyres
Deep fresh snow Snow chains Sport (S)
Normal driving
conditions (e.g. dry
tarmac, town driving,
motorway cruising
etc. ) Standard
No driver
selection
required.
Special modes off. Drive (D)
Overtaking on a dry
road Drive (D) or
Sport (S)
Pulling out onto a
busy road in dry
conditions
Favourite country
lane (public road) Dynamic mode Sport (S)
or
Sport (S) + Manual
Private track/race
day TracDSC
(where conditions
permit)
Page 216 of 391

Wheels and tyres
216
GENERAL INFORMATION
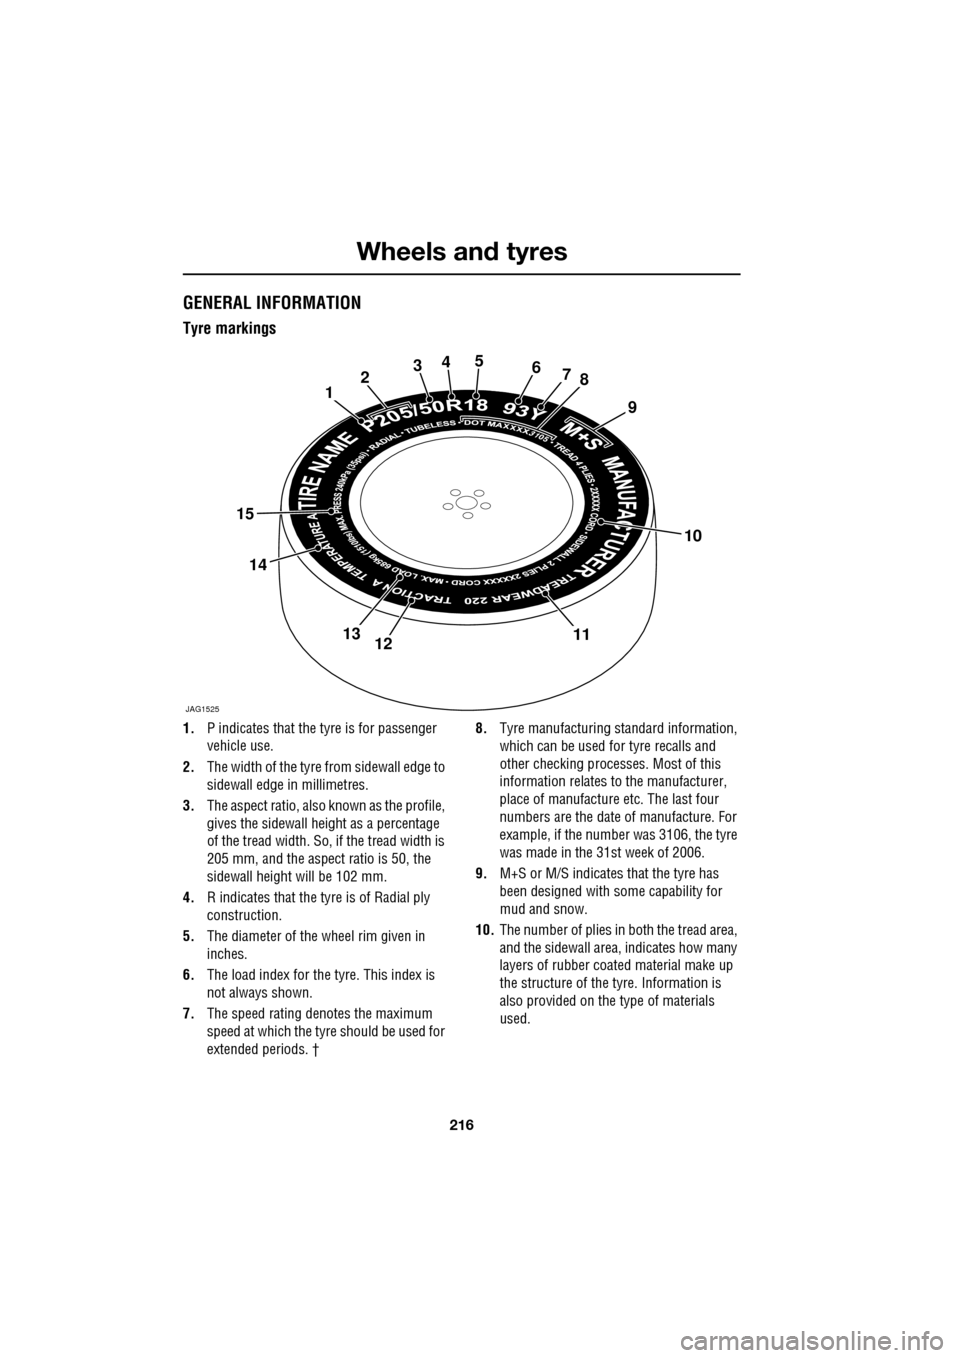
Tyre markings
1.P indicates that the tyre is for passenger
vehicle use.
2. The width of the tyre fr om sidewall edge to
sidewall edge in millimetres.
3. The aspect ratio, also known as the profile,
gives the sidewall height as a percentage
of the tread width. So, if the tread width is
205 mm, and the aspect ratio is 50, the
sidewall height will be 102 mm.
4. R indicates that the ty re is of Radial ply
construction.
5. The diameter of the wheel rim given in
inches.
6. The load index for the tyre. This index is
not always shown.
7. The speed rating denotes the maximum
speed at which the tyre should be used for
extended periods. † 8.
Tyre manufacturing standard information,
which can be used for tyre recalls and
other checking processe s. Most of this
information relates to the manufacturer,
place of manufacture etc. The last four
numbers are the date of manufacture. For
example, if the number was 3106, the tyre
was made in the 31st week of 2006.
9. M+S or M/S indicates that the tyre has
been designed with some capability for
mud and snow.
10. The number of plies in both the tread area,
and the sidewall area, indicates how many
layers of rubber coat ed material make up
the structure of the tyre. Information is
also provided on the type of materials
used.
JAG1525
12345678
9
10
111213
14
15
Page 217 of 391

217
Wheels and tyres
11.Wear rate indicator. A tyre rated at 400 for
example, will last twice as long as a tyre
rated at 200.
12. The traction rating grades a tyres
performance when stopping on a wet road
surface. The higher the grade the better the
braking performance. The grades from
highest to lowest are, AA, A, B, and C.
13. The maximum load which can be carried
by the tyre.
14. Heat resistance grading. The tyre's
resistance to heat is grade A, B, or C, with
A indicating the greatest resistance to heat.
This grading is provided for a correctly
inflated tyre, which is being used within its
speed and loading limits.
15. The maximum inflation pressure for the
tyre. This pressure should not be used for
normal driving.
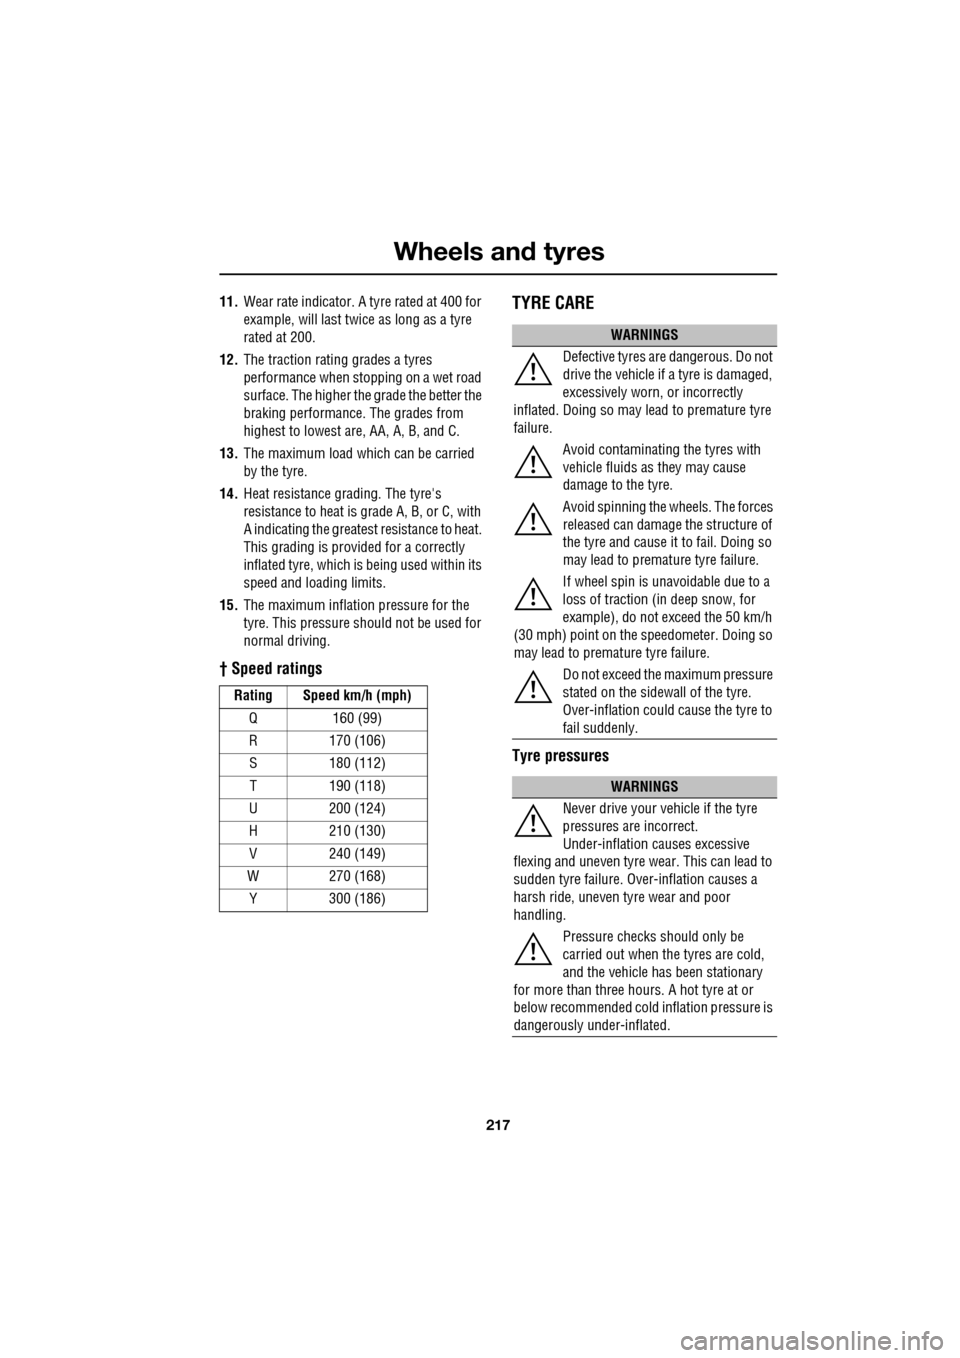
† Speed ratings
TYRE CARE
Tyre pressures
Rating Speed km/h (mph)
Q 160 (99)
R 170 (106)S 180 (112)
T 190 (118)
U 200 (124)
H 210 (130)
V 240 (149)
W 270 (168) Y 300 (186)
WARNINGS
Defective tyres are dangerous. Do not
drive the vehicle if a tyre is damaged,
excessively worn, or incorrectly
inflated. Doing so may lead to premature tyre
failure.
Avoid contaminating the tyres with
vehicle fluids as they may cause
damage to the tyre.
Avoid spinning the wh eels. The forces
released can damage the structure of
the tyre and cause it to fail. Doing so
may lead to premature tyre failure.
If wheel spin is unavoidable due to a
loss of traction (i n deep snow, for
example), do not exceed the 50 km/h
(30 mph) point on the speedometer. Doing so
may lead to premature tyre failure.
Do not exceed the maximum pressure
stated on the sidewall of the tyre.
Over-inflation could cause the tyre to
fail suddenly.
WARNINGS
Never drive your vehicle if the tyre
pressures are incorrect.
Under-inflation causes excessive
flexing and uneven tyre we ar. This can lead to
sudden tyre failure. Ov er-inflation causes a
harsh ride, uneven tyre wear and poor
handling.
Pressure checks should only be
carried out when the tyres are cold,
and the vehicle has been stationary
for more than three hours. A hot tyre at or
below recommended cold inflation pressure is
dangerously under-inflated.
Page 218 of 391

Wheels and tyres
218
All of the vehicle's tyres (including the spare)
should be checked regularly for damage, wear
and distortion. If you are in any doubt about the
condition of a tyre, have it checked immediately
by a tyre repair centre or your
Dealer/Authorised repairer.
Checking the tyre pressures
The recommended tyre pressures are listed on
a placard label fixed to the end of the left-hand
side door. These pressures provide optimum
ride and handling charac teristics for all normal
operating conditions.
If winter tyres are fitted, please refer to the
winter tyre pressure information. SeeUSING
WINTER TYRES (page 223).
In the interest of safe ty, reliability and fuel
efficiency, check the tyres, including the spare,
for condition and pressu re on a weekly basis
and before long journeys.
Do not check tyre pressures immediately after
the vehicle has travelled in excess of 1.6 km
(1.0 mile). Tyre temperatures and pressures
increase when running. Deflating a warm tyre
to the recommended pressure will result in
under-inflation.
If tyre pressures are checked while the vehicle
is inside a protected covered area, e.g. a
garage, and subsequent ly driven in lower
outdoor temperatures, tyre under-inflation
could occur.
A slight pressure loss occurs naturally with
time. If this exceeds 0.14 bar (2 lbf/in², 14 kPa,)
per week, have the cause investigated and
rectified by qualified assistance.
Tyre pressures (including the spare) should be
checked at least once a week with normal
on-road use, but should be checked daily if the
vehicle is used off-road. Always check the tyre
pressures before setti ng off on a long journey.
If it is necessary to check tyre pressures when
the tyres are warm, you should expect the
pressures to have increased by up to
0.3-0.4 bar (4-6 lbf/in², 30-40 kpa). Do not
reduce the tyre pressures to the cold inflation
pressure under these circumstances. Allow the
tyres to cool fully before adjusting the
pressures.
If the vehicle has been parked in
strong sunlight, or used in high
ambient temperatures do not reduce
the tyre pressures. move the vehicle into the
shade and allow the tyres to cool before
re-checking the pressures.
WARNING
Tyre pressures should be checked
regularly using an accurate pressure
gauge, when the tyres are cold.
Failure to properly maintain your tyre
pressures could increase the risk of tyre failure
resulting in loss of vehicle control and
personal injury.
WARNINGS
E95180
Page 219 of 391

219
Wheels and tyres
The following procedure should be used to
check and adjust the tyres pressures.
1.Remove the valve cap.
2. Firmly attach a tyre pressure gauge/inflator
to the valve.
3. Read the tyre pressure from the gauge,
and add air if required.
4. If air is added to the tyre, remove the gauge
and re-attach it be fore reading the
pressure. Failure to do so may result in an
inaccurate reading.
5. If the tyre pressure is too high, remove the
gauge and allow air out of the tyre by
pressing the centre of the valve. Refit the
gauge to the valve and check the pressure.
6. Repeat the process a dding or removing air
as required until the correct tyre pressure
is reached.
7. Refit the valve cap.
Note: It is an offence in certain countries to
drive a vehicle with incorrect tyre pressures.
Note: It is the driver's responsibility to ensure
that the tyre pressures are correct.
Tyre valves
Keep the valve caps screwed down firmly to
prevent water or dirt entering the valve. Check
the valves for leaks when checking the tyre
pressures.
Pressure compensation for ambient
temperature changes
If the intended journey will take the vehicle into
an area where the ambien t local temperature is
known to be lower than the journey start point,
tyre pressure under-i nflation could occur. A colder ambient local temperature will reduce
pressure within the tyre. An effect is to
decrease sidewall height
and to increase tyre
shoulder wear with the potential for tyre failure.
Vehicle dynamics could also be adversely
affected.
In order to minimise this effect, tyre pressures
can be adjusted to compensate before the start
of the journey. Alternatively, tyre pressures can
be adjusted when the area of lower ambient
temperature is reached.
In this situation, the vehicle must be left in the
ambient local temperature for a least one hour
before tyre pressu re is adjusted.
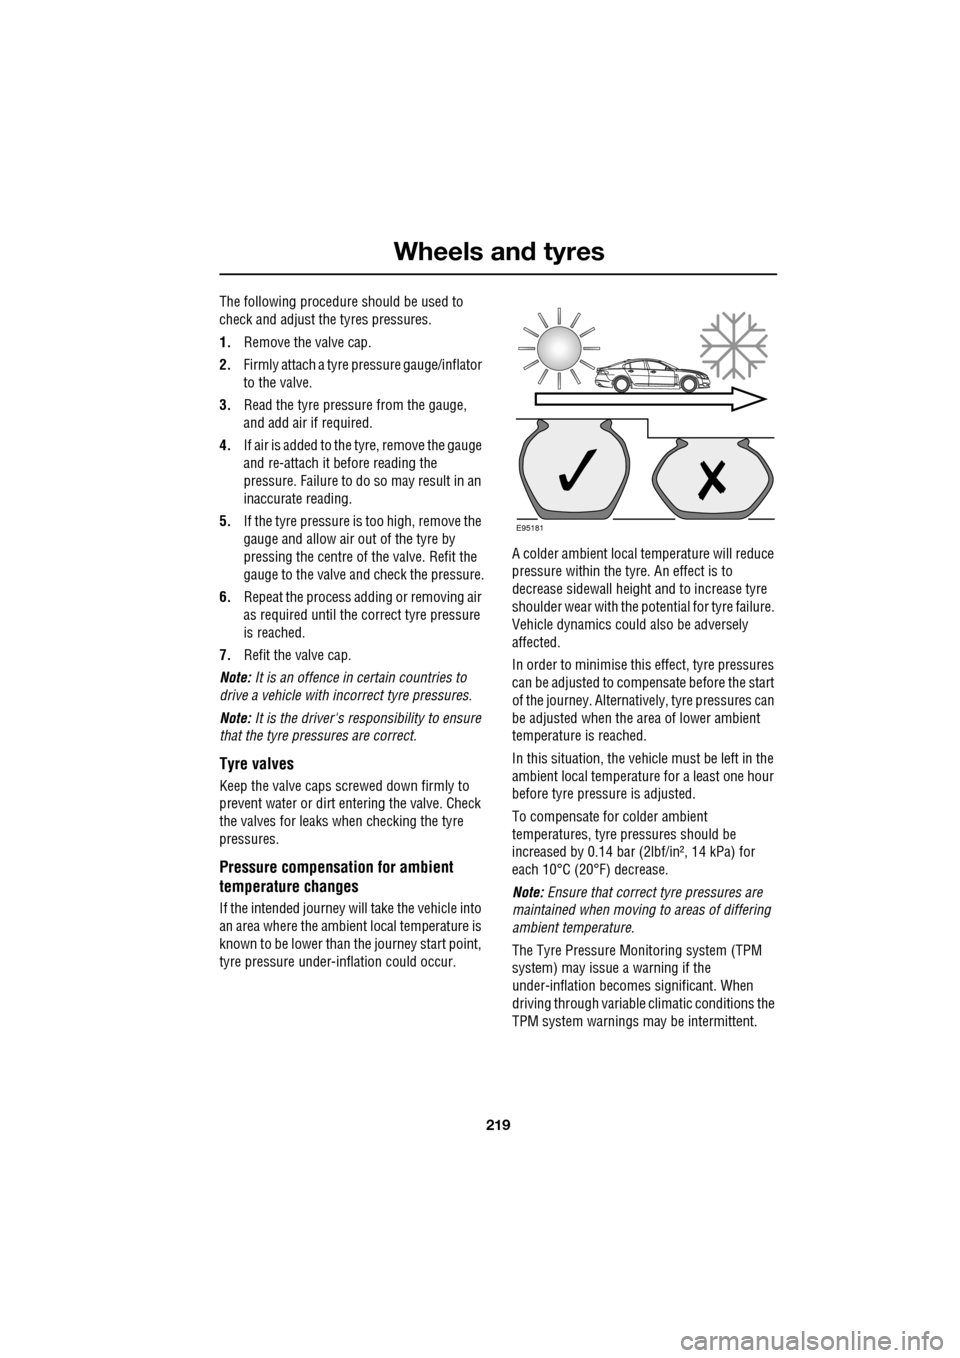
To compensate for colder ambient
temperatures, tyre pressures should be
increased by 0.14 bar (2lbf/in², 14 kPa) for
each 10°C (20°F) decrease.
Note: Ensure that correct tyre pressures are
maintained when moving to areas of differing
ambient temperature.
The Tyre Pressure M onitoring system (TPM
system) may issue a warning if the
under-inflation becomes significant. When
driving through variable climatic conditions the
TPM system warnings may be intermittent.
E95181