2009 JAGUAR XF Steering wheel adjust
[x] Cancel search: Steering wheel adjustPage 3 of 391

Contents
3
Introduction
SYMBOLS GLOSSARY ...................................... 9
LABEL LOCATIONS ........................................... 9
HEALTH AND SAFETY ..................................... 10
DATA RECORDING.......................................... 11
DISABILITY MODIFICATIONS ......................... 11
FASCIA AND CONTROLS ................................ 12
PARTS AND ACCESSORIES ............................ 14
Keys and remote controls
PRINCIPLE OF OPERATION ............................ 16
GENERAL INFORMATION ON RADIO
FREQUENCIES ................................................ 16
USING THE REMOTE CONTROL ..................... 17
UNLOCKING AND DISARMING THE VEHICLE. 18
LOCKING AND ARMING THE VEHICLE ........... 19
DOCKING/UNDOCKING THE JAGUAR SMART
KEY ................................................................. 20
PROGRAMMING THE REMOTE CONTROL...... 21
CHANGING THE REMOTE CONTROL BATTERY ...
24
EMERGENCY KEY BLADE ............................... 25
Locks
LOCKING AND UNLOCKING............................ 26
USING THE EMERGENCY KEY BLADE ............ 28
VALET MODE .................................................. 30
JAGUAR SMART KEY SYSTEM TRANSMITTERS
32
KEYLESS ENTRY ............................................ 33
GLOBAL OPENING AND CLOSING .................. 35
Alarm
ARMING THE ALARM ..................................... 37
DISARMING THE ALARM ............................... 38
SECURITY SENSORS ...................................... 39
Seats
SITTING IN THE CORRECT POSITION ............ 41
ELECTRIC SEATS ............................................ 42
HEAD RESTRAINTS ........................................ 44
REAR SEATS ................................................... 45
HEATED SEATS............................................... 47
CLIMATE SEATS ............................................. 48
Seat belts
PRINCIPLE OF OPERATION ............................ 49 SEAT BELT REMINDER .................................. 50
USING SEAT BELTS DURING PREGNANCY.... 51
FASTENING THE SEAT BELTS ........................ 51
SEAT BELT HEIGHT ADJUSTMENT ................ 52
Supplementary restraints system
PRINCIPLE OF OPERATION ............................ 53
AIRBAG WARNING LAMP .............................. 57
WHIPLASH PROTECTION ............................... 57
AIRBAG LABELS ............................................. 58
AIRBAG SERVICE INFORMATION................... 58
Child safety
CHILD SEATS ................................................. 59
CHILD SEAT POSITIONING ............................ 60
BOOSTER CUSHIONS ..................................... 61
CHILD SEAT ANCHOR POINTS ....................... 62
CHILD SAFETY LOCKS ................................... 65
Pedestrian protection
PRINCIPLE OF OPERATION ............................ 66
AFTER DEPLOYMENT OF THE PEDESTRIAN
PROTECTION SYSTEM ................................... 66
Steering wheel
ADJUSTING THE STEERING WHEEL .............. 67
HORN ............................................................. 68
HEATED STEERING WHEEL............................ 68
AUDIO CONTROL ........................................... 69
VOICE CONTROL ............................................ 69
CRUISE CONTROL.......................................... 74
Lighting
LIGHTING CONTROL ...................................... 75
AUTOLAMPS .................................................. 76
REAR FOG LAMPS.......................................... 77
HAZARD WARNING FLASHERS...................... 77
DIRECTION INDICATORS ............................... 78
HEADLAMPS - DRIVING ABROAD.................. 78
HEADLAMP LEVELLING ................................. 79
CORNERING OR STATIC BENDING LAMPS.... 79
INTERIOR LAMPS .......................................... 80
APPROACH LAMPS ........................................ 81
REMOVING A HEADLAMP .............................. 81
REMOVING A REAR LAMP ............................. 82
CHANGING A BULB ........................................ 83
HEADLAMP UNIT BULBS ............................... 83
Page 13 of 391

13
Introduction
1.Steering wheel audio controls.
See AUDIO CONTROL (page 69).
2. External lamp controls. See LIGHTING
CONTROL (page 75).
3. Sequential gear change down paddle.
See AUTOMATIC TRANSMISSION
(page 137).
4. Speedometer. See INSTRUMENT PANEL
OVERVIEW (page 99).
5. Driver’s horn and airbag. See HORN
(page 68). See Supplementary
restraints system (page 53).
6. Message centre. See WARNING AND
INFORMATION MESSAGES (page 106).
7. Tachometer. See INSTRUMENT PANEL
OVERVIEW (page 99).
8. Sequential gear change up paddle.
See AUTOMATIC TRANSMISSION
(page 137).
9. Wiper and washer control. See Wipers
and washers (page 88).
10. Cruise control and Adaptive cruise
control steering wheel controls.
SeeCruise control (page 156).
See Adaptive cruise control (ACC)
(page 159).
11. Audio control panel. See Audio unit
overview (page 269).
12. Fascia lock/unlock buttons.
SeeLOCKING AND UNLOCKING
(page 26).
13. Touch-screen. See TOUCH-SCREEN
(page 109).
14. Hazard warning lamp switch.
SeeHAZARD WARNING FLASHERS
(page 77).
15. Climate contro l panel. SeeClimate
control (page 115). 16.
Glove box proximity sensor. See GLOVE
BOX (page 125).
17. Engine START/STOP switch.
SeeStarting the engine (page 132).
18. JaguarDrive gear selector.
SeeAUTOMATIC TRANSMISSION
(page
137).
19. JaguarDrive mode selectors. See Driving
dynamics (page 169).
20. Electric Parking Brake (EPB).
SeeELECTRIC PARKIN G BRAKE (EPB)
(page 146).
21. Steering wheel adju stment control.
See ADJUSTING THE STEERING WHEEL
(page 67).
22. Starter control docking unit for the
Jaguar Smart Key.
SeeDOCKING/UNDOCKING THE
JAGUAR SMART KEY (page 20).
23. Bonnet release lever. See OPENING AND
CLOSING THE BONNET (page 195).
24. Luggage compartment release switch.
SeeLOCKING AND UNLOCKING
(page 26).
25. Headlamp levelling control.
SeeHEADLAMP LEVELLING (page 79).
26. Instrument lighting dimmer control.
SeeINSTRUMENT LIGHTING DIMMER
(page 123).
27. Rear fog lamps switch. See REAR FOG
LAMPS (page 77).
28. Adaptive Cruise Control (ACC) Forward
Alert switch. See FORWARD ALERT
FUNCTION (page 164).
Page 41 of 391

41
Seats
SITTING IN THE CORRECT POSITION
The seat, head restraint, seat belt and airbags,
all contribute to the protection of the user.
Correct use of these components will give you
greater protection, therefore you should
observe the following points:
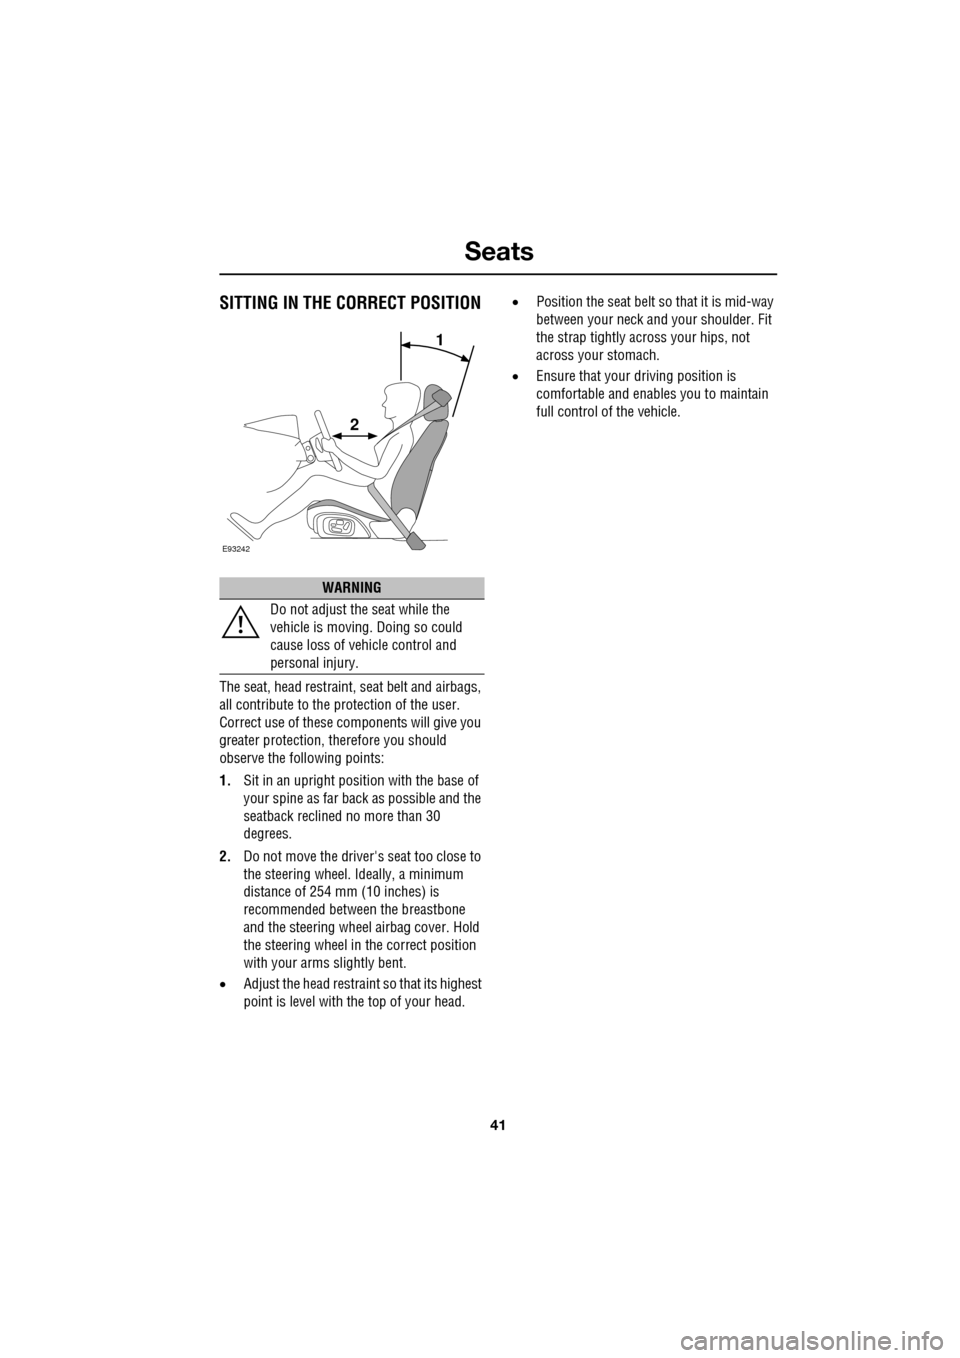
1. Sit in an upright position with the base of
your spine as far back as possible and the
seatback reclined no more than 30
degrees.
2. Do not move the driver's seat too close to
the steering wheel. Ideally, a minimum
distance of 254 mm (10 inches) is
recommended betwee n the breastbone
and the steering wheel airbag cover. Hold
the steering wheel in the correct position
with your arms slightly bent.
• Adjust the head restraint so that its highest
point is level with the top of your head. •
Position the seat belt so that it is mid-way
between your neck an d your shoulder. Fit
the strap tightly across your hips, not
across your stomach.
• Ensure that your driving position is
comfortable and enables you to maintain
full control of the vehicle.
WARNING
Do not adjust the seat while the
vehicle is moving. Doing so could
cause loss of vehicle control and
personal injury.
E93242
1
2
Page 67 of 391

67
Steering wheel
ADJUSTING THE STEERING WHEEL
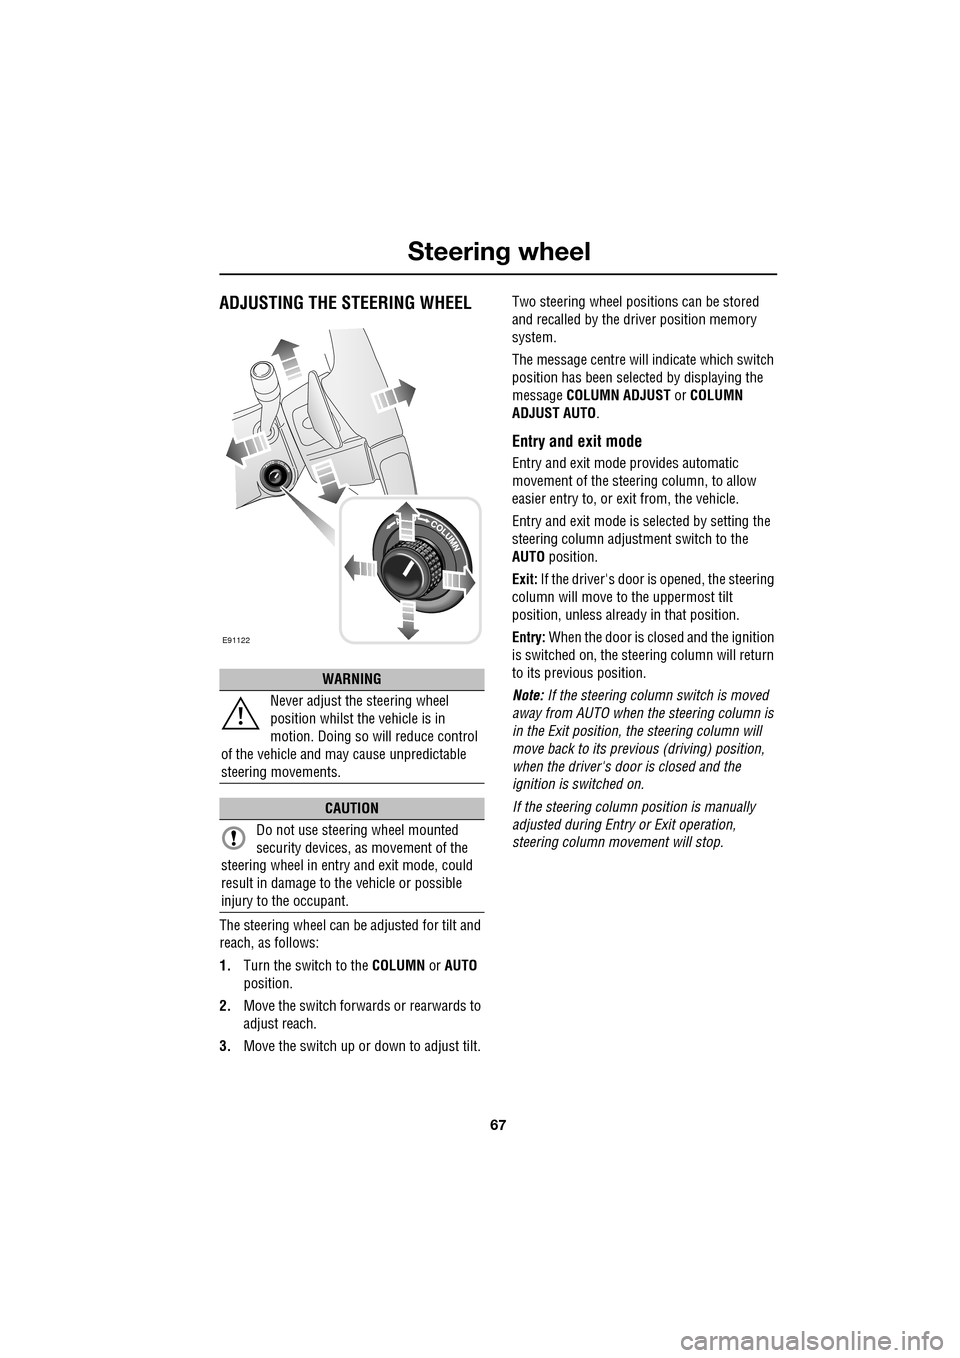
The steering wheel can be adjusted for tilt and
reach, as follows:
1.Turn the switch to the COLUMN or AUTO
position.
2. Move the switch forwards or rearwards to
adjust reach.
3. Move the switch up or down to adjust tilt. Two steering wheel positions can be stored
and recalled by the dr
iver position memory
system.
The message centre will indicate which switch
position has been select ed by displaying the
message COLUMN ADJUST or COLUMN
ADJUST AUTO .
Entry and exit mode
Entry and exit mode provides automatic
movement of the steering column, to allow
easier entry to, or exit from, the vehicle.
Entry and exit mode is selected by setting the
steering column adjustment switch to the
AUTO position.
Exit: If the driver's door is opened, the steering
column will move to the uppermost tilt
position, unless alread y in that position.
Entry: When the door is closed and the ignition
is switched on, the steering column will return
to its previous position.
Note: If the steering column switch is moved
away from AUTO when the steering column is
in the Exit position, the steering column will
move back to its previous (driving) position,
when the driver's door is closed and the
ignition is switched on.
If the steering column position is manually
adjusted during Entry or Exit operation,
steering column movement will stop.
WARNING
Never adjust the steering wheel
position whilst the vehicle is in
motion. Doing so will reduce control
of the vehicle and may cause unpredictable
steering movements.
CAUTION
Do not use steering wheel mounted
security devices, as movement of the
steering wheel in entr y and exit mode, could
result in damage to the vehicle or possible
injury to the occupant.
E91122
Page 73 of 391

73
Steering wheel
Notepad
The notepad facility enables the user to record
a note, up to a maximum of 30 seconds
duration, which can be subsequently recalled.
Note: To hear information on notepad
commands, press the Voice button, wait for the
tone to sound and then say NOTEPAD HELP.
Recording a note
1.Press and release the Voice button, wait
for the tone to sound, then say RECORD
NOTE .
2. Say the words of the note to be recorded,
then press and hold the Voice button to
end and save the note.
Note: The maximum length of a note is 30
seconds, after wh ich time the recording of the
note will be ended automatically.
Playing a note
Press and release the Voice button, wait for the
tone to sound, then say PLAY NOTEPAD. If
multiple notes are stored on the system, press
and release the Voice button during playback
and say NEXT, to skip to the next note.
Deleting notes
To delete an individual note, press and release
the Voice button during playback of the note to
be deleted and say DELETE.
To delete all notes stored on the system, press
and release the Voice button and say CLEAR
NOTEPAD .
Voice volume adjustment
The volume level for voice recognition can be
adjusted independently, either by using the
steering wheel controls or using the
touch-screen:
•Press the voice button on the steering
wheel, to initiate a voice session. Use the
volume control thumbwheel on the
steering wheel to adjust the volume, as
required.
• Select Vehicle from the touch-screen
Home menu, then select Veh. settings.
Find the correct entry from the menu of
infotainment volume settings and adjust as
required.
Voice commands
This is a list and a de scription of the basic
Voice commands used to operate the system.
A list and description of telephone and
Navigation system commands, is detailed later
in this handbook. See TELEPHONE VOICE
CONTROL (page 323). See NAVIGATION
SYSTEM VOICE COMMANDS (page 374).
Command Description
VOICE HELP Plays information on
operating the Voice
system.
VOICE TUTORIAL Initiates a four-part tutorial on use of the
Voice system.
DISPLAY HELP Plays information on touch-screen display
voice commands.
DISPLAY SHOW
PHONE The Phone menu is
displayed on the
touch-screen.
Page 88 of 391

Wipers and washers
88
WINDSCREEN WIPERS
Note: If the wiper blades become stuck or
jammed, an electronic cut-out may temporarily
halt wiper operation. If this happens, switch off
the wipers and the ignition. Clear any
obstructions and free th e wiper blades, before
attempting to switch on the ignition.
Wiper operation
1. Windscreen wipers off and parked.
2. Rain sensor activated wipe.
3. Low speed wipe.
4. High speed wipe.
5. Rain sensor sensitivity control.
Rain sensor variable delay
1.Maximum sensitivity.
2. Rotate control to adjust sensitivity.
3. Minimum sensitivity.
With the rain sensor acti vated, the sensitivity of
the rain sensor can be adjusted. Rotate the
control upwards to reduce the sensitivity of the
rain sensor.
Single wipe
Pull the stalk towards the steering wheel for a
single wipe. Holding the sw itch in this position,
operates the wipers at normal speed until the
switch is released.
CAUTIONS
Do not operate the windscreen wipers
on a dry screen. The drag on the wiper
mechanism may cause damage.
In freezing or very hot conditions,
ensure that the wipers have not stuck to
the windscreen before operating. The drag on
the wiper mechanism may cause damage.
Remove any snow, ice or frost from the
windscreen, around the wiper arms and
blades, and the screen scuttle, before
operating the wipers. S now and ice can cause
damage to the wiper mechanism, if left
uncleared.
JAG1620
5
1
2
3
4
1
2
3
JAG1622
JAG1621
Page 112 of 391

Information displays
112
Further adjustment of the touch-screen
brightness can be achieved by using the + or -
buttons in the Cont./Bright. screen or by
adjustment of the inst rument panel dimmer
switch. See INSTRUMENT LIGHTING DIMMER
(page 123).
Pop-up messages
The operation of certain functions will cause a
small message (pop-up) to appear, overlaying
the touch-screen display.
The pop-up is mainly for information and will
disappear automatically after a few seconds, or
can be dismissed by touching the pop-up
screen area. If any action or adjustment is
required, the message will clearly indicate what
is required and which button to touch.
Touch-screen systems
There are five major systems controlled via the
touch-screen with thei r individual levels of
operation and settings . They are as follows:
• Audio
• Climate
• Phone/Comms/Voice
• Navigation
• Vehicle .
Note: The Phone entry is renamed Comms if
the JaguarVoice system is fitted and renamed
Voice if the JaguarVoice system is fitted but
without telephone.
Audio system
The vehicle Audio syst em interacts with
Navigation, In-car Telephone and Climate
Control systems.
The Audio system can be controlled from the
switches on the console, the touch-screen
buttons and from the multi-function controls
on the left-hand side of the steering wheel.
See AUDIO CONTROL (page 69).
Detailed instructions on the use of the audio
system are provided later in this handbook.
See Audio unit operation (page 271).
Automatic climate control
The automatic climate control system can be
controlled from the switches on the console
and the touch-screen buttons.
SeeAUTOMATIC CLIMATE CONTROL
(page 116).
Phone/Comms/Voice
The communications system is composed of
the following facilities:
• Digit dial
• Phonebook
• Last ten calls made, received, missed.
• Voice
The telephone system can be controlled from
the touch-screen, by voice recognition or by
using the multi-function controls on the
left-hand side of the steering wheel.
See ADJUSTING THE STEERING WHEEL
(page 67). Detailed instructions on the use of
the phone are provided later in this handbook.
See Telephone (page 307).
Navigation system
Detailed instructions on the use of the
navigation system are pr ovided later in this
handbook. See Navigation system (page 334).
Audio/TV
DAB radio
CD
AM/FM
12 : 26 pm
TP TA PTY DPLIITr 04
Portable audio
00:36
Settings
89.9 89.9 BBC R2
Cancel
Please wait... Audio
E95072
Page 118 of 391

Climate control
118
Blower speed
Set the blower speed as required by
adjusting the rotary control.
Press to turn the climate control
system on or off.
When operating in AUTO mode, blower speed
is controlled au tomatically and AUTO is
displayed on the touch-screen. Any adjustment
of the knob will cancel AUTO mode.
Note: In AUTO mode, if heating is required, the
blower only operates at low speed, until the
engine reaches normal operating temperature.
Recirculation
Press to turn recirculation on
or off. The button indicator
illuminates when recirculation
is turned on.
When selected, the air is recirculated inside the
vehicle. This helps to ma intain a high or low
temperature, and is useful for preventing
fumes from entering the vehicle.
Recirculation may also be selected in AUTO
mode, if the climate control system detects
high levels of pollution in the atmosphere
outside the vehicle (if a smog sensor is fitted).
Manual operation of the recirculation control
will override the automatic setting. This facility
can be switched off through the Settings menu
on the touch-screen.
Note: Prolonged use at low temperatures may
cause the windows to mist.
Air conditioning
Press the AUTO button to turn
the air conditioning on.
The air conditioning system is
controlled automatically in AUTO mode to
maintain the desired temperature and humidity
(even if higher temperature settings are
selected).
The air conditioning system is also switched on
automatically in defrost mode ( DEF) in order to
dehumidify the air.
Note: Water may collect unde rneath the vehicle
when parked. This is moisture expelled from
the interior of the vehicle by the air
conditioning system a nd is not cause for
concern.
Heated/climate seats and heated
steering wheel
The heated seats, climate seats and heated
steering wheel can be controlled from both the
Home and Climate menus on the touch-screen.
See HEATED SEATS (page 47). See CLIMATE
SEATS (page 48). See HEATED STEERING
WHEEL (page 68).