2009 JAGUAR XF page 95
[x] Cancel search: page 95Page 232 of 391

Wheels and tyres
232
Using the Jaguar tyre repair kit
Note: All vehicle drivers and occupants should
be made aware that a temporary repair has
been made to a tyre fitted to the vehicle. They
should also be made aware of the special
driving conditions im posed when using a
repaired tyre.
Repair procedure
1. Open the tyre repair kit and peel off the
maximum speed label. Attach the label to
the fascia in the driver's field of vision.
Take care not to obstruct any of the
instruments or warning lights.
2. Uncoil the compressor power cable and
the inflation hose.
3. Unscrew the orange cap from the sealant
bottle receiver and the sealant bottle cap.
4. Screw the sealant bottle into the receiver
(clockwise) until tight.
•Screwing the bottle onto the receiver will
pierce the bottle's se al. Do not unscrew
a full, or partly us ed bottle from the
receiver. Doing so will result in sealant
leaking from the bottle.
5. Remove the valve cap from the damaged
tyre.
6. Remove the protective cap from the
inflation hose and connect the inflation
hose to the tyre valve. Ensure that the hose
is screwed on firmly.
7. Ensure that the compressor switch is in
the off (0) position.
8. Insert the power cable connector into the
auxiliary power socket. See AUXILIARY
POWER SOCKETS (page 125).
WARNINGS
Avoid skin contact with the sealant
which contains natu ral rubber latex.
If the tyre inflati on pressure does not
reach 1.8 bar (26 lbf/in², 180 kPa)
within seven minutes, the tyre may
have suffered excessive damage. A temporary
repair will not be poss ible, and the vehicle
should not be driven until the tyre has been
replaced.
CAUTIONS
Before attempting a ty re repair, ensure
that the vehicle is parked safely, as far
away from passing traffic as possible.
Ensure that the parki ng brake is applied
and P (Park) is selected.
Do not attempt to remove foreign
objects such as nails, screws, etc. from
the tyre.
Always run the engine when using the
compressor, unless the vehicle is in an
enclosed or poorly ventil ated space, as this
may cause asphyxiation.
To prevent overheating, do not operate
the compressor continuously for longer
than ten minutes.
WARNING
Check the tyre sidewall prior to
inflation. If there are any cracks,
bumps or similar damage, do not
attempt to inflate the tyre. Do not stand
directly beside the tyre while the compressor
is pumping. Watch the ty re sidewall. If any
cracks, bumps or simila r damage appear, turn
off the compressor and let the air out by
means of the pressure relief valve. Do not
continue to use the tyre.
Page 233 of 391

233
Wheels and tyres
9.Unless the vehicle is in an enclosed area,
start the engine.
10. Set the compressor switch to the on ( I)
position.
11. Inflate the tyre to a minimum of 1.9 bar
(26 lbf/in²) and a maximum of 3.5 bar
(51 lbf/in²).
•When pumping the sealant through the
tyre valve, the pressure may rise up to 6
bar (87 lbf/in²). The pressure will drop
again after approximately 30 seconds.
12. During the inflation, switch the
compressor off briefly, to check the tyre
pressure using the gauge mounted on the
compressor.
• It should not take longer than seven
minutes to inflate the tyre. If, after seven
minutes, the tyre has not yet reached
minimum pressure, the tyre should not
be used.
13. Once the tyre has been inflated, switch off
the compressor. If desired, the engine may
be turned off after the compressor has
been turned off.
14. Remove the power connector from the
auxiliary power socket.
15. Remove the inflation hose from the tyre
valve, by unscrewing it as quickly as
possible (count er-clockwise).
16. Replace the inflation hose protective cap
and the tyre valve cap.
17. Do not remove the sealant bottle from the
receiver.
18. Ensure that the tyre repair kit (including
the bottle and receiver caps) are placed
securely in the vehicle. You will need to
use the kit to check the tyre pressure after
approximately 3 km (2 miles), so ensure
they are easily accessible. 19.
Immediately drive the vehicle for
approximately 3 km (2 miles), to allow the
sealant to coat the inner surface of the tyre
and form a seal at the puncture.
Checking the tyre pressure after a repair
1.Drive the vehicle for 3 km (2 miles) then
stop in a safe place. Carry out a visual
examination of the tyres condition.
2. Make sure that the sealant container
section is in its original position.
3. Screw the inflation hos e connector firmly
onto the tyre valve.
4. Read the tyre pressure from the gauge.
5. If the pressure of the sealant filled tyre is
above 1.3 bar (19 lb/in²) adjust the
pressure to the correct value. See TYRE
CARE (page 217).
6. Ensure that the compressor switch is in
the off (O ) position and insert the power
cable connector into the auxiliary power
socket.
If the vehicle is in a well ventilated area,
start the engine.
WARNINGS
When driving the vehicle, if you
experience vibr ations, abnormal
steering, or noises, reduce speed
immediately. Drive with extreme caution and
reduced speed, to the first safe place to stop
the vehicle. Visually examine the tyre and
check its pressure. If there are any signs of
damage or deformity to the tyre, or the tyre
pressure is below 1.3 bar (19 lb/in²), do not
continue driving.
Consult a tyre repair centre or your
Dealer/Authorised Repairer, for
advice concerning the replacement of
a tyre after using a tyre repair kit.
Page 235 of 391

235
Wheels and tyres
Note: Different types of tyre may affect the
performance of the TPM system. Always
replace tyres in accordance with
recommendations. See TYRE
SPECIFICATIONS - ARDUOUS TERRAIN
(page 239).
Your vehicle may be equipped with a TPM
System which monitors pressure in each tyre
(temporary use spare wheels are not fitted with
sensors and are conseque ntly not monitored).
Wheels fitted with a TPM system can be easily
visually identified by the external metal lock nut
and valve ( 1). All Jaguar n on-TPM system
wheels have a rubber valve fitted (2).
TPM system operation
The TPM system monitors pressure of the
tyres via sensors located in each wheel and a
receiver located within the vehicle.
Communication between se nsor and receiver
is via Radio Frequency (RF) signals.
The tyre pressure warning
comprises a yellow warning telltale
within the instrument panel, and
the associated messages within the message
centre. If the telltale light illu
minates, you should stop
and check your tyres as soon as possible and
inflate them to the recommended pressure as
stated on the tyre pressure placard. If low
pressure warnings occur frequently, the cause
must be determined and rectified.
When driving through variable climatic
conditions the TPM syst em warnings may be
intermittent.
Your vehicle will also indicate a TPM System
malfunction by initially flashing and
subsequent continuous illumination of the
warning telltale. A text message will
accompany the system malfunction and will
display TYRE PRESSURE SYSTEM FAULT . The
TPM system fault sequence will be activated at
every ignition cycle until the fault is rectified.
When a malfunction occurs, the system may
not be able to de tect or signal low tyre pressure
as intended.
TPM system malfuncti ons may occur for a
variety of reasons which may include other
radio frequency systems that could cause
interference or the installation of incompatible
replacement tyres on the vehicle.
1
2
E91713
AutokmInst Ful/100km
E95244
Page 253 of 391

253
Vehicle recovery
TOWING POINTS
Front and rear towing eyes and lashing points
The front and rear towing eyes are the only
recommended lashing points on the vehicle.
Attaching the front towing eye
The front towing eye is included in the tool kit,
located in the under-floor area of the luggage
compartment. See TOOL KIT (page 224).
1. Press the lower edge of the towing eye
cover in the front bumper to open, then
pull from the aperture, allowing the cover
to hang from its retaining strap.
2. Locate the towing eye through the bumper
and screw the towing eye
counter-clockwise into its fixing, until
secure.
E95301
1
2
WARNINGS
The towing eyes at the front and rear
of the vehicle are designed for
on-road recovery only. If they are
used for any purpose other than those
indicated, it may result in vehicle damage and
serious injury.
Never use the towing eyes to tow a
trailer, caravan etc. Doing so may
result in vehicle damage and serious
injury.
CAUTION
Only use the lashing points indicated, or
over-tyre tie-downs, to secure the
vehicle to the transporter or trailer. Use of any
other position (e.g. lower control arms) may
result in damage to the vehicle.
Page 256 of 391

Vehicle recovery
256
TOWING THE VEHICLE ON FOUR
WHEELS
Note: The recommended recovery method is
to raise all four wheels.
Towing procedure
1. The vehicle should be parked on firm level
ground, with the parking brake on, and the
gear selector in P (Park).
2. Secure the towing attachment from the
recovery vehicle to the front towing eye.
See TOWING POINTS (page 253).
3. Dock the Jaguar Smart Key and switch on
the ignition. See GENERAL INFORMATION
(page 132). 4.
Apply the foot brake and release the
parking brake.
5. With the foot brake st ill applied, activate
the Emergency Park Release (EPR).
See TRANSPORTING THE VEHICLE
(page 254).
6. The vehicle can now be towed a maximum
of 0.8 km (0.5 miles) at a maximum speed
of 48 kmh (30 mph).
7. Upon arrival at the destination, ensure
wherever possible that the vehicle is
parked on firm level ground.
8. Lower the Emergency Park Release (EPR)
lever, to cancel EP R and to re-engage P
(Park).
9. Apply the parking brake.
10. Switch off the ignition and remove the
Jaguar Smart Key.
11. Remove the towing attachment from the
towing eye.
WARNINGS
Ensure that the remote control
remains docked whilst the vehicle is
being towed. Removing the remote
control will engage the steering lock, which
will prevent the vehicle from steering
correctly.
If the engine cannot be run whilst the
vehicle is being towed, there will be
no power assistance for the steering
or brakes. This will result in greater effort
being required to steer or slow the vehicle, and
greatly increased stopping distances.
CAUTIONS
The vehicle should only be towed in a
forward direction with all four wheels on
the ground.
The vehicle should only be towed for a
maximum of 0.8 km (0.5 miles), at a
maximum speed of 48 km/h (30 mph). Towing
for a greater distance or at a higher speed, may
result in serious damage to the transmission.
CAUTION
Leaving the ignition switched on for
extended periods will cause the battery
to drain.
WARNING
Use extreme caution when detaching
towing equipment. Vehicle movement
is possible which can result in serious
injuries.
Page 269 of 391

269
Audio unit overview
AUDIO UNIT OVERVIEW
The Jaguar infotainment system contains
AM/FM radio, compact disc player and portable
audio interface. Digital (DAB) radio, six-disc CD
player and TV are optional.
Audio controls
The audio unit is c ontrolled by the
touch-screen ( 1) and console buttons ( 2–8).
1. Touch-screen: See TOUCH-SCREEN
(page 109).
2. LOAD : Press to load one or more CDs.
See LOADING COMPACT DISCS
(page 292).
3. Seek up: Short press to seek next station
frequency up or next CD track.
4. Settings button:
•Short press to display the audio Settings
menu.
• Long press (two seconds) to display the
Vol presets settings menu. 5.
Audio system on/off and volume control:
•Press to switch the system on/off.
• Rotate to increase or decrease volume
level. Any volume adjustment made in
any mode will be memorised for that
mode.
6. SOURCE : Press repeatedly to scroll
through all audio sources: FM1, FM2, AM,
DAB1, DAB2, DAB3, CD , Portable audio
and TV.
7. Seek down: Short press to seek next
station frequency down or previous CD
track.
8. Eject: Press to eject CD. See EJECTING
COMPACT DISCS (page 294).
9. CD load and eject slot.
WARNING
Sustained exposure to high sound
levels can damage your hearing.
Audio/TV
DAB radio
CDAM/FM
12 : 26 pm
BBC R2 BBC R3
BBC R4 BBC LDN BBC W&M Mercia Galaxy 106 2Radio 1
Settings
Autostore
TP TA PTY AF REG 3CHFM2 89 0 BBC R2
Portable audio TV
E93935
1
9
8
7
6
5
2
3
4
Page 272 of 391

Audio unit operation
272
While the volume is being adjusted, the volume
level is displayed on the touch-screen display
using a graduated bar.
Volume settings
A number of functions have preset volume
levels. You can adjust these settings on the Vol
presets menu.
1. From the touch-screen Home menu, select
Vehicle .
2. Select Syst. settings and then select Vol.
presets .
3. Use the + and – icons to adjust the volume
levels for the options available.
Automatic volume control (AVC)
This maintains radio volume at a level sufficient
to overcome road noise, as vehicle speed
increases or decreases.
On the Vol presets menu, select Low, Medium
or High levels for AVC.
The default AVC setting is Medium.
AUDIO CONTROL
Sound settings
On the main AM/FM screen, select Settings.
Select Sound to display the sound quality
settings menu.
Note: The list of settings available depends on
the sound system fitted to the vehicle.
See AUDIO UNIT OVERVIEW (page 269).
Home
Audio
Climate
Phone
Navigation
Vehicle Left Right
TP T
A PTY
Valet12 : 26 pm
Audio
External15C
E94087
Voice
Vehicle
Display set
Preferences
Button audioParking aid
Vol. presets
AVC Low
MediumHigh
12 : 26 pm
Navigation
Phone
E94052
Audio/TV
DAB radio
CD
AM/FM
12 : 26 pm
BBC R2 BBC R3
BBC R4 BBC LDN BBC W&M Mercia Galaxy 106.2Radio 1
Settings
Aut
TP TA PTY AF REG 3CHFM2 89.0 BBC R2
Portable audio TV
E94055
Page 277 of 391

277
Audio unit menus
RADIO DATA SYSTEM (RDS)
Options menu overview
Your radio is equipped with Radio Data System
(RDS), which enables the audio unit to receive
additional inform ation with normal FM radio
signals.
When tuned to certai n stations on the FM
waveband, the radi o decodes signals
transmitted to provide the functions listed
below (dependent upon th e service available
from the broadcasters).
Note: Not all FM radio stat ions broadcast RDS
information. If you are currently tuned to a
non-RDS station, then RDS features will be
unavailable.
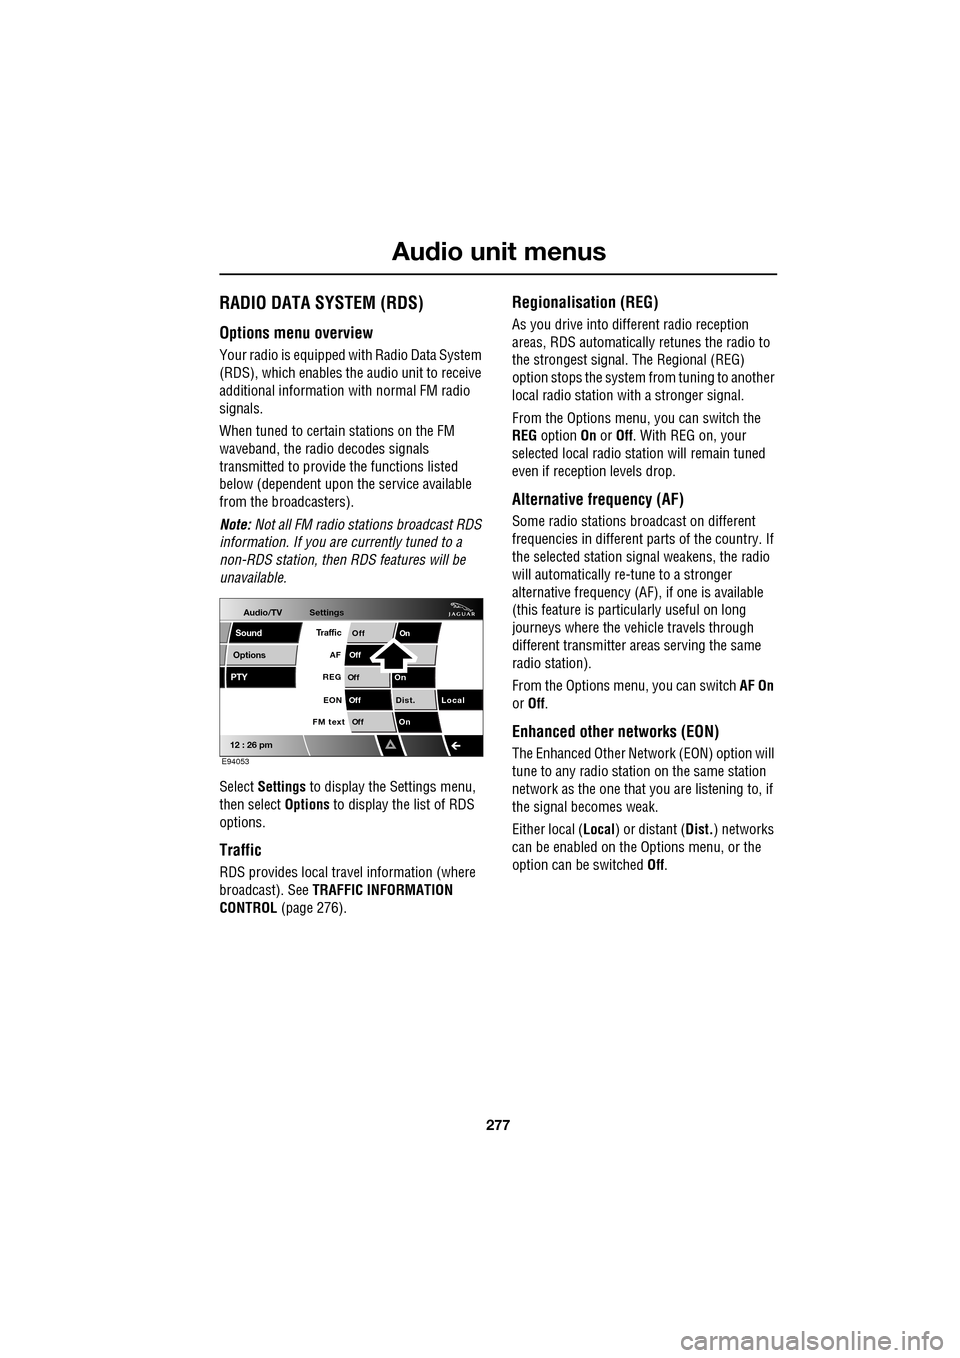
Select Settings to display the Settings menu,
then select Options to display the list of RDS
options.
Traffic
RDS provides local trav el information (where
broadcast). See TRAFFIC INFORMATION
CONTROL (page 276).
Regionalisation (REG)
As you drive into different radio reception
areas, RDS automatically retunes the radio to
the strongest signal. The Regional (REG)
option stops the system from tuning to another
local radio station wi th a stronger signal.
From the Options menu, you can switch the
REG option On or Off . With REG on, your
selected local radio st ation will remain tuned
even if reception levels drop.
Alternative frequency (AF)
Some radio stations broadcast on different
frequencies in different parts of the country. If
the selected station signal weakens, the radio
will automatically re -tune to a stronger
alternative frequency (AF) , if one is available
(this feature is partic ularly useful on long
journeys where the vehicle travels through
different transmitter areas serving the same
radio station).
From the Options menu, you can switch AF On
or Off .
Enhanced other networks (EON)
The Enhanced Other Network (EON) option will
tune to any radio station on the same station
network as the one that you are listening to, if
the signal becomes weak.
Either local ( Local) or distant ( Dist.) networks
can be enabled on the Options menu, or the
option can be switched Off.
Audio/TV
Options
PTY
Sound
12 : 26 pm
Settings
TrafficOnOff
Of f
On
Of
f
Dist. Local
Of f
On
Of f
FM text EON
REG
AF
E94053