2009 JAGUAR XF vehicle setting
[x] Cancel search: vehicle settingPage 167 of 391

167
Automatic speed limiter (ASL)
PRINCIPLE OF OPERATION
ASL can be used in a situation where varying
vehicle speed is likely but a maximum speed
must not be exceeded. For example, where a
local speed limit is 80 km/h (50 mph), the set
speed could be at that limit or just under.
If ASL is not selected, cr uise control is always
available by simply rotating the thumb wheel
on the right-hand side of the steering wheel to
set a cruising speed. The ASL button allows the
driver to select betwee n cruise control and the
automatic speed limiter. The ASL can be set to
any speed between 30 km/h (18 mph) and 240
km/h (150 mph).
Note: Although ASL only operates at speeds
between 30 km/h (18 mph) and 240 km/h (150
mph), the maximum speed can be set when the
vehicle is stationary.
When ASL is selected, the warning indicator in
the instrument panel will illuminate. When the
ASL button is pressed ag ain, the light will
extinguish, ASL will be cancelled and cruise
control will be available again.
USING THE ASL
Setting a speed limit
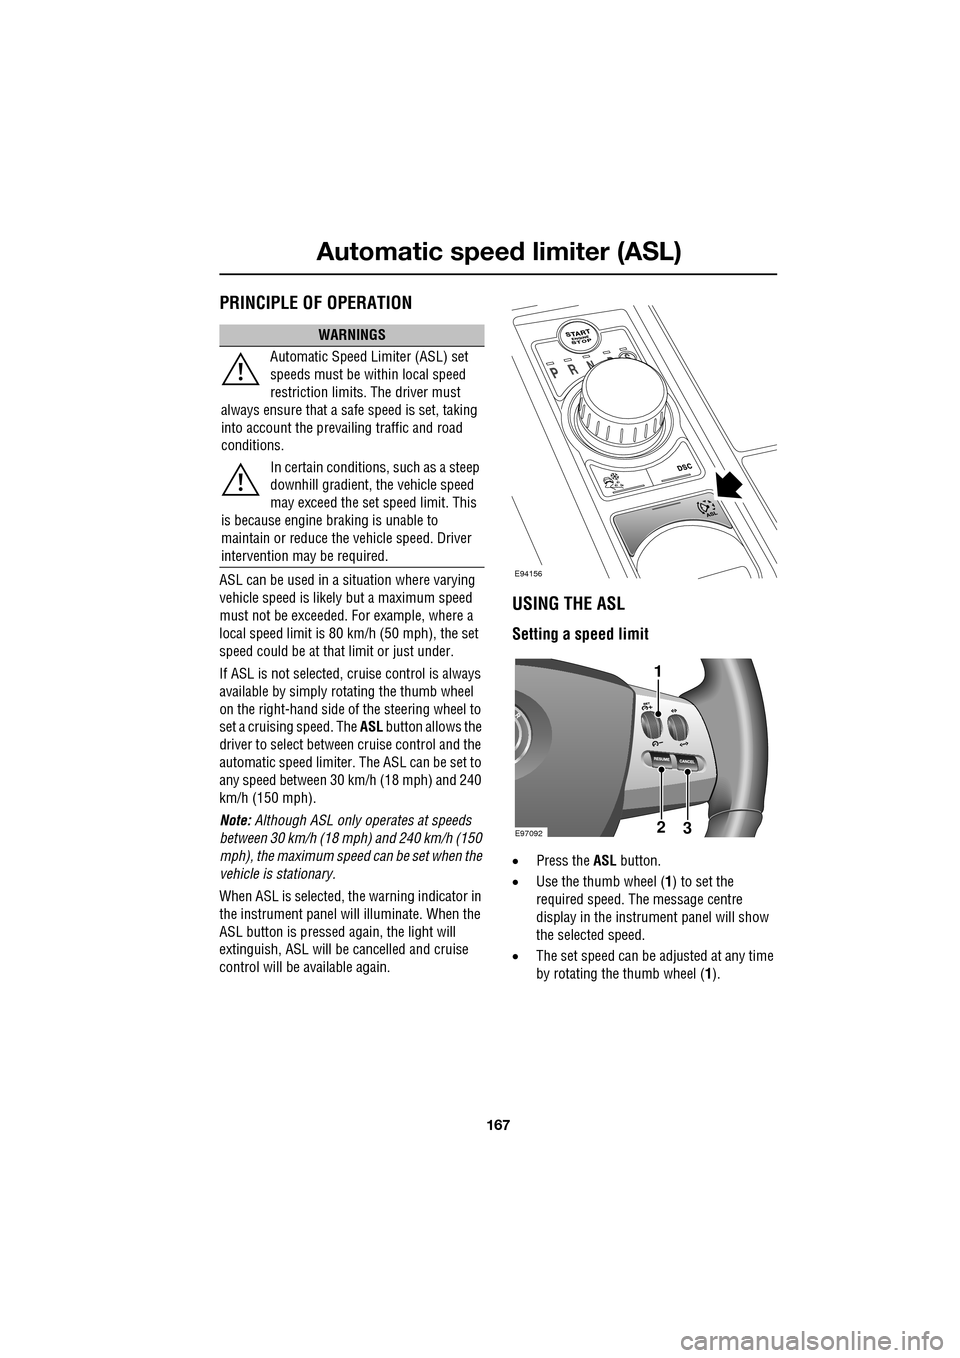
• Press the ASL button.
• Use the thumb wheel ( 1) to set the
required speed. The message centre
display in the instru ment panel will show
the selected speed.
• The set speed can be adjusted at any time
by rotating the thumb wheel (1).
WARNINGS
Automatic Speed Limiter (ASL) set
speeds must be within local speed
restriction limits. The driver must
always ensure that a safe speed is set, taking
into account the prevailing traffic and road
conditions.
In certain conditions, such as a steep
downhill gradient, the vehicle speed
may exceed the set speed limit. This
is because engine br aking is unable to
maintain or reduce the vehicle speed. Driver
intervention may be required.
E94156
E9709223
1
Page 170 of 391

Driving dynamics
170
DYNAMIC MODE
(V8 petrol and diesel vehicles only)
Press to operate. Dynamic mode
co-ordinates the vehicle's control
systems to deliver a high
performance driving experience. This setting
enhances key vehicle systems so that the
vehicle's full potential can be exploited. The
vehicle's responses are aimed at involving the
driver more in focused and purposeful driving,
helping swift progress.
Note: When the transmission is set to
permanent manual mode (i.e. using the
paddles to change gear while in Sport mode)
and Dynamic mode is selected, transmission
upshifts are fully controlled by the driver. This
means that the transmissi on will not change up
a gear automatically, even when the vehicle's
rev limit is reached. When the rev limit is
reached, the gear position indicator in the
message centre will glow amber, to indicate
that the next gear should be selected.
Note: Dynamic mode cannot be active at the
same time as Winter m ode. Dynamic mode will
remain selected for approximately six hours
after the ignition is swit ched off, after which
point it will need to be reselected if required.
STABILITY CONTROL
Dynamic Stability Control (DSC)
Dynamic Stability Contro l (DSC) is operational
whenever the engine is running, unless it has
been manually switched off. When the system
is operating, the warn ing indicator in the
instrument panel will flash.
The DSC system controls the Anti-lock Braking
System (ABS), traction control and yaw control
of the vehicle.
The DSC system assists the driver in retaining
directional control of th e vehicle in situations
where the vehicle is sliding (understeer or
oversteer). It must not encourage the driver to
drive beyond the limit of adhesion or at speeds
higher than those suitable for the prevailing
road and traffic conditions.
DSC applies braking pres sure to individual
wheels if excessive variation is detected. This
ensures that the vehicle follows the driver’s
intended direction of travel as closely as
possible.
Traction control will intervene to control wheel
spin by automatically reducing the power
output from the engine and applying braking to
individual wheels. This improves acceleration,
particularly on surfaces with uneven friction
(e.g. one wheel on ice with another on tarmac).
Note: For recommended DSC mode selection,
refer to the JaguarDri ve Control scenarios
section in this handbook.
WARNING
The fact that the vehicle is fitted with
DSC, must never allow the driver to
be tempted into taking risks which
could affect his or her sa fety or that of other
road users. In all cases, it remains the driver’s
responsibility to drive sa fely according to the
prevailing conditions.
Page 171 of 391

171
Driving dynamics
TracDSC
TracDSC is an alternative setting of DSC with
reduced system interventions. With TracDSC
engaged, traction may be somewhat increased,
although stability may be reduced compared to
normal DSC. TracDSC is intended for use only
on dry tarmac, by suitably experienced drivers
and should not be select ed for other surfaces
or by drivers with insufficient skill and training
to operate the vehicle safely with the TracDSC
function engaged.
The less restrictive TracDSC setting may be
preferred, for example, by expert drivers
engaged in high performance driving on dry
Tarmac surfaces such as tracks and circuits.
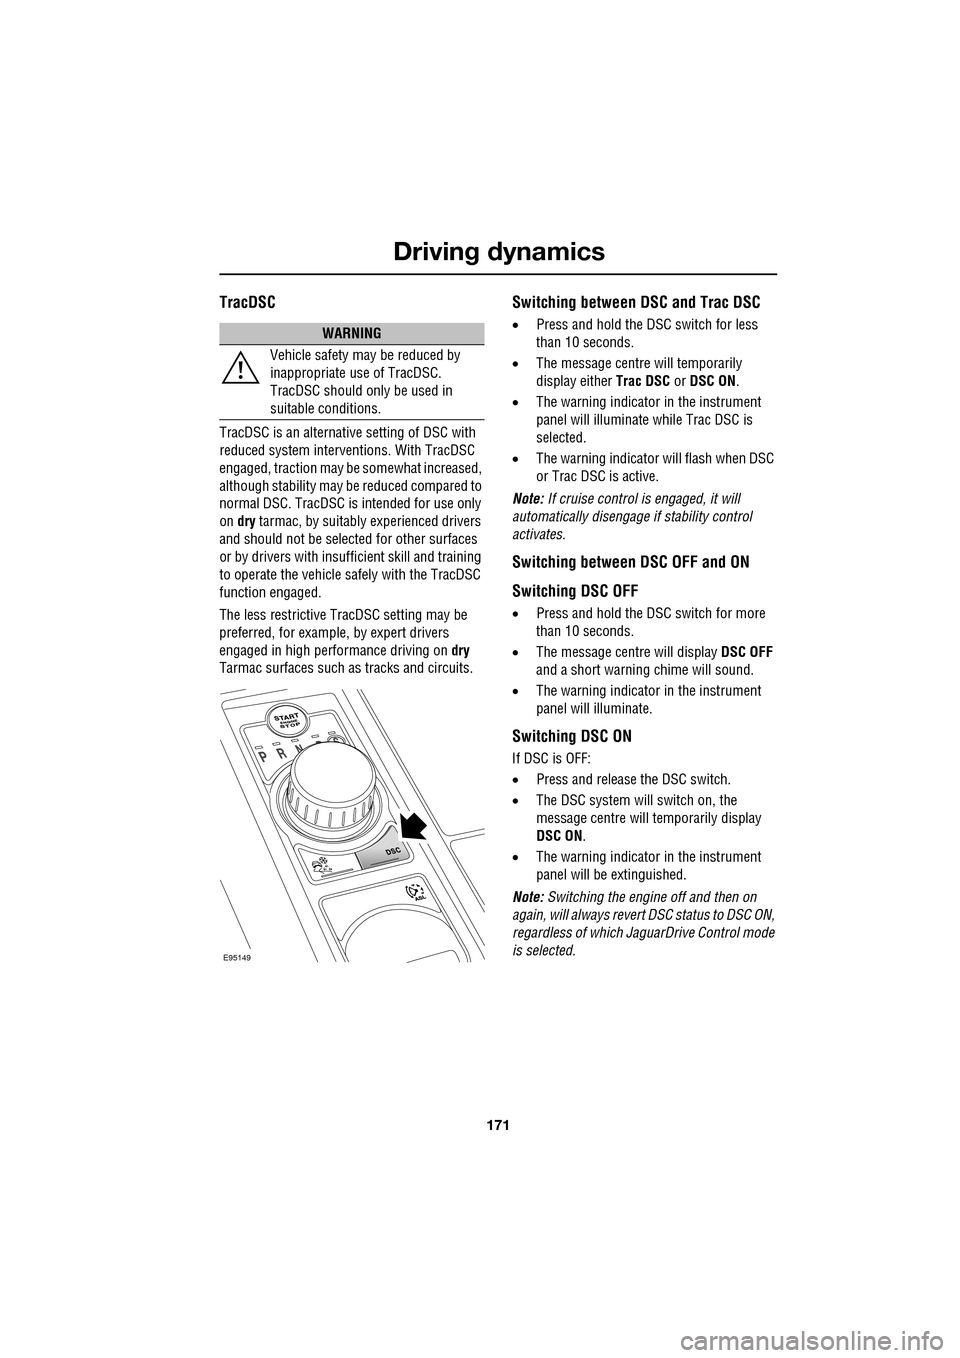
Switching between DSC and Trac DSC
• Press and hold the DSC switch for less
than 10 seconds.
• The message centre will temporarily
display either Trac DSC or DSC ON.
• The warning indicator in the instrument
panel will illuminate while Trac DSC is
selected.
• The warning indicator will flash when DSC
or Trac DSC is active.
Note: If cruise control is engaged, it will
automatically disengage if stability control
activates.
Switching between DSC OFF and ON
Switching DSC OFF
• Press and hold the DSC switch for more
than 10 seconds.
• The message centre will display DSC OFF
and a short warning chime will sound.
• The warning indicator in the instrument
panel will illuminate.
Switching DSC ON
If DSC is OFF:
• Press and release the DSC switch.
• The DSC system will switch on, the
message centre will temporarily display
DSC ON .
• The warning indicator in the instrument
panel will be extinguished.
Note: Switching the engine off and then on
again, will always revert DSC status to DSC ON,
regardless of which Ja guarDrive Control mode
is selected.
WARNING
Vehicle safety may be reduced by
inappropriate use of TracDSC.
TracDSC should only be used in
suitable conditions.
E95149
Page 172 of 391

Driving dynamics
172
Note: In rare circumstances, when TracDSC is
selected or DSC is o ff, high acceleration on
rough roads may cause DSC to switch back on.
This prevents high loads on the vehicle
driveline. DSC will su bsequently remain on,
unless TracDSC is selected or DSC is switched
off manually.
Stability control indicator
If there is a fault, the warning
indicator will ill uminate in the
instrument panel and the message
centre will display DSC NOT AVAILABLE with
an amber backlight.
It is safe to drive the vehicle, but the DSC
system will not activa te under wheel spin or
slide conditions. You should seek qualified
assistance as soon as possible.
Adaptive dynamics
(Supercharged vehicles only)
Jaguar Adaptive dy namics continuously
monitors the road a nd driver inputs and
optimises the vehicle suspension settings for
ride comfort and control.
The adaptive dynamics system is linked to
Dynamic mode, modifying the suspension
settings for a more sporting character.
If the message centre displays the message
ADAPTIVE DYNAMICS FAULT , a fault has been
detected in the adaptive dynamics system.
Seek qualified assistan ce as soon as possible.
Active Differential Control (E-diff)
(Supercharged vehicles only)
The E-diff improves trac tion when one driven
wheel has more grip than the other. This
improves progress out of corners and on
patchy or uneven surfaces. The E-diff can also
increase stability in oversteer situations,
depending on road c onditions and driver
inputs. Settings for the E-diff are made automatically,
without the need for driver selection.
If there is a fault with the E-diff system, the
message centre will display
EDIFF SYSTEM
FAULT . If DSC is off, then TracDSC will be
selected automatically. The driver can still
switch between DSC mode s, as normal and the
vehicle is safe to dr ive, but seek qualified
assistance as soon as possible.
Note: If the E-diff is active continuously for an
extended period (e.g. on a patchy surface with
DSC off) then the E-diff may be temporarily
deactivated to prevent ov erheating. If DSC is
off, then TracDSC will be selected
automatically. The mess age centre will display
EDIFF NOT AVAILABLE . The driver can still
switch between DSC modes as normal and the
E-diff will become availa ble again automatically
when it has cool ed sufficiently.
Page 178 of 391

Fuel and refuelling
178
Resetting the fuel cut-off
1.Switch the ignition off and wait for one
minute.
2. Turn the ignition on for 30 seconds.
3. Check the vehicle thor oughly for fuel leaks.
If a leak is detected switch the ignition off
immediately.
• Do not start the vehicle if a leak is
present. Seek qualified advice and have
the vehicle recovered.
4. If no leaks are detected, start the vehicle.
FUEL FILLER FLAP
Note: The fuel filler flap cannot be opened
when the alarm system is armed.
The fuel filler flap is located on the right-hand
side of the vehicle, at the rear.
1. Ensure that the vehicle is fully unlocked.
Push and release the rear of the flap (in the
area indicated in the illustration) to
unlatch.
2. Pull the fuel filler flap open. The label on
the inside of the flap indicates the correct
fuel for the vehicle. 3.
Twist the cap counte r-clockwise to undo.
4. Stow the cap on the lip provided on the top
of the hinge arm, as shown.
When replacing the cap, turn it clockwise until
the ratchet clicks. Failur e to do so could cause
the Engine malfunction warning indicator to
illuminate.
To close the filler flap, pus h the flap closed until
it latches.
WARNING
The fuel cut-off should never be reset
if you can smell fuel, or a leak can be
seen. Doing so can lead to a fire
which may cause persona l injury or death.
WARNINGS
Open the fuel filler cap slowly and
allow the pressure to release before
fully removing the cap to avoid fuel
spillage due to rapid expansion.
Take note of all warnings and
instructions given on the label affixed
to the inside of the fi ller flap. Failure to
do so may result in injury or death.
E95150
2
1
3
4
Page 180 of 391

Fuel and refuelling
180
DIESEL MISFUELLING PROTECTION
DEVICE
Diesel engine vehicles in some markets are
equipped with a misfuelling protection device,
incorporated into the fuel filler neck, designed
to alert that the wrong fuel type has been
selected. If the narrow filler nozzle fitted to
pumps delivering unleaded petrol is correctly
inserted (i.e. fully inserted) into the filler neck,
the misfuel protection de vice will activate.
The protection device c ontinually interrupts the
fuel flow from the pump, until the protector
mechanism in the filler neck is reset.
When activated, the yellow protection device
will be visible in the f iller neck. The device will
need to be reset before the tank can be
correctly filled with dies el fuel. This is achieved
using the reset tool, lo cated in the luggage
compartment, clipped onto the battery
restraining bar.
Note: It is the driver’s responsibility to fill the
vehicle with the correct fuel. The diesel
misfuelling protection devi ce only reduces the
risk of filling the vehicle with the incorrect fuel.
Note: When refuelling the vehicle using a
disposable fuel canister, use a canister
designed for diesel fuel where possible. The
spout on petrol canist ers may activate the
protection device. The device may also be
activated by fuel pumps with a smaller nozzle
than those fitted to standard diesel pumps.
Resetting the protection device
To reset the misfuelling protection device:
1. Insert the reset tool (with the teeth
uppermost) into the fi ller neck opening, as
far as it will go. The triangular section on
the reset tool stop s on the protection
device at the requi red insertion depth.
2. Pivot the reset tool handle downwards to
engage the teeth into the protection device.
3. Keeping the reset tool handle held down,
slowly pull the reset tool out of the filler
neck to reset the misfuelling protection
device.
Note: To ensure that the pr otection device is
correctly reset, check that the yellow protector
is no longer visible in the filler neck.
After resetting the misfuelling protection
device, remove the tool fr om the filler neck and
secure it to the battery restraining bar. If
subsequent driveability difficulties are
encountered, seek assistance from your
Dealer/Authorised Repairer.
WARNINGS
When the misfuelling protection
device is activated, it could cause fuel
to be discharged from the filler neck.
CAUTIONS
Using the incorrect fuel can result in
major damage to your vehicle’s engine
and fuel system.
JAG1618
1
2
3
Page 193 of 391

193
Maintenance
Weekly checks
•Engine oil level (non- electronic dipstick
vehicles). See ENGINE OIL CHECK - V6
Petrol engines (page 197).
• Engine coolant check. See ENGINE
COOLANT CHECK (page 204).
• Brake fluid level. See BRAKE FLUID
CHECK (page 206).
• Power steering fluid level. See POWER
STEERING FLUID CHECK (page 208).
• Screen washer fluid level. See WASHER
FLUID CHECK (page 209).
• Tyre pressures and condition. See TYRE
CARE (page 217).
• Operate air conditioning. See AUTOMATIC
CLIMATE CONTROL (page 116).
Note: The engine oil level on V6 petrol engines,
should be checked more frequently if the
vehicle is driven for prolonged periods at high
speeds. The engine oil level on diesel and V8
petrol engines is checked automatically at all
times by the electronic dipstick.
Severe driving conditions
When a vehicle is operated in severe
conditions, more frequent attention must be
paid to servicing requirements.
Severe driving conditions include:
• Driving in dusty and/or sandy conditions.
• Driving on rough and/or muddy roads
and/or wading. •
Driving in extremely hot or cold
conditions.
• Driving in areas using road salt or other
corrosive materials.
• Towing a trailer or driving in mountainous
conditions.
Contact your Dealer/Authorised Repairer for
advice.
Emission control
Your vehicle is fitted with various items of
emission and evaporati ve control equipment,
designed to meet specific territorial
requirements. You should be aware that
unauthorised replacemen t, modification or
tampering with this equipment by an owner or
repair shop, may be unlawful and subject to
legal penalties.
In addition, engine se ttings must not be
tampered with. These have been established to
ensure that your vehicle complies with
stringent exhaust em ission regulations.
Incorrect engine settings may adversely affect
exhaust emissi ons, engine performance and
fuel consumption. The y may also cause high
temperatures, which will result in damage to
the catalytic converter and the vehicle.
Road testing dynamometers (rolling
roads)
Because your vehicle is equipped with anti-lock
brakes, it is essential that any dynamometer
testing is carried out only by a qualified person,
familiar with the dynamometer testing and
safety procedures practised by
Dealers/Authorised Repairers.
CAUTION
Ensure that you take notice of any
message centre information and
warnings relating to engi ne oil level (V8 petrol
and diesel engines only). Top-up the level
when advised to do so. See ENGINE OIL
CHECK - V8 Petrol engines (page 199).
Page 251 of 391

251
Status after a collision
DRIVING AFTER A COLLISION
Before starting or driving
If the vehicle has been involved in an accident
it should be checked thoroughly before
attempting to start the engine or drive the
vehicle.
Check for:-
• Fuel leaks.
• Fluid leaks.
• Battery damage.
• Damage to wiring.
• Damage to lights.
• Damage to steering, suspension, wheels
or tyres.
• Sharp or protruding bodywork.
• Operation of doors and locks.
• Condition and operation of seat belts and
SRS components.
• Activation of the pe destrian protection
system.
• Condition of chil d seats and their
mounting/attach ment points.
Note: This list is not exhaustive.
Resetting the fuel cut-off
The fuel system cut-off forms part of the Safety
and Restraint System (SRS) fitted to your
vehicle. Following an impact, and depending on
the severity, the fuel pump may be switched
off.
1.Switch the ignition off, and wait for 10
seconds.
2. Without pressing the brake pedal, press
the engine START/STOP button, to switch
the electrical circuits on. Wait for 30
seconds.
3. Check the vehicle thoroughly for fuel leaks.
If a leak is detected switch the ignition off
immediately.
•The vehicle must not be started if a leak
is present. Seek qualified advice, and
have the vehicle recovered.
4. If no leaks are detected, start the engine.
WARNING
If the vehicle is involved in a collision
it should be checked by a Dealer/
Authorised repairer, or suitably
qualified personnel, before starting or driving.
WARNING
The fuel cut-off should never be reset
if you can smell fuel, or a leak can be
seen. Doing so can lead to a fire
which may cause personal injury or death.