2009 JAGUAR XF ECO mode
[x] Cancel search: ECO modePage 275 of 391

275
Audio unit operation
STATION PRESET BUTTONS
Tuning stations
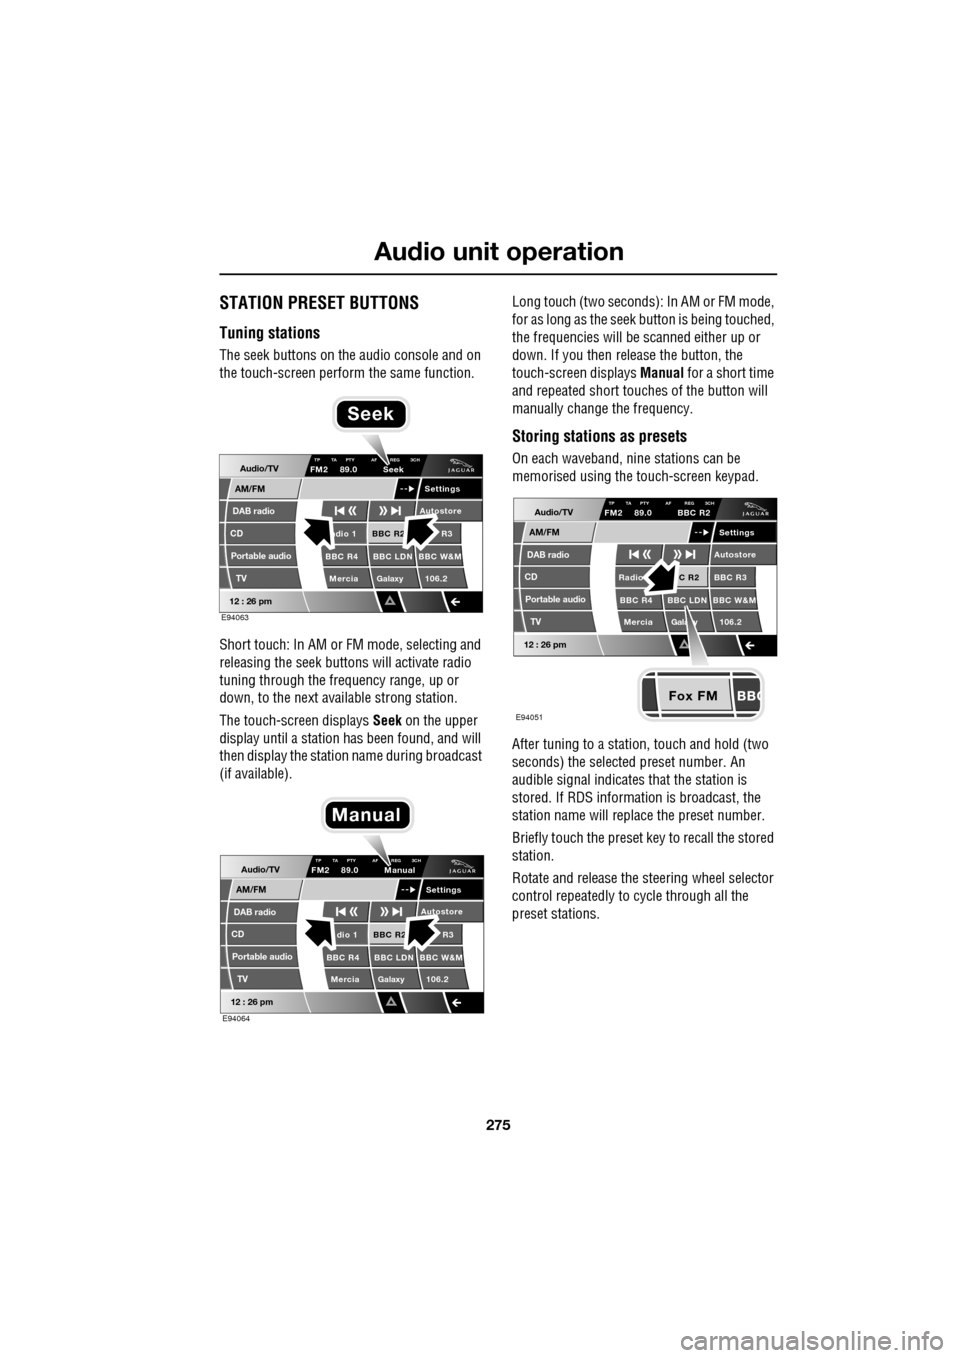
The seek buttons on the audio console and on
the touch-screen perform the same function.
Short touch: In AM or FM mode, selecting and
releasing the seek buttons will activate radio
tuning through the frequency range, up or
down, to the next available strong station.
The touch-screen displays Seek on the upper
display until a station has been found, and will
then display the station name during broadcast
(if available). Long touch (two seconds): In AM or FM mode,
for as long as the seek
button is being touched,
the frequencies will be scanned either up or
down. If you then release the button, the
touch-screen displays Manual for a short time
and repeated short touc hes of the button will
manually change the frequency.
Storing stations as presets
On each waveband, ni ne stations can be
memorised using the touch-screen keypad.
After tuning to a stati on, touch and hold (two
seconds) the selected preset number. An
audible signal indicates that the station is
stored. If RDS informat ion is broadcast, the
station name will replace the preset number.
Briefly touch the preset key to recall the stored
station.
Rotate and release the steering wheel selector
control repeatedly to cycle through all the
preset stations.Audio/TV
DAB radio
CD
AM/FM
12 : 26 pm
BBC R2 R3
BBC R4 BBC LDN BBC W&M Mercia Galaxy 106.2adio 1
Settings
Autostore
TP TA PTY AF REG 3CHFM2 89.0 Seek
Portable audio TV
E94063
Seek
Audio/TV
DAB radio
CD
AM/FM
12 : 26 pm
BBC R2 R3
BBC R4 BBC LDN BBC W&M Mercia Galaxy 106.2dio 1
Settings
Autostore
TP TA PTY AF REG 3CHFM2 89.0 Manual
Portable audio TV
E94064
Manual
Fox FM
Audio/TV
DAB radio
CD
AM/FM
12 : 26 pm
C R2 BBC R3
BBC R4 BBC LDN BBC W&M
Mercia Gala y 106.2Radio
Settings
Autostore
TP TA PTY AF REG 3CHFM2 89.0 BBC R2
Portable audio TV
E94051
Page 288 of 391

Digital audio broadcasting
288
SETTINGS
In DAB mode, select Settings.
Select Options .
Note: If Settings is selected once, but no
action is taken for a further ten seconds, the
system will exit the menu automatically.
Announcements
You can select up to four types of
announcement from a list of eleven, for
example, News, Area/Weather , Traffic and
Alarm .
When a DAB announcement is broadcast, it will
interrupt normal play for the duration of the
announcement.
Note: The Alarm announcement type,
broadcasts information concerning crises of
national or international importance. To display the full list
of announcement types,
touch Select .
Select an announcement type to enable it,
select it again to disabl e it. If you want to clear
all enabled types, select Clear all. To scroll
through the list, select the arrow buttons.
Note: If you have already selected four
announcement types, y ou will be unable to
select further types.
Audio/TV
DAB radio
CD
AM/FM
12 : 26 pm
BBC R2 Viking
Trent Century BBC LeicRadio 1
Settings search
TA FM DAB i Link DPLIIDAB1 BBC Radio2
Portable audio
TV
DAB radio text
BBC National DAB
E94190
Audio/TV
Bal/Fade
Options
Sound
12 : 26 pm
Settings
Announcements
On
Of f
On
Of f
EnsemblePTY
Of f
DAB text
Link DAB
FM trafficPTY
Select
Clear all
E94191
Audio/TV
Bal/Fade
Options
Sound
12 : 26 pm
Settings
Announcements
On
Of f
On
Of f
EnsemblePTY
Of f
DAB text
Link DAB
FM trafficPTY
Select
Clear all
E94192
Audio/TV
12 : 26 pm
Settings
News
Alarm
Traffic
T ransport flash
W
arning services
Clear allSelect up to
four options
E94193
Page 294 of 391

Compact disc player
294
Loading several CDs (six CD player)
Press the LOAD button and insert each CD into
the CD slot as requested by the message on the
touch-screen. A pop-up me ssage will indicate
which slot is being sele cted in turn until the
unit is fully loaded.
When the CD player has been loaded, you can
operate the CD using the touch-screen
controls.
EJECTING COMPACT DISCS
Press the eject button. A short press will eject
a single CD, while a long press will eject each
loaded CD in sequence.
When a disc is ejected, remove it from the
loading slot. If you fail to remove an ejected
disc, it will be drawn back into the player after
ten seconds.
If you want to stop ejecting multiple discs, on
the touch-screen, select Cancel.
COMPACT DISC SELECTION
On a six CD player, when a CD has been
selected on the touch-screen, the upper display
indicates which disc is being loaded and play
will start when loading is complete. Touch
another disc on the scre en to load and start
playing that disc.
• TP: The background radio station provides
Traffic Programme (TP) and is able to
support Traffic Anouncements (TA).
• TA: Traffic announcements are available in
the CD mode and will interrupt the playing
of the CD. At the end of the announcement,
the CD will resume playing.
E94068
E94071
Audio/TV
DAB radio
CD
AM/FM
12 : 26 pm
Portable audio
TV
Settings
1 23 45 6
MixRepeat
TP TA
3CHLoading CD 1
E94072
TP TA3CH
Loading CD 1
Page 296 of 391

Compact disc player
296
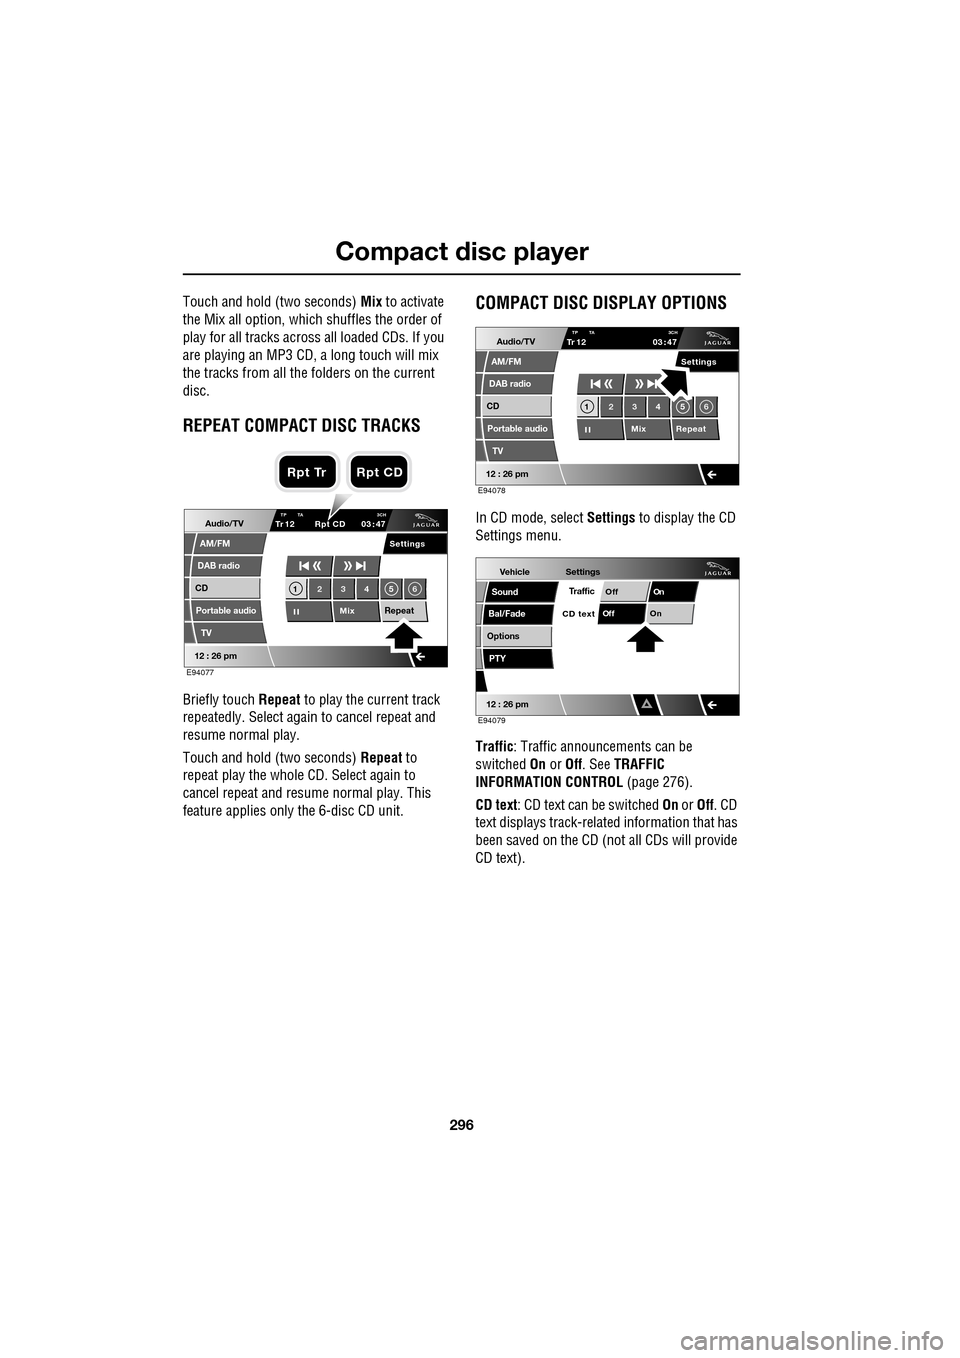
Touch and hold (two seconds) Mix to activate
the Mix all option, which shuffles the order of
play for all tracks across all loaded CDs. If you
are playing an MP3 CD, a long touch will mix
the tracks from all the folders on the current
disc.
REPEAT COMPACT DISC TRACKS
Briefly touch Repeat to play the current track
repeatedly. Select again to cancel repeat and
resume normal play.
Touch and hold (two seconds) Repeat to
repeat play the whole CD. Select again to
cancel repeat and resu me normal play. This
feature applies only the 6-disc CD unit.
COMPACT DISC DISPLAY OPTIONS
In CD mode, select Settings to display the CD
Settings menu.
Traffic : Traffic announcements can be
switched On or Off. See TRAFFIC
INFORMATION CONTROL (page 276).
CD text : CD text can be switched On or Off. CD
text displays track-related information that has
been saved on the CD (not all CDs will provide
CD text).Audio/TV
DAB radio
CD
AM/FM
12 : 26 pm
Portable audio
TV
Settings
1 23 45 6
MixRepeat
TrTP TA 3CH1203 47
Rpt CD
E94077
Rpt Tr Rpt CD
Audio/TV
DAB radio
CD
AM/FM
12 : 26 pm
Portable audio
TV
Settings
1 23 45 6
MixRepeat
TrTP TA
3CH1203 47
E94078
Vehicle
Options
Sound
Bal/Fade
12 : 26 pm
Settings
TrafficOnOff
On
Of f
CD text
PTY
E94079
Page 299 of 391

299
Portable audio
PORTABLE AUDIO
Portable audio overview
The portable audio system is located in the
centre console cubby box. You can connect a
variety of audio devices, including iPods, via
this interface to the audio system.
If you are connecting an iPod or mass storage
device, you can use the touch-screen to
operate and search the device. Many of the
controls are similar to those available for CD
play.
The devices that you can connect to the
portable audio interface include:
• USB mass storage devices, for example
memory stick.
• iPod.
• Auxiliary device (no to uch-screen control).
Note: The portable audio interface supports
the following iPods:
•iPod (generations 3-5).
•iPod Mini.
•iPod Nano (generations 1-3).
•iPod Photo.
•iPod Classic.
Note: The audio system will play MP3, WMA,
WAV and AAC files. Note:
Some MP3 players ha ve their own file
system that is not suppor ted by this system. To
use your MP3 player, y ou must set it to USB
Removable Device or Mass Storage Device
mode (see manufacturer's information for
further details). Only music that has been
added to the device in this mode can be played
via the vehicle's portable audio system.
Note: The system will suppor t devices with a
storage capacity up to 256 GB (approximately
65 000 tracks).
CAUTION
We recommend that you replace the
rubber cover when a portable device is
not plugged in. This will prevent damage to the
system. The cover is not waterproof.
Please disconnect your iPod when
leaving the vehicle. Failure to do so may
result in the iPod battery discharging.
Page 304 of 391

Portable audio
304
Searching a portable device
Next/previous track
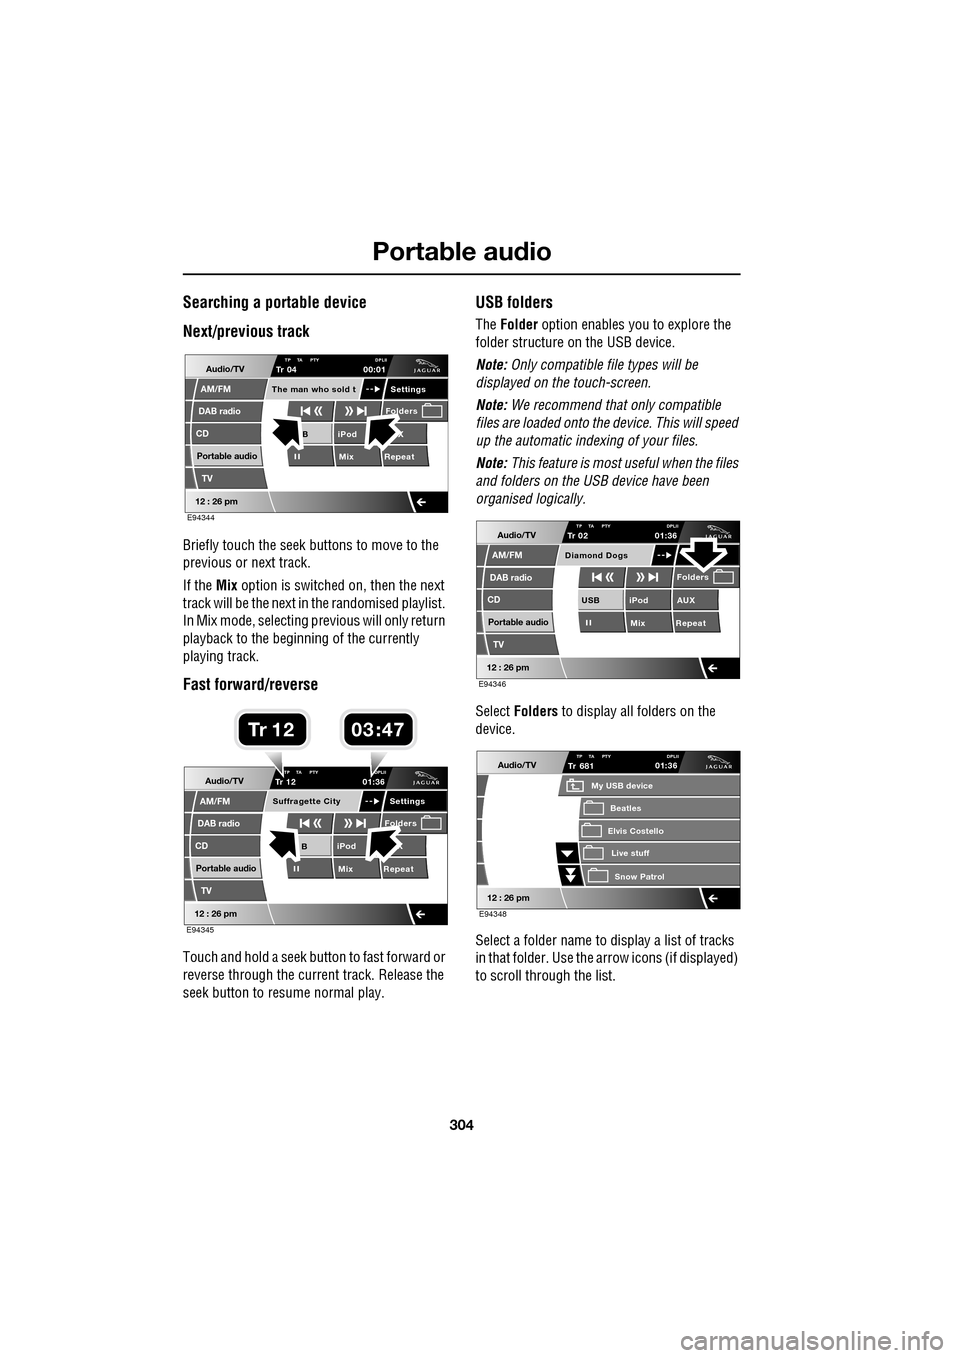
Briefly touch the seek buttons to move to the
previous or next track.
If the Mix option is switched on, then the next
track will be the next in the randomised playlist.
In Mix mode, selecting previous will only return
playback to the beginning of the currently
playing track.
Fast forward/reverse
Touch and hold a seek button to fast forward or
reverse through the current track. Release the
seek button to resume normal play.
USB folders
The Folder option enables you to explore the
folder structure on the USB device.
Note: Only compatible file types will be
displayed on the touch-screen.
Note: We recommend that only compatible
files are loaded onto the device. This will speed
up the automatic indexing of your files.
Note: This feature is most useful when the files
and folders on the USB device have been
organised logically.
Select Folders to display all folders on the
device.
Select a folder name to display a list of tracks
in that folder. Use the arrow icons (if displayed)
to scroll through the list.
Audio/TV
DAB radio
CD
AM/FM
12 : 26 pm
iPod X
Mix RepeatB
Settings
Folders
TP TA PTY DPLIITr 04
Portable audio
TV
The man who sold t
00:01
E94344
Audio/TV
DAB radio
CD
AM/FM
12 : 26 pm
iPod X
Mix RepeatB
Settings
Folders
TP TA PTY DPLIITr 12
Portable audio
TV
Suffragette City
01:36
E94345
03 47Tr 1 2
Audio/TV
DAB radio
CD
AM/FM
12 : 26 pm
iPod AUX
Mix RepeatUSB
Folders
TP TA PTY DPLIITr 02
Portable audio
TV
Diamond Dogs
01:36
E94346
Audio/TV
12 : 26 pm
Tr
Elvis Costello
My USB device
Live stuffSnow Patr ol
Beatles
681TP TA PTY DPLII01:36
E94348
Page 309 of 391

309
Telephone
Safety
Driving
Check local regulations covering the use of
in-car telephones in the areas that you intend to
use your telephone, and always obey them.
Observe the following guidelines if you are
using the phone when driving.
• Give full attention to driving - safe driving
is your prime responsibility.
• Always use hands-free operation when
driving.
• When receiving a call, if driving conditions
demand, pull off the road and park.
Electronic devices
Most modern electronic equipment is shielded
from Radio Frequency (R F) signals. However,
certain equipment may not be shielded against
RF signals from your phone.
Pacemakers
The Health Industry Manufacturers'
Association recommends that a minimum
separation of 15 centimetres (six inches) is
maintained between a wireless phone antenna
and a pacemaker, to avoid potential
interference with the pacemaker. These
recommendations are consistent with the
independent research by, and
recommendations of, Wireless Technology
Research.
TELEPHONE PAIRING AND DOCKING
Before use, your mobile phone must be paired
and docked with the vehicle’s Bluetooth
system. This is done via your mobile phone or
the touch-screen.
Pairing and docking using your mobile
phone
Follow the steps below, to pair and dock your
phone with the vehicle using your mobile
phone.
Note: The process of pairing and docking your
phone with the vehicle using the mobile phone,
will vary depending on the type of mobile
phone used.
3. Ensure that the ignition is on and the
touch-screen is active.
4. Ensure that there is no mobile phone
currently docked with the vehicle's
Bluetooth system. If a mobile phone is
docked with the system, you will not be
able pair and dock another phone until the
current phone has been undocked. To
undock a phone, select Phone or Comms
on the home screen, then Settings and
then Undock .
5. Using the mobile phone, search for
Bluetooth devices. See your phone's
operating instructions for further
information.
WARNING
Read the following information
thoroughly before using your
telephone.
nametag
Register
Voice mail
Answer options
Phone options
Change phone
E96911
Comms
Add phone
Search new
Docked phone: Nokia 6230i
Undock
Page 317 of 391

317
Telephone
MAKING A CALL
Before you make a call, your mobile phone
must be paired and docked with the vehicle’s
Bluetooth system.
From the Home menu, select Comms.
Key in the phone number, including the area
code, if applicable - the number will be
displayed. Touch the connect icon.
Changing a phone number
When entering a number, you can change the
phone number shown on the touch-screen
using the C button.
A momentary touch erases a single digit, a long
touch erases the complete number.
Receiving a call
If the audio system is in use when the phone
becomes active, the audio system source is
suppressed for the dur ation of the call. If automatic answer has been programmed, the
call will automatically answer after a few
seconds. Refer to
Answer options.
To answer a call: The preferred method to
accept an incoming call, if Automatic answer is
not active, is to use th e hands-free controls on
the steering wheel (refer to Hand-free
controls ). Alternatively, you can accept or
reject the incoming call, from the pop-up
displayed on the touch-screen.
Ending a call
The preferred method to end a call is to use the
hands-free controls on the steering wheel.
Refer to Hands-free controls .
Alternatively, select the End call icon
(arrowed).
Continuity of calls
Whilst in a call, the ca ll remains connected if
the vehicle is in convenience mode. When the
call ends, another call cannot be made or
received through the vehicle system, unless
the ignition is on and the touch-screen system
active.
Home
Audio/TV
Climate
Comms
Navigation
VehicleExternal
Left Right
20 17CC
15C
.5 .5
DAB radio DAB1
BBC 5Live Xtra
BBC National DAB
TA FM DAB i Subch. PL II
Valet12 : 26 pm
E96908
Digit Dial
Names
Last 10
Settings
7
1
4
*8
2
5
0 9
3
6
Options
C
E96924
Comms02476303080Digit Dial
Names
Last 10
Settings
7
1
4
*8
2
5
0 9
3
6
Options
C
E96925
Comms
00:00:05