2009 JAGUAR XF Lamps
[x] Cancel search: LampsPage 103 of 391

103
Instruments
Tyre Pressure Monitoring System -
Yellow
Illuminates when one or more tyres
are significantly under-inflated. The
vehicle should be stopped as soon
as possible and the tyres checked and inflated
to the recommended pressure.
High beam - Blue
Illuminates when the high beam
headlamps are switched on or
flashed.
Automatic Speed Limiter - Green
Illuminates when Automatic Speed
Limiter is active.
Side lamps - Green
Illuminates when the side (parking)
lamps are switched on.
Direction indicators - Green
The appropriate indicator will flash
when the column stalk is moved up
or down to signal a turn. If a
direction indicator bulb fails, the audible ticking
and warning indicator wi ll sound and flash at
twice the normal rate, when that direction
indicator is selected.
Hazard warning indicators
When the hazard warning lamps are switched
on, both direction indica tor warning indicators
flash simultaneously.
Page 104 of 391

Instruments
104
AUDIBLE WARNINGS AND INDICATORS
Various sounds are produced for warning and notification purposes as follows:Hazard or Condition Chime or tone/remedy
External lamps remain on when
the driver’s door is opened. A chime will sound until the lamps are switched off or driver’s
door is closed (unless the lighting control is in
AUTO position).
Hazard warning indicators on. A ti cking will sound until the hazard indicators are switched off.
Direction indicators on. A tick ing will sound until the indicators are switched off.
Memory 1 (or 2) settings saved. A short tone as the memory selection is saved.
Airbag system failure. A tone sequence is repeated five times. Seek qualified assistance as soon as possible.
Seat belt reminder. A chime will sound until an unfastened se at belt is fastened. The
warning will cease if occupied fr ont seat belts are buckled, the
ignition is turned off or more than approximately three minutes
has elapsed since the start of the chime.
Electric parking brake (EPB). If the EPB is a pplied while the vehicle is moving a continuous
chime will sound; release the EPB. If there is a fault with the
system which would prevent the a pplication of the EPB, a brief
sequence of chimes is initiated.
Adaptive Cruise Control (ACC)
driver intervene. Multiple chime. Apply the brakes.
ACC low speed automatic
switch off. A chime will sound to indicate that the ACC system is no longer
operating.
Forward Alert Multiple chime. Apply the brakes.
Speed is over 15 km/h (9 mph)
above the set limit speed. A short warning chime. Reduce speed.
Gear selector is not in Park with
ignition off. A chime will sound.
Select Park.
Entry delay warning (European
markets only). Intermittent slow, low pitc
hed chime. Disarm vehicle.
The Jaguar Smart Key cannot be
detected. A chime will sound. The remote ha
ndset should be inserted into
the starter control unit.
The Jaguar Smart Key is to be
removed from the starter
control unit. A chime will sound for 60 seconds if
the Jaguar Smart Key is in
the starter control unit and the driver’s door is opened. The
remote handset should be remove d from the starter control unit.
DSC OFF A chime will sound.
Page 123 of 391

123
Convenience features
SUN VISORS
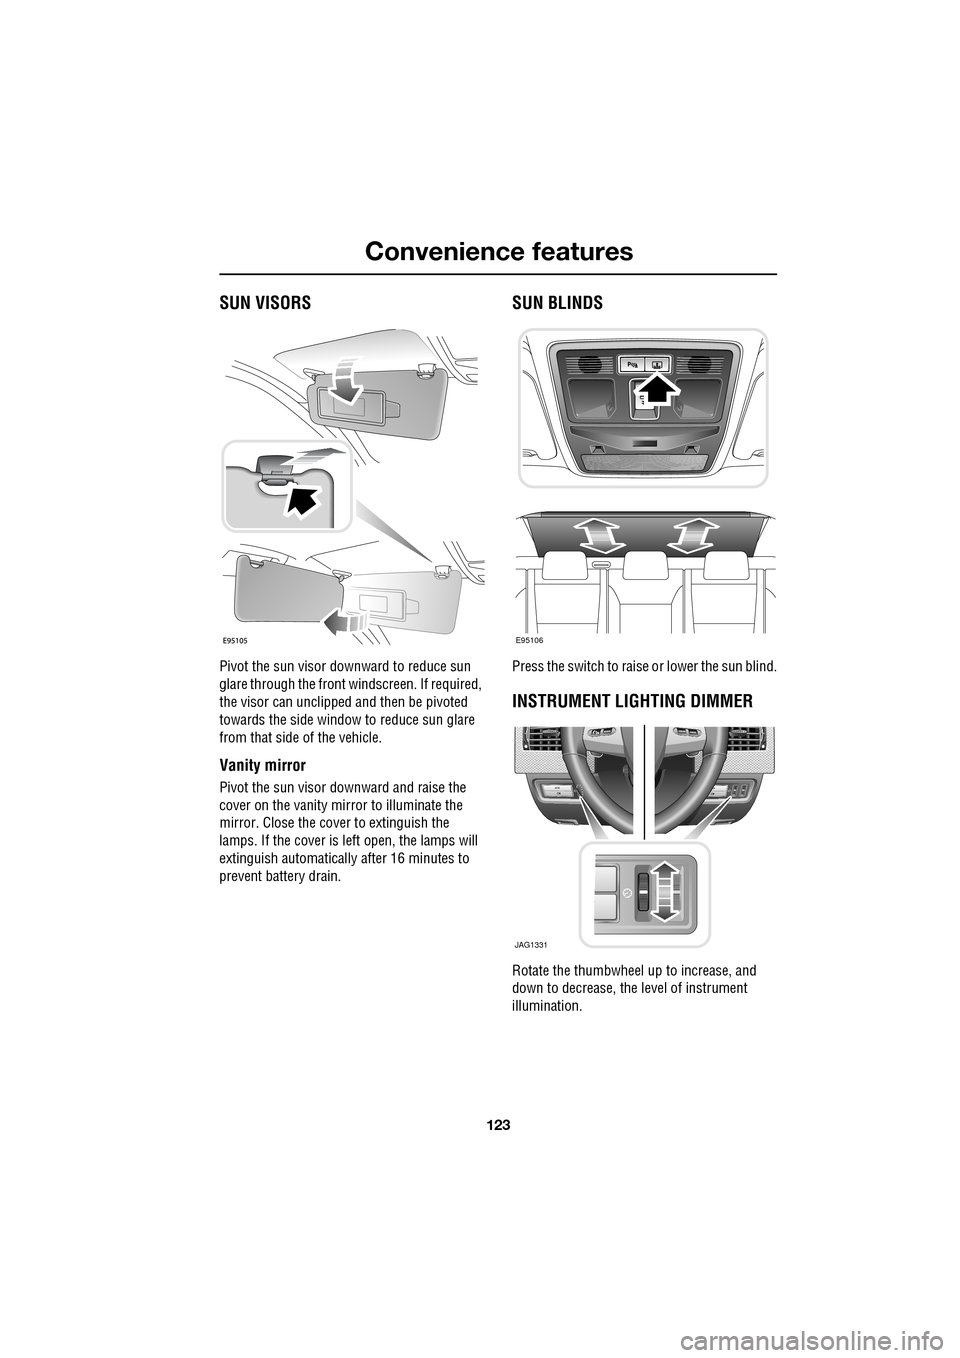
Pivot the sun visor downward to reduce sun
glare through the front windscreen. If required,
the visor can unclipped and then be pivoted
towards the side window to reduce sun glare
from that side of the vehicle.
Vanity mirror
Pivot the sun visor downward and raise the
cover on the vanity mirror to illuminate the
mirror. Close the cover to extinguish the
lamps. If the cover is left open, the lamps will
extinguish automatically after 16 minutes to
prevent battery drain.
SUN BLINDS
Press the switch to raise or lower the sun blind.
INSTRUMENT LIGHTING DIMMER
Rotate the thumbwheel up to increase, and
down to decrease, the level of instrument
illumination.
E95106
JAG1331
Page 162 of 391

Adaptive cruise control (ACC)
162
Automatic low speed switch off
If the speed of the vehicle decreases below
30 km/h (18 mph), the ACC system will be
automatically switched off and the instrument
warning indicator will go out.
If the brakes were being applied by the ACC
system, they will be slowly released.
This will be accompanied by an audible
warning, and DRIVER INTERVENE will be
displayed on the message centre. The driver
must take control.
Automatic switch off
ACC will disengage, but not clear the memory
when;
• the CANCEL button ( 3) is pressed
• the brake pedal is pressed
• Neutral ( N), Park ( P) or Reverse ( R) gear
positions are selected
• Dynamic Stability Control activates.
ACC will disengage, and clear the memory
when;
• the ignition system is switched off
• maximum vehicle speed is reached
• a fault occurs in the ACC system.
Resuming the speed and follow mode
By pressing the RESUME button (4) after ACC
has been cancelled, for example, after braking,
the ACC will become active again provided that
the set speed memory has not been erased.
The original set speed will be resumed (unless
a vehicle ahead causes the follow mode to
become active) and the set speed will be
displayed in the message centre for four
seconds.
Hints on driving with ACC
The system acts by regulating the speed of the
vehicle using engine c ontrol and the brakes.
Gear changes may occur in response to
deceleration or acceleration whilst in ACC.
ACC is not a collision avoidance system.
However, during some situations the system
may provide the driver with an indication that
intervention is required.
An audible alarm will sound, accompanied by
the message DRIVER INTERVENE if the ACC
detects:
• A failure has occurred whilst the system is
active
• That using maximum ACC braking only is
not sufficient.
Note: ACC operates when the gear selector
lever is in position S or D.
Note: When engaged, the accelerator pedal
rests in the raised position. Fully release the
pedal to allow normal ACC operation.
Note: When braking is applied by the ACC, the
vehicle brake lamps will be switched on
although the brake pedal will not move.
CAUTION
RESUME should only be used if the
driver is aware of the set speed and
intends to return to it.
Page 187 of 391

187
Vehicle care
CLEANING THE ALLOY WHEELS
Wash the wheels with soap and water, this
should be done more frequently when the
wheels are exposed to heavy dirt deposits, salt,
clay etc. If you are unsure how often to clean
the wheels in particular conditions, seek advice
from your Dealer/A uthorised Repairer.
Jaguar approved wheel cleaner should be used
to remove heavy soiling.
CLEANING THE EXTERIOR
Washing the vehicle paintwork
Remove heavy deposits of mud and dirt with a
hose before washing the vehicle.
When salt is used on the roads, wash the
vehicle immediately after encountering such
conditions. Clean undersid es and wheel arches
using a high pressure jet.
Wash the vehicle frequently using a sponge
and generous quantities of cold or luke warm
water containing a suitable car shampoo. Rinse
thoroughly and dry with a chamois leather or
synthetic substitute.
For best results, do not wash the vehicle under
strong sunlight. Always allow the vehicle to
cool down before washing.
Do not use a dry cloth to wipe dirty paintwork.
Dust and gritty substances are abrasive and
will scratch the paintwork. Remove dirt using a
cellulose sponge and plen ty of warm (never
hot) water. Rinse off with clean water and dry
using a clean, damp cham ois leather. Wash the
vehicle frequently.
CAUTION
Do not use non-approved, or acid based
wheel cleaners. These can damage the
wheel coating which may lead to corrosion of
the wheel rims.
CAUTIONS
Some high pressure cleaning systems
are sufficiently powe rful to penetrate
door and window seals, and damage trim and
door locks. Never aim the water jet directly at
the engine air intake, he ater air intakes, body
seals (doors, sunroof, windows etc.) or at any
components which may be damaged (lamps,
mirrors, exterior trim etc.).
Ensure that you read and comply with all
warnings and instruct ions supplied with
any cleaning products.
Never use cleaning products which are
not approved for use on vehicles.
CAUTION
Substances which are corrosive, such
as bird droppings, tree resin, dead
insects, tar spots, road salt and industrial fall
out, can damage the vehic le's paintwork. Any
such deposits should be removed as soon as
possible to prevent damage.
E94168
Page 192 of 391

Maintenance
192
GENERAL INFORMATION
Regular systematic maintenance is the key to
ensuring the continued reliability and efficiency
of your vehicle.
Maintenance is the owner's responsibility and
you must ensure that owner maintenance
operations, oil services, inspections and brake
fluid and coolant changes are carried out when
required and according to the manufacturer's
recommendations.
The routine maintenance requirements for your
vehicle are shown in th e Service Portfolio book.
Most of this necessar y workshop maintenance
requires specialised knowledge and
equipment, and should preferably be entrusted
to a Dealer/Authorised Repairer.
Service Portfolio
The Service Portfolio book includes a Service
Record section, which enables a record to be
kept of all the servicing and inspections that are
carried out on the vehicle. This section of the
book also has an area for brake fluid changes
to be recorded.
Ensure your service provider signs and stamps
the book after each se rvice and inspection.
Owner maintenance
In addition to the routine services and
inspections, a number of simple checks must
be carried out more frequently. These checks
can be carried out by th e owner and advice is
given on the pages that follow.
Daily checks
• Operation of lamps, horn, direction
indicators, wipers, washers and warning
indicators.
• Operation of seat belts and brakes.
• Look for fluid deposits underneath the
vehicle that might indicate a leak.
Condensation drips from the air
conditioning is normal.
CAUTION
Severe damage to the electrical system
and electronic components can occur, if
any attempt is made to diagnose faults in the
electrical system using conventional
diagnostic equipment (e .g. the use of test
lamps or low impedanc e voltmeters). The
fitting of any electric al accessory should only
be entrusted to a Deal er/Authorised Repairer.CAUTION
Any significant or sudden drop in fluid
levels, or uneven tyre wear, should be
reported to a qualifie d technician without
delay.
Page 214 of 391

Vehicle battery
214
USING BOOSTER CABLES
Note: Before connecti ng booster cables,
ensure that the battery connections on the
disabled vehicle are correct and that all
electrical equipment has been switched off.
1. Connect one end of the positive booster
cable to the positive terminal on the donor
vehicle's battery.
2. Connect the other end of the positive
booster cable to the positive terminal on
the disabled vehicle's battery. 3.
Connect one end of th e negative booster
cable to the earth point of the donor vehicle
that is recommended for jump starting by
the manufacturer.
4. Connect the other end of the negative
booster cable to a suitable earth point on
the disabled vehicle. The earth point
should be at least 0.5 metres (20 inches)
away from the battery and as far as
possible from any fu el or brake pipes.
• Check that all cables are clear of any
moving components and that all four
connections are secure.
5. Start the engine of the donor vehicle, and
allow it to idle for a few minutes.
6. Start the engine of the disabled vehicle.
7. Allow both vehicles to idle for two minutes.
8. Switch off the donor vehicle.
Disconnecting the cables
Note: Do not switch on any electrical
equipment until after th e cables have been
disconnected.
The engine should be running on the
previously disabled ve hicle and the engine
switched off on the donor vehicle. Disconnect
the booster cables in the exact reverse order of
that used for connection.
WARNINGS
Always wear appropriate eye
protection when working with
batteries.
During normal use, batteries emit
explosive hydrogen gas - ensure
sparks and naked lights are kept away
from the luggage compartment.
Do not attempt to start the vehicle if
the electrolyte in the battery is
suspected of being frozen.
Make sure both batt eries are of the 12
volt type and that the booster cables
have insulated clamps and are
approved for use with 12 volt batteries.
Do not disconnect the discharged
battery.
Do not connect posit ive (+) terminals
to negative (-) terminals and ensure
booster cables are kept away from
any moving parts in the engine compartment.
Do not connect a booster cable to the
negative (-) terminal of the battery.
Always connect to the recommended
earthing point.
WARNING
To avoid serious in jury use extreme
caution when removing the booster
cables as the engine will be running
on the previously disabl ed vehicle. This means
that you may be workin g close to components
which are moving at high speed, carry high
voltage, or may be hot.
Page 225 of 391

225
Wheels and tyres
CHANGING A ROAD WHEEL
If a wheel change is required, pull off the road
completely. Park on ground which is as level
and solid as possible. Ensure that the vehicle is
clear of any objects that will obstruct the safe
removal of the wheel. Switch on hazard
warning lamps and, where legally required,
display the warning triangle.
Regular maintenance of tyres contributes not
only to safety, but to the designed function of
the vehicle. Road-holdi ng, steering and braking
are especially vulnerable to incorrectly
pressurised, badly fitted or worn tyres.
Tyres of the correct size and type, but of
different make can have widely varying
characteristics. It is therefore recommended
that Jaguar approved tyres are fitted to all
wheels.
Temporary use spare wheel
Observe the following wa rnings before using
the wheel:
WARNINGS
Always ensure replacement tyres
have the correct rating and
specifications (e.g. load index, size,
speed rating) for your vehicle.
When using tyres other than those
recommended by Jaguar, do not
exceed the speed capacity
recommended by the manufacturer.
Wheels are extremely heavy. Take
care when lifting and particularly
when removing and replacing a wheel
in its storage position in the luggage
compartment.
CAUTION
Ultra high performance tyres. This
vehicle is equipped with an Ultra High
Performance (UHP) tyre and wheel
combination designed to give maximum dry
road performance with consideration for
aquaplaning resistan ce. UHP tyres have
performance enhancing soft rubber tread
compound. If driven aggressively they may
suffer rapid tread wear and a shorter life than
can be expected from other tyre types. This
wheel and tyre comb ination is more
susceptible to damage from road hazards.
Do not use this combination for driving on
snow or ice. High perf ormance tyres must be
replaced with winter tyres when weather
conditions dictate.
WARNINGS
Note the temporary use spare wheel
warning label. Adhere to instructions
on the label. Failure to comply can be
dangerous.
When a temporary use spare wheel is
fitted, drive with caution and replace
with the specified wheel and tyre as
soon as possible.
Do not fit more than one temporary
use spare wheel and tyre assembly at
one time.
The temporary use spare wheel must
be inflated to 4.2 bar (60 lbf/in²,
420 kPa) and cannot be repaired.
Temporary use spare wheel,
maximum speed is 80 km/h
(50 mph).