2009 JAGUAR XF power
[x] Cancel search: powerPage 87 of 391

87
Lighting
BULB SPECIFICATION CHART
Note: The tail lamp, stop lamp, rear fog lamps,
rear side lamps, side repeater lamps and high
mounted stop lamp, ar e LED units and are
non-serviceable. If an y of these lamps should
fail, they should be investigated by qualified
personnel. Consult your Dealer/Authorised
Repairer.
CAUTION
Before attempting to replace a bulb,
ensure that both the affected lamp and
the vehicle's ignition are turned off. If the
circuit is live a short circuit can occur which
may damage the vehicle's electrical system.
Lamp Specification Power (Watts)
Halogen headlamp (Low and High beam) H7/H755/55
Xenon headlamp (Low and High beam) D1S/H735/55
Front side lamps W5W HCB5
Front direction indicators PY21W21
Rear direction indicators PY19W19
Reverse lamps PS19W19
Number plate lamps W5W5
Interior overhead lamps W6WX6
Footwell lamps W5W5
Luggage lamp S10W10
Tailgate lamps W5W5
Glove box lamp W5W5
Vanity mirror lamp 2 x TS1.3W1.3
Page 90 of 391

Wipers and washers
90
Low screen wash
If the low washer fluid warning is on, the
windscreen wipers will not operate when the
wash/wipe is activated, even though there may
be washer fluid remaining in the reservoir
which is sprayed onto the screen. This is to
prevent damage to the wiper blades, scratching
of the glass or smearing dirt across the screen.
Normal, fast or single wipe can be selected
manually, to clear any spray from the
windscreen.
Timed jet function
If the timed jet func tion is configured,
the washer jets will only operate on the
up stroke of the wipers.
This function can be enabled/disabled by your
Dealer/Authorised Repairer.
Drip wipe
If the drip wipe function is configured,
the wipers will operate four seconds
after a wash wipe cycle has finished, to
clear any remaining drips from the windscreen.
This function can be enabled/disabled by your
Dealer/Authorised Repairer.
Blocked jets
If a washer jet becomes blocked, use a thin
strand of wire to unblock the jet by inserting
the wire into the jet. Ensure that the wire is
completely remove d after unblocking.
HEADLAMP WASHERS
Headlamp power wash operates automatically
with the windscreen wash, and will only
operate if the headlamps are switched on and
there is sufficient washer fluid in the reservoir.
Headlamp wash operates with every fourth
operation of the screen wa shers, provided that
ten minutes have elapsed since the last
operation of the headlamp washers.
Note: The power wash sequence is reset when
the headlamps or the ignition are turned off.
Note: Headlamp power wash is inhibited when
the low washer fluid warning is on.
CHECKING THE WIPER BLADES
The wiping edge of the blades should be
checked and cleaned periodically. Check the
blade rubber and replace the blade immediately
if cracks, splits or roughness are detected, to
prevent damage to the glass.
Clean the blade edge by wiping with a soft cloth
or sponge, using wa rm soapy water.
If the wipers fail to clear the windscreen when
operated, check the cond ition of the blade and
replace if necessary.
WARNING
Do not operate the washer jets during
adjustment. Windscreen washer fluid
may cause irritation to the eyes and
skin. Always read and observe the washer fluid
manufacturers instructions.
WARNING
Only use cleani ng products which
have been approved for use on
automotive glass and rubber.
Inappropriate products can cause smearing,
and increase glare.
E80573
Page 93 of 391

93
Windows and mirrors
ELECTRIC WINDOWS
With the ignition on or engine running, press a
switch down to lower the window, pull it up to
raise the window. Release the switch at any
point to stop window movement.
The windows will operate for five minutes after
the engine is switched off, as long as none of
the doors are opened.
One-shot operation
All four windows have one-shot operation.
Briefly pull the switch up and release, the
window will continue to raise until fully closed.
Briefly press the switch down and release, the
window will continue to lower until fully open.
Pressing or pulling the switch again will stop
the window.
Overriding anti-trap protection
Anti-trap protection will stop window
movement if an obstruction or resistance is
detected. Check the window and its aperture
and remove any obstructions, ice, etc. If it is
still necessary to raise the window, the override
procedure is as follows:-
1. Attempt to close the window. Anti-trap will
prevent closure and lower the window.
2. Within ten seconds, attempt to raise the
window again. Anti-t rap will prevent
closure and lower the window.
3. Attempt to close the window for a third
time, this time holding the switch in the
close position. The window will raise
whilst the switch is held. Hold until closed.
Note: If this procedure fails to remove the
blockage, the window operation may need to
be reset.
Window reset
The windows will need to be reset if the battery
is disconnected, becomes discharged or power
supply is interrupted.
Reset as follows:-
1. Close the window fully.
2. Release the switch, then lift it to the close
position and hold for two seconds.
3. Open the window fully.
4. Release the switch, then push it to the
open position and hold for two seconds.
5. Lift and release the switch to operate the
one-shot function.
6. Repeat the procedure on each window.
WARNING
All of the windows have an anti-trap
protection system. However, before
closing a window care must be taken
to ensure that none of the occupants have any
part of their body in a position where it could
be trapped. Even with an anti-trap system
serious injury or death can occur.
E94755
Page 95 of 391

95
Windows and mirrors
EXTERIOR MIRRORS
Adjusting and folding
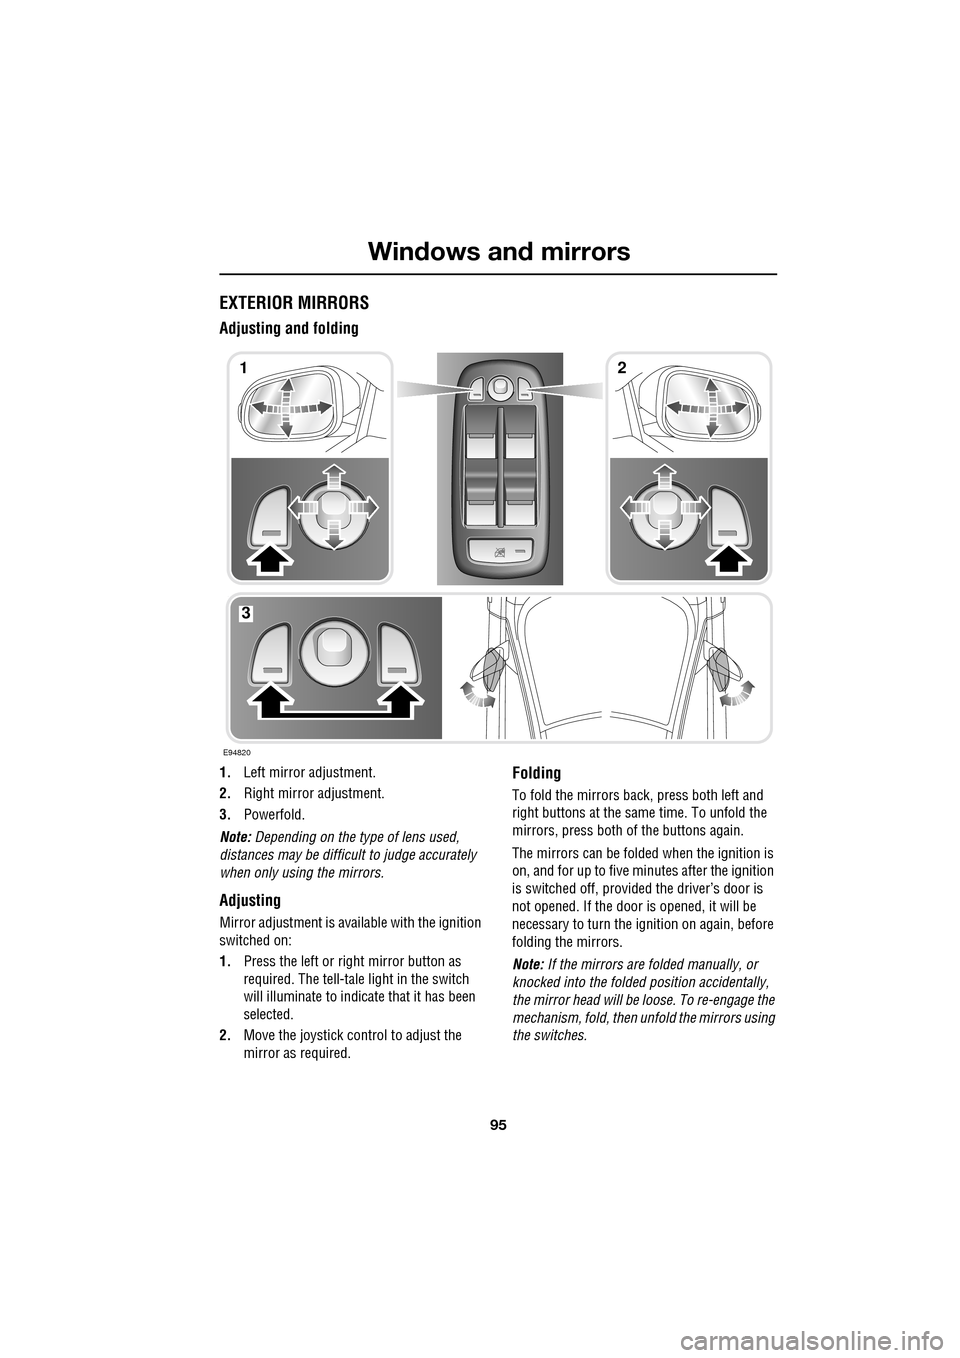
1.Left mirror adjustment.
2. Right mirror adjustment.
3. Powerfold.
Note: Depending on the type of lens used,
distances may be difficult to judge accurately
when only using the mirrors.
Adjusting
Mirror adjustment is avai lable with the ignition
switched on:
1. Press the left or right mirror button as
required. The tell-tale light in the switch
will illuminate to indica te that it has been
selected.
2. Move the joystick control to adjust the
mirror as required.
Folding
To fold the mirrors back, press both left and
right buttons at the sa me time. To unfold the
mirrors, press both of the buttons again.
The mirrors can be folded when the ignition is
on, and for up to five minutes after the ignition
is switched off, provid ed the driver’s door is
not opened. If the door is opened, it will be
necessary to turn the ignition on again, before
folding the mirrors.
Note: If the mirrors are folded manually, or
knocked into the folded position accidentally,
the mirror head will be loose. To re-engage the
mechanism, fold, then unfold the mirrors using
the switches.
E94820
12
3
Page 120 of 391

Climate control
120
Note: If the air vents are programmed to rotate,
they will rotate into th e fascia when climate
control is turned off.
External temperature
The external temperature is displayed at the top
of the Climate menu.
Smog/pollution filter
The smog filter operates in conjunction with
the air recirculation feature, to reduce
pollutants entering the vehicle.
When pollution is detected by the smog
sensor, air recirculation is selected
automatically, to help prevent pollution
entering the vehicle.
The sensitivity of the smog sensor can be
adjusted for personal preference or the sensor
can be switched off entirely, as follows:
1. Select Settings from the Climate menu.
2. Touch the + or - buttons to increase or
decrease the sensitivity of the smog
sensor.
There are five sensitivit y settings, indicated by
the five bars between the + and - buttons. To
switch the smog filter off, touch the - button
until none of the five bars are illuminated.
This icon appears at the top of the
touch-screen when the smog filter
is on. When the smog sensor is
switched off, this icon will not be displayed.
Air conditioning
on/off. When the air
conditioning is
switched off, Economy
mode is selected automatically. Economy
mode turns off the air conditioning
compressor and redu ces power consumed
by the climate control system. This will
reduce air conditioning performance.
Prolonged use of Econom y mode, may cause
the windows to mist.
Climate control on/off
button.
Aut o
12:26 pm
Aut oClimate
Vent RotationExternal
Sensitivity
Change unitsAlways
open
Auto
15C
JAG1519
Aut o
Page 122 of 391

Climate control
122
Calibration
If the battery is disconnected, or the power
supply is interrupted, whilst the sunroof is
partially open it will need to be recalibrated.
Once the battery is reconnected, or the power
supply is restored, recalibrate the sunroof as
follows:
1. Switch the ignition on.
2. Press the front of the switch, so that the
sunroof is in the tilt position, then release
the switch.
3. Press the front of the sunroof switch, and
hold for thirty seconds.
4. After thirty seconds the sunroof will begin
to move. Keep the front of the switch
pressed until the sunroof has fully opened,
then closed.
5. Once the open/close cycle has completed
and the sunroof ha s stopped moving,
release the switch.
The sunroof can now be operated as normal.
Sunroof blind
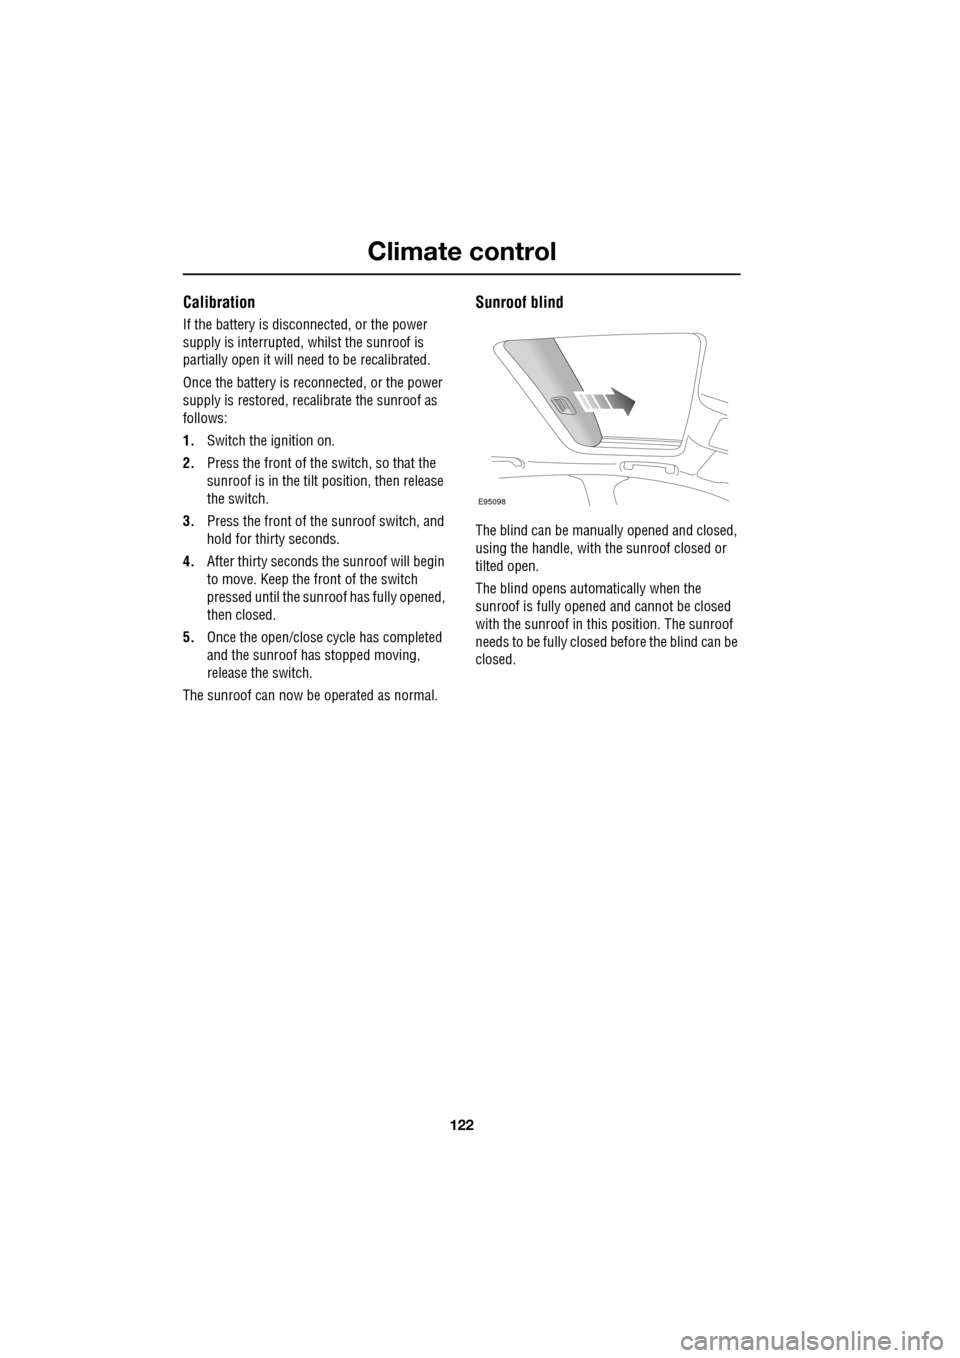
The blind can be manua lly opened and closed,
using the handle, with the sunroof closed or
tilted open.
The blind opens automatically when the
sunroof is fully opened and cannot be closed
with the sunroof in this position. The sunroof
needs to be fully closed before the blind can be
closed.
E95098
Page 125 of 391

125
Convenience features
AUXILIARY POWER SOCKETS
The auxiliary power socket is located in the
cubby box.
GLOVE BOX
The glove box is opened using the
JaguarSense proximity sensor on the fascia
(arrowed). To open the glove box, place the tip
of your finger close to and directly over the
sensor, as shown in the left-hand inset of the
illustration.
The sensor is able to distinguish between a
finger approach and an accidental finger rub
approach from a knee or other large items,
including being wiped for cleaning purposes.
Under these conditions, the sensor will not
react to the input and th e glove box will remain
closed.
Note: When the vehicle alarm is armed or Valet
mode is selected, the proximity sensor is
disabled, preventing the glove box from being
opened.
Note: The wearing of gloves may interfere with
the operation of the prox imity sensor. If gloves
are worn, it may be necessary to touch the
sensor to open the glove box.
CAUTIONS
Only Jaguar approv ed accessories
should be plugged into the power
sockets. Using any other equipment may
damage the vehicle's electrical system. If you
are in any doubt contact your Dealer/
Authorised Repairer.
The engine should be running when
using accessories for long periods.
Failure to do so can discharge the battery.
E95111
JAG1653
Page 140 of 391

Transmission
140
Fast off
Activated when rapidly lifting off the
accelerator pedal and takes account of road
gradient. This feature inhibits up-shifts,
enhancing pe rformance.
Note: If Sport mode is selected, driver type
recognition will vary the activation of this
feature according to driving style.
Shift adapt under braking
Under braking, the transmission will vary the
down-shift point in proportion to braking effort
and road gradient. This feature works in
conjunction with the posit ive torque function,
resulting in a smoother down-shift.
Note: If Sport mode is selected, driver type
recognition will vary the activation of this
feature according to driving style.
Corner recognition
Inhibits up-shifts during cornering, to provide
improved vehicle balance.
Note: If Sport mode is selected, driver type
recognition will vary the activation of this
feature according to driving style.
Road gradient recognition
When the vehicle is being driven on an uphill
gradient, the transmission adapts the shift
pattern to make better use of engine power.
When driving on a long downhill gradient, the
transmission may automatically select a lower
gear, to increase engi ne braking. Selecting
Sport mode (S ) will increase the tendency of
the transmission to select a lower gear in these
conditions, further incr easing engine braking.
Note: It is also possible to manually select a
lower gear to increase e ngine braking via use of
the shift paddles.
Sport mode
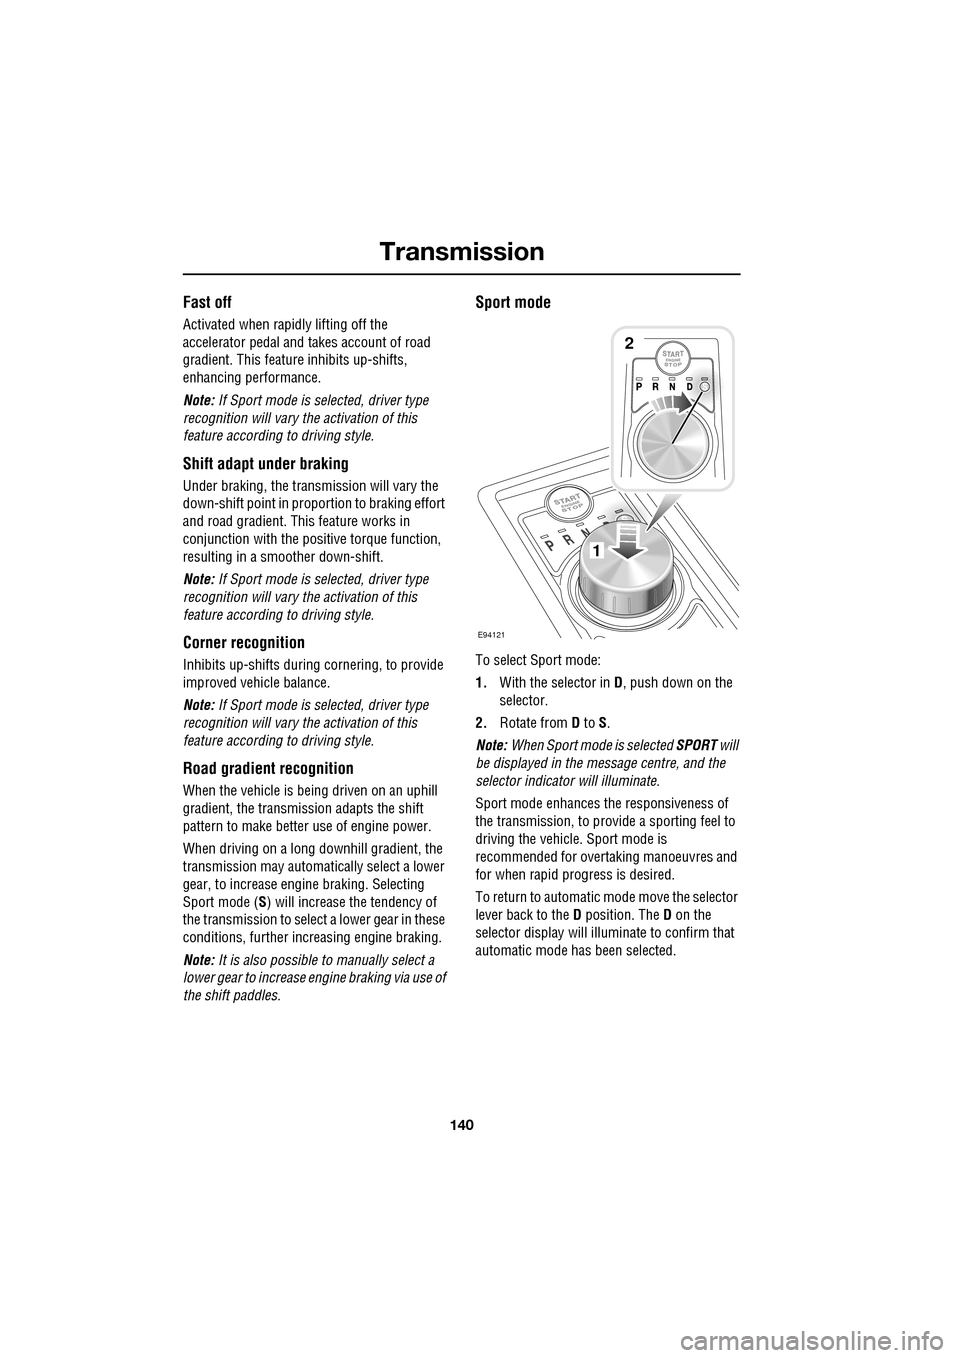
To select Sport mode:
1. With the selector in D, push down on the
selector.
2. Rotate from D to S.
Note: When Sport mode is selected SPORT will
be displayed in the message centre, and the
selector indicator will illuminate.
Sport mode enhances th e responsiveness of
the transmission, to prov ide a sporting feel to
driving the vehicle. Sport mode is
recommended for over taking manoeuvres and
for when rapid progress is desired.
To return to automatic m ode move the selector
lever back to the D position. The D on the
selector display will illuminate to confirm that
automatic mode has been selected.
E94121
1
2