2009 JAGUAR XF Windows
[x] Cancel search: WindowsPage 37 of 391

37
Alarm
ARMING THE ALARM
The engine is automatically
immobilised when the Jaguar
Smart Key is removed from the
vehicle. The alarm system is armed when the
lock button on the Jaguar Smart Key is pressed
or the button on the ex terior door handle is
pressed with a valid Jaguar Smart Key in close
proximity. The hazard lamps will flash to
indicate that the alarm is armed (in certain
markets, an audible tone will sound). The alarm
can also arm automatically (known as passive
arming), 30 seconds afte r all doors, luggage
compartment and bonnet apertures are closed,
and the Jaguar Smart Key is removed from the
vehicle. Passive arming does not lock the
vehicle.
This feature can be enab led/disabled using the
vehicle touch-screen. See PROGRAMMING
THE REMOTE CONTROL (page 21).
Full alarm
To set full alarm protection, ensure that all the
windows and the sunroof are closed. Then, on
vehicles fitted with doubl e-locking, press the
lock button twice within three seconds. The
hazard warning lights will flash twice to
confirm the alarm state and, in some markets,
an audible tone will sound.
Once fully armed the alarm will sound if:-
• The bonnet, luggage compartment, or a
door are opened.
• If a front door is unlocked using the
emergency key blade or the interior door
lock release levers and then opened.
• Movement is detected within the vehicle
interior.
• A window, front or rear windscreen, or
sunroof glass are broken.
• The vehicle is raised or tilted.
• The vehicle battery is disconnected. •
An attempt is made to disconnect the
alarm siren.
• An attempt is made to start the vehicle,
without a valid Jaguar Smart Key present.
Note: If the alarm is armed and a window or the
sunroof are left open, the alarm may sound due
to movement of air currents.
Note: Some of the above conditions are market
or option dependent a nd therefore may not
apply to your vehicle.
Perimeter alarm
To set perimeter alarm pr otection, briefly press
the lock button once. The hazard warning lights
will flash once to confirm the alarm state.
Once armed the perimeter alarm will sound if:-
• The bonnet, luggage compartment, or a
door are opened.
• If a front door is unlocked using the
emergency key blade or the interior door
lock release levers and then opened.
• The vehicle battery is disconnected.
• An attempt is made to disconnect the
alarm siren.
• An attempt is made to start the vehicle,
without a valid Jaguar Smart Key present.
Note: This setting should be used in
circumstances such as travelling on a ferry,
when pets are to be left in the vehicle, when a
window must be left open etc.
Note: Some of the above conditions are market
or option dependent a nd therefore may not
apply to your vehicle.
Page 39 of 391

39
Alarm
Alarm trigger information
If you have reason to believe that the alarm was
triggered when you were away from the
vehicle, it is possible to check on your return
using the touch-screen.
From the touch-screen Home menu, select
Vehicle and then Veh. settings . The Security
menu is displayed automatically as the default.
Use the arrow icons to scroll to the second
screen.
A text display (arrowed) will indicate if the
alarm has been triggere d, and also indicate
what the cause of the trigger was (e.g. Driver
door, Passenger door, Inclination sensor,
Trunk, etc.).
SECURITY SENSORS
Note: If the vehicle is to be transported by
road, rail or sea, the vehicle should not be
double-locked or the tilt and intrusion sensors
should be deactivated using the touch-screen.
See PROGRAMMING THE REMOTE CONTROL
(page 21). This prevents the alarm from
sounding as the vehi cle pitches and rolls.
Tilt sensor
The tilt sensor detect s any change in the
vehicle's inclination to the ground. When the
alarm is armed and the vehicle double-locked,
any change in the vehicle's inclination will
activate the tilt alarm. This feature protects
against unauthorised towing away or
jacking-up of the vehicle.
The tilt alarm is disarmed when the vehicle
security system is disarmed using the Jaguar
Smart Key.
Intrusion sensor
The intrusion sensor is mounted in the roof
console and detects any movement within the
vehicle cabin via the use of ultrasonic sound
waves. When the alarm is armed and the
vehicle double-locked, an y movement detected
inside the cabin will activate the alarm.
Note: It takes approximately 30 seconds for
the sensor to create an ultrasonic profile of the
cabin and be fully armed.
The intrusion alarm is disarmed when the
vehicle security system is disarmed using the
Jaguar Smart Key.
Note: Ensure all windows and sunroof are
closed prior to arming the alarm and
double-locking the vehicl e. Failure to do so
may result in false al arms being sounded due
to movements detected outside the vehicle.
Vehicle
Security
Parking
Passive armf On
Alarm sensors Of f On
12:26 pm
Off On
Auto-relock and
armValet mode
Passenger door
Alarm triggered by:
JAG1309
Page 70 of 391

Steering wheel
70
Activating the system
To activate voice control, press the voice
button on the steering wheel. A tone will be
heard and LISTENING will be displayed in the
message centre, to indicate that the system is
now waiting for a voice command.
Note: It is only necessary to press the voice
button at the beginning of each voice session.
Language and accent
Voice feedback is give n in the same language
as is set for Voice recognition. For example, if
the Voice recognition language is set to UK
English, the system wi ll not recognise other
languages (e.g. US English). The language for
the system can be changed using the
touch-screen as follows:
1. From the Home menu, select Comms.
2. From the Comms menu, select Voice and
then select Settings.
3. Select Change, then select the desired
language from the options available. Note:
Changing the Voice recognition language
will not affect the language settings for the
touch-screen.
Giving a command
Note: If background noise is excessive (e.g.
driving with windows open), the voice system
may not recognise a given voice command.
Press and release the Voice button on the
steering wheel and, after the tone, say one of
the commands listed later in this section, or
one of the commands given in either the
Telephone voice section or the Navigation
voice section, as appropriate. See TELEPHONE
VOICE CONTROL (page 323). SeeUSING
VOICE CONTROL (page 373).
Note: Always wait until the tone finishes
sounding before giving a voice command.
Give commands while facing forwards, in a
natural speaking voice as if talking to a
passenger or on the phon e. Most accents are
understood without difficul ty, but if the system
does not recognise the command, the system
will respond with SORRY and allow two more
attempts to say the command.
The system will repe at the command (as
understood by the system ) back to you as
confirmation. The comma nd will then be acted
on or the system will ask for further
information - always wait until after the tone
has sounded before speaking.
Once you are familiar with system requests, it
is possible to skip to the end of the request (to
when the tone sounds) to give your response.
To achieve this, briefly press and release the
voice button on the steering wheel during the
system request.
Note: If the Voice button on the steering wheel
is pressed before the system is ready to receive
a command, VOICE NOT READY will be
displayed in the message centre.
Voice
12 : 26 pm
Add phone nametags
Command list Operating guide
Settings
E96024
Voice
12 : 26 pm
Feedback Volume
Voice language
English UKChange
Page 93 of 391

93
Windows and mirrors
ELECTRIC WINDOWS
With the ignition on or engine running, press a
switch down to lower the window, pull it up to
raise the window. Release the switch at any
point to stop window movement.
The windows will operate for five minutes after
the engine is switched off, as long as none of
the doors are opened.
One-shot operation
All four windows have one-shot operation.
Briefly pull the switch up and release, the
window will continue to raise until fully closed.
Briefly press the switch down and release, the
window will continue to lower until fully open.
Pressing or pulling the switch again will stop
the window.
Overriding anti-trap protection
Anti-trap protection will stop window
movement if an obstruction or resistance is
detected. Check the window and its aperture
and remove any obstructions, ice, etc. If it is
still necessary to raise the window, the override
procedure is as follows:-
1. Attempt to close the window. Anti-trap will
prevent closure and lower the window.
2. Within ten seconds, attempt to raise the
window again. Anti-t rap will prevent
closure and lower the window.
3. Attempt to close the window for a third
time, this time holding the switch in the
close position. The window will raise
whilst the switch is held. Hold until closed.
Note: If this procedure fails to remove the
blockage, the window operation may need to
be reset.
Window reset
The windows will need to be reset if the battery
is disconnected, becomes discharged or power
supply is interrupted.
Reset as follows:-
1. Close the window fully.
2. Release the switch, then lift it to the close
position and hold for two seconds.
3. Open the window fully.
4. Release the switch, then push it to the
open position and hold for two seconds.
5. Lift and release the switch to operate the
one-shot function.
6. Repeat the procedure on each window.
WARNING
All of the windows have an anti-trap
protection system. However, before
closing a window care must be taken
to ensure that none of the occupants have any
part of their body in a position where it could
be trapped. Even with an anti-trap system
serious injury or death can occur.
E94755
Page 94 of 391

Windows and mirrors
94
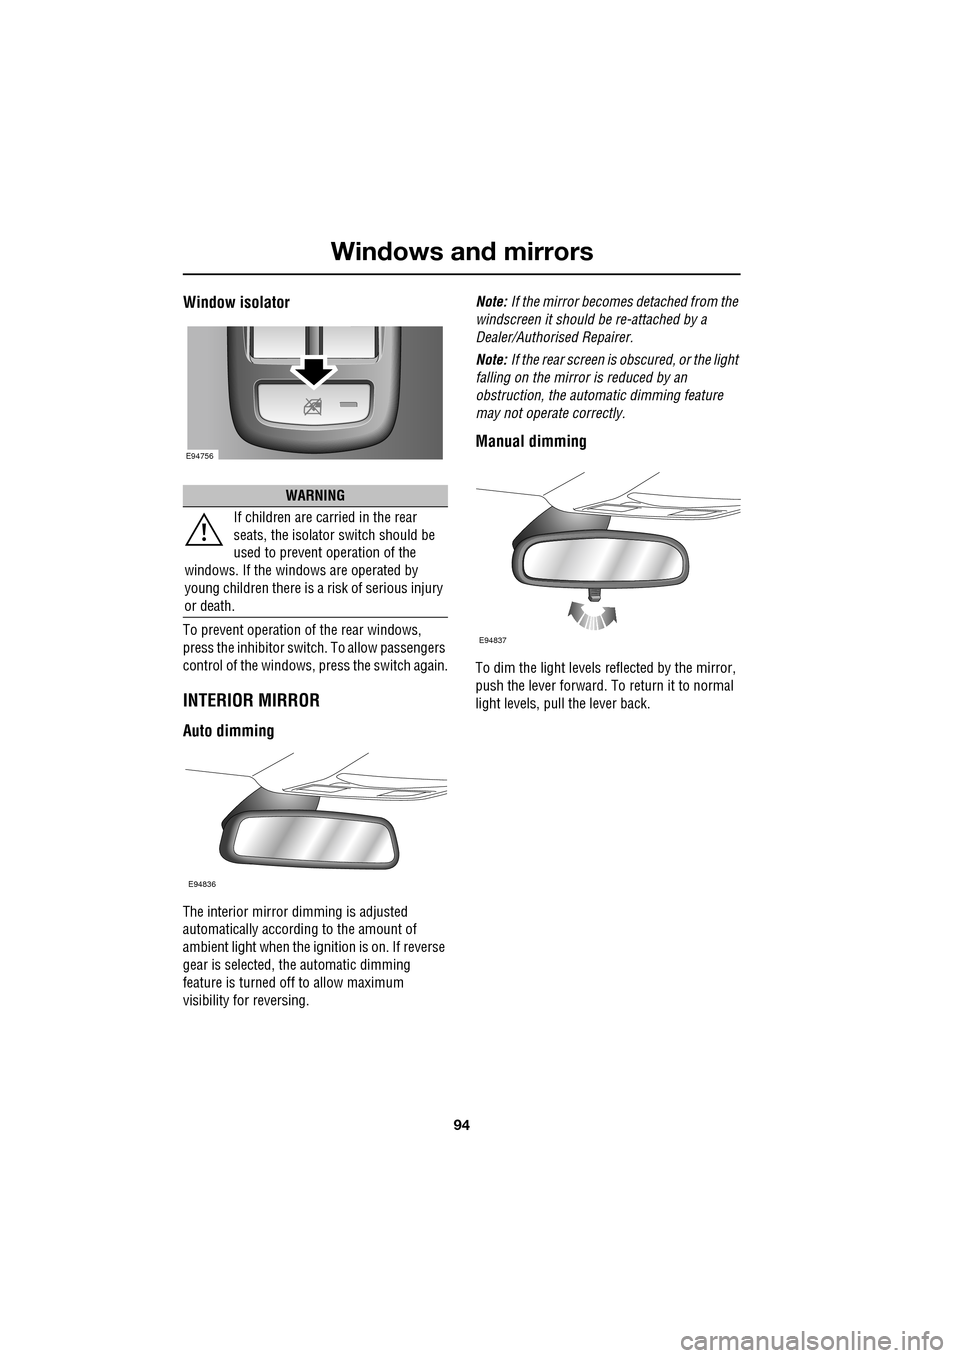
Window isolator
To prevent operation of the rear windows,
press the inhibitor switch. To allow passengers
control of the windows, press the switch again.
INTERIOR MIRROR
Auto dimming
The interior mirror dimming is adjusted
automatically according to the amount of
ambient light when the i gnition is on. If reverse
gear is selected, the automatic dimming
feature is turned off to allow maximum
visibility for reversing. Note:
If the mirror becomes detached from the
windscreen it should be re-attached by a
Dealer/Authorised Repairer.
Note: If the rear screen is obscured, or the light
falling on the mirror is reduced by an
obstruction, the automa tic dimming feature
may not operate correctly.
Manual dimming
To dim the light levels re flected by the mirror,
push the lever forward. To return it to normal
light levels, pull the lever back.
WARNING
If children are carried in the rear
seats, the is olator switch should be
used to prevent operation of the
windows. If the windows are operated by
young children there is a risk of serious injury
or death.
E94756
E94836
E94837
Page 95 of 391

95
Windows and mirrors
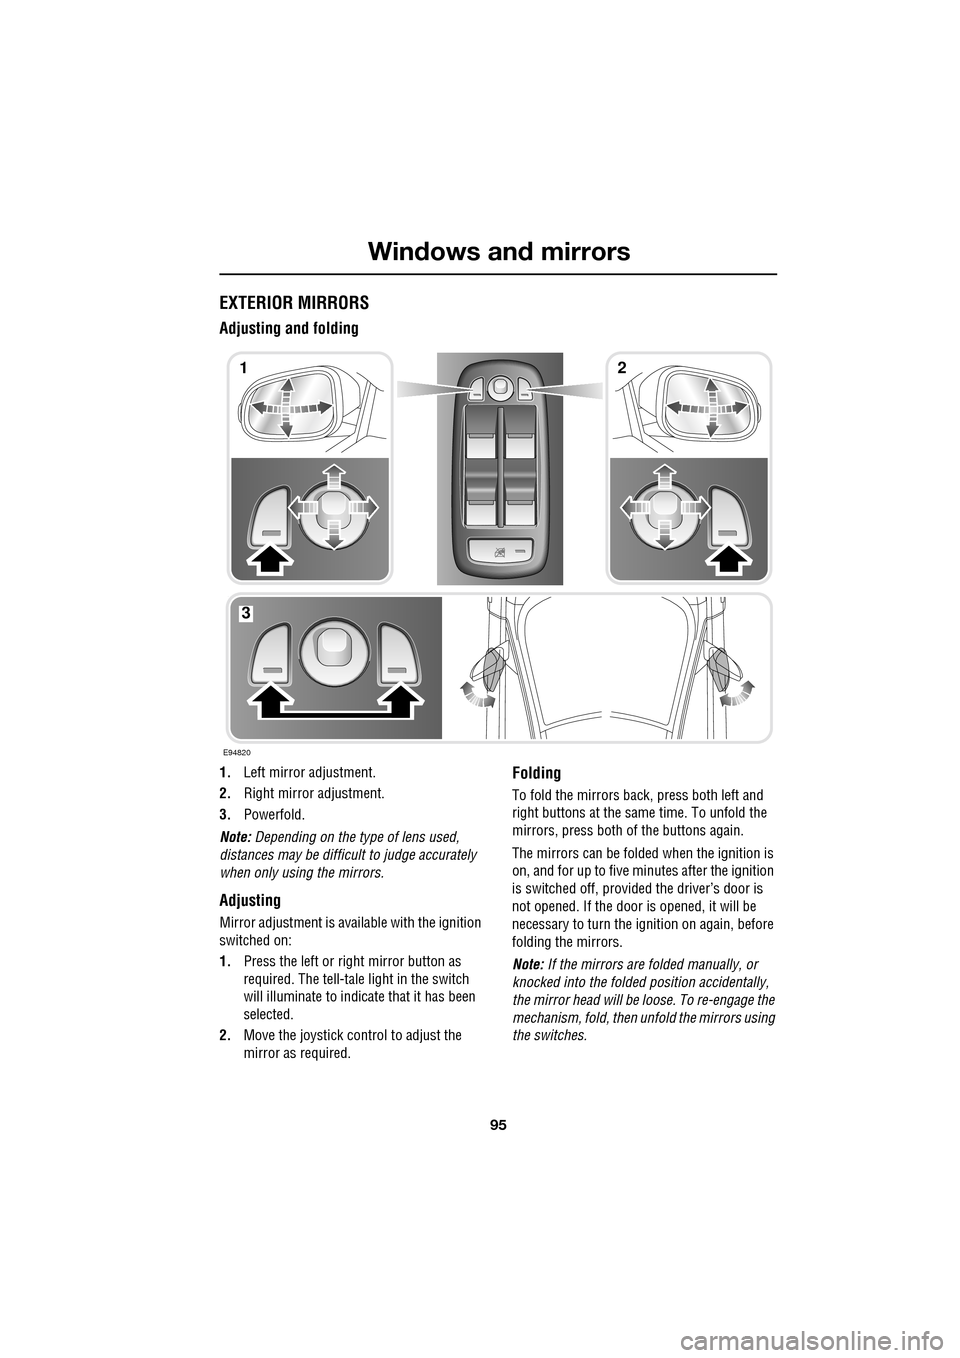
EXTERIOR MIRRORS
Adjusting and folding
1.Left mirror adjustment.
2. Right mirror adjustment.
3. Powerfold.
Note: Depending on the type of lens used,
distances may be difficult to judge accurately
when only using the mirrors.
Adjusting
Mirror adjustment is avai lable with the ignition
switched on:
1. Press the left or right mirror button as
required. The tell-tale light in the switch
will illuminate to indica te that it has been
selected.
2. Move the joystick control to adjust the
mirror as required.
Folding
To fold the mirrors back, press both left and
right buttons at the sa me time. To unfold the
mirrors, press both of the buttons again.
The mirrors can be folded when the ignition is
on, and for up to five minutes after the ignition
is switched off, provid ed the driver’s door is
not opened. If the door is opened, it will be
necessary to turn the ignition on again, before
folding the mirrors.
Note: If the mirrors are folded manually, or
knocked into the folded position accidentally,
the mirror head will be loose. To re-engage the
mechanism, fold, then unfold the mirrors using
the switches.
E94820
12
3
Page 96 of 391

Windows and mirrors
96
Automatic folding
The mirrors can be configured to automatically
fold when the vehicle is locked and unfold
when unlocked.
Note: If the mirrors were folded using the
switches, they will not unfold when the vehicle
is unlocked.
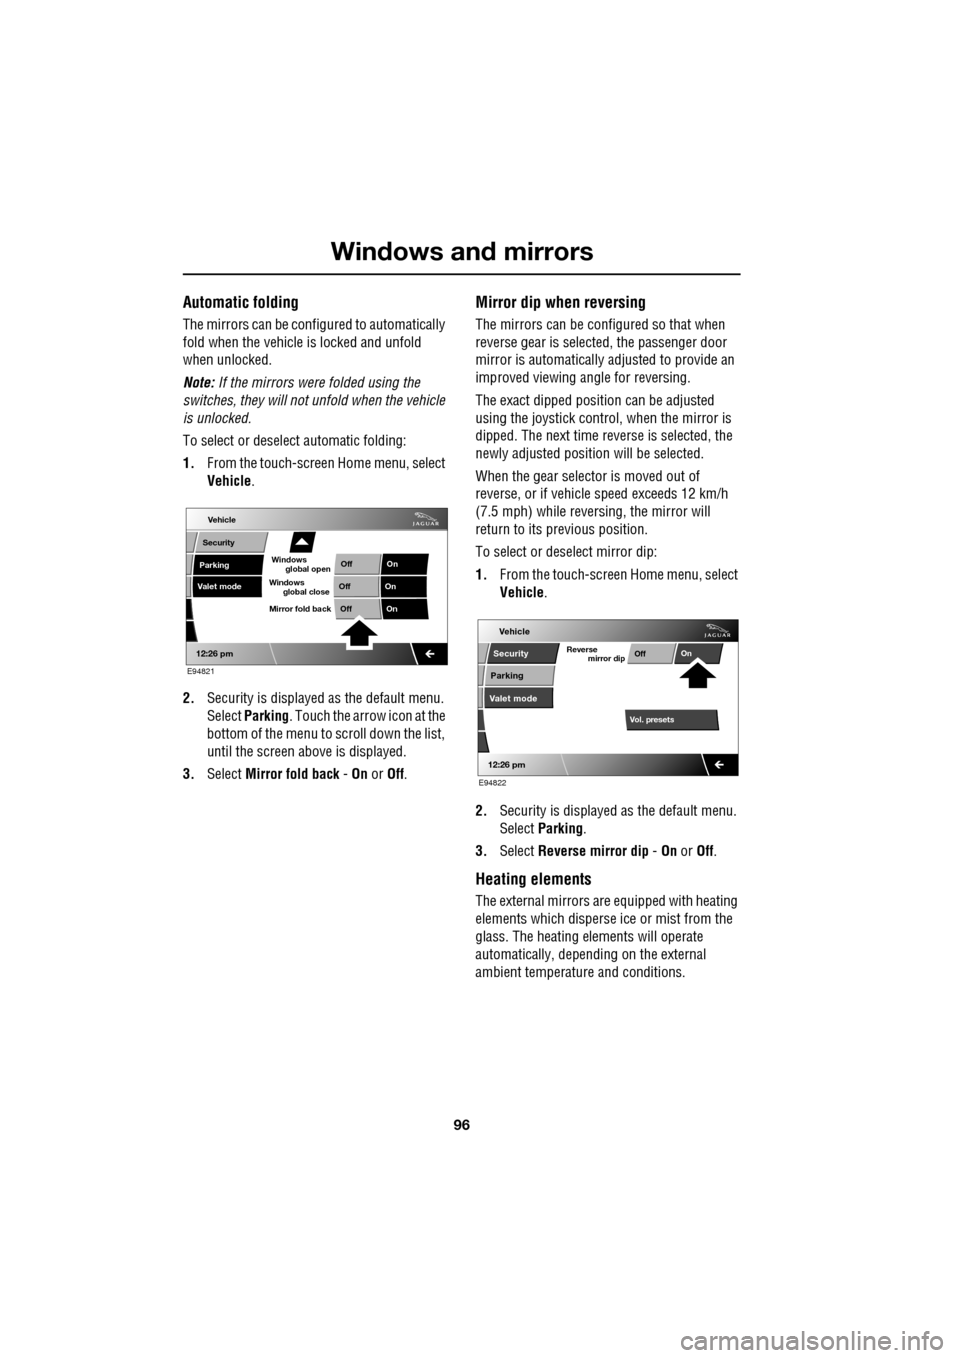
To select or deselect automatic folding:
1. From the touch-screen Home menu, select
Vehicle .
2. Security is displayed as the default menu.
Select Parking . Touch the arrow icon at the
bottom of the menu to scroll down the list,
until the screen a bove is displayed.
3. Select Mirror fold back - On or Off.
Mirror dip when reversing
The mirrors can be configured so that when
reverse gear is select ed, the passenger door
mirror is automatically adjusted to provide an
improved viewing a ngle for reversing.
The exact dipped positi on can be adjusted
using the joystick contro l, when the mirror is
dipped. The next time reverse is selected, the
newly adjusted position will be selected.
When the gear selector is moved out of
reverse, or if vehicle speed exceeds 12 km/h
(7.5 mph) while revers ing, the mirror will
return to its previous position.
To select or deselect mirror dip:
1. From the touch-screen Home menu, select
Vehicle .
2. Security is displayed as the default menu.
Select Parking .
3. Select Reverse mirror dip - On or Off.
Heating elements
The external mirrors are equipped with heating
elements which disperse ice or mist from the
glass. The heating el ements will operate
automatically, depending on the external
ambient temperatur e and conditions.
Vehicle
Valet mode
Security
Parking Off
On
Off On
12:26 pm
OffOn
Mirror fold back
E94821
global open
Windows
global close
Windows
mirror dip
Vol. presetsOff
On
Vehicle
Security
Parking
Valet mode
Reverse
12:26 pm
E94822
Page 97 of 391

97
Windows and mirrors
BLIND SPOT MONITOR
The Blind Spot Monitor (BSM) system
monitors a zone that covers the area adjacent
to the vehicle, that is not easily visible by the
driver and is designed to identify any object
overtaking the vehicle. Th e system uses a radar
on each side of the vehicle to identify any
overtaking vehicl e/object within the blind spot
area of the vehicle, while disregarding other
objects which may be stati onary or travelling in
the opposite direction, etc.
The radar monitors the ar ea extending from the
exterior mirror rearwards, to approximately 7
metres (23 feet) behind the rear wheels, and up
to 2.5 metres (8.2 feet) from the side of the
vehicle (the wi dth of a typical carriageway
lane).
Note: This radar sensor is approved in all RTTE
countries.
Note: The system covers an area of a fixed lane
width. If the lanes are narrower than a typical
carriageway lane, objects travelling in
non-adjacent lanes may be detected.
BSM automatically switches on and becomes
active when the vehicle is travelling at greater
than 16 km/h (10 mph) in a forward drive gear.
When the system initiates, it performs a
self-check, during which the warning icons in
the mirrors illuminate alternately for a short
period of time.
WARNINGS
The Blind Spot Monitor (BSM)
system is a supplement to, not a
replacement for, a safe driving style
and use of the exterior and rear-view mirrors.
It remains the driver's re sponsibility to detect
other vehicles, and their relative distance and
speed, when deciding whet her or not it is safe
to change lanes.
Please note that BSM may not be able
to give adequate wa rning of vehicles
approaching very quickly from behind
or vehicles that are be ing overtaken rapidly.
The radar sensors may be impaired
by rain, snow or road spray. This may
affect the sy stem's ability to reliably
detect a vehicle/object wi thin the blind spot. In
such conditions, take extra care when
changing lanes.
BSM may not be able to detect all
vehicles and may also detect objects,
such as roadside barriers, etc.
CAUTIONS
Ensure that the warning indicators in the
exterior mirrors are not obscured by
stickers or other objects.
Do not attach stickers or objects to the
rear bumpers, that may interfere with
the radar sensors.
E96410