2009 JAGUAR XF Valet mode
[x] Cancel search: Valet modePage 31 of 391

31
Locks
Deselecting valet mode
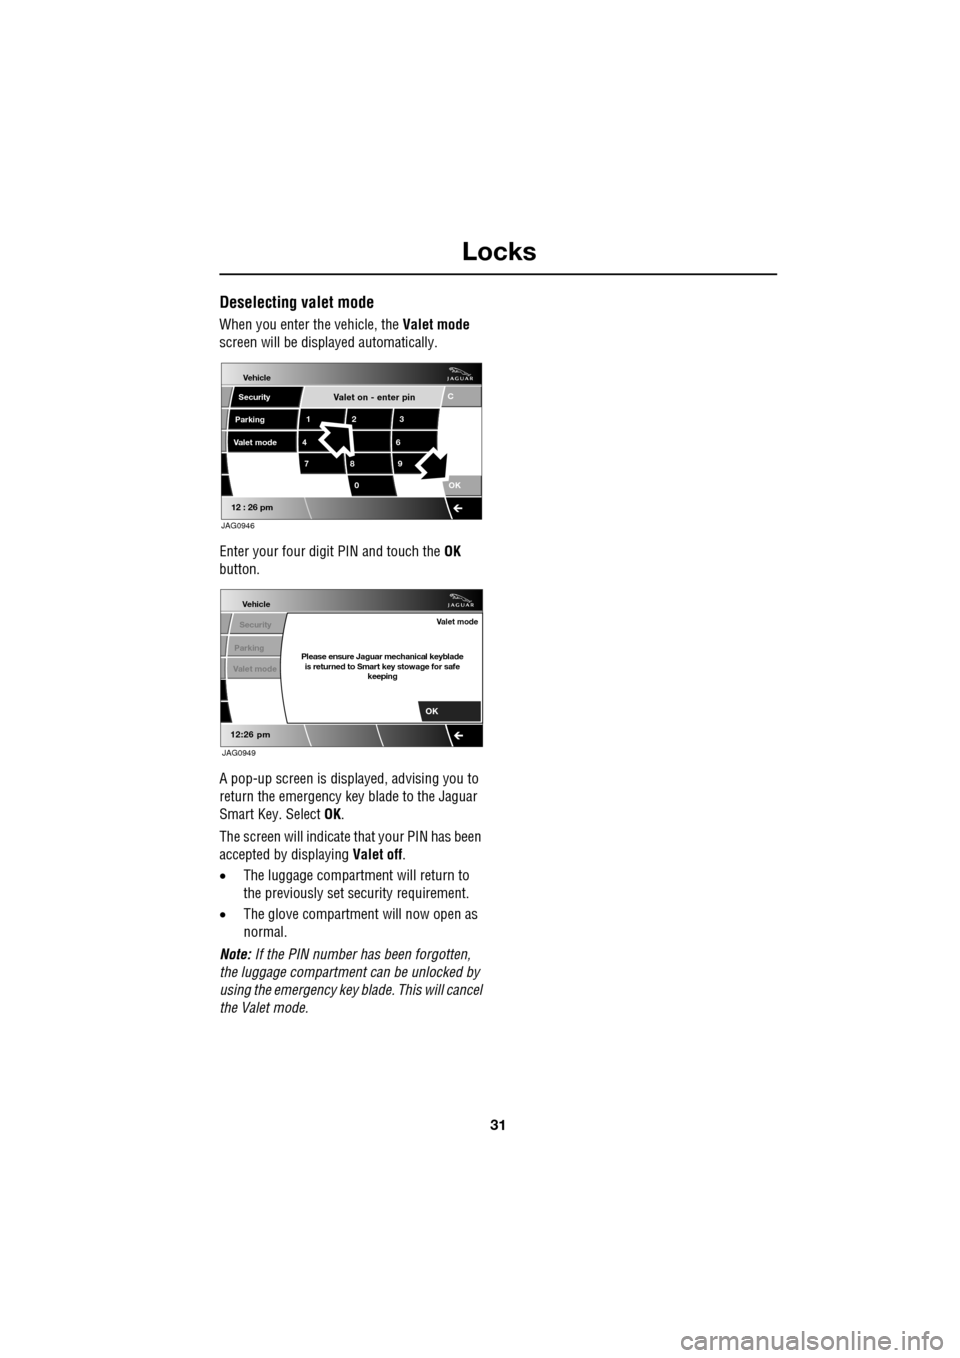
When you enter the vehicle, the Valet mode
screen will be displayed automatically.
Enter your four digit PIN and touch the OK
button.
A pop-up screen is displayed, advising you to
return the emergency key blade to the Jaguar
Smart Key. Select OK.
The screen will indicate that your PIN has been
accepted by displaying Valet off.
• The luggage compartment will return to
the previously set se curity requirement.
• The glove compartment will now open as
normal.
Note: If the PIN number ha s been forgotten,
the luggage compartment can be unlocked by
using the emergency key blade. This will cancel
the Valet mode.
Valet on - enter pin
Vehicle
Security
Parking
12 3
4 6
78 9
0 C
OK
12 : 26 pm
Valet mode
JAG0946
Vehicle
Security
Parking
12:26 pm
Valet modePlease ensure Jaguar mechanical keyblade is returned to Smart key stowage for safe keeping
Valet mode
OK
JAG0949
Page 39 of 391

39
Alarm
Alarm trigger information
If you have reason to believe that the alarm was
triggered when you were away from the
vehicle, it is possible to check on your return
using the touch-screen.
From the touch-screen Home menu, select
Vehicle and then Veh. settings . The Security
menu is displayed automatically as the default.
Use the arrow icons to scroll to the second
screen.
A text display (arrowed) will indicate if the
alarm has been triggere d, and also indicate
what the cause of the trigger was (e.g. Driver
door, Passenger door, Inclination sensor,
Trunk, etc.).
SECURITY SENSORS
Note: If the vehicle is to be transported by
road, rail or sea, the vehicle should not be
double-locked or the tilt and intrusion sensors
should be deactivated using the touch-screen.
See PROGRAMMING THE REMOTE CONTROL
(page 21). This prevents the alarm from
sounding as the vehi cle pitches and rolls.
Tilt sensor
The tilt sensor detect s any change in the
vehicle's inclination to the ground. When the
alarm is armed and the vehicle double-locked,
any change in the vehicle's inclination will
activate the tilt alarm. This feature protects
against unauthorised towing away or
jacking-up of the vehicle.
The tilt alarm is disarmed when the vehicle
security system is disarmed using the Jaguar
Smart Key.
Intrusion sensor
The intrusion sensor is mounted in the roof
console and detects any movement within the
vehicle cabin via the use of ultrasonic sound
waves. When the alarm is armed and the
vehicle double-locked, an y movement detected
inside the cabin will activate the alarm.
Note: It takes approximately 30 seconds for
the sensor to create an ultrasonic profile of the
cabin and be fully armed.
The intrusion alarm is disarmed when the
vehicle security system is disarmed using the
Jaguar Smart Key.
Note: Ensure all windows and sunroof are
closed prior to arming the alarm and
double-locking the vehicl e. Failure to do so
may result in false al arms being sounded due
to movements detected outside the vehicle.
Vehicle
Security
Parking
Passive armf On
Alarm sensors Of f On
12:26 pm
Off On
Auto-relock and
armValet mode
Passenger door
Alarm triggered by:
JAG1309
Page 96 of 391

Windows and mirrors
96
Automatic folding
The mirrors can be configured to automatically
fold when the vehicle is locked and unfold
when unlocked.
Note: If the mirrors were folded using the
switches, they will not unfold when the vehicle
is unlocked.
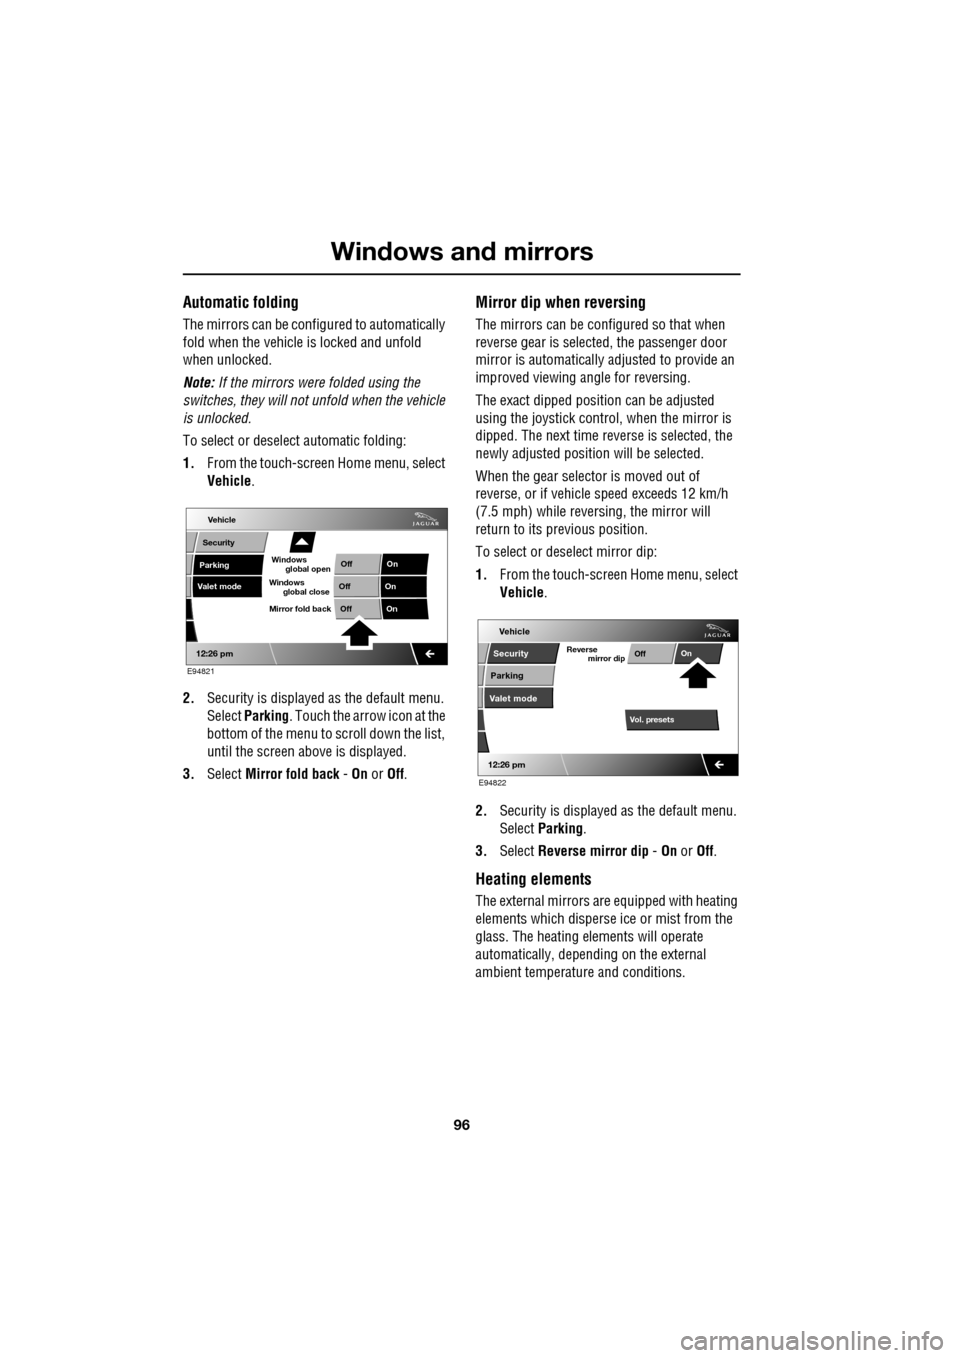
To select or deselect automatic folding:
1. From the touch-screen Home menu, select
Vehicle .
2. Security is displayed as the default menu.
Select Parking . Touch the arrow icon at the
bottom of the menu to scroll down the list,
until the screen a bove is displayed.
3. Select Mirror fold back - On or Off.
Mirror dip when reversing
The mirrors can be configured so that when
reverse gear is select ed, the passenger door
mirror is automatically adjusted to provide an
improved viewing a ngle for reversing.
The exact dipped positi on can be adjusted
using the joystick contro l, when the mirror is
dipped. The next time reverse is selected, the
newly adjusted position will be selected.
When the gear selector is moved out of
reverse, or if vehicle speed exceeds 12 km/h
(7.5 mph) while revers ing, the mirror will
return to its previous position.
To select or deselect mirror dip:
1. From the touch-screen Home menu, select
Vehicle .
2. Security is displayed as the default menu.
Select Parking .
3. Select Reverse mirror dip - On or Off.
Heating elements
The external mirrors are equipped with heating
elements which disperse ice or mist from the
glass. The heating el ements will operate
automatically, depending on the external
ambient temperatur e and conditions.
Vehicle
Valet mode
Security
Parking Off
On
Off On
12:26 pm
OffOn
Mirror fold back
E94821
global open
Windows
global close
Windows
mirror dip
Vol. presetsOff
On
Vehicle
Security
Parking
Valet mode
Reverse
12:26 pm
E94822
Page 109 of 391

109
Information displays
TOUCH-SCREEN
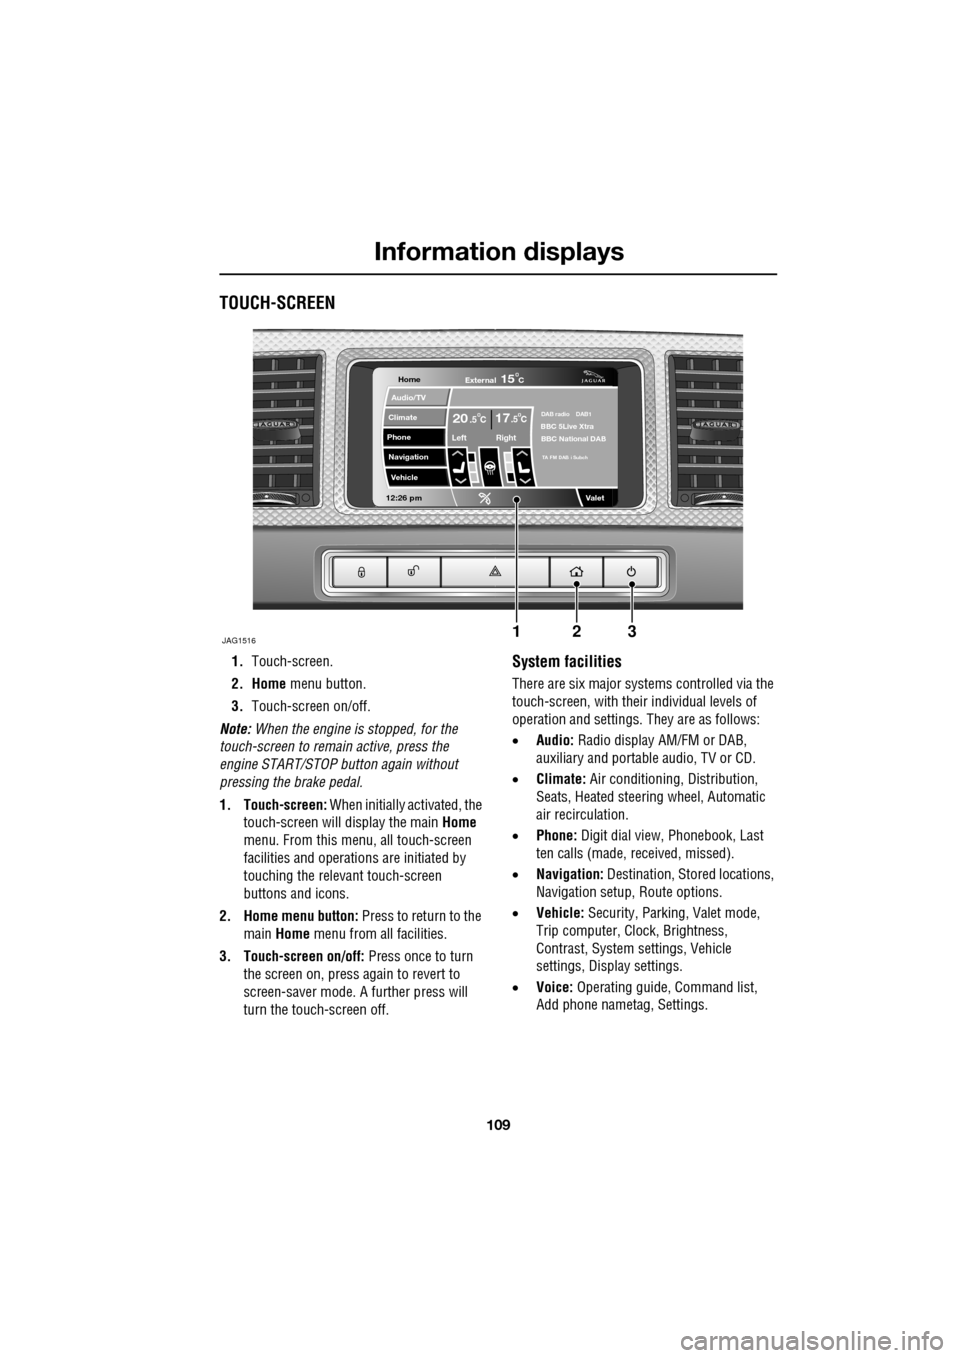
1.Touch-screen.
2. Home menu button.
3. Touch-screen on/off.
Note: When the engine is stopped, for the
touch-screen to remain active, press the
engine START/STOP button again without
pressing the brake pedal.
1. Touch-screen: When initially activated, the
touch-screen will display the main Home
menu. From this menu, all touch-screen
facilities and operati ons are initiated by
touching the relevant touch-screen
buttons and icons.
2. Home menu button: Press to return to the main Home menu from all facilities.
3. Touch-screen on/off: Press once to turn
the screen on, press again to revert to
screen-saver mode. A further press will
turn the touch-screen off.System facilities
There are six major systems controlled via the
touch-screen, with their individual levels of
operation and settings. They are as follows:
• Audio: Radio display AM/FM or DAB,
auxiliary and portable audio, TV or CD.
• Climate: Air conditioning, Distribution,
Seats, Heated steering wheel, Automatic
air recirculation.
• Phone: Digit dial view, Phonebook, Last
ten calls (made, received, missed).
• Navigation: Destination, St ored locations,
Navigation setup, Route options.
• Vehicle: Security, Parking, Valet mode,
Trip computer, Clock, Brightness,
Contrast, System settings, Vehicle
settings, Displa y settings.
• Voice: Operating guide, Command list,
Add phone nametag, Settings.
Home
Audio/TV
Climate
Phone
Navigation
Vehicle
Valet12:26 pm
JAG1516
External15C
Left Right
20 17CC.5 .5DAB radio DAB1BBC 5Live Xtra
BBC National DAB
TA FM DAB i Subch
123
Page 110 of 391

Information displays
110
Touch-screen use
When the engine START/STOP button is
pressed, the touch-screen is activated by the
on/off switch on the centre console.
The buttons on the centre console, below the
touch-screen display, are referred to as hard
buttons and should be pressed firmly. The
touch-screen buttons are soft buttons and only
require short, light pressu re to function. Do not
use excessive pressure.
When operating touch-sc reen buttons, always
extend the tip of one finger, and withhold the
thumb and remaining finge rs from the screen.
Touching the screen with more than one finger
at a time may cause false inputs.
Throughout the handbook, the expression
Select an item (or similar wording) means
touch the on-screen button to select or alter
the required item.
The handbook shows the on-screen menus,
explains how to oper ate the controls and
illustrates how to select or alter settings and
requirements. After becoming familiar with the
controls, follow the on-screen menus and
prompts, to operate th e system as required.
Touch-screen display icons
Touch-screen display icons are as follows
(they may not all be displayed at the same
time):WARNING
In the interest of road safety, only
operate, adjust or view the system
when it is safe to do so.
CAUTION
Always run the engine during prolonged
use of the touch-screen. Failure to do so
may discharge the vehicle battery, preventing
the engine from starting.
Return to the previous screen
displayed.
Warning triangle button indicating
an information or warning
message in the message centre.
Touch the button to temporarily remove the
warning message from the message centre
display. See WARNING AND INFORMATION
MESSAGES (page 106).
Telephone: send button.
Telephone: end call.
Page up or increase setting to
required value.
Page down or decrease setting to
required value.
Direct access to the valet mode
setting screen.
Telephone signal strength
indicator (if supported by
Bluetooth phone).
Telephone battery level indicator
(if supported by Bluetooth phone).
No phone connected.
Valet
Page 111 of 391

111
Information displays
Touch-screen care
Do not use any abrasive cleaners to clean your
touch-screen. For approved screen cleaners,
you should contact your Dealer/Authorised
Repairer.
The touch-screen inner bezel must be kept
clean to maintain optimum performance.
Finger marks and attracted dust should be
regularly removed usi ng a soft cloth and a
Jaguar approved cleaning agent.
Where possible, avoid exposing the
touch-screen to dire ct sunlight for long
periods.
PERSONALISED SETTINGS
General Information
The touch-screen provides touch-control of the
vehicle Audio, Climate, Phone, Navigation and
Vehicle systems, as fitted.
Note: When the engine is stopped, the
touch-screen reverts to the stand-by mode. To
activate the touch-screen press the engine
Start/Stop button again.
Home menu display
When initially activated, the touch-screen will
display the main Home menu. The Home menu
may also be displayed at any time by pressing
the Home button on the screen surround.
Screen settings: The touch-screen brightness
and contrast can be set to individual
requirements, including dimming for night
driving. This is accessed via the Vehicle menu.
Select Cont./Bright .
Auto dimming: Select Auto dimming On.
Brightness and contra st are automatically
adjusted by the ambient light level. As the light
level decreases, the t ouch-screen brightness
will decrease, until the fu ll night screen level of
brightness is initiated.
CAUTION
Care must be taken to avoid spilling or
splashing fluids onto the touch-screen.Home
Audio/TV
Climate
Phone
Navigation
Vehicle
Valet12:26 pm
External15C
Left Right
20 17CC.5 .5DAB radio DAB1BBC 5Live Xtra
BBC National DAB
TA FM DAB i Subch.
JAG1517
Vehicle
Off On
Auto
Trip computer
Clock adjust
Cont./Bright.
Syst. settings
Veh. settings Contrast
12:26 pm
dimming
Brightness
JAG1416
Page 119 of 391

119
Climate control
Touch-screen operation
Certain functions of the climate control system
are adjusted using the Climate menu on the
touch-screen.
Select Climate from the Home menu.
The climate main menu is displayed, from
which the climate cont rol settings can be
adjusted.
Climate control display icons
The climate control display buttons and icons
are as follows:
Home
Audio/TV
Climate
Phone
Navigation
Vehicle
Valet12:26 pm
External15C
t Right
20 17CC.5 .5DAB radio DAB1BBC 5Live Xtra
BBC National DAB
TA FM DAB i Subch.
JAG1518
Settings
Temp. sync. External
12C
Auto
21 21C.5 C
Auto
A/C
OFF
.5
Climate
12 : 26 pm
Auto
E95094
Auto climate control
on.
Air distribution to
windscreen.
Air distribution to
face.
Air distribution to feet.
Synchronizes the
passenger's climate
control zone to the
driver's settings.
Blower speed control decrease and increase. Access to the Settings
control menu to set
the vent rotation
mode, to adjust
personal climate zone se ttings and also to
access the automatic air recirculation sensor
control setting.Auto
Temp. sync.
Settings
Page 125 of 391

125
Convenience features
AUXILIARY POWER SOCKETS
The auxiliary power socket is located in the
cubby box.
GLOVE BOX
The glove box is opened using the
JaguarSense proximity sensor on the fascia
(arrowed). To open the glove box, place the tip
of your finger close to and directly over the
sensor, as shown in the left-hand inset of the
illustration.
The sensor is able to distinguish between a
finger approach and an accidental finger rub
approach from a knee or other large items,
including being wiped for cleaning purposes.
Under these conditions, the sensor will not
react to the input and th e glove box will remain
closed.
Note: When the vehicle alarm is armed or Valet
mode is selected, the proximity sensor is
disabled, preventing the glove box from being
opened.
Note: The wearing of gloves may interfere with
the operation of the prox imity sensor. If gloves
are worn, it may be necessary to touch the
sensor to open the glove box.
CAUTIONS
Only Jaguar approv ed accessories
should be plugged into the power
sockets. Using any other equipment may
damage the vehicle's electrical system. If you
are in any doubt contact your Dealer/
Authorised Repairer.
The engine should be running when
using accessories for long periods.
Failure to do so can discharge the battery.
E95111
JAG1653