Page 3867 of 4171

TRANSMISSION ASSEMBLYTM-219
< REMOVAL AND INSTALLATION >
CEF
G H
I
J
K L
M A
B
TM
N
O P
INSPECTION
Installation and Inspection of Torque Converter
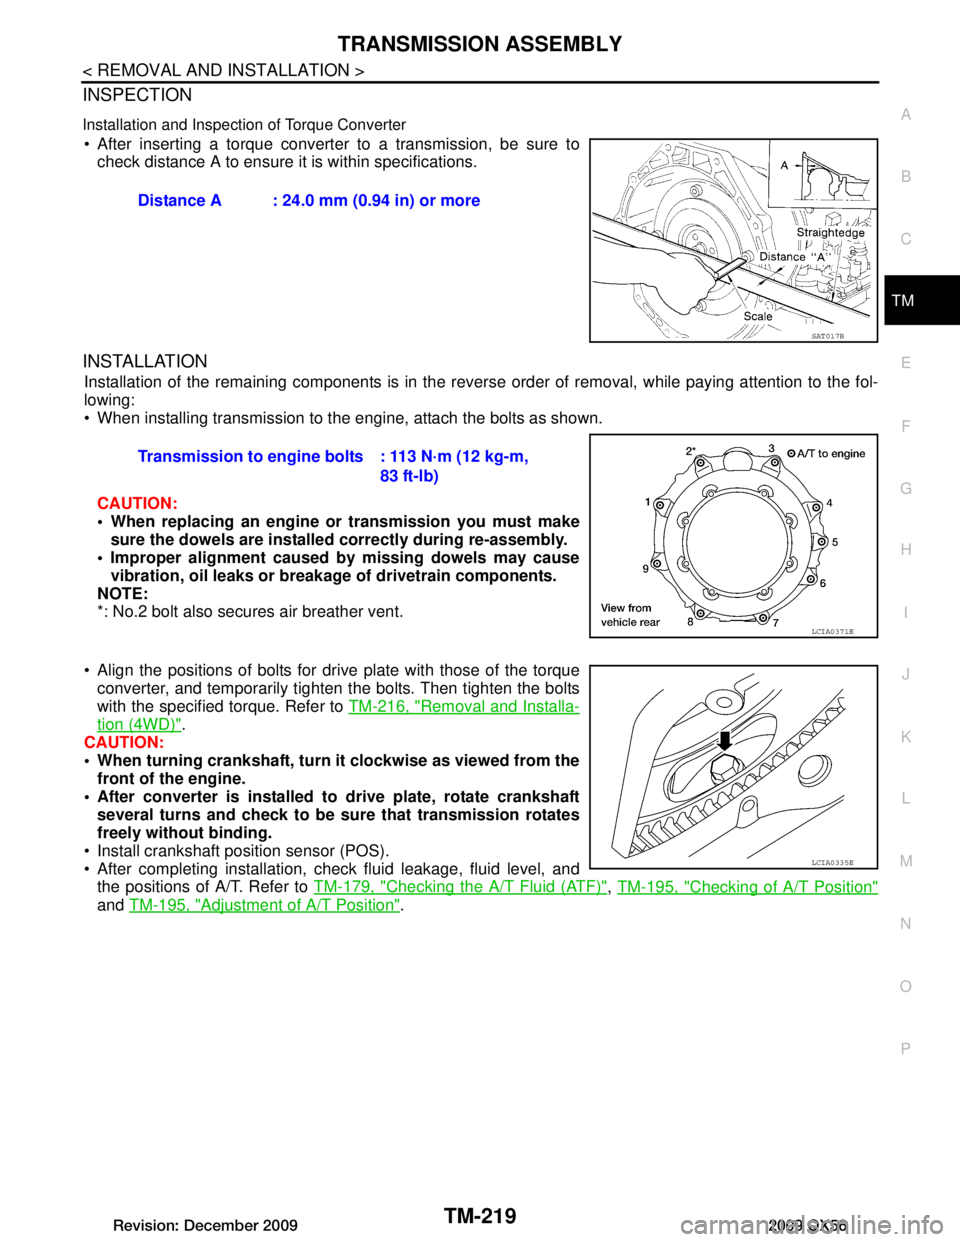
After inserting a torque converter to a transmission, be sure to check distance A to ensure it is within specifications.
INSTALLATION
Installation of the remaining components is in the revers e order of removal, while paying attention to the fol-
lowing:
When installing transmission to the engine, attach the bolts as shown.
CAUTION:
When replacing an engine or transmission you must make sure the dowels are installed correctly during re-assembly.
Improper alignment caused by missing dowels may cause vibration, oil leaks or breakage of drivetrain components.
NOTE:
*: No.2 bolt also secures air breather vent.
Align the positions of bolts for dr ive plate with those of the torque
converter, and temporarily tighten the bolts. Then tighten the bolts
with the specified torque. Refer to TM-216, "Removal and Installa-
tion (4WD)".
CAUTION:
When turning crankshaft, turn it clockwise as viewed from the
front of the engine.
After converter is installed to drive plate, rotate crankshaft
several turns and check to be sure that transmission rotates
freely without binding.
Install crankshaft position sensor (POS).
After completing installation, check fluid leakage, fluid level, and the positions of A/T. Refer to TM-179, "Checking the A/T Fluid (ATF)"
, TM-195, "Checking of A/T Position"
and TM-195, "Adjustment of A/T Position".
Distance A : 24.0 mm (0.94 in) or more
SAT017B
Transmission to engine bolts : 113 N·m (12 kg-m,
83 ft-lb)
LCIA0371E
LCIA0335E
Revision: December 20092009 QX56
Page 3872 of 4171
TM-224
< DISASSEMBLY AND ASSEMBLY >
OVERHAUL
4WD
16. Bearing race 17. Needle bearing 18. Manual plate
19. Parking rod 20. Manual shaft oil seal 21. Manual shaft
22. O-ring 23. Band servo anchor end pin 24. Detent spring
25. Spacer 26. Seal ring 27. Snap ring
28. Return spring 29. O-ring 30. Servo assembly
31. Snap ring 32. Sub-harness 33. Control valve with TCM
34. Bracket 35. A/T fluid temperature sensor 2 36. A/T assemblt harness connector
37. O-ring 38. Retaining pin 39. Transmission case
*: Apply Genuine Anaerobic Liquid Gasket or equivalent.
Revision: December 20092009 QX56
Page 3876 of 4171
TM-228
< DISASSEMBLY AND ASSEMBLY >
OVERHAUL
4WD models
SCIA5189E
Revision: December 20092009 QX56
Page 3878 of 4171
TM-230
< DISASSEMBLY AND ASSEMBLY >
OVERHAUL
VK56DE models 4WD
10. Outer diameter 80 mm (3.15 in) 11. Outer diameter 77 mm (3.03 in) 12. Outer diameter 77 mm (3.03 in)
13. Outer diameter 47 mm (1.85 in) 14. Outer diameter 84 mm (3.31 in) 15. Outer diameter 84 mm (3.31 in)
16. Outer diameter 92 mm (3.62 in) 17. Outer diameter 60 mm (2.36 in) 18. Outer diameter 63 mm (2.48 in)
19. Outer diameter 92 mm (3.62 in) 20. Outer diameter 65 mm (2.56 in) 21. Bearing race
22. Outer diameter 60 mm (2.36 in)
WCIA0561E
Revision: December 20092009 QX56
Page 3888 of 4171
TM-240
< DISASSEMBLY AND ASSEMBLY >
DISASSEMBLY
40. Disconnect TCM connectors.CAUTION:
Do not damage connectors.
41. Remove A/T assembly harness connector from control valve with TCM using suitable tool.
42. Disconnect TCM connector and transmission range switch con- nector.
CAUTION:
Do not damage connectors.
43. Remove rear extension assembly (2WD models) or adapter case assembly (4WD models) according to the following procedures.
a. 2WD models
i. Remove bolts (1 brackets) for rear extension assembly and transmission case.
Self-sealing bolts (2)
SCIA5447E
SCIA5448E
SCIA5449E
WCIA0562E
Revision: December 20092009 QX56
Page 3889 of 4171
DISASSEMBLYTM-241
< DISASSEMBLY AND ASSEMBLY >
CEF
G H
I
J
K L
M A
B
TM
N
O P
ii. Tap rear extension assembly with soft hammer.
iii. Remove rear extension assembly (with needle bearing) from transmission case.
b. 4WD models
i. Remove adapter case to transmission case bolts and terminal bracket (1).
Self-sealing bolt (2)
ii. Tap adapter case assembly using suitable tool.
SCIA5028E
SCIA5029E
WCIA0563E
SCIA5201E
Revision: December 20092009 QX56
Page 3895 of 4171
DISASSEMBLYTM-247
< DISASSEMBLY AND ASSEMBLY >
CEF
G H
I
J
K L
M A
B
TM
N
O P
67. Remove snap ring from transmission case using suitable tool.
68. Remove servo assembly (with return spring) from transmission case.
69. Remove return spring from servo assembly.
70. Remove O-rings from servo assembly.
71. Remove needle bearing (1) from rear extension (2WD models) or adapter case (4WD models).
SCIA2333E
SCIA5679E
SCIA5717E
SCIA5719E
SCIA6179J
Revision: December 20092009 QX56
Page 3896 of 4171
TM-248
< DISASSEMBLY AND ASSEMBLY >
DISASSEMBLY
72. Remove parking actuator support from rear extension (2WD
models) or adapter case (4WD models).
73. Remove parking pawl (with return spring) and pawl shaft from rear extension (2WD models) or adapter case (4WD models).
74. Remove return spring (1) from parking pawl (2).
75. Remove rear oil seal from rear extension (2WD models) or adapter case (4WD models) using suitable tool.
CAUTION:
Do not scratch rear extension (2WD models) or adapter
case (4WD models).
SCIA3423E
SCIA3424E
SCIA6180J
SCIA5272E
Revision: December 20092009 QX56