2009 HYUNDAI TUCSON instrument panel
[x] Cancel search: instrument panelPage 54 of 273
1
FEATURES OF YOUR HYUNDAI
43
!
!
NOTE:The PASSENGER AIR BAG "OFF" indi-
cator illuminates for about 4 seconds
after the ignition key is turned to the
"ON" position or after the engine is
started. If the front passenger seat is
occupied, the occupant classification
sensor will then classify the front pas-
senger after several more seconds.
CAUTION:
If the occupant classification system is
not working properly, the SRS airbag
warning light on the instrument panel
will illuminate because the passenger's
front airbags are connected with the
occupant classification system. If there
is a malfunction of the occupant classi-
fication system, the PASSENGER AIR
BAG "OFF" indicator will illuminate and
the passenger's front airbags will not
inflate in frontal impact crashes even if
there is adult occupant in the front
passenger's seat. If the SRS airbag warn-
ing light does not illuminate when the
ignition key is turned to the "ON" posi-
tion, remains illuminated after approxi-
mately 6 seconds when the ignition key
is turned to the "ON" position, or if it
illuminates while the vehicle is being
driven, have an authorized Hyundai
dealer inspect the occupant classifica-
tion system and the SRS airbag system
as soon as possible.
WARNING:
Do not allow an adult passenger to ride
in the front seat when the PASSENGER
AIRBAG "OFF" indicator is illuminated,
because the airbag will not deploy in the
event of a crash. If the PASSENGER AIR
BAG "OFF" indicator remains illumi-
nated after the passenger repositions
themselves properly and the car is re-
started, Hyundai recommends that pas-
senger move to the rear seat because
the passenger's front airbag will not de-
ploy.
Front seat passengers must stay prop-
erly seated to avoid serious injury from
a deploying airbag. For more informa-
tion see page 1-38. When an adult is seated in the front passen-
ger seat, if the PASSENGER AIR BAG "OFF"
indicator is on, turn the ignition key to "LOCK"
and ask the passenger to sit properly (sitting
upright with the seat back in an upright
position, centered on the seat cushion with
their seat belt on, legs comfortably extended
and their feet on the floor). Restart the
engine and have the person remain in that
position. This will allow the system to detect
the person and to enable the passenger
airbag. If the PASSENGER AIR BAG "OFF"
indicator is still on, ask the passenger to
move to the rear seat.
!
WARNING:
o Even though your vehicle is equipped
with the occupation classification sys-
tem, never install a child restraint
system in the front passenger's seat.
A deploying airbag can forcefully
strike a child resulting in serious inju-
ries or death. Any child under 13
years of age should ride in the rear
seat. Children too large for child re-
straints should use the available lap/
shoulder belts. No matter what type
of crash, children of all ages are safer
when restrained in the rear seat.
o If the PASSENGER AIR BAG "OFF"
indicator is illuminated when the front
passenger's seat is occupied by an
adult and he/she sits properly (sitting
upright with the seatback in an upright
position, centered on the seat cush-
ion with their seat belt on, legs com-
fortably extended and their feet on the
floor), have that person sit in the rear
seat.
o Do not modify or replace the front
passenger seat. Don't place anything
on or attach anything such as a blan-
ket or after market seat heater to the
front passenger seat. This can ad-
versely affect the occupant classifi-
cation system.
Page 57 of 273
1FEATURES OF YOUR HYUNDAI46
!
o If components of the airbag system
must be discarded, or if the vehicle
must be scrapped, certain safety pre-
cautions must be observed. Your
Hyundai dealer knows these precau-
tions and can give you the necessary
information. Failure to follow these
precautions and procedures could
increase the risk of personal injury.
o If your car was flooded and has soaked
carpeting or water on the floor, don't
try to start the engine; have the car
towed to an authorized Hyundai dealer.
o Do not replace the bumper or the
bumper guard with the one other than
the Hyundai genuine parts. Otherwise,
it can adversely affect SRS perfor-
mance and lead to an increased risk
of injury.
WARNING:
o For cleaning the airbag pad covers,
use only a soft, dry cloth or one which
has been moistened with plain water.
Solvents or cleaners could adversely
affect the airbag covers and proper
deployment of the system.
o No objects should be placed over or
near the airbag modules on the steer-
ing wheel, instrument panel, and the
front passenger's panel above the
glove box, because any such object
could cause harm if the vehicle is in a
crash severe enough to cause the
airbags to inflate.
o If the airbags inflate, they must be
replaced by an authorized Hyundai
dealer.
o Do not tamper with or disconnect SRS
wiring, or other components of the
SRS system. Doing so could result in
injury, due to accidental inflation of
the airbags or by rendering the SRS
inoperative.
!
WARNING:
!
WARNING:
o Do not install a child restraint system
in the front passenger seat position.
A child restraint system must never
be placed in the front seat. The infant
or child could be severely injured or
killed by an airbag deployment in
case of an accident.
o Modification to SRS components or
wir-ing, including the addition of any
kind of badges to the pad covers or
modifications to the body structure,
can adversely affect SRS perfor-
mance and lead to possible injury.B240C02JM-AATSRS Careo The SRS is virtually maintenance free
and there are no parts you can safely
service by yourself. If the SRS SRI (Ser-
vice Reminder Indicator) does not illu-
minate, or continuously remains on,
have your vehicle immediately in-
spected by your Hyundai dealer.
o Any work on the SRS system, such as
removing, installing, repairing, or any
work on the steering wheel must be
performed by a qualified Hyundai tech-
nician. Improper handling of the airbag
system may result in serious personal
injury.
Page 70 of 273
1
FEATURES OF YOUR HYUNDAI
59
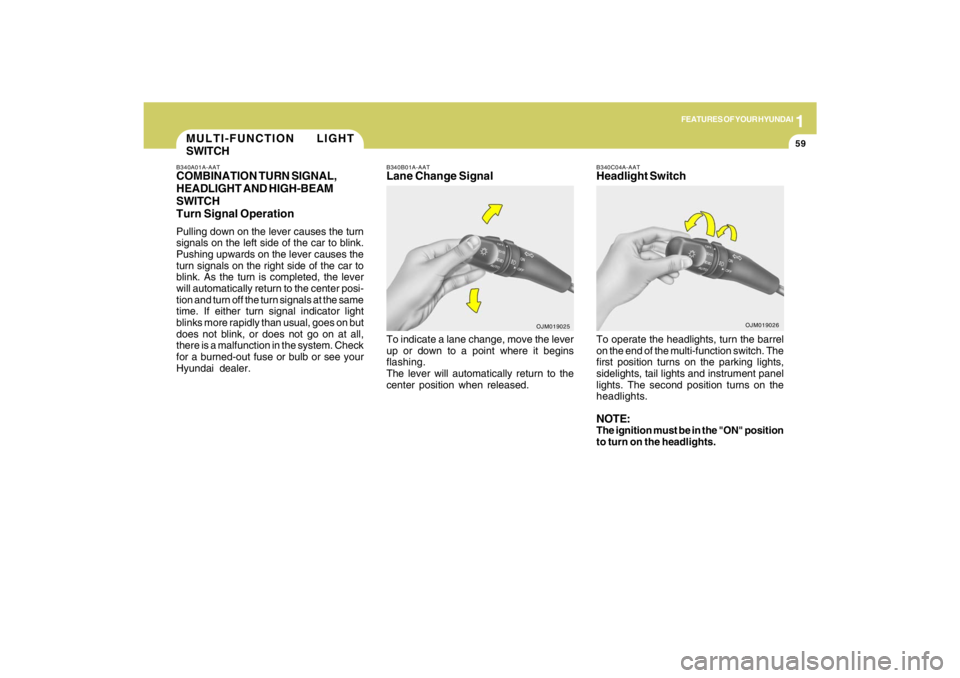
B340C04A-AATHeadlight SwitchTo operate the headlights, turn the barrel
on the end of the multi-function switch. The
first position turns on the parking lights,
sidelights, tail lights and instrument panel
lights. The second position turns on the
headlights.NOTE:The ignition must be in the "ON" position
to turn on the headlights.
OJM019026
MULTI-FUNCTION LIGHT
SWITCHB340A01A-AATCOMBINATION TURN SIGNAL,
HEADLIGHT AND HIGH-BEAM
SWITCH
Turn Signal OperationPulling down on the lever causes the turn
signals on the left side of the car to blink.
Pushing upwards on the lever causes the
turn signals on the right side of the car to
blink. As the turn is completed, the lever
will automatically return to the center posi-
tion and turn off the turn signals at the same
time. If either turn signal indicator light
blinks more rapidly than usual, goes on but
does not blink, or does not go on at all,
there is a malfunction in the system. Check
for a burned-out fuse or bulb or see your
Hyundai dealer.
B340B01A-AATLane Change SignalTo indicate a lane change, move the lever
up or down to a point where it begins
flashing.
The lever will automatically return to the
center position when released.
OJM019025
Page 77 of 273
1FEATURES OF YOUR HYUNDAI66
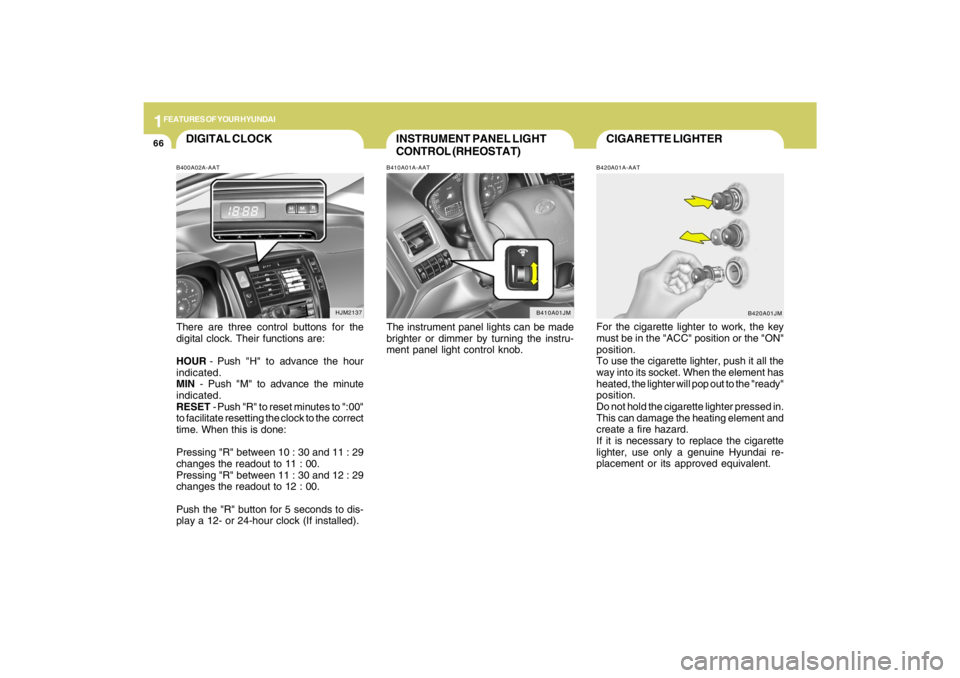
CIGARETTE LIGHTERB420A01A-AATFor the cigarette lighter to work, the key
must be in the "ACC" position or the "ON"
position.
To use the cigarette lighter, push it all the
way into its socket. When the element has
heated, the lighter will pop out to the "ready"
position.
Do not hold the cigarette lighter pressed in.
This can damage the heating element and
create a fire hazard.
If it is necessary to replace the cigarette
lighter, use only a genuine Hyundai re-
placement or its approved equivalent.
B420A01JM
INSTRUMENT PANEL LIGHT
CONTROL (RHEOSTAT)B410A01A-AATThe instrument panel lights can be made
brighter or dimmer by turning the instru-
ment panel light control knob.
B410A01JM
DIGITAL CLOCKB400A02A-AATThere are three control buttons for the
digital clock. Their functions are:
HOUR - Push "H" to advance the hour
indicated.
MIN - Push "M" to advance the minute
indicated.
RESET - Push "R" to reset minutes to ":00"
to facilitate resetting the clock to the correct
time. When this is done:
Pressing "R" between 10 : 30 and 11 : 29
changes the readout to 11 : 00.
Pressing "R" between 11 : 30 and 12 : 29
changes the readout to 12 : 00.
Push the "R" button for 5 seconds to dis-
play a 12- or 24-hour clock (If installed).
HJM2137
Page 247 of 273
8
CONSUMER INFORMATION, REPORTING SAFETY DEFECTS & BINDING ARBITRATION OF WARRANTY CLAIMS2
ENGINE NUMBER
VEHICLE IDENTIFICATION
NUMBER (VIN)
I010B01A-AAT I010A02JM-AAT
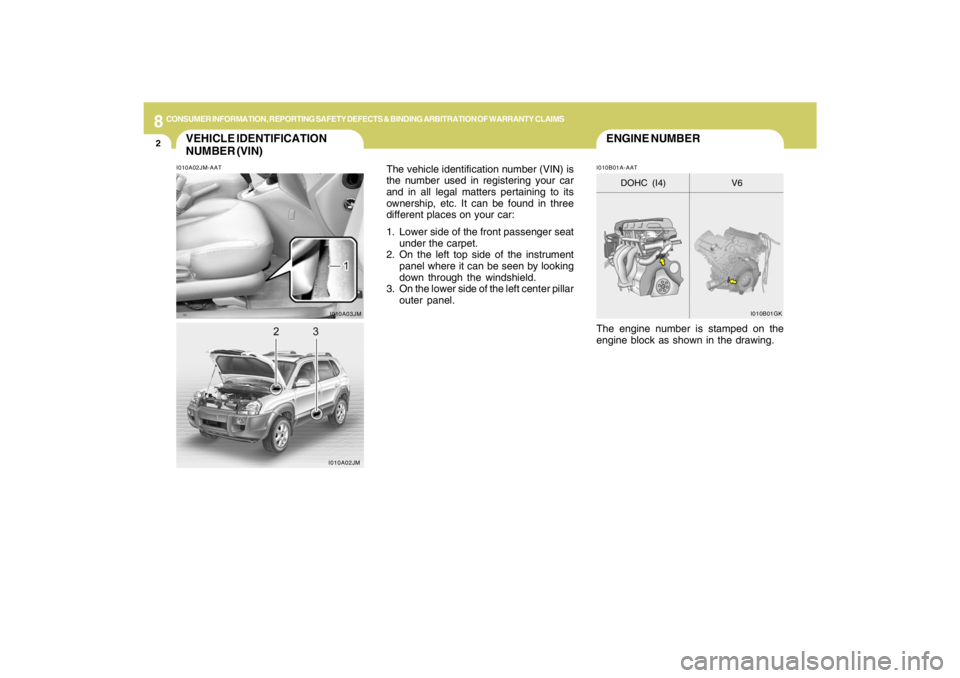
The vehicle identification number (VIN) is
the number used in registering your car
and in all legal matters pertaining to its
ownership, etc. It can be found in three
different places on your car:
1. Lower side of the front passenger seat
under the carpet.
2. On the left top side of the instrument
panel where it can be seen by looking
down through the windshield.
3. On the lower side of the left center pillar
outer panel.
The engine number is stamped on the
engine block as shown in the drawing.
I010A03JMI010B01GK
V6 DOHC (I4)
I010A02JM
Page 270 of 273

10
INDEX
3
Drive Belts.........................................................................................6-20
Driving
Driving for economy .....................................................................2-22
Smooth cornering.........................................................................2-23
Winter driving...............................................................................2-23
E
Emission Control System ................................................................... 7-2
Engine
Before starting the engine .............................................................. 2-4
Compartment................................................................................. 6-2
Coolant........................................................................................... 6-8
If the engine overheats .................................................................. 3-4
Number........................................................................................... 8-2
Oil ................................................................................................... 6-5
Starting........................................................................................... 2-6
Engine Exhaust Can Be Dangerous .................................................. 2-2
F
4WD Lock System ............................................................................2-19
Fan Speed Control............................................................................1-94
Floor Mat Anchor ..............................................................................1-86
Fog Light
Front.............................................................................................1-64
Front Seats
Adjustable front seats ..................................................................1-13
Adjustable headrests...................................................................1-14
Adjusting seat forward and rearward..........................................1-13
Adjusting seatback angle .............................................................1-13
Fuel
Capacity......................................................................................... 9-2
Gauge...........................................................................................1-55
Recommendations......................................................................... 1-2Fuel Filler Lid
Remote release............................................................................1-83
Full-time 4WD Operation..................................................................2-16
Fuses ................................................................................................6-21
Fuse panel description......................................................................6-35
G
General Checks.................................................................................. 6-4
Glove Box..........................................................................................1-72
H
Hazard Warning System ..................................................................1-64
Heating and Cooling Control.............................................................1-93
Heating and Ventilation
Air flow control..............................................................................1-95
Air intake control switch ............................................................1-105
Bi-level heating.............................................................................1-99
Defrosting / Defogging ..............................................................1-101
Fan speed control (Blower control).............................................1-94
Temperature control....................................................................1-98
High-Mounted Rear Stop Light .........................................................1-83
Hood Release....................................................................................1-85
Horn.................................................................................................1-88
How to Use Luggage Room.............................................................1-80
I
Ignition Switch ...................................................................................... 2-5
Instrument Cluster and Indicator Lights...........................................1-48
Instrument Panel Light Control (Rheostat).......................................1-66
Interior Light.......................................................................................1-71
J
Jump Starting...................................................................................... 3-3