Page 79 of 286

1FEATURES OF YOUR HYUNDAI66
INSTRUMENT PANEL LIGHT
CONTROL (RHEOSTAT)B410A01A-AATThe instrument panel lights can be made
brighter or dimmer by turning the instrument
panel light control knob.
CIGARETTE LIGHTERB420A02A-AATFor the cigarette lighter to work, the key
must be in the "ACC" position or the "ON"
position.
To use the cigarette lighter, push it all the
way into its socket. When the element has
heated, the lighter will pop out to the "ready"
position.
Do not hold the cigarette lighter pressed
in. This can damage the heating element
and create a fire hazard.
If it is necessary to replace the cigarette
lighter, use only a genuine Hyundai
replacement or its approved equivalent.
!
CAUTION:
Do not use electric accessories or equip-
ment other than the Hyundai genuine
parts in the socket.
ONF048039N
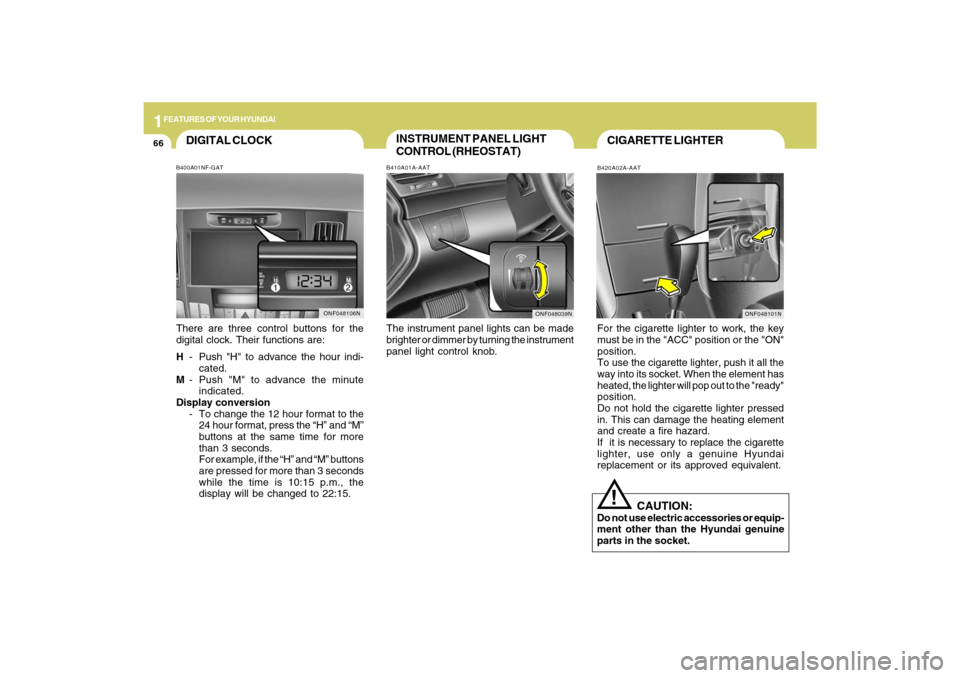
DIGITAL CLOCKB400A01NF-GATThere are three control buttons for the
digital clock. Their functions are:
H- Push "H" to advance the hour indi-
cated.
M- Push "M" to advance the minute
indicated.
Display conversion
- To change the 12 hour format to the
24 hour format, press the “H” and “M”
buttons at the same time for more
than 3 seconds.
For example, if the “H” and “M” buttons
are pressed for more than 3 seconds
while the time is 10:15 p.m., the
display will be changed to 22:15.
ONF048106N
ONF048101N
Page 81 of 286
1FEATURES OF YOUR HYUNDAI68
SEATBACK POCKETB540B01E-GAT(If Installed)
HNF2042
The seatback pockets for holding papers
are located on the backside of the front
seats.
!
CAUTION:
Place the drink holder in its closed
position while not in use.
HNF2185
B450B01NF-GATRear Drink HolderThe rear drink holder for holding cups or
cans is located in the center of the rear seat
armrest.
!
WARNING:
o Use caution when using the drink hold-
ers. A spilled beverage that is very
hot can injure you or your passen-
gers. Spilled liquids can damage
interior trim and electrical compo-
nents.
o Do not place objects other than cups
or cans in the drink holder. These
objects can be thrown out in the event
of a sudden stop or an accident,
possibly injuring the passengers in
the vehicle.
Page 83 of 286

1FEATURES OF YOUR HYUNDAI70
!
Manual tilt downTo close the sunroof, press the SLIDE
OPEN button on the overhead console
and hold it until the sunroof is closed.NOTE:After washing the car or after there is
rain, be sure to wipe off any water that is
on the sunroof before operating it.
WARNING:
o Do not close a sunroof if anyone's
hands, arms or body are between the
sliding glass and the sunroof sash, as
this could result in injury.
o Do not place your head or arms out of
the sunroof opening at any time.
o While the vehicle is moving, always
keep the head, hands and other parts
of the body of all occupants away
from the roof opening. Otherwise, you
could be seriously injured if the ve-
hicle stops suddenly or if the vehicle
is involved in an accident.
!
B460C01TG-GATTilting the Sunroof System
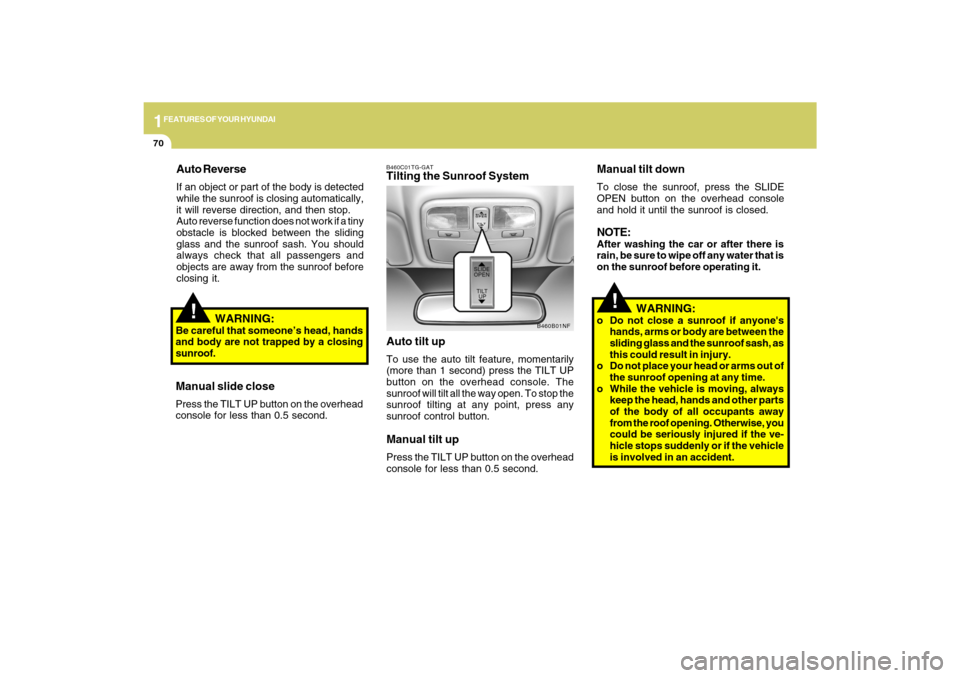
Auto tilt upTo use the auto tilt feature, momentarily
(more than 1 second) press the TILT UP
button on the overhead console. The
sunroof will tilt all the way open. To stop the
sunroof tilting at any point, press any
sunroof control button.Manual tilt upPress the TILT UP button on the overhead
console for less than 0.5 second.
Auto ReverseIf an object or part of the body is detected
while the sunroof is closing automatically,
it will reverse direction, and then stop.
Auto reverse function does not work if a tiny
obstacle is blocked between the sliding
glass and the sunroof sash. You should
always check that all passengers and
objects are away from the sunroof before
closing it.
WARNING:
Be careful that someone’s head, hands
and body are not trapped by a closing
sunroof.Manual slide closePress the TILT UP button on the overhead
console for less than 0.5 second.
B460B01NF
Page 84 of 286
1
FEATURES OF YOUR HYUNDAI
71
B460D01NF-AATManual Operation of SunroofIf the sunroof does not operate electrically:
1. Open the sunglass holder.
2. Remove the two mounting screws of the
front overhead console with a (+) driver.
HNF2028
!
CAUTION:
o Do not open the sunroof in severely
cold temperatures or when it is
covered with ice or snow.
o Periodically remove any dirt that may
have accumulated on the guide rails.
o Do not press any sunroof control
button longer than necessary.
Damage to the motor or system com-
ponents could occur.
3. Insert the hexagonal head wrench
provided with the vehicle into the socket.
This wrench can be found in the vehicle's
trunk or glove box.
4. Turn the wrench clockwise to open or
counterclockwise to close the sunroof.
HNF2029
Page 87 of 286
1FEATURES OF YOUR HYUNDAI74
The center console box is used for storing
cassette tapes or small articles.
To use the center console box, pull up the
handle and lift the lid as shown.CENTER CONSOLE
COMPARTMENTB505A01NF-GATCenter Console Box
ONF048098
B500B01HP-DATMULTI BOXTo open the cover, push the cover. It can be
used for storing small items.
B500B01NF-GATIlluminated Glove Box
(If Installed)Opening the glove box will automatically
turn on the light when the multi-function
switch is turned to the first position.
ONF048100N
Page 89 of 286
1FEATURES OF YOUR HYUNDAI76
The outside rearview mirror heater is actu-
ated in connection with the rear window de-
froster. To heat the outside rearview mirror
glass, push in the switch for the rear window
defroster. The rearview mirror glass will be
heated for defrosting or defogging and will
give you improved rear vision in inclement
weather conditions. Push the switch again to
turn the heater off. The outside rearview mirror
heater automatically turns itself off after 20
minutes.B510D01HP-AATOUTSIDE REARVIEW MIRROR
HEATER
DAY/NIGHT INSIDE REARVIEW
MIRRORB520A01A-AATManual TypeYour Hyundai is equipped with a day/night
inside rearview mirror. The "night" position
is selected by flipping the tab at the bottom
of the mirror toward you. In the "night"
position, the glare of headlights of cars
behind you is reduced.
B520A01NF
ONF048071NONF048072
With Manual A/C
With Automatic A/C
Page 90 of 286
1
FEATURES OF YOUR HYUNDAI
77
HOMELINK MIRRORB520C01NF-AATAutomatic-Dimming Mirror
with Z-Nav™ Electronic Compass
Display and HomeLink
® (If Installed)
Your vehicle comes with a Gentex Auto-
matic-Dimming Mirror with a Z-Nav™ Elec-
tronic Compass Display and an Integrated
HomeLink
® Wireless Control System.
During nighttime driving, this feature will
automatically detect and reduce rearview
mirror glare while the compass indicates
the direction the vehicle is pointed. The
HomeLink® Universal Transceiver allows
you to activate your garage door(s), electric
gate, home lighting, etc.
1. Channel 1 Button
2. Channel 2 Button
3. Status Indicator LED
4. Channel 3 Button5. Rear Light Sensor
6. Dimming On/Off Button
7. Compass Control Button
8. Display
B520C01NF
Page 91 of 286

1FEATURES OF YOUR HYUNDAI78
Automatic-Dimming Night Vision
Safety™ (NVS
®) Mirror
The NVS
® Mirror in your vehicle is the most
advanced way to reduce annoying glare in
the rearview mirror during any driving
situation. For more information regarding
NVS
® mirrors and other applications,
please refer to the Gentex website:
www.gentex.com. CAUTION:
The NVS
® Mirror automatically reduces
glare during driving conditions based
upon light levels monitored in front of the
vehicle and from the rear of the vehicle.
These light sensors are visible through
openings in the front and rear of the
mirror case. Any object that would
obstruct either light sensor will degrade
the automatic dimming control feature.
!
Automatic-Dimming Function
Your mirror will automatically dim upon
detecting glare from the vehicles traveling
behind you. The auto-dimming function
can be controlled by the Dimming ON/OFF
Button:
1. Pressing the
button turns the auto-
dimming function OFF which is
indicated by the green Status Indicator
LED turning off.
2. Pressing the button again turns the
auto-dimming function ON which is
indicated by the green Status Indicator
LED turning on.
NOTE:The mirror defaults to the "ON" position
each time the vehicle is started.Compass Function
The Compass can be turned ON and OFF
and will remember the last state when the
ignition is cycled. To turn the display
feature ON/OFF:
1. Press and release the
button to turn
the display feature OFF.
2. Press and release the button again
to turn the display back ON.
Additional options can be set with press
and hold sequences of the button and
are detailed below.
There is a difference between magnetic
north and true north. The compass in the
mirror can compensate for this difference
when it knows the Magnetic Zone in which
it is operating. This is set either by the dealer
or by the user. The operating Zone Numbers
for North America are shown in the figure on
the following section.
Z-Nav™ Compass DisplayThe NVS™ Mirror in your vehicle is also
equipped with a Z-Nav™ Compass that
shows the vehicle Compass heading in
the Display Window using the 8 basic
cardinal headings (N, NE, E, SE, etc.).