2009 Hyundai Sonata clock
[x] Cancel search: clockPage 223 of 286
6
DO-IT-YOURSELF MAINTENANCE
8
CHECKING AND CHANGING THE
ENGINE COOLANT!
G050A01A-AAT
WARNING:
Do not remove the radiator cap when the
engine is hot. When the engine is hot, the
engine coolant is under pressure and
may erupt through the opening if the cap
is removed. You could be seriously
burned if you do not observe this
precaution. Do not remove the radiator
cap until the radiator is cool to the touch.
!
5. Remove the oil filter by turning it counter-
clockwise with a oil filter wrench of the
proper size. A certain amount of oil will
come out when you remove the filter. So be
sure to have your drain pan in place
underneath it.
6. Install a new oil filter in accordance with the
instructions on the carton or on the filter
itself. Do not over-tighten.
Tightening torque:
8.7 ~ 11.6 lb.ft (1.2 ~ 1.6 kgf.m)
Be sure that the mounting surface on the
engine is clean and that the old gasket is
removed completely. Lubricate the new
gasket on the filter with clean engine oil
before installation.
7. Remove the engine oil level dipstick.
8. Refill the crankcase with the recommended
engine oil. Refer to the specification in
chapter 9 for engine oil capacity.
CAUTION:
Slowly pour the recommended oil into a
funnel. Do not overfill to avoid damage to
the engine.
NOTE:Always dispose of used engine oil in an
environmentally acceptable manner. It
is suggested that it be placed in a sealed
container and taken to a service station
for reclamation. Do not pour the oil on the
ground or put it into the household trash.
PROPOSITION 65 WARNING:
This product contains a chemical known
to the State of California to cause cancer.
Used engine oil may cause irritation or
cancer of the skin if left in contact with
the skin for prolonged periods of time.
Used engine oil contains chemicals that
have caused cancer in laboratory
animals. Always protect your skin by
washing your hands thoroughly with
soap and warm water as soon as possible
after handling used oil.
!
9. Start the engine and check to be sure no
oil is leaking from the drain plug or oil
filter.
10. Shut off the engine and recheck the oil
level.
Page 225 of 286
6
DO-IT-YOURSELF MAINTENANCE
10
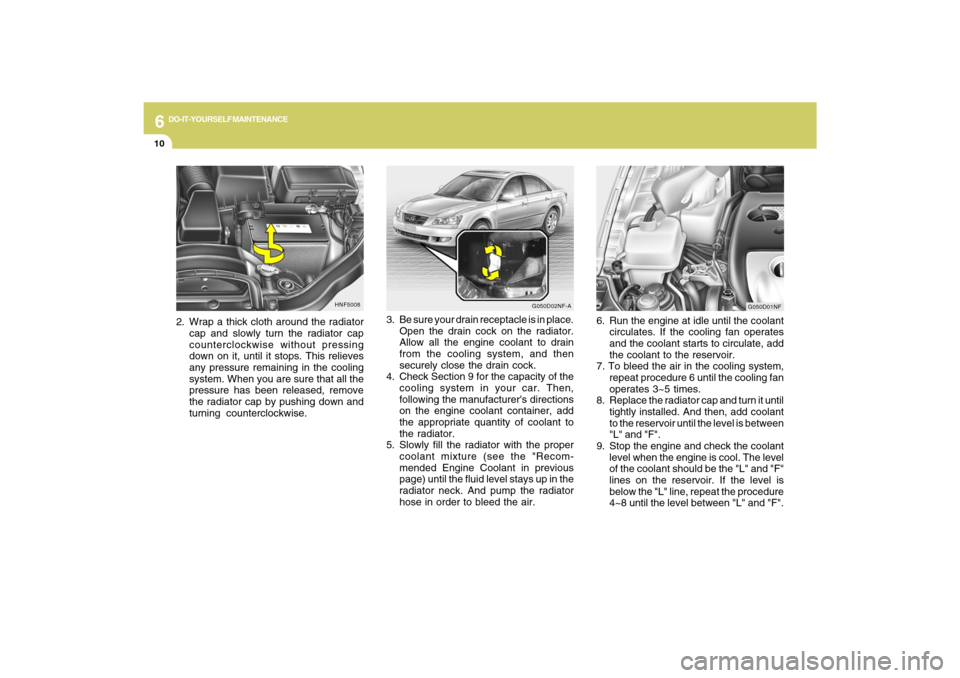
3. Be sure your drain receptacle is in place.
Open the drain cock on the radiator.
Allow all the engine coolant to drain
from the cooling system, and then
securely close the drain cock.
4. Check Section 9 for the capacity of the
cooling system in your car. Then,
following the manufacturer's directions
on the engine coolant container, add
the appropriate quantity of coolant to
the radiator.
5. Slowly fill the radiator with the proper
coolant mixture (see the "Recom-
mended Engine Coolant in previous
page) until the fluid level stays up in the
radiator neck. And pump the radiator
hose in order to bleed the air.
HNF5008
2. Wrap a thick cloth around the radiator
cap and slowly turn the radiator cap
counterclockwise without pressing
down on it, until it stops. This relieves
any pressure remaining in the cooling
system. When you are sure that all the
pressure has been released, remove
the radiator cap by pushing down and
turning counterclockwise.
G050D02NF-A
G050D01NF
6. Run the engine at idle until the coolant
circulates. If the cooling fan operates
and the coolant starts to circulate, add
the coolant to the reservoir.
7. To bleed the air in the cooling system,
repeat procedure 6 until the cooling fan
operates 3~5 times.
8. Replace the radiator cap and turn it until
tightly installed. And then, add coolant
to the reservoir until the level is between
"L" and "F".
9. Stop the engine and check the coolant
level when the engine is cool. The level
of the coolant should be the "L" and "F"
lines on the reservoir. If the level is
below the "L" line, repeat the procedure
4~8 until the level between "L" and "F".
Page 245 of 286
6
DO-IT-YOURSELF MAINTENANCE
30
HNF5027
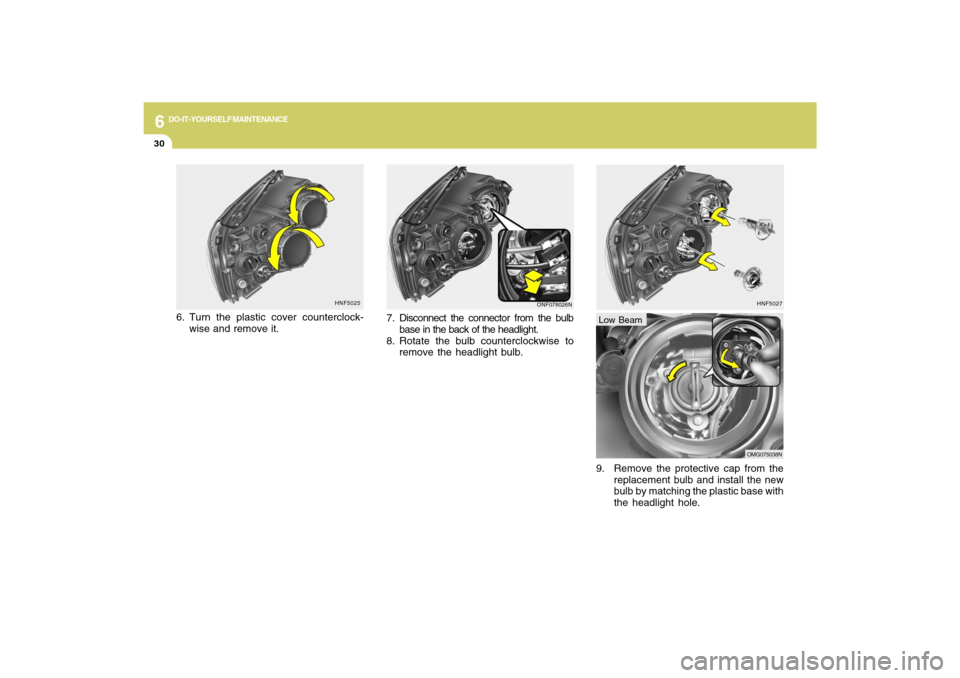
9. Remove the protective cap from the
replacement bulb and install the new
bulb by matching the plastic base with
the headlight hole.Low Beam
OMG075038N
HNF5025
6. Turn the plastic cover counterclock-
wise and remove it.
ONF078026N
7. Disconnect the connector from the bulb
base in the back of the headlight.
8. Rotate the bulb counterclockwise to
remove the headlight bulb.
Page 247 of 286
6
DO-IT-YOURSELF MAINTENANCE
32
HNF5042
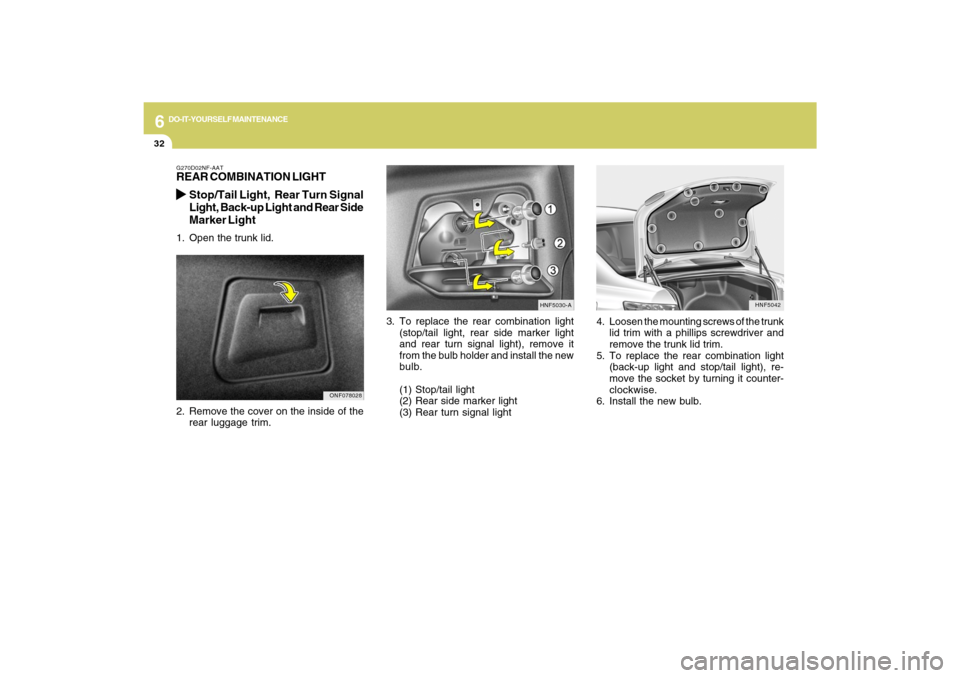
4. Loosen the mounting screws of the trunk
lid trim with a phillips screwdriver and
remove the trunk lid trim.
5. To replace the rear combination light
(back-up light and stop/tail light), re-
move the socket by turning it counter-
clockwise.
6. Install the new bulb.
3. To replace the rear combination light
(stop/tail light, rear side marker light
and rear turn signal light), remove it
from the bulb holder and install the new
bulb.
(1) Stop/tail light
(2) Rear side marker light
(3) Rear turn signal light
HNF5030-A
G270D02NF-AATREAR COMBINATION LIGHT
Stop/Tail Light, Rear Turn Signal
Light, Back-up Light and Rear Side
Marker Light1. Open the trunk lid.
2. Remove the cover on the inside of the
rear luggage trim.
ONF078028
Page 254 of 286

6
DO-IT-YOURSELF MAINTENANCE
39
PROTECTED COMPONENTS
FUSE RATING FUSE
SPARE 15A(Spare)
SPARE 15A(Spare)
ETACS 10ABCM(Body Control Module), Sunroof control module, Electronic chrome mirror, Rheostat
ESC 10A ESC module, Blower relay
C/LIGHTER 20ACigarette lighter
SPARE 15A(Spare)
TAIL RH 10AIllumination lights, Right : License light (LH, RH), Rear combination light, Headlight, Glove box light
TAIL LH 10A Front fog light relay, Left : Rear combination light, Headlight
IONIZER 10A (Spare)
H/LP 10ADRL control module, Headlight relay, AQS and ambient sensor
WIPER 25A Wiper and washer
A/CON 10AA/C control module
A/BAG 15A SRS control module, Passenger's Airbag switch
P/OUTLET 20AFront accessory socket, Rear power outlet
D/CLOCK 10ADigital clock, Audio, A/T shift lock control module, Power outside mirror and mirror folding, BCM
SAFETY PWR 25A Safety window module
ECS 15A (Spare)
ATM KEY LOCK 10A A/T shift lock control module
P/WDW RR LH 25A Power window main switch, Left rear power window switch
P/WDW RH 30A Power window main switch, Right power window switch
Inner Panel
Page 255 of 286
6
DO-IT-YOURSELF MAINTENANCE
40
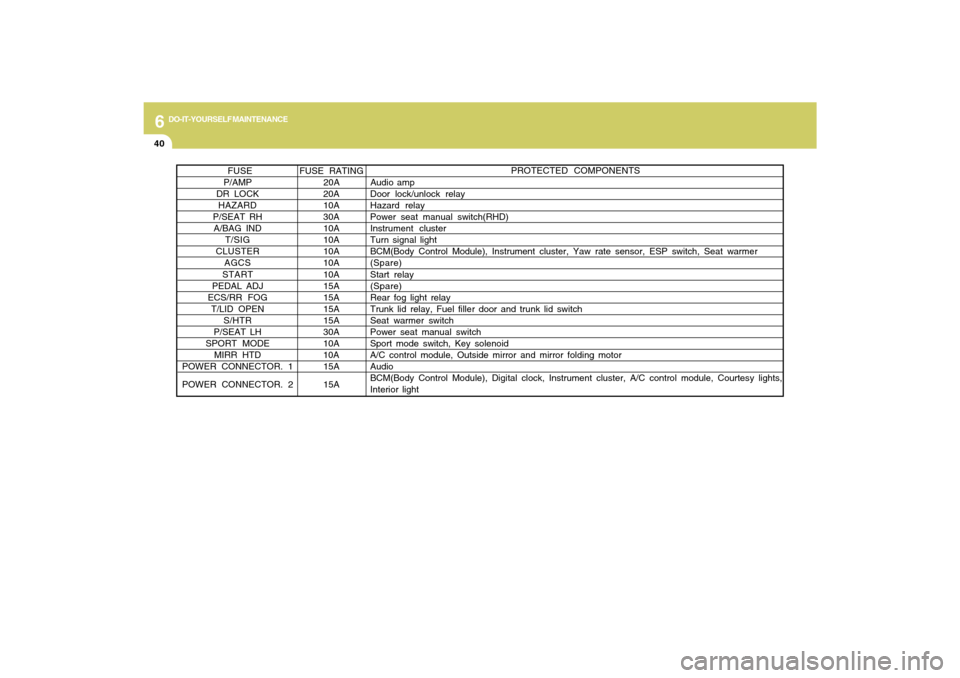
PROTECTED COMPONENTS
FUSE RATING FUSE
P/AMP 20A Audio amp
DR LOCK 20A Door lock/unlock relay
HAZARD 10AHazard relay
P/SEAT RH 30A Power seat manual switch(RHD)
A/BAG IND 10A Instrument cluster
T/SIG 10A Turn signal light
CLUSTER 10ABCM(Body Control Module), Instrument cluster, Yaw rate sensor, ESP switch, Seat warmer
AGCS 10A (Spare)
START 10A Start relay
PEDAL ADJ 15A(Spare)
ECS/RR FOG 15A Rear fog light relay
T/LID OPEN 15A Trunk lid relay, Fuel filler door and trunk lid switch
S/HTR 15A Seat warmer switch
P/SEAT LH 30A Power seat manual switch
SPORT MODE 10A Sport mode switch, Key solenoid
MIRR HTD 10A A/C control module, Outside mirror and mirror folding motor
POWER CONNECTOR. 115A Audio
POWER CONNECTOR. 2 15ABCM(Body Control Module), Digital clock, Instrument cluster, A/C control module, Courtesy lights,
Interior light
Page 281 of 286
10
INDEX
2
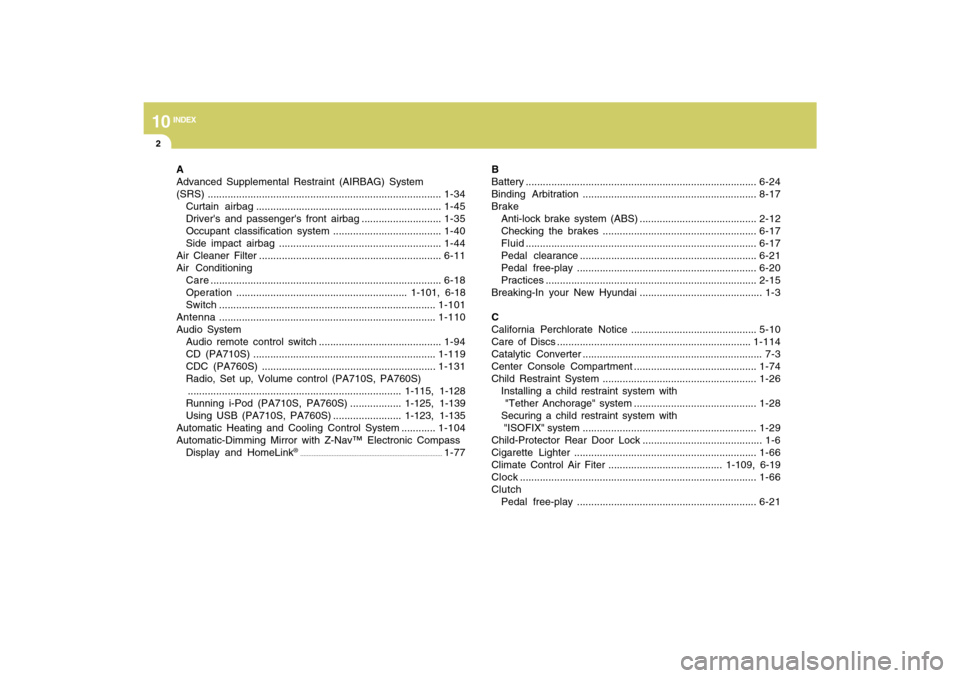
A
Advanced Supplemental Restraint (AIRBAG) System
(SRS)..................................................................................1-34
Curtain airbag .................................................................1-45
Driver's and passenger's front airbag ............................1-35
Occupant classification system ......................................1-40
Side impact airbag .........................................................1-44
Air Cleaner Filter ................................................................6-11
Air Conditioning
Care.................................................................................6-18
Operation............................................................ 1-101, 6-18
Switch............................................................................1-101
Antenna ............................................................................1-110
Audio System
Audio remote control switch ...........................................1-94
CD (PA710S) ................................................................1-119
CDC (PA760S) .............................................................1-131
Radio, Set up, Volume control (PA710S, PA760S)
........................................................................... 1-115, 1-128
Running i-Pod (PA710S, PA760S) .................. 1-125, 1-139
Using USB (PA710S, PA760S) ........................ 1-123, 1-135
Automatic Heating and Cooling Control System ............1-104
Automatic-Dimming Mirror with Z-Nav™ Electronic Compass
Display and HomeLink
®
......................................................................................
1-77B
Battery .................................................................................6-24
Binding Arbitration .............................................................8-17
Brake
Anti-lock brake system (ABS) .........................................2-12
Checking the brakes ......................................................6-17
Fluid.................................................................................6-17
Pedal clearance ..............................................................6-21
Pedal free-play ...............................................................6-20
Practices..........................................................................2-15
Breaking-In your New Hyundai ........................................... 1-3
C
California Perchlorate Notice ............................................5-10
Care of Discs ....................................................................1-114
Catalytic Converter ............................................................... 7-3
Center Console Compartment ...........................................1-74
Child Restraint System ......................................................1-26
Installing a child restraint system with
"Tether Anchorage" system ...........................................1-28
Securing a child restraint system with
"ISOFIX" system .............................................................1-29
Child-Protector Rear Door Lock .......................................... 1-6
Cigarette Lighter ................................................................1-66
Climate Control Air Fiter ........................................ 1-109, 6-19
Clock...................................................................................1-66
Clutch
Pedal free-play ...............................................................6-21