2009 Hyundai Sonata brake
[x] Cancel search: brakePage 260 of 340
717
Maintenance
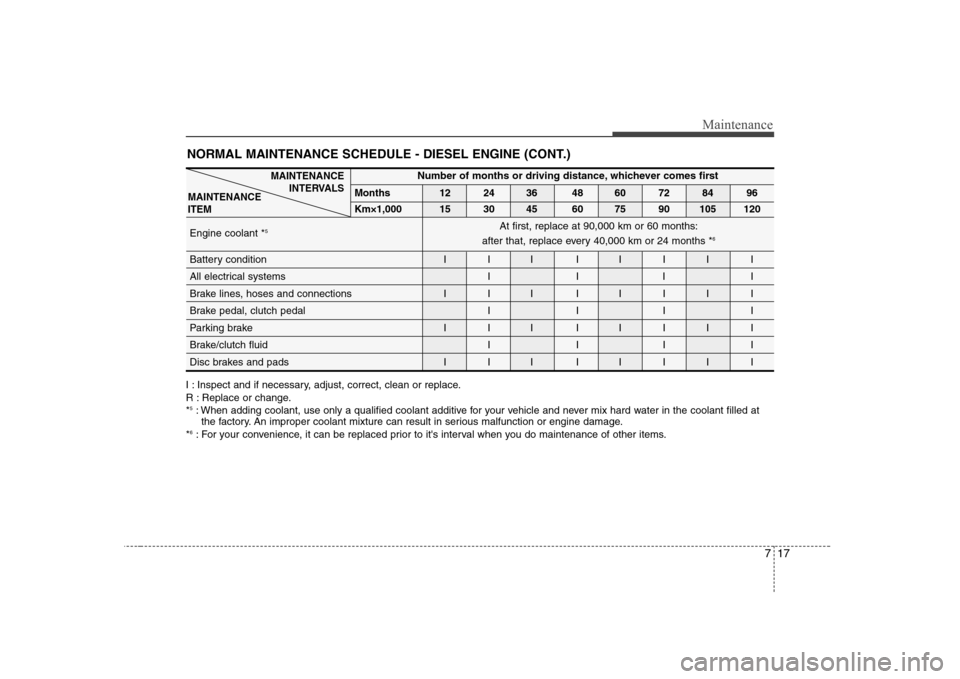
NORMAL MAINTENANCE SCHEDULE - DIESEL ENGINE (CONT.)
Number of months or driving distance, whichever comes first
Months 12 24 36 48 60 72 84 96
Km×1,000 15 30 45 60 75 90 105 120
Engine coolant *5
Battery condition I I I I I I I I
All electrical systems I I I I
Brake lines, hoses and connections I I I I I I I I
Brake pedal, clutch pedal I I I I
Parking brake I I I I I I I I
Brake/clutch fluid I I I I
Disc brakes and pads I I I I I I I IAt first, replace at 90,000 km or 60 months:
after that, replace every 40,000 km or 24 months * 6
MAINTENANCE
INTERVALS
MAINTENANCE ITEM
I : Inspect and if necessary, adjust, correct, clean or replace.
R : Replace or change.* 5
: When adding coolant, use only a qualified coolant additive for your vehicle and never mix hard water in the coolant filled at
the factory. An improper coolant mixture can result in serious malfunction or engine damage.
* 6
: For your convenience, it can be replaced prior to it's interval when you do maintenance of other items.
Page 263 of 340
Maintenance
20
7
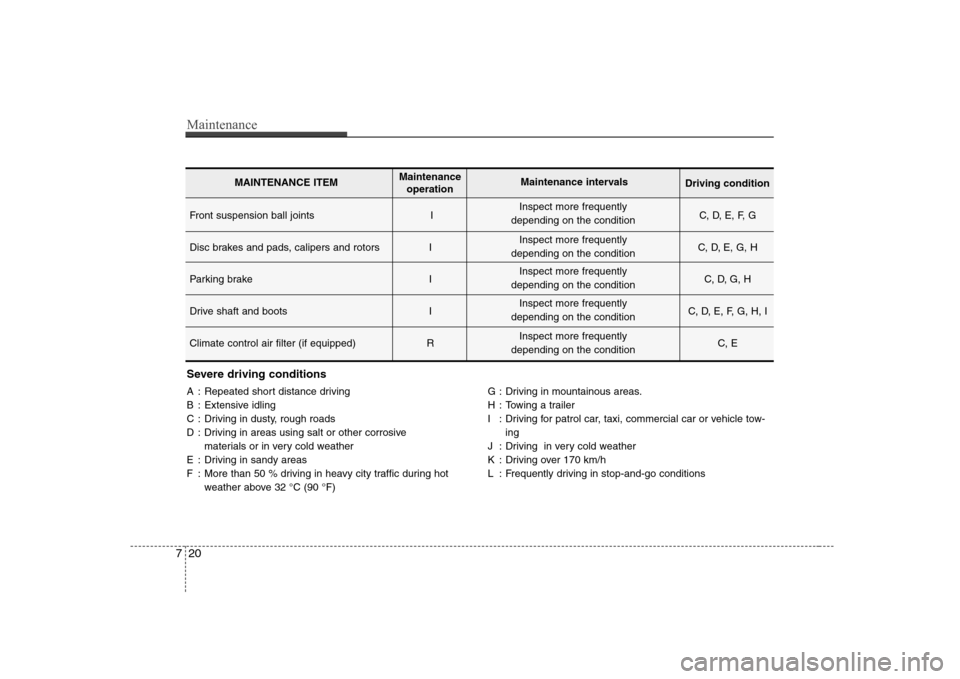
Severe driving conditions
A : Repeated short distance driving
B : Extensive idling
C : Driving in dusty, rough roads
D : Driving in areas using salt or other corrosive
materials or in very cold weather
E : Driving in sandy areas
F : More than 50 % driving in heavy city traffic during hot weather above 32 °C (90 °F) G : Driving in mountainous areas.
H : Towing a trailer
I : Driving for patrol car, taxi, commercial car or vehicle tow-
ing
J : Driving in very cold weather
K : Driving over 170 km/h
L : Frequently driving in stop-and-go conditions
Front suspension ball joints I C, D, E, F, G
Disc brakes and pads, calipers and rotors I C, D, E, G, H
Parking brake I C, D, G, H
Drive shaft and boots I C, D, E, F, G, H, I
Climate control air filter (if equipped) R C, E
MAINTENANCE ITEMMaintenance
operation Maintenance intervals
Driving condition
Inspect more frequently
depending on the condition
Inspect more frequently
depending on the condition
Inspect more frequently
depending on the condition
Inspect more frequently
depending on the condition
Inspect more frequently
depending on the condition
Page 266 of 340
723
Maintenance
G051300AUN
Manual transaxle fluid (if equipped)
Inspect the manual transaxle fluid
according to the maintenance schedule.
G051400AUN
Automatic transaxle fluid (if equipped)
The fluid level should be in the "HOT"
range of the dipstick, after the engine
and transaxle are at normal operating
temperature. Check the automatic
transaxle fluid level with the engine run-
ning and the transaxle in neutral, with the
parking brake properly applied.
G051500AUN Brake hoses and lines
Visually check for proper installation,
chafing, cracks, deterioration and any
leakage. Replace any deteriorated or
damaged parts immediately.G051600AUN Brake fluid
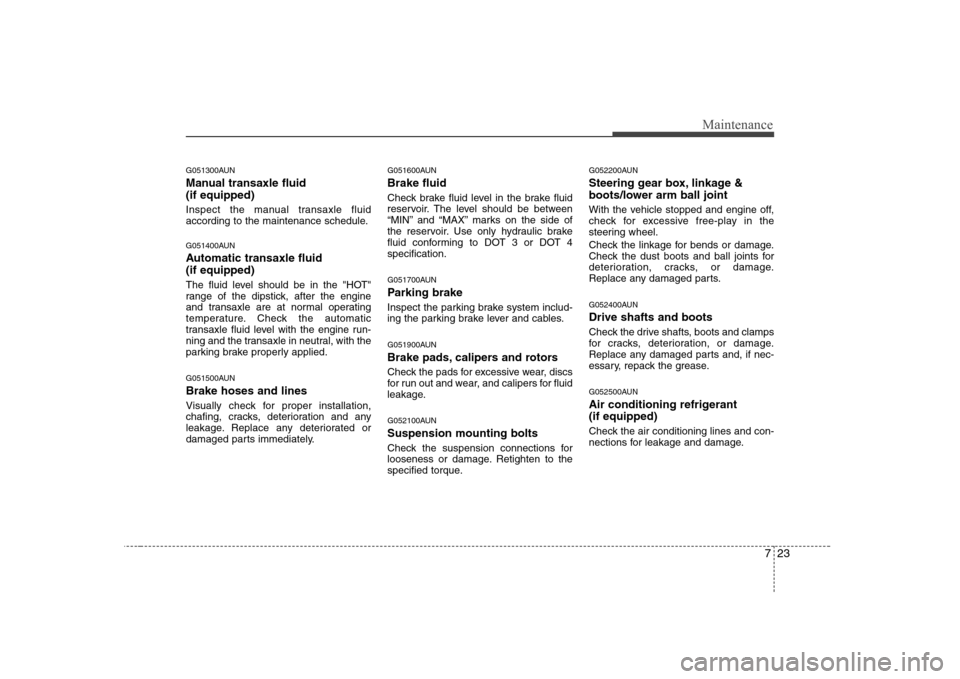
Check brake fluid level in the brake fluid
reservoir. The level should be between
“MIN” and “MAX” marks on the side of
the reservoir. Use only hydraulic brake
fluid conforming to DOT 3 or DOT 4specification.
G051700AUN
Parking brake
Inspect the parking brake system includ-
ing the parking brake lever and cables.
G051900AUN
Brake pads, calipers and rotors
Check the pads for excessive wear, discs
for run out and wear, and calipers for fluid
leakage.
G052100AUN Suspension mounting bolts
Check the suspension connections for
looseness or damage. Retighten to the
specified torque.G052200AUN
Steering gear box, linkage &
boots/lower arm ball joint
With the vehicle stopped and engine off,
check for excessive free-play in the
steering wheel.
Check the linkage for bends or damage.
Check the dust boots and ball joints for
deterioration, cracks, or damage.
Replace any damaged parts.
G052400AUN Drive shafts and boots
Check the drive shafts, boots and clamps
for cracks, deterioration, or damage.
Replace any damaged parts and, if nec-
essary, repack the grease.
G052500AUN
Air conditioning refrigerant (if equipped)
Check the air conditioning lines and con-
nections for leakage and damage.
Page 271 of 340
Maintenance
28
7
BRAKE AND CLUTCH (IF EQUIPPED) FLUID
G080100AFD-EA
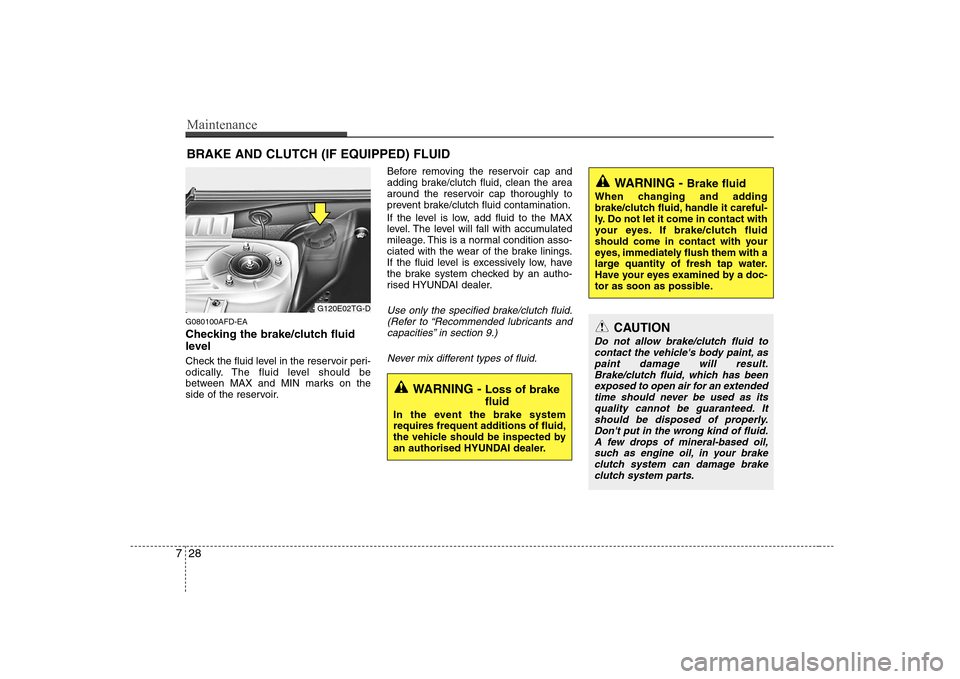
Checking the brake/clutch fluid
level
Check the fluid level in the reservoir peri-
odically. The fluid level should be
between MAX and MIN marks on the
side of the reservoir. Before removing the reservoir cap and
adding brake/clutch fluid, clean the area
around the reservoir cap thoroughly to
prevent brake/clutch fluid contamination.
If the level is low, add fluid to the MAX
level. The level will fall with accumulated
mileage. This is a normal condition asso-
ciated with the wear of the brake linings.
If the fluid level is excessively low, have
the brake system checked by an autho-
rised HYUNDAI dealer.
Use only the specified brake/clutch fluid.
(Refer to “Recommended lubricants andcapacities” in section 9.)
Never mix different types of fluid.
WARNING - Brake fluid
When changing and adding
brake/clutch fluid, handle it careful-
ly. Do not let it come in contact with
your eyes. If brake/clutch fluid
should come in contact with your
eyes, immediately flush them with a
large quantity of fresh tap water.
Have your eyes examined by a doc-
tor as soon as possible.
WARNING - Loss of brake fluid
In the event the brake system
requires frequent additions of fluid,
the vehicle should be inspected by
an authorised HYUNDAI dealer.
CAUTION
Do not allow brake/clutch fluid to contact the vehicle's body paint, as paint damage will result.
Brake/clutch fluid, which has been exposed to open air for an extendedtime should never be used as itsquality cannot be guaranteed. It should be disposed of properly.
Don't put in the wrong kind of fluid.A few drops of mineral-based oil, such as engine oil, in your brakeclutch system can damage brake
clutch system parts.
G120E02TG-D
Page 273 of 340
Maintenance
30
7
AUTOMATIC TRANSAXLE FLUID (IF EQUIPPED)
G100100AFD-EA
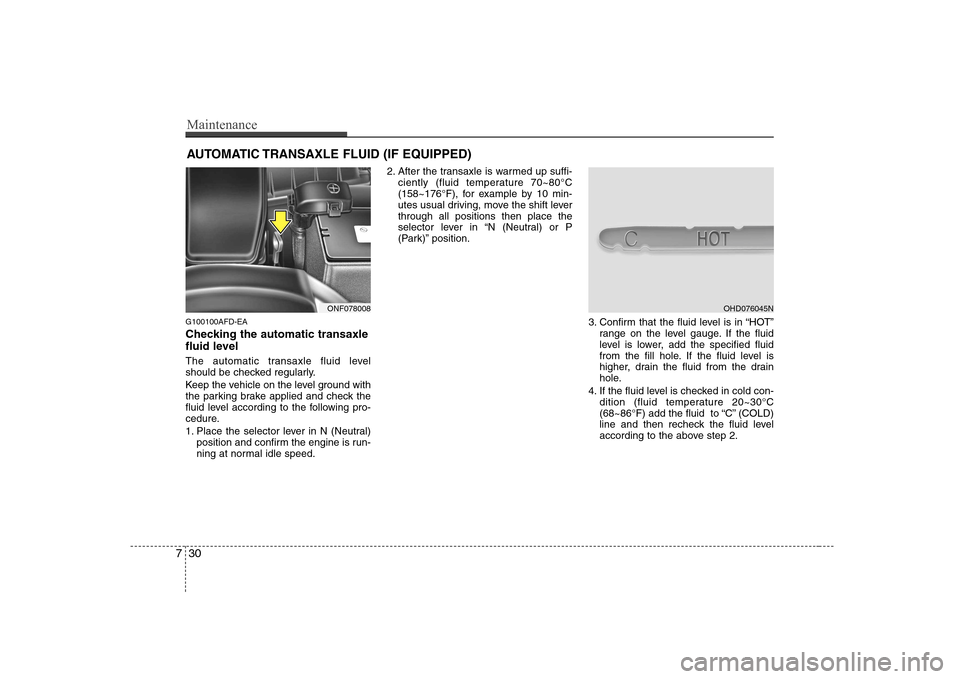
Checking the automatic transaxle
fluid level
The automatic transaxle fluid level
should be checked regularly.
Keep the vehicle on the level ground with
the parking brake applied and check the
fluid level according to the following pro-
cedure.
1. Place the selector lever in N (Neutral) position and confirm the engine is run-
ning at normal idle speed. 2. After the transaxle is warmed up suffi-
ciently (fluid temperature 70~80°C
(158~176°F), for example by 10 min-
utes usual driving, move the shift leverthrough all positions then place the
selector lever in “N (Neutral) or P
(Park)” position.
3. Confirm that the fluid level is in “HOT”range on the level gauge. If the fluid
level is lower, add the specified fluid
from the fill hole. If the fluid level is
higher, drain the fluid from the drain
hole.
4. If the fluid level is checked in cold con- dition (fluid temperature 20~30°C
(68~86°F) add the fluid to “C” (COLD)
line and then recheck the fluid level
according to the above step 2.
ONF078008OHD076045N
Page 274 of 340
731
Maintenance
✽✽NOTICE
“C” (COLD) range is for reference only
and should NOT be used to determinetransaxle fluid level. ✽
✽
NOTICE
New automatic transaxle fluid should be
red. The red dye is added so the assem-bly plant can identify it as automatic
transaxle fluid and distinguish it from
engine oil or antifreeze. The red dye,
which is not an indicator of fluid quali-
ty, is not permanent. As the vehicle isdriven, the automatic transaxle fluid
will begin to look darker. The colour
may eventually appear light brown.
Therefore, have an authorised
HYUNDAI dealer change the automatictransaxle fluid according to theScheduled Maintenance at the begin-ning of this section.
Use only the specified automatic
transaxle fluid. (Refer to “Recommended
lubricants and capacities” in section 9.) G100200AFD-EA Changing the automatic transaxle fluid
Have automatic transaxle fluid changed
by an authorised HYUNDAI dealeraccording to the Maintenance Scheduleat the beginning of this section.
WARNING - Transaxle fluid
The transaxle fluid level should be
checked when the engine is at nor-
mal operating temperature. This
means that the engine, radiator,
radiator hose and exhaust system
etc., are very hot. Exercise great
care not to burn yourself during
this procedure.
WARNING - Parking brake
To avoid sudden movement of the
vehicle, apply parking brake and
depress the brake pedal before
moving the shift lever.
CAUTION
Low fluid level causes transaxle slippage. Overfilling can causefoaming, loss of fluid and transaxle malfunction.
The use of a non-specified fluid could result in transaxle malfunc-tion and failure.
Page 275 of 340
Maintenance
32
7
WASHER FLUID
G120100AUN
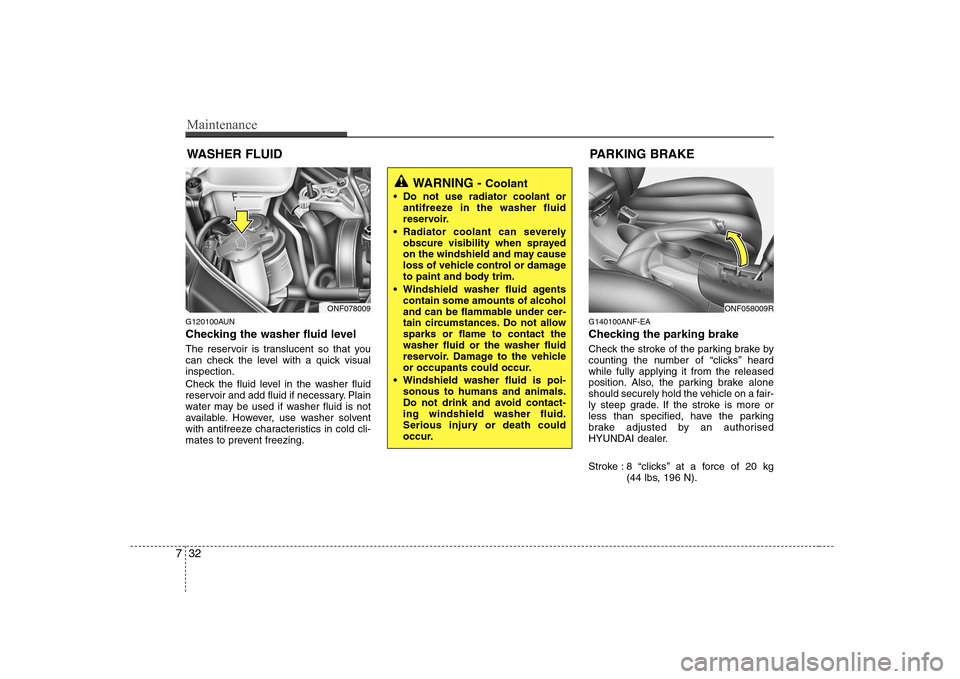
Checking the washer fluid level
The reservoir is translucent so that you
can check the level with a quick visualinspection.
Check the fluid level in the washer fluid
reservoir and add fluid if necessary. Plain
water may be used if washer fluid is not
available. However, use washer solvent
with antifreeze characteristics in cold cli-
mates to prevent freezing. G140100ANF-EA
Checking the parking brake
Check the stroke of the parking brake by
counting the number of “clicks’’ heardwhile fully applying it from the released
position. Also, the parking brake alone
should securely hold the vehicle on a fair-
ly steep grade. If the stroke is more or
less than specified, have the parking
brake adjusted by an authorised
HYUNDAI dealer.
Stroke : 8 “clicks’’ at a force of 20 kg
(44 lbs, 196 N).
WARNING - Coolant
Do not use radiator coolant or antifreeze in the washer fluid
reservoir.
Radiator coolant can severely obscure visibility when sprayed
on the windshield and may cause
loss of vehicle control or damage
to paint and body trim.
Windshield washer fluid agents contain some amounts of alcohol
and can be flammable under cer-
tain circumstances. Do not allowsparks or flame to contact thewasher fluid or the washer fluid
reservoir. Damage to the vehicle
or occupants could occur.
Windshield washer fluid is poi- sonous to humans and animals.
Do not drink and avoid contact-ing windshield washer fluid.
Serious injury or death could
occur.
ONF078009ONF058009R
PARKING BRAKE
Page 289 of 340
Maintenance
46
7
G200400AUN-EA
Tyre rotation
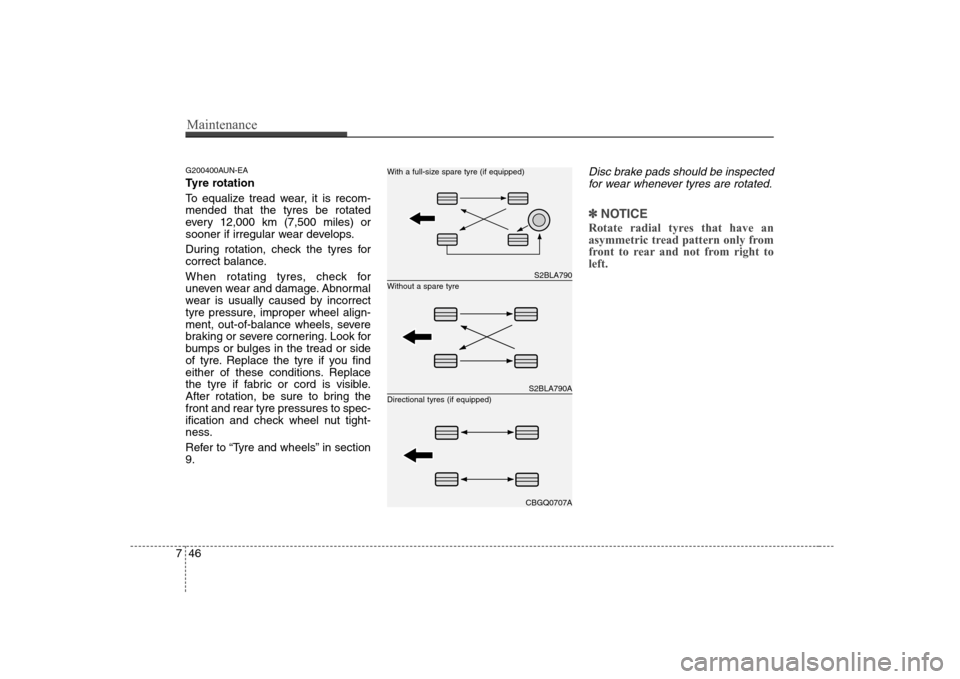
To equalize tread wear, it is recom- mended that the tyres be rotated
every 12,000 km (7,500 miles) or
sooner if irregular wear develops.
During rotation, check the tyres for
correct balance.
When rotating tyres, check for
uneven wear and damage. Abnormal
wear is usually caused by incorrect
tyre pressure, improper wheel align-
ment, out-of-balance wheels, severe
braking or severe cornering. Look for
bumps or bulges in the tread or side
of tyre. Replace the tyre if you find
either of these conditions. Replace
the tyre if fabric or cord is visible.
After rotation, be sure to bring thefront and rear tyre pressures to spec-
ification and check wheel nut tight-
ness.
Refer to “Tyre and wheels” in section 9.Disc brake pads should be inspected
for wear whenever tyres are rotated.
✽✽ NOTICE
Rotate radial tyres that have an
asymmetric tread pattern only from
front to rear and not from right toleft.
S2BLA790
S2BLA790A
CBGQ0707A
Without a spare tyre
With a full-size spare tyre (if equipped) Directional tyres (if equipped)