2009 Hyundai Sonata ECU
[x] Cancel search: ECUPage 264 of 340
721
Maintenance
EXPLANATION OF SCHEDULED MAINTENANCE ITEMS
G050100AUN Engine oil and filter The engine oil and filter should be
changed at the intervals specified in the
maintenance schedule. If the car is being
driven in severe conditions, more fre-quent oil and filter changes are required.
G050200AUN Drive belts
Inspect all drive belts for evidence of
cuts, cracks, excessive wear or oil satu-
ration and replace if necessary. Drive
belts should be checked periodically forproper tension and adjusted as neces-
sary. G050300AFD-EA
Fuel filter (cartridge) A clogged filter can limit the speed at
which the vehicle may be driven, damage
the emission system and cause multiple
issues such as hard starting. If an exces-
sive amount of foreign matter accumu-
lates in the fuel tank, the filter may
require replacement more frequently.
After installing a new filter, run the engine
for several minutes, and check for leaks
at the connections. Fuel filters should be
installed by an authorised HYUNDAI
dealer.
G050400AFD-EA
Fuel lines, fuel hoses and con- nections
Check the fuel lines, fuel hoses and con-
nections for leakage and damage. Have
an authorised HYUNDAI dealer replace
any damaged or leaking parts immedi-
ately.
WARNING -
Diesel only
Never work on injection system with engine running or within 30
seconds after shutting off engine.
High pressure pump, rail, injectorsand high pressure pipes are sub-
ject to high pressure even after the
engine stopped. The fuel jet pro-
duced by fuel leaks may cause seri-
ous injury, if it touch the body.
People using pacemakers should
not move than 30cm closer to theECU or wiring harness within the
engine room while engine is run-
ning, since the high currents in the
Common Rail system produce con-
siderable magnetic fields.
Page 265 of 340

Maintenance
22
7
G050500AUN Timing belt (if equipped)
Inspect all parts related to the timing belt
for damage and deformation. Replace
any damaged parts immediately.
G050600AUN-EA
Vapour hose and fuel filler cap
The vapour hose and fuel filler cap
should be inspected at those intervals
specified in the maintenance schedule.
Make sure that a new vapour hose or fuelfiller cap is correctly replaced. G050700AUN
Vacuum crankcase ventilation hoses (if equipped)
Inspect the surface of hoses for evidence
of heat and/or mechanical damage. Hard
and brittle rubber, cracking, tears, cuts,
abrasions, and excessive swelling indi-
cate deterioration. Particular attention
should be paid to examine those hose
surfaces nearest to high heat sources,
such as the exhaust manifold. Inspect the hose routing to assure that the hoses do not come in contact with
any heat source, sharp edges or movingcomponent which might cause heat dam-
age or mechanical wear. Inspect all hose
connections, such as clamps and cou-
plings, to make sure they are secure, and
that no leaks are present. Hoses should
be replaced immediately if there is any
evidence of deterioration or damage.G050800AFD
Air cleaner filter
A Genuine HYUNDAI air cleaner filter is recommended when the filter isreplaced.
G050900AUN-EA
Spark plugs (for petrol engine)
Make sure to install new spark plugs of
the correct heat range. G051000AFD-EA
Valve clearance (if equipped)
Inspect excessive valve noise and/or
engine vibration and adjust if necessary.
An authorised HYUNDAI dealer should
perform the operation.
G051100AUN Cooling system
Check the cooling system parts, such as
radiator, coolant reservoir, hoses and
connections for leakage and damage.
Replace any damaged parts.
G051200AUN Coolant The coolant should be changed at the
intervals specified in the maintenance
schedule.
Page 275 of 340
Maintenance
32
7
WASHER FLUID
G120100AUN
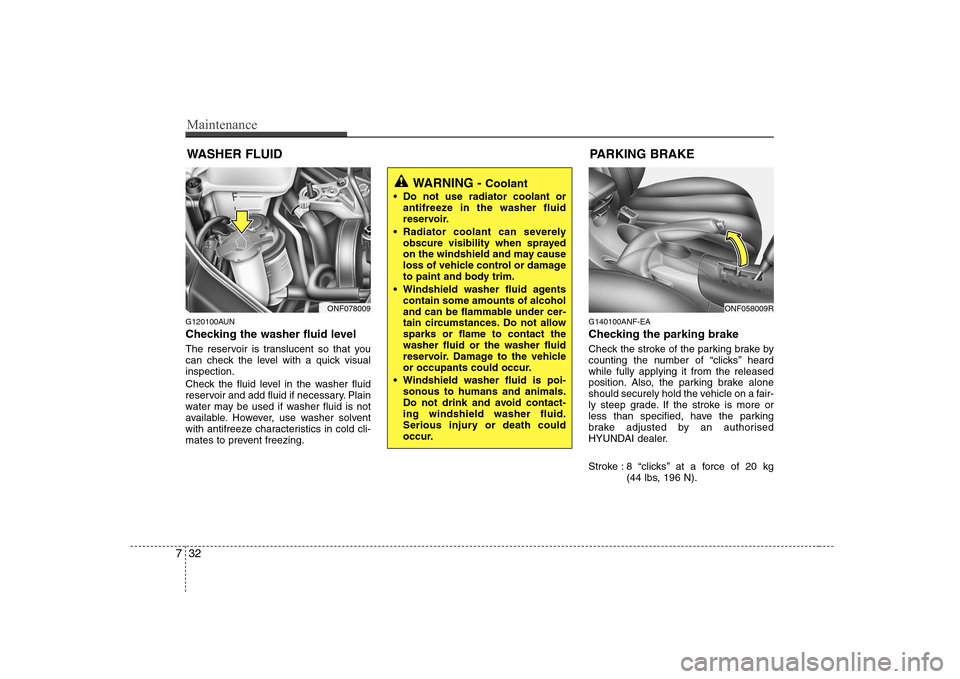
Checking the washer fluid level
The reservoir is translucent so that you
can check the level with a quick visualinspection.
Check the fluid level in the washer fluid
reservoir and add fluid if necessary. Plain
water may be used if washer fluid is not
available. However, use washer solvent
with antifreeze characteristics in cold cli-
mates to prevent freezing. G140100ANF-EA
Checking the parking brake
Check the stroke of the parking brake by
counting the number of “clicks’’ heardwhile fully applying it from the released
position. Also, the parking brake alone
should securely hold the vehicle on a fair-
ly steep grade. If the stroke is more or
less than specified, have the parking
brake adjusted by an authorised
HYUNDAI dealer.
Stroke : 8 “clicks’’ at a force of 20 kg
(44 lbs, 196 N).
WARNING - Coolant
Do not use radiator coolant or antifreeze in the washer fluid
reservoir.
Radiator coolant can severely obscure visibility when sprayed
on the windshield and may cause
loss of vehicle control or damage
to paint and body trim.
Windshield washer fluid agents contain some amounts of alcohol
and can be flammable under cer-
tain circumstances. Do not allowsparks or flame to contact thewasher fluid or the washer fluid
reservoir. Damage to the vehicle
or occupants could occur.
Windshield washer fluid is poi- sonous to humans and animals.
Do not drink and avoid contact-ing windshield washer fluid.
Serious injury or death could
occur.
ONF078009ONF058009R
PARKING BRAKE
Page 283 of 340
Maintenance
40
7
BATTERY
G190100AUN
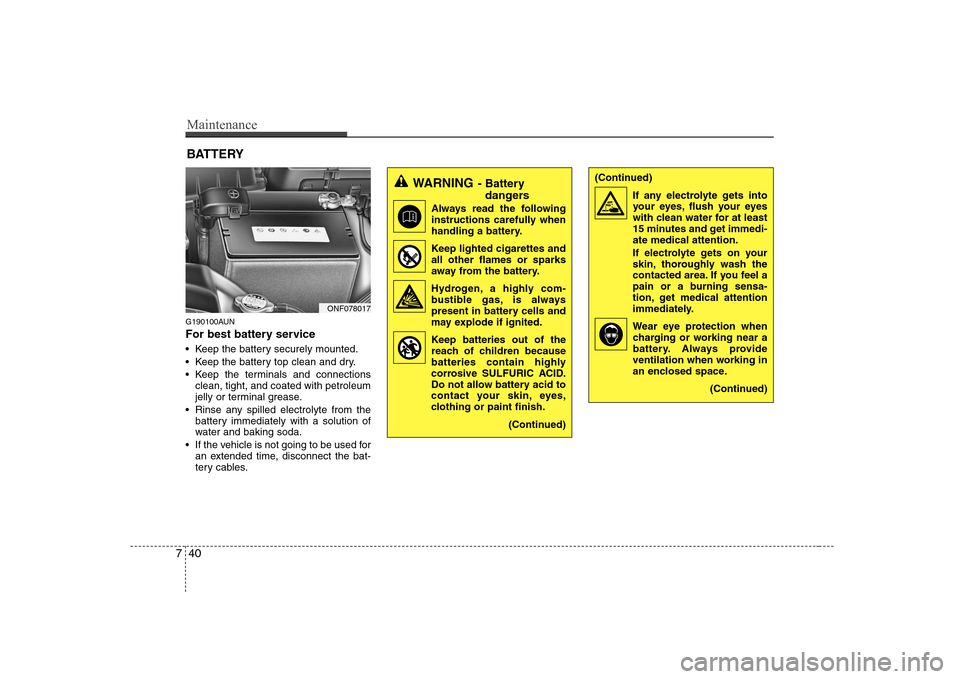
For best battery service
Keep the battery securely mounted.
Keep the battery top clean and dry.
Keep the terminals and connections clean, tight, and coated with petroleum
jelly or terminal grease.
Rinse any spilled electrolyte from the battery immediately with a solution of
water and baking soda.
If the vehicle is not going to be used for an extended time, disconnect the bat-
tery cables.
WARNING - Battery
dangers
Always read the following
instructions carefully when
handling a battery.
Keep lighted cigarettes and all other flames or sparks
away from the battery.
Hydrogen, a highly com- bustible gas, is always
present in battery cells and
may explode if ignited.
Keep batteries out of the
reach of children because
batteries contain highly
corrosive SULFURIC ACID.
Do not allow battery acid to
contact your skin, eyes,
clothing or paint finish.
(Continued)(Continued)If any electrolyte gets intoyour eyes, flush your eyes
with clean water for at least
15 minutes and get immedi-ate medical attention.
If electrolyte gets on your
skin, thoroughly wash the
contacted area. If you feel a
pain or a burning sensa-
tion, get medical attention
immediately.
Wear eye protection when charging or working near a
battery. Always provide
ventilation when working in
an enclosed space.
(Continued)
ONF078017
Page 299 of 340
Maintenance
56
7
4. Push in a new fuse of the same rating,
and make sure it fits tightly in the clips.
If it fits loosely, consult an authorised
HYUNDAI dealer.
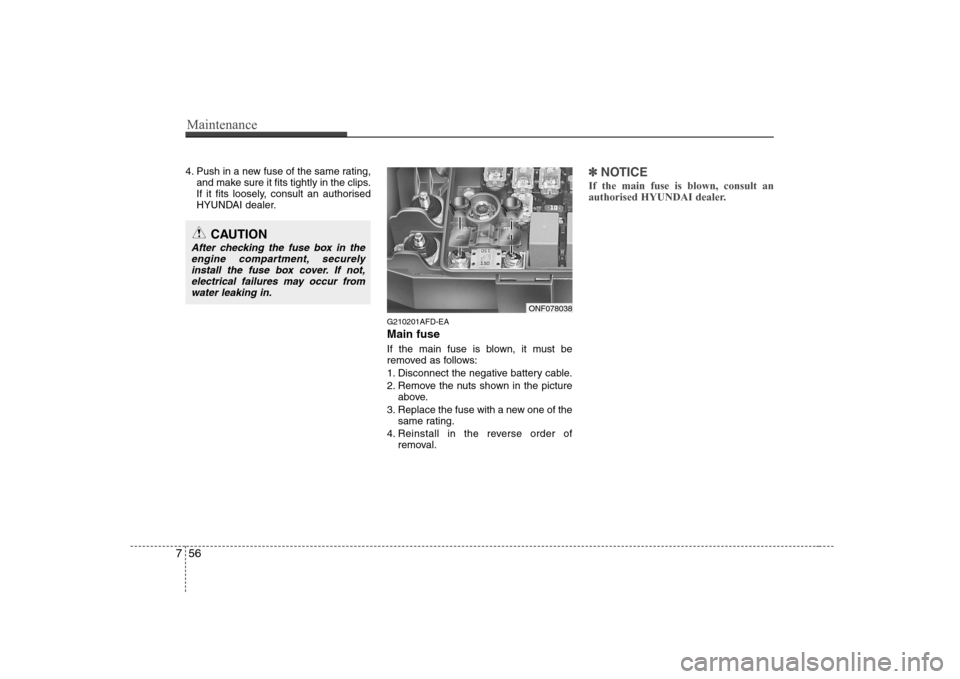
G210201AFD-EA Main fuse
If the main fuse is blown, it must be
removed as follows:
1. Disconnect the negative battery cable.
2. Remove the nuts shown in the pictureabove.
3. Replace the fuse with a new one of the same rating.
4. Reinstall in the reverse order of removal.✽✽ NOTICE
If the main fuse is blown, consult an
authorised HYUNDAI dealer.
CAUTION
After checking the fuse box in the engine compartment, securely install the fuse box cover. If not,
electrical failures may occur from water leaking in.
ONF078038
Page 303 of 340
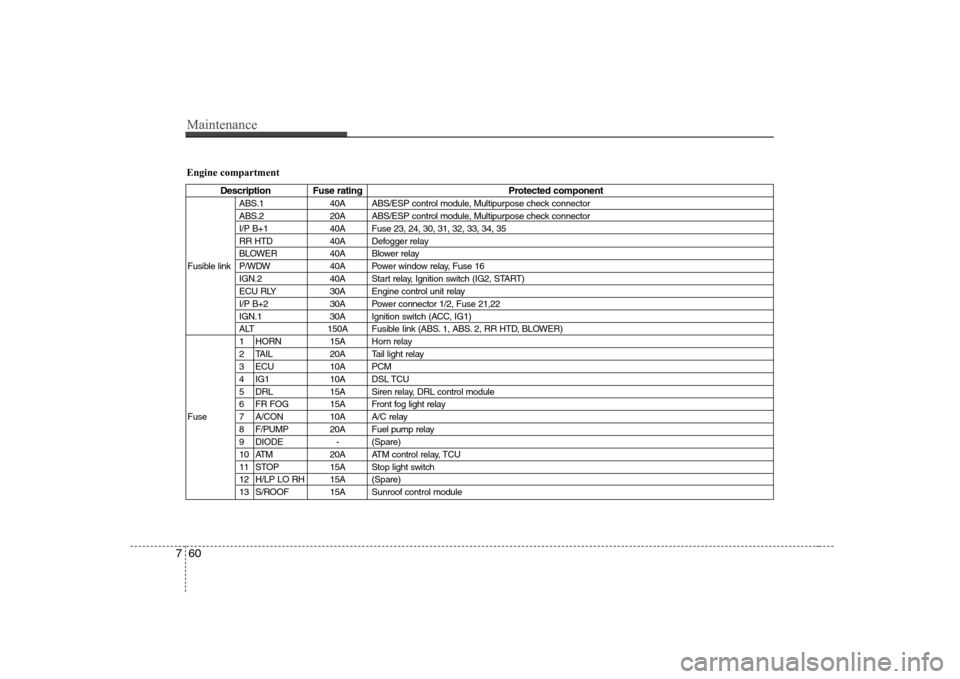
Maintenance
60
7
Engine compartment
Description Fuse rating Protected component
ABS.1 40A ABS/ESP control module, Multipurpose check connector
ABS.2 20A ABS/ESP control module, Multipurpose check connector
I/P B+1 40A Fuse 23, 24, 30, 31, 32, 33, 34, 35
RR HTD 40A Defogger relay
BLOWER 40A Blower relay
Fusible link P/WDW 40A Power window relay, Fuse 16 IGN.2 40A Start relay, Ignition switch (IG2, START)
ECU RLY 30A Engine control unit relay
I/P B+2 30A Power connector 1/2, Fuse 21,22
IGN.1 30A Ignition switch (ACC, IG1)
ALT 150A Fusible Iink (ABS. 1, ABS. 2, RR HTD, BLOWER)
1 HORN 15A Horn relay
2 TAIL 20A Tail light relay
3 ECU 10A PCM
4 IG1 10A DSL TCU
5 DRL 15A Siren relay, DRL control module
6 FR FOG 15A Front fog light relay
Fuse 7 A/CON 10A A/C relay 8 F/PUMP 20A Fuel pump relay
9 DIODE - (Spare)
10 ATM 20A ATM control relay, TCU
11 STOP 15A Stop light switch
12 H/LP LO RH 15A (Spare)
13 S/ROOF 15A Sunroof control module
Page 304 of 340
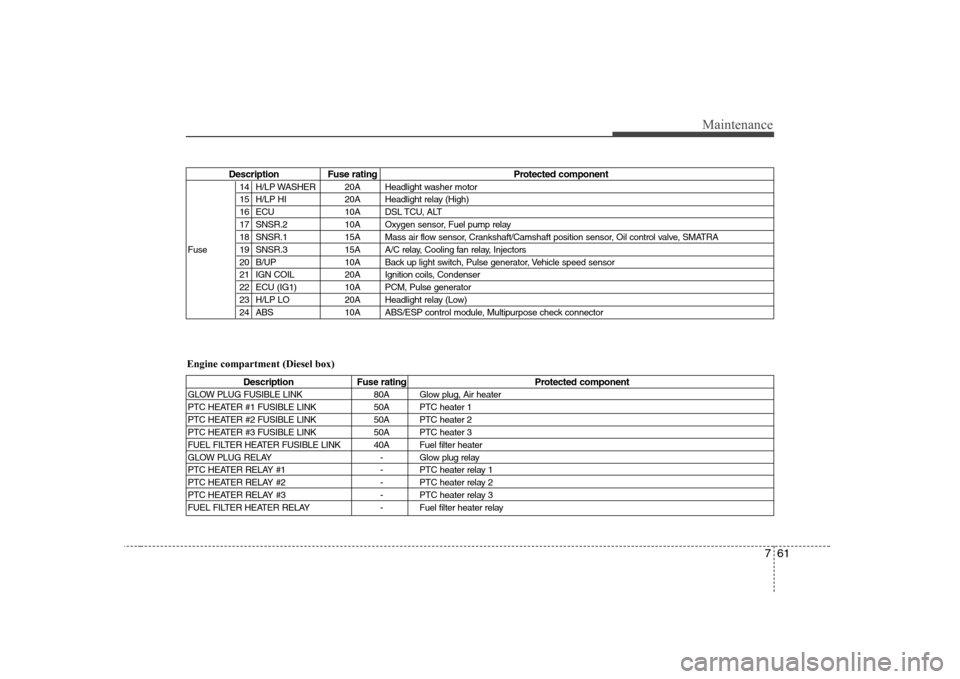
761
Maintenance
Description Fuse rating Protected component14 H/LP WASHER 20A Headlight washer motor
15 H/LP HI 20A Headlight relay (High)
16 ECU 10A DSL TCU, ALT
17 SNSR.2 10A Oxygen sensor, Fuel pump relay
18 SNSR.1 15A Mass air flow sensor, Crankshaft/Camshaft position sensor, Oil control valve, SMATRA
Fuse 19 SNSR.3 15A A/C relay, Cooling fan relay, Injectors 20 B/UP 10A Back up light switch, Pulse generator, Vehicle speed sensor
21 IGN COIL 20A Ignition coils, Condenser
22 ECU (IG1) 10A PCM, Pulse generator
23 H/LP LO 20A Headlight relay (Low)
24 ABS 10A ABS/ESP control module, Multipurpose check connector
Description Fuse rating Protected component
GLOW PLUG FUSIBLE LINK 80A Glow plug, Air heater
PTC HEATER #1 FUSIBLE LINK 50A PTC heater 1
PTC HEATER #2 FUSIBLE LINK 50A PTC heater 2
PTC HEATER #3 FUSIBLE LINK 50A PTC heater 3
FUEL FILTER HEATER FUSIBLE LINK 40A Fuel filter heater
GLOW PLUG RELAY - Glow plug relay
PTC HEATER RELAY #1 - PTC heater relay 1
PTC HEATER RELAY #2 - PTC heater relay 2
PTC HEATER RELAY #3 - PTC heater relay 3
FUEL FILTER HEATER RELAY - Fuel filter heater relay
Engine compartment (Diesel box)
Page 309 of 340
Maintenance
66
7
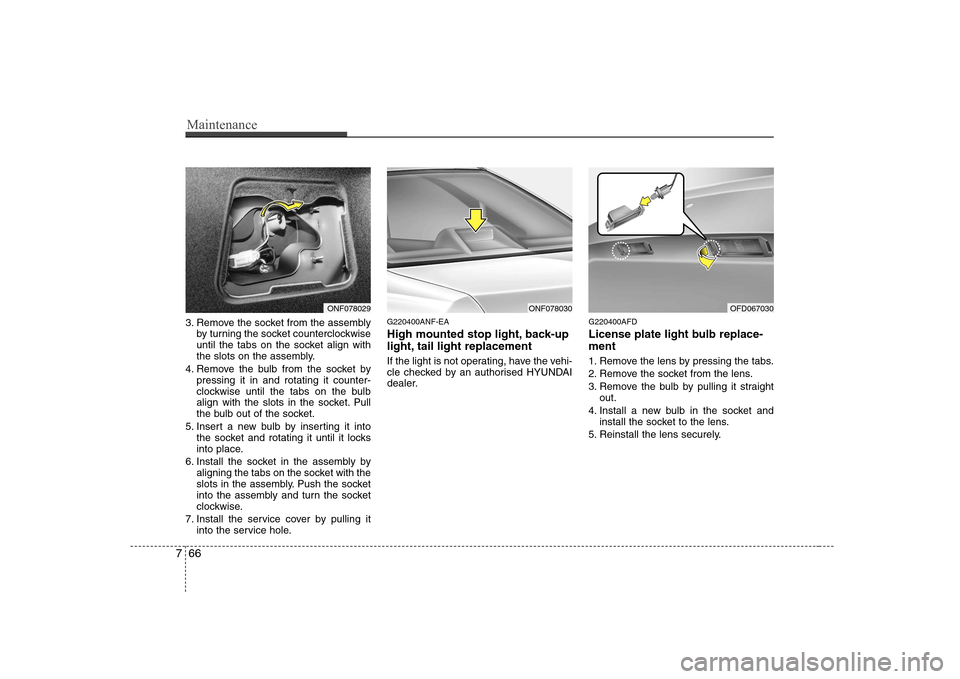
3. Remove the socket from the assembly
by turning the socket counterclockwise
until the tabs on the socket align with
the slots on the assembly.
4. Remove the bulb from the socket by pressing it in and rotating it counter-
clockwise until the tabs on the bulb
align with the slots in the socket. Pull
the bulb out of the socket.
5. Insert a new bulb by inserting it into the socket and rotating it until it locks
into place.
6. Install the socket in the assembly by aligning the tabs on the socket with the
slots in the assembly. Push the socket
into the assembly and turn the socket
clockwise.
7. Install the service cover by pulling it into the service hole. G220400ANF-EA
High mounted stop light, back-up
light, tail light replacement
If the light is not operating, have the vehi-
cle checked by an authorised HYUNDAI
dealer.
G220400AFD
License plate light bulb replace- ment
1. Remove the lens by pressing the tabs.
2. Remove the socket from the lens.
3. Remove the bulb by pulling it straight
out.
4. Install a new bulb in the socket and install the socket to the lens.
5. Reinstall the lens securely.
ONF078029ONF078030OFD067030