Page 216 of 353
2
DRIVING YOUR HYUNDAI
6
C070C01E-1
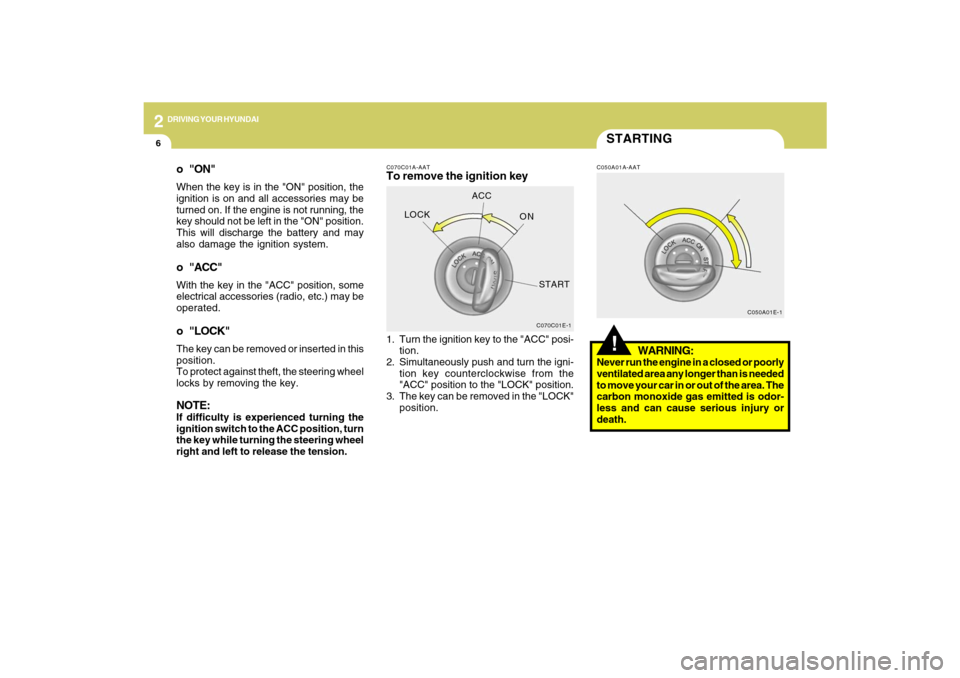
LOCKACC
ON
START
C050A01E-1
STARTING!
C070C01A-AATTo remove the ignition key
C050A01A-AAT
1. Turn the ignition key to the "ACC" posi-
tion.
2. Simultaneously push and turn the igni-
tion key counterclockwise from the
"ACC" position to the "LOCK" position.
3. The key can be removed in the "LOCK"
position.
WARNING:
Never run the engine in a closed or poorly
ventilated area any longer than is needed
to move your car in or out of the area. The
carbon monoxide gas emitted is odor-
less and can cause serious injury or
death.
o "ON"When the key is in the "ON" position, the
ignition is on and all accessories may be
turned on. If the engine is not running, the
key should not be left in the "ON" position.
This will discharge the battery and may
also damage the ignition system.o "ACC"With the key in the "ACC" position, some
electrical accessories (radio, etc.) may be
operated.o "LOCK"The key can be removed or inserted in this
position.
To protect against theft, the steering wheel
locks by removing the key.NOTE:If difficulty is experienced turning the
ignition switch to the ACC position, turn
the key while turning the steering wheel
right and left to release the tension.
Page 258 of 353
3
WHAT TO DO IN AN EMERGENCY
11
3. Turn the wheel nut wrench counter-
clockwise until the spare tire reaches
the ground.
OCM054010
OCM053100L
4. Pull out the spare tire and remove the
retainer from the center of spare tire.
D040B01CM-AATHandling the Spare Tire
To remove the spare tire
1. Open the tail gate.
2. Remove the mounting bolt cover with
a screwdriver or coin.
OCM054009
Page 260 of 353
3
WHAT TO DO IN AN EMERGENCY
13
D060D01A-AAT3. Loosen Wheel Nuts
The wheel nuts should be loosened
slightly before raising the car. To loosen
the nuts, turn the wrench handle coun-
terclockwise. When doing this, be sure
that the socket is seated completely
over the nut so it cannot slip off. For
maximum leverage, position the wrench
so the handle is to the left as shown in
the drawing. Then, while holding the
wrench near the end of the handle, push
down on it with steady pressure. Do not
remove the nuts at this time. Just
loosen them about one-half turn.
OCM054011
D060C02A-AAT2. Block the Wheel
Block the wheel that is diagonally oppo-
site from the flat to keep the vehicle
from rolling when the vehicle is raised
on the jack.
1VQA4023Flat tire
Remove the spare tire and remove the
jack and tool bag from the luggage
compartment.
NOTE:
The spare tire is located underneath
the car.D060B02O-AAT1. Obtain Spare Tire and Tool
OCM054008
Page 261 of 353
314
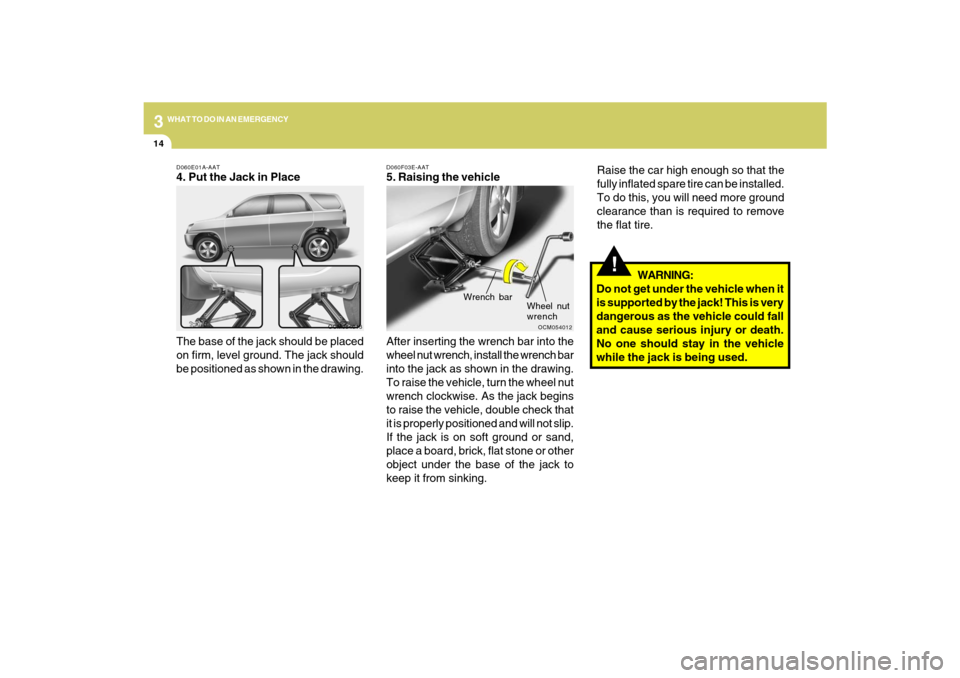
WHAT TO DO IN AN EMERGENCYD060E01A-AAT4. Put the Jack in Place
The base of the jack should be placed
on firm, level ground. The jack should
be positioned as shown in the drawing.
OCM054013D060F03E-AAT
5. Raising the vehicle
After inserting the wrench bar into the
wheel nut wrench, install the wrench bar
into the jack as shown in the drawing.
To raise the vehicle, turn the wheel nut
wrench clockwise. As the jack begins
to raise the vehicle, double check that
it is properly positioned and will not slip.
If the jack is on soft ground or sand,
place a board, brick, flat stone or other
object under the base of the jack to
keep it from sinking.
OCM054012
Wrench bar
Wheel nut
wrench
!
Raise the car high enough so that the
fully inflated spare tire can be installed.
To do this, you will need more ground
clearance than is required to remove
the flat tire.
WARNING:
Do not get under the vehicle when it
is supported by the jack! This is very
dangerous as the vehicle could fall
and cause serious injury or death.
No one should stay in the vehicle
while the jack is being used.
Page 263 of 353
316
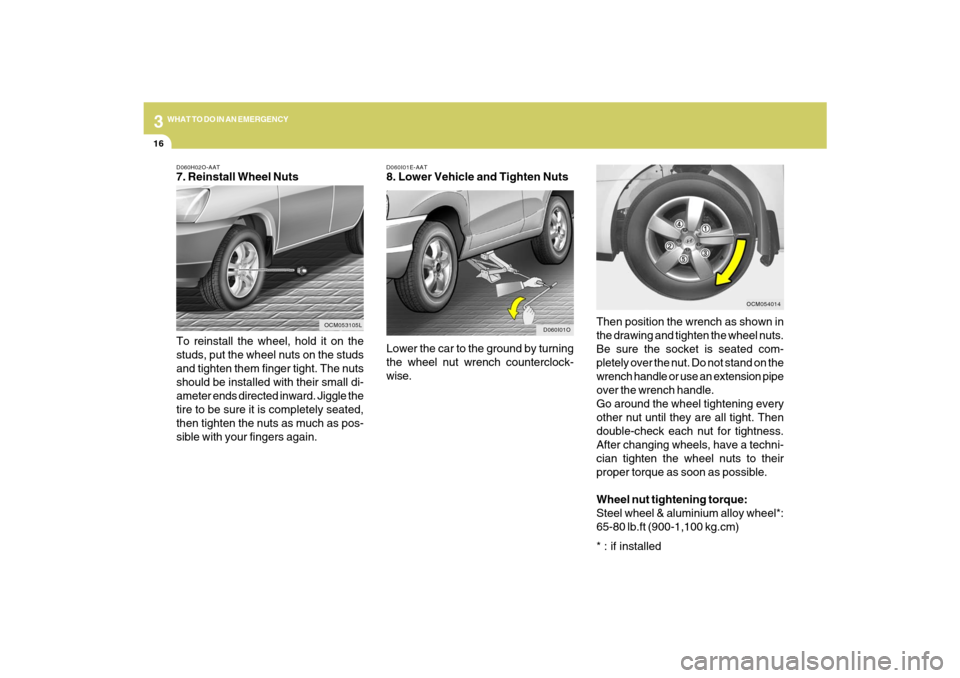
WHAT TO DO IN AN EMERGENCYD060H02O-AAT7. Reinstall Wheel Nuts
To reinstall the wheel, hold it on the
studs, put the wheel nuts on the studs
and tighten them finger tight. The nuts
should be installed with their small di-
ameter ends directed inward. Jiggle the
tire to be sure it is completely seated,
then tighten the nuts as much as pos-
sible with your fingers again.
OCM053105LD060I01E-AAT
8. Lower Vehicle and Tighten Nuts
Lower the car to the ground by turning
the wheel nut wrench counterclock-
wise.
D060I01O
Then position the wrench as shown in
the drawing and tighten the wheel nuts.
Be sure the socket is seated com-
pletely over the nut. Do not stand on the
wrench handle or use an extension pipe
over the wrench handle.
Go around the wheel tightening every
other nut until they are all tight. Then
double-check each nut for tightness.
After changing wheels, have a techni-
cian tighten the wheel nuts to their
proper torque as soon as possible.
Wheel nut tightening torque:
Steel wheel & aluminium alloy wheel*:
65-80 lb.ft (900-1,100 kg.cm)
* : if installed
OCM054014
Page 267 of 353
320
WHAT TO DO IN AN EMERGENCY
!
CAUTION:
If the car is being towed with all four
wheels on the ground, it can be towed
only from the front. Be sure that the
transaxle is in neutral. If your vehicle is
equipped with an automatic transaxle,
do not tow at speeds greater than 30 mph
(50 km/h) and for more than 15 miles (25
km).
Be sure the steering is unlocked by plac-
ing the key in the "ACC" position. A
driver must be in the towed vehicle to
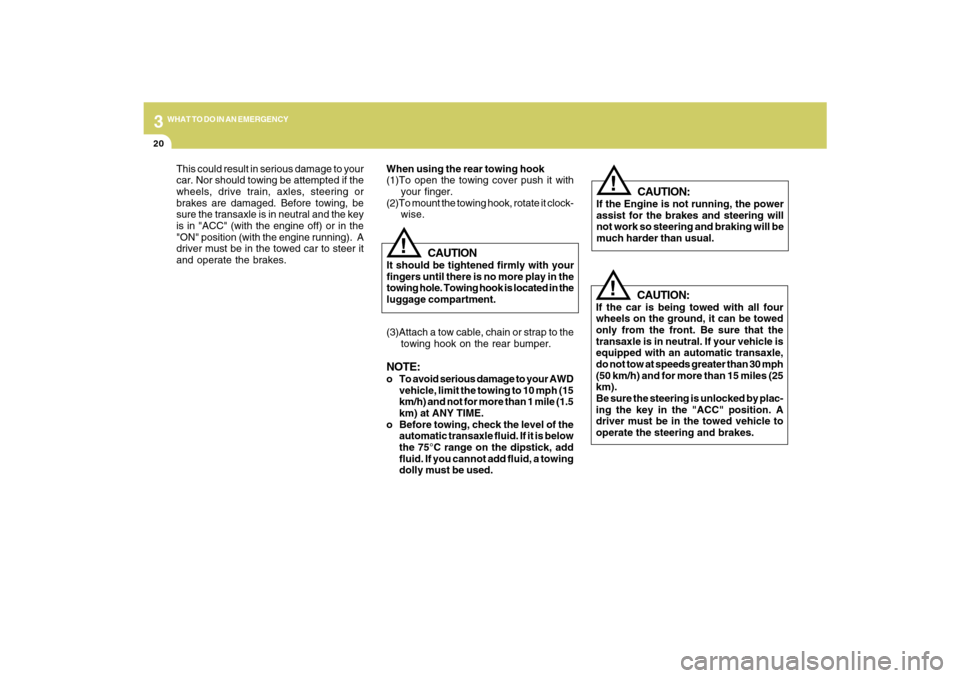
operate the steering and brakes. (3)Attach a tow cable, chain or strap to the
towing hook on the rear bumper.
NOTE:o To avoid serious damage to your AWD
vehicle, limit the towing to 10 mph (15
km/h) and not for more than 1 mile (1.5
km) at ANY TIME.
o Before towing, check the level of the
automatic transaxle fluid. If it is below
the 75°C range on the dipstick, add
fluid. If you cannot add fluid, a towing
dolly must be used.
CAUTION:
If the Engine is not running, the power
assist for the brakes and steering will
not work so steering and braking will be
much harder than usual.
!
This could result in serious damage to your
car. Nor should towing be attempted if the
wheels, drive train, axles, steering or
brakes are damaged. Before towing, be
sure the transaxle is in neutral and the key
is in "ACC" (with the engine off) or in the
"ON" position (with the engine running). A
driver must be in the towed car to steer it
and operate the brakes.
CAUTION
It should be tightened firmly with your
fingers until there is no more play in the
towing hole. Towing hook is located in the
luggage compartment.
!
When using the rear towing hook
(1)To open the towing cover push it with
your finger.
(2)To mount the towing hook, rotate it clock-
wise.
Page 291 of 353
6
DO-IT-YOURSELF MAINTENANCE
6
!
CAUTION:
Slowly pour the recommended oil by
using a funnel. Do not overfill so as not to
damage engine.
!
WARNING:
Be very careful not to touch the radiator
hose when adding the engine oil as it may
be hot enough to burn you.
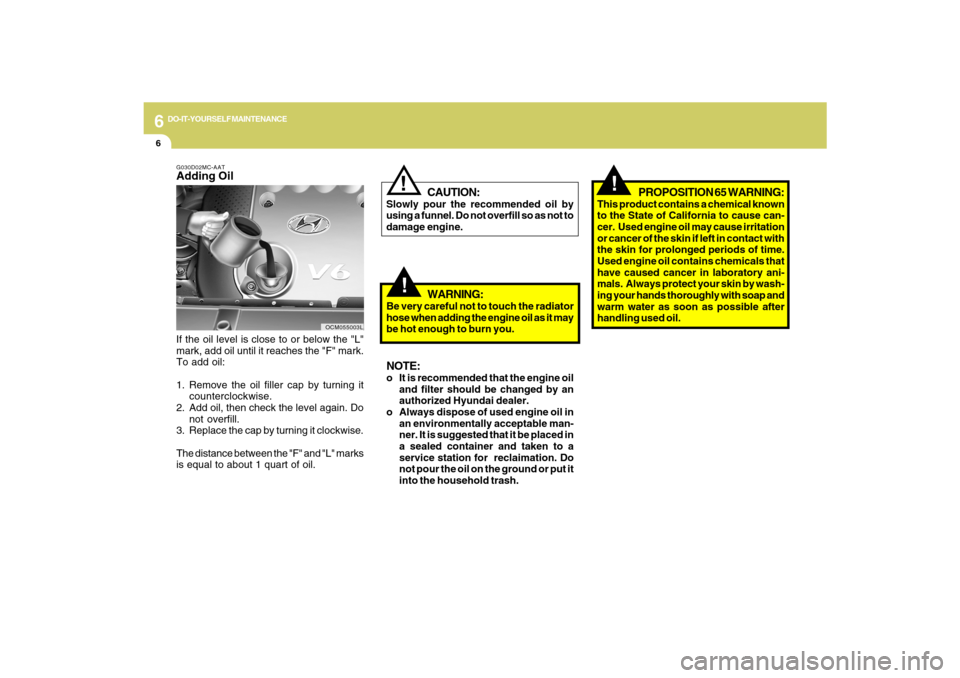
G030D02MC-AATAdding OilIf the oil level is close to or below the "L"
mark, add oil until it reaches the "F" mark.
To add oil:
1. Remove the oil filler cap by turning it
counterclockwise.
2. Add oil, then check the level again. Do
not overfill.
3. Replace the cap by turning it clockwise.
The distance between the "F" and "L" marks
is equal to about 1 quart of oil.
OCM055003L
NOTE:o It is recommended that the engine oil
and filter should be changed by an
authorized Hyundai dealer.
o Always dispose of used engine oil in
an environmentally acceptable man-
ner. It is suggested that it be placed in
a sealed container and taken to a
service station for reclaimation. Do
not pour the oil on the ground or put it
into the household trash.
!
PROPOSITION 65 WARNING:
This product contains a chemical known
to the State of California to cause can-
cer. Used engine oil may cause irritation
or cancer of the skin if left in contact with
the skin for prolonged periods of time.
Used engine oil contains chemicals that
have caused cancer in laboratory ani-
mals. Always protect your skin by wash-
ing your hands thoroughly with soap and
warm water as soon as possible after
handling used oil.
Page 305 of 353
6
DO-IT-YOURSELF MAINTENANCE
20
G200C01CM-GATPower connectorNOTE:
o If the power connector is pulled out of
the fuse panel, the warning chime,
audio, clock and interior lamps, etc.,
will not operate. The following items
must be reset after replacement.
- Digital Clock
- Trip computer
- Automatic heating and cooling con-
trol system
- Audio
o Even though the power connector is
pulled out, the battery can still be
discharged by operation of the head-
lights or other electrical devices.
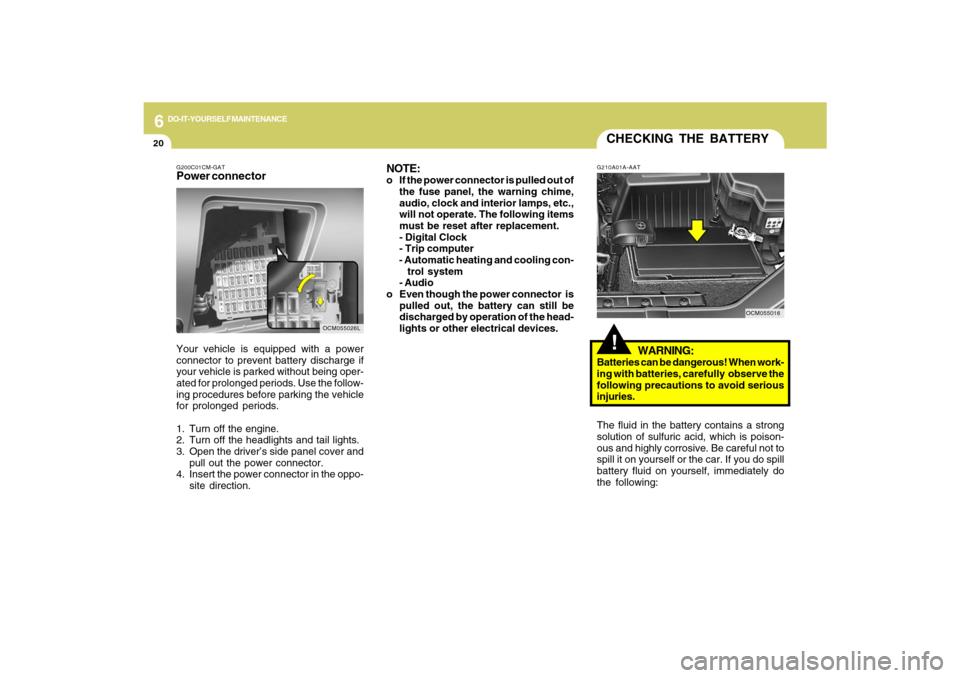
Your vehicle is equipped with a power
connector to prevent battery discharge if
your vehicle is parked without being oper-
ated for prolonged periods. Use the follow-
ing procedures before parking the vehicle
for prolonged periods.
1. Turn off the engine.
2. Turn off the headlights and tail lights.
3. Open the driver’s side panel cover and
pull out the power connector.
4. Insert the power connector in the oppo-
site direction.
OCM055026L
CHECKING THE BATTERY!
G210A01A-AAT
WARNING:
Batteries can be dangerous! When work-
ing with batteries, carefully observe the
following precautions to avoid serious
injuries.
The fluid in the battery contains a strong
solution of sulfuric acid, which is poison-
ous and highly corrosive. Be careful not to
spill it on yourself or the car. If you do spill
battery fluid on yourself, immediately do
the following:
OCM055016