2009 Hyundai Getz clock
[x] Cancel search: clockPage 9 of 191

YOUR VEHICLE AT A GLANCE
F9
1. Glove Box
2. Passenger's Airbag (If installed)
3. Audio System (If installed)
4. Hazard Warning Light
5. Digital Clock
6. Windshield Wiper/Washer Switch
7. Horn and Driver's Airbag (If installed)
8. Instrument Cluster
9. Multi-Function Light Switch
10. Front Fog Light Switch (If installed)
11. Rear Drink Holder
CAUTION:
When installing a container of liquid air freshener inside a vehicle, do not place it near the instrument cluster nor on the instrument panel pad surface. If there is any leakage from the airfreshener onto these areas (instrument cluster, instrument panel pad or air ventilator), it may damage these parts. If the liquid from the air freshener does leak onto these areas, wash them with water immediately. 12. Hand Brake Lever
13. Shift Lever (If installed)
14. Front Drink Holder
15. Ashtray
16. Power Outlelet
17. Heating/Air Conditioning Control Panel
(If installed)
18. Audio Remote Control Switch (If installed)
19. Fuse Box
20. Bonnet Release Lever
!
Page 21 of 191
1- 10 FEATURES OF YOUR HYUNDAI
!
HTB257-D
B050A01A-AAT WINDOW GLASS
To raise or lower the window, turn the window regulator handle clockwise or counterclockwise. WARNING:
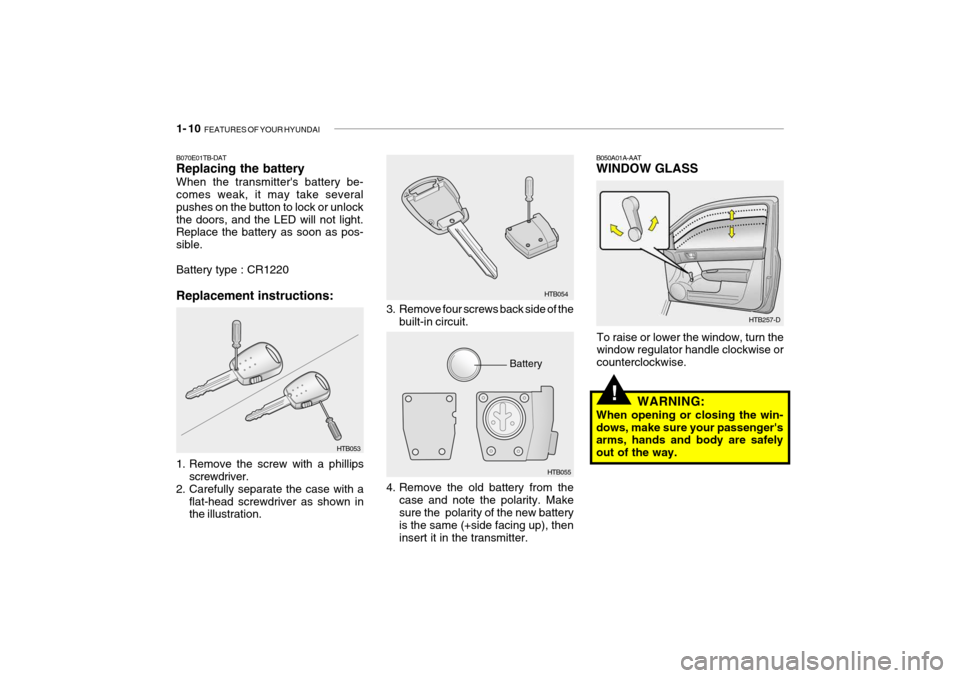
When opening or closing the win-dows, make sure your passenger's arms, hands and body are safely out of the way.3. Remove four screws back side of the built-in circuit. HTB054
HTB055
Battery
4. Remove the old battery from the case and note the polarity. Make sure the polarity of the new battery is the same (+side facing up), then insert it in the transmitter.
HTB053
B070E01TB-DAT Replacing the battery When the transmitter's battery be- comes weak, it may take several pushes on the button to lock or unlockthe doors, and the LED will not light. Replace the battery as soon as pos- sible. Battery type : CR1220 Replacement instructions:
1. Remove the screw with a phillips
screwdriver.
2. Carefully separate the case with a flat-head screwdriver as shown in the illustration.
Page 43 of 191
1- 32 FEATURES OF YOUR HYUNDAI
!
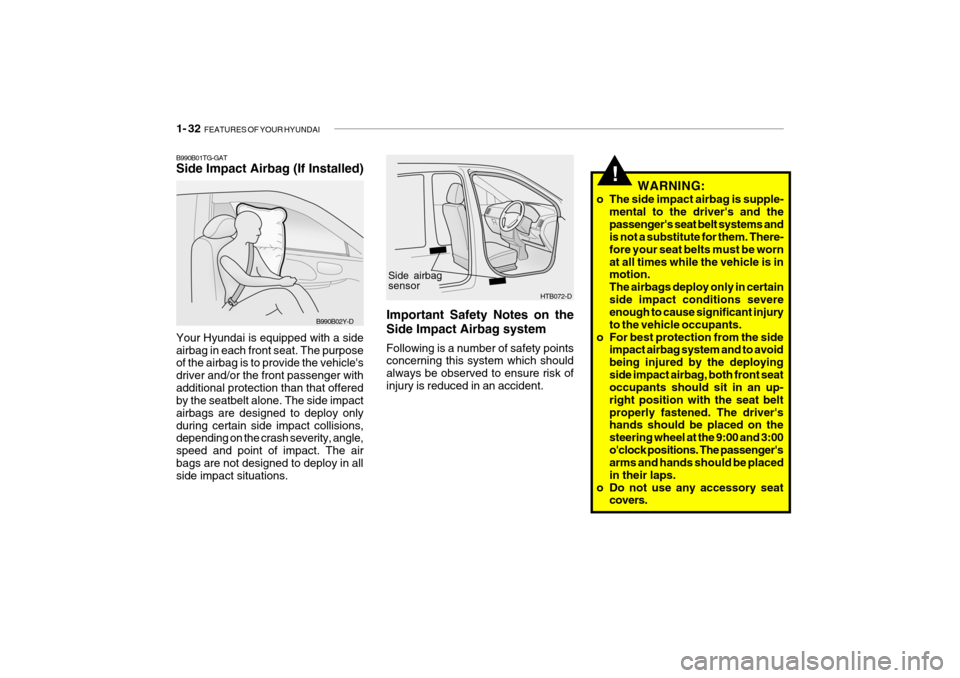
B990B01TG-GAT Side Impact Airbag (If Installed) Your Hyundai is equipped with a side airbag in each front seat. The purpose of the airbag is to provide the vehicle's driver and/or the front passenger withadditional protection than that offered by the seatbelt alone. The side impact airbags are designed to deploy onlyduring certain side impact collisions, depending on the crash severity, angle, speed and point of impact. The airbags are not designed to deploy in all side impact situations.
B990B02Y-D
HTB072-D
Side airbag sensor
Important Safety Notes on the Side Impact Airbag system Following is a number of safety points concerning this system which should always be observed to ensure risk ofinjury is reduced in an accident. WARNING:
o The side impact airbag is supple- mental to the driver's and thepassenger's seat belt systems and is not a substitute for them. There- fore your seat belts must be wornat all times while the vehicle is in motion. The airbags deploy only in certainside impact conditions severe enough to cause significant injury to the vehicle occupants.
o For best protection from the side impact airbag system and to avoidbeing injured by the deployingside impact airbag, both front seat occupants should sit in an up- right position with the seat beltproperly fastened. The driver's hands should be placed on the steering wheel at the 9:00 and 3:00o'clock positions. The passenger's arms and hands should be placed in their laps.
o Do not use any accessory seat covers.
Page 62 of 191
FEATURES OF YOUR HYUNDAI 1- 51
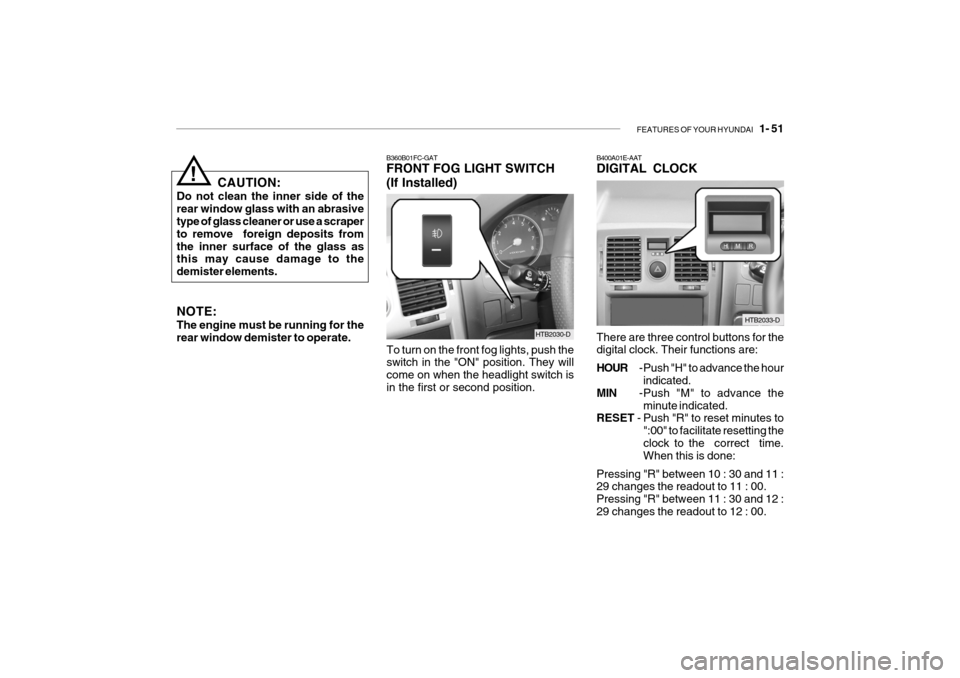
B360B01FC-GAT FRONT FOG LIGHT SWITCH (If Installed)
To turn on the front fog lights, push the switch in the "ON" position. They will come on when the headlight switch isin the first or second position.
CAUTION:
Do not clean the inner side of therear window glass with an abrasive type of glass cleaner or use a scraper to remove foreign deposits fromthe inner surface of the glass as this may cause damage to the demister elements. NOTE: The engine must be running for the rear window demister to operate.
!
HTB2030-D
B400A01E-AAT DIGITAL CLOCK
HTB2033-D
There are three control buttons for the digital clock. Their functions are: HOUR -Push "H" to advance the hour
indicated.
MIN -Push "M" to advance the
minute indicated.
RESET - Push "R" to reset minutes to
":00" to facilitate resetting the clock to the correct time. When this is done:
Pressing "R" between 10 : 30 and 11 :29 changes the readout to 11 : 00. Pressing "R" between 11 : 30 and 12 :29 changes the readout to 12 : 00.
Page 95 of 191
1- 84 FEATURES OF YOUR HYUNDAI
CAUTION:
o Be sure to remove the antenna before washing the car in an au- tomatic car wash or it may bedamaged.
o Before entering a place with a
low height clearance, be sure toadjust the roof antenna low.
o When reinstalling your antenna,
it is important that it is fully tight-ened to ensure proper reception.!
HTB2043
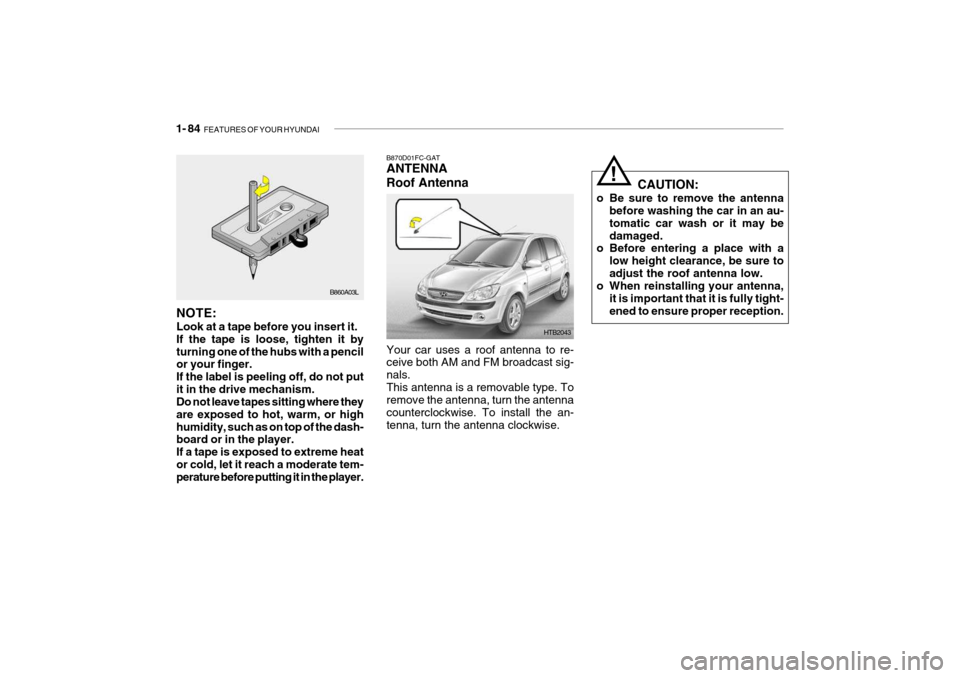
B870D01FC-GAT ANTENNA Roof Antenna
Your car uses a roof antenna to re- ceive both AM and FM broadcast sig- nals.This antenna is a removable type. To remove the antenna, turn the antenna counterclockwise. To install the an-tenna, turn the antenna clockwise.
B860A03L
NOTE: Look at a tape before you insert it. If the tape is loose, tighten it byturning one of the hubs with a pencil or your finger. If the label is peeling off, do not putit in the drive mechanism. Do not leave tapes sitting where they are exposed to hot, warm, or highhumidity, such as on top of the dash- board or in the player. If a tape is exposed to extreme heator cold, let it reach a moderate tem- perature before putting it in the player.
Page 99 of 191
2- 4 DRIVING YOUR HYUNDAI
C070C01E
C070C01A-AAT
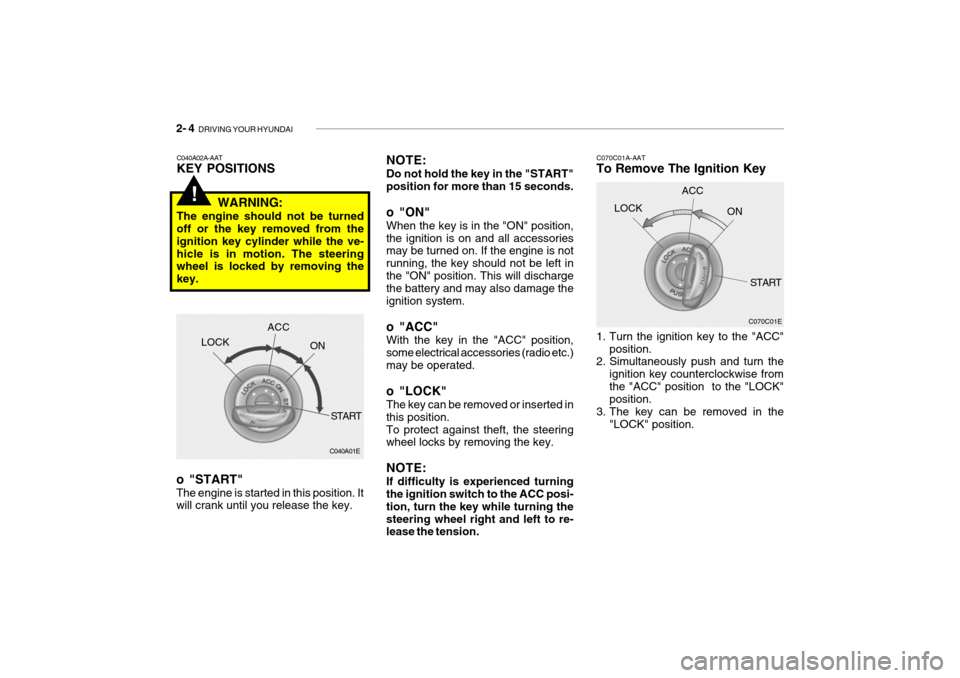
To Remove The Ignition Key
1. Turn the ignition key to the "ACC"
position.
2. Simultaneously push and turn the
ignition key counterclockwise from the "ACC" position to the "LOCK" position.
3. The key can be removed in the "LOCK" position.LOCK
ACC
ON
START
NOTE: Do not hold the key in the "START" position for more than 15 seconds.
o "ON" When the key is in the "ON" position, the ignition is on and all accessories may be turned on. If the engine is not running, the key should not be left inthe "ON" position. This will discharge the battery and may also damage the ignition system.
o "ACC" With the key in the "ACC" position, some electrical accessories (radio etc.)may be operated.
o "LOCK" The key can be removed or inserted in this position.To protect against theft, the steering wheel locks by removing the key. NOTE: If difficulty is experienced turning the ignition switch to the ACC posi- tion, turn the key while turning thesteering wheel right and left to re- lease the tension.
!
C040A02A-AAT KEY POSITIONS
WARNING:
The engine should not be turned off or the key removed from the ignition key cylinder while the ve-hicle is in motion. The steering wheel is locked by removing the key.
C040A01E
LOCK
ACC
ON
START
o "START" The engine is started in this position. It will crank until you release the key.
Page 126 of 191
3- 10 WHAT TO DO IN AN EMERGENCY
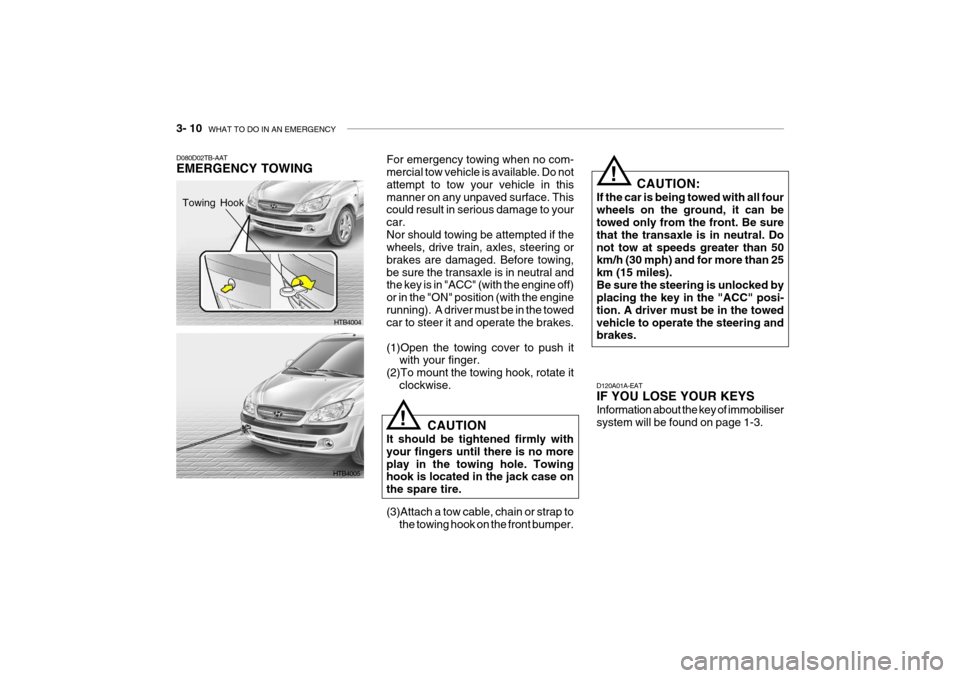
D080D02TB-AAT EMERGENCY TOWING For emergency towing when no com- mercial tow vehicle is available. Do not attempt to tow your vehicle in thismanner on any unpaved surface. This could result in serious damage to your car.Nor should towing be attempted if the wheels, drive train, axles, steering or brakes are damaged. Before towing,be sure the transaxle is in neutral and the key is in "ACC" (with the engine off) or in the "ON" position (with the enginerunning). A driver must be in the towed car to steer it and operate the brakes. (1)Open the towing cover to push it
with your finger.
(2)To mount the towing hook, rotate it clockwise.
HTB4004
D120A01A-EAT IF YOU LOSE YOUR KEYS Information about the key of immobiliser system will be found on page 1-3.
HTB4005 CAUTION:
If the car is being towed with all fourwheels on the ground, it can be towed only from the front. Be sure that the transaxle is in neutral. Donot tow at speeds greater than 50 km/h (30 mph) and for more than 25 km (15 miles).Be sure the steering is unlocked by placing the key in the "ACC" posi- tion. A driver must be in the towedvehicle to operate the steering and brakes.
!
CAUTION
It should be tightened firmly with your fingers until there is no moreplay in the towing hole. Towing hook is located in the jack case on the spare tire. (3)Attach a tow cable, chain or strap to the towing hook on the front bumper.
!
Towing Hook
Page 147 of 191

DO-IT-YOURSELF MAINTENANCE 6- 5
G030C01FC-DAT To Check the Oil Level Before checking the oil, warm up the engine to normal operating temperature and be sure your car is parked on level ground. Turn the engine off. Wait about five minutes, then remove the dipstick, wipe it off, fully reinsert the dipstick and withdraw it again. Then note the highest level the oil has reached on the dipstick. It should be between the upper ("F") and lower ("L") range. G030D01TB-DAT Adding Oil
HTB169
If the oil level is close to or below the "L" mark, add oil until it reaches the "F" mark. To add oil:
1. Remove the oil filler cap by turning it counter clockwise.
2. Add oil, then check the level again. Do not overfill.
3. Replace the cap by turning it clock-
wise.
The distance between the "F" and "L" marks is equal to about 1.2 litre of oil.
NOTE:
o For good fuel economy, SAE 5W-
20 (5W-30), ILSAC GF-3 engine oil is preferred regardless of regionaloption and engine variation.
o If SAE 5W-20, ILSAC GF-3 engine
oil is not available, secondary rec-ommended engine oil for corre- sponding temperature range can be used.
HTB167
!WARNING:
Be very careful not to touch the radia- tor hose when checking the engine oil as it may be hot enough to burn you.