2009 Hyundai Getz maintenance
[x] Cancel search: maintenancePage 54 of 191

FEATURES OF YOUR HYUNDAI 1- 43
2. Trip odometer
o This mode indicates the drive dis-
tance travelled since the last drive time reset.
o Pressing the trip switch for more
than 1 second, when the drive dis-tance is being displayed, clears the drive distance to zero.
o Refer to the explanation of the trip computer (see page 1-46, Drive Dis-tance).
B TYPE (WITHOUT TRIP COMPUTER) Function of digital odometer/trip odometer
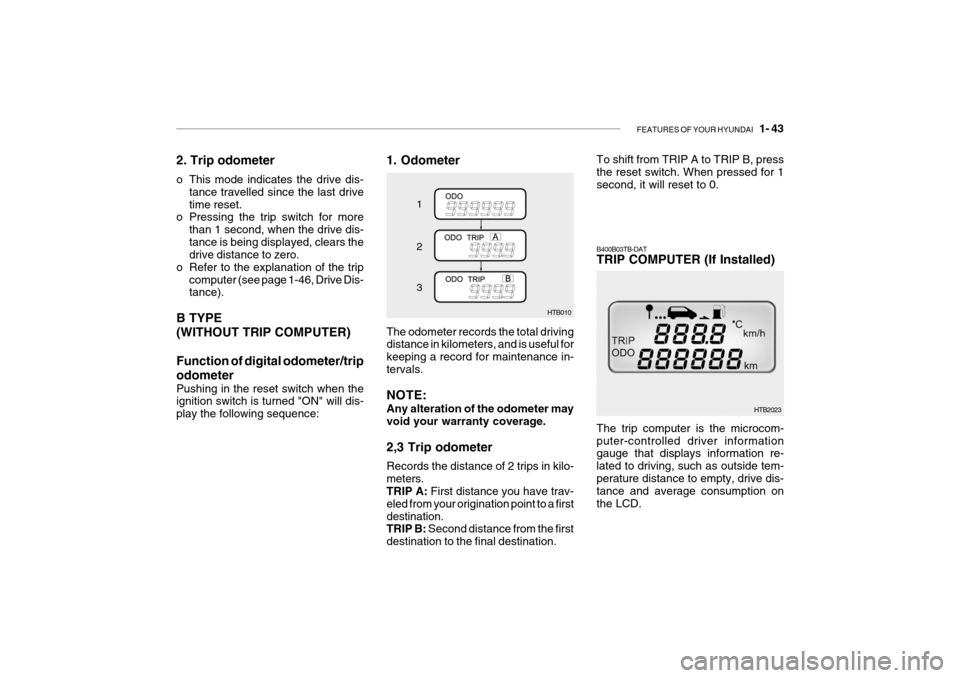
Pushing in the reset switch when the ignition switch is turned "ON" will dis- play the following sequence: 1. Odometer
HTB010
1 2 3
The odometer records the total driving distance in kilometers, and is useful for keeping a record for maintenance in-tervals. NOTE: Any alteration of the odometer may void your warranty coverage. 2,3 Trip odometer Records the distance of 2 trips in kilo- meters. TRIP A: First distance you have trav-
eled from your origination point to a first destination. TRIP B: Second distance from the first
destination to the final destination. To shift from TRIP A to TRIP B, pressthe reset switch. When pressed for 1 second, it will reset to 0.
The trip computer is the microcom- puter-controlled driver information gauge that displays information re- lated to driving, such as outside tem-perature distance to empty, drive dis- tance and average consumption on the LCD.
B400B03TB-DAT TRIP COMPUTER (If Installed)
HTB2023
Page 104 of 191

DRIVING YOUR HYUNDAI 2- 9
C090H01A-DAT NOTE:
o For smooth and safe operation,
depress the brake pedal when shifting from "Neutral" position or "Park" position to a forward or reverse gear.
o The ignition key must be in the "ON" position and the brake pedalfully depressed in order to movethe shift lever from the "P" (Park) position to any of the other posi- tions.
o It is always possible to shift from "R", "N", "D", "2", L" position to"P" position. The vehicle mustbe fully stopped to avoid transaxle damage.
C090F01A-AAT o 2 (Second gear): Use for driving on a slippery road, hill climbing or engine braking downhill."2" automatically shifts between first and second gears. This means that no shift-up to 3rd gearis performed. However, the shift-up to third gear is done when the car speed exceeds a certain value to prevent theengine from over-revving. Manually move the selector to "D" returning to normal driving condition. C090G01S-GAT o L (Low gear): Use for driving up a very steep grade or for engine braking when descendingsteep hills. When downshifting to "L", the transaxle will temporarily remain in second gear until the vehicle hasslowed enough for low gear to engage. Do not exceed 50 km/h (30 mph) in low gear."L" shifts to 1st gear only. However, shift up to 2nd is performed when the car exceeds a certain speed and, asspeed increases, the transaxle will shift up to 3rd gear to prevent over-revving the engine.
C090I04A-DAT
CAUTION:
o Shift into "R", "D" and "P" posi- tion only when the vehicle hascompletely stopped.
o Do not accelerate the engine in
reverse or any of the forwardpositions with the brakes applied.
! o Always apply the footbrake when
shifting from "P" or "N", to "R", "D", "2" or "L" position.
o Do not use the "P" (Park) posi- tion in place of the hand brake.Always set the hand brake, shift the transaxle into "P" (Park) po-sition and turn off the ignition when you leave the vehicle, even momentarily. Never leave the ve-hicle unattended while the en- gine is running.
o When accelerating from a stop on
a steep hill, the vehicle may havea tendency to roll backwards. Shift- ing the shift lever into 2nd gearwill help prevent the vehicle from rolling backwards.
o Check the automatic transaxle fluid
level regularly, and add fluid asnecessary. See the maintenance schedulefor the proper fluid recommen- dation.
Page 109 of 191

2- 14 DRIVING YOUR HYUNDAI
C140A01A-DAT DRIVING FOR ECONOMY You can save fuel and get more kilo- meters from your car if you followthese suggestions:
o Drive smoothly. Accelerate at a
moderate rate. Don't make "kanga- roo" starts or full-throttle shifts. Maintain a steady cruising speed.Don't race between stoplights. Try to adjust your speed to that of the other traffic so you don't have tochange speeds unnecessarily. Avoid heavy traffic whenever possible. Always maintain a safe distancefrom other vehicles so you can avoid unnecessary braking. This also reduces brake wear.
o Drive at a moderate speed. The faster you drive, the more fuel yourcar uses. Driving at a moderatespeed, especially on the highway, is one of the most effective ways to reduce fuel consumption.
o Don't "ride" the brake. This can in- crease fuel consumption and alsoincrease wear on this components. o In addition, driving with your foot
resting on the brake pedal may causethe brakes to overheat, which re-duces their effectiveness and may
lead to more serious consequences.
o Take care of your tyres. Keep them inflated to the recommended pres-sure. Incorrect inflation, either too much or too little, results in unnec-essary tyre wear. Check the tyre pressures at least once a month.
o Be sure that the wheels are aligned correctly. Improper alignment canresult from hitting curbs or driving too fast over irregular surfaces Pooralignment causes faster tyre wear and may also result in other prob- lems as well as greater fuel con-sumption.
o Keep your car in good condition. For
better fuel economy and reducedmaintenance costs, maintain your car in accordance with the mainte- nance schedule in Section 5. If youdrive your car in severe conditions, more frequent maintenance is re- quired (see Section 5 for details).
C310D01JM-AAT Indicators and Warning The indicators should illuminate when the ignition key is turned to ON orSTART but should go out after three seconds. If the indicators do not illuminate, or theESP or ESP-OFF indicator does not go out after 3 seconds, have the vehicle checked by an authorized dealer. Should there be any unusual conditions in the device while driving, ESP-OFFindicator illuminates as a warning. If ESP-OFF indicator illuminates, pull your car to a safe place and stop theengine. Then, start the engine again to check if the ESP-OFF indicator goes out. If the indicator remains lit even after the engine has been started, have your carchecked by an authorized Hyundai dealer.
Page 111 of 191

2- 16 DRIVING YOUR HYUNDAI
C160G01A-GAT To Keep Locks from Freezing To keep the locks from freezing, squirt an approved de-icer fluid or glycerineinto the key opening. If a lock is cov- ered with ice, squirt it with an approved de-icing fluid to remove the ice. If thelock is frozen internally, you may be able to thaw it out by using a heated key. Handle the heated key with careto avoid burning your fingers. NOTE: The proper temperature for using the immobilizer key is from -40°C to80°C. If you heat the immobilizer key over 80°C to open a frozen lock, it may cause damage to the tran-sponder in its head.
C160F01A-AAT Check Spark Plugs and Ignition System Inspect your spark plugs as described in Section 6 and replace them if neces- sary. Also check all ignition wiring and components to be sure they are notcracked, worn or damaged in any way.
C160E01A-AAT Change to "Winter Weight" Oil if Necessary In some climates it is recommended that a lower viscosity "winter weight" oil be used during cold weather. SeeSection 9 for recommendations. If you aren't sure what weight oil you should use, consult your Hyundai dealer.
C160C01A-AAT
Use High Quality Ethylene Glycol Coolant Your Hyundai is delivered with high quality ethylene glycol coolant in the cooling system. It is the only type ofcoolant that should be used because it helps prevent corrosion in the cooling system, lubricates the water pump andprevents freezing. Be sure to replace or replenish your coolant in accor- dance with the maintenance schedulein Section 5. Before winter, have your coolant tested to assure that its freez- ing point is sufficient for the tempera-tures anticipated during the winter. C160D01A-DAT Check Battery and Cables Winter puts additional burdens on the battery and charging system. Visually inspect the battery and cables as de-scribed in Section 6. The level of charge in your battery can be checked by your Hyundai dealer or a service station.
Page 113 of 191

2- 18 DRIVING YOUR HYUNDAI
!
C190C02S-DAT Trailer Brakes If your trailer is equipped with a braking system, make sure it conforms to fed-eral and/or local regulations and that it is properly installed and operating cor- rectly. NOTE: If you tow a trailer or vehicle, your car will require more frequent main- tenance due to the additional load.See "Maintenance Under Severe Usage Conditions" on page 5-4.
!
C190B01FC-DAT Trailer Tow Bars Select the proper tow bar and ball combination, making sure that its loca-tion is compatible with that of the trailer or vehicle being towed. We recom- mend only genuine Hyundai tow bars(the tow bars are made and tested in Australia for local conditions). Use a quality non-equalising hitch which dis-tributes the tongue load uniformly throughout the chassis. Maintain 4% of the trailer load on thetrailer tongue for dead weight hitches. Tongue loads can be increased or decreased by redistributing the load inthe trailer. This can be verified by checking the total weight of the loaded trailer and then checking the load onthe tongue.
WARNING:
Improperly loading your car andtrailer can serious affect its steer-ing and braking performance caus- ing a crash in which you may be seriously injured. CAUTION:
o Never connect a trailer brake sys- tem directly to the vehicle brake system.
o When towing a trailer on steep grades (in excess of 6%) pay closeattention to the engine coolant temperature gauge to ensure theengine does not overheat.
C180A01A-AAT USE OF LIGHTS Check your lights regularly for correct operation and always keep them clean.When driving during the day in condi- tions of poor visibility, it is helpful to drive with headlights on low beam.This enables you to be seen as well as to see. C190A01A-DAT TRAILER OR VEHICLE TOWING If you are considering towing with your car, you should first check with your State Department of Motor Vehicles to determine their legal requirements.Since laws vary from state to state the requirements for towing trailers, cars, or other types of vehicles or apparatusmay differ. Ask your Hyundai dealer for further details before towing.
!
CAUTION
Do not do any towing with your car during its first 2,000 km (1,200 miles) in order to allow the engine to prop- erly break in. Failure to heed thiscaution may result in serious en- gine or transaxle damage.
Page 123 of 191

WHAT TO DO IN AN EMERGENCY 3- 7
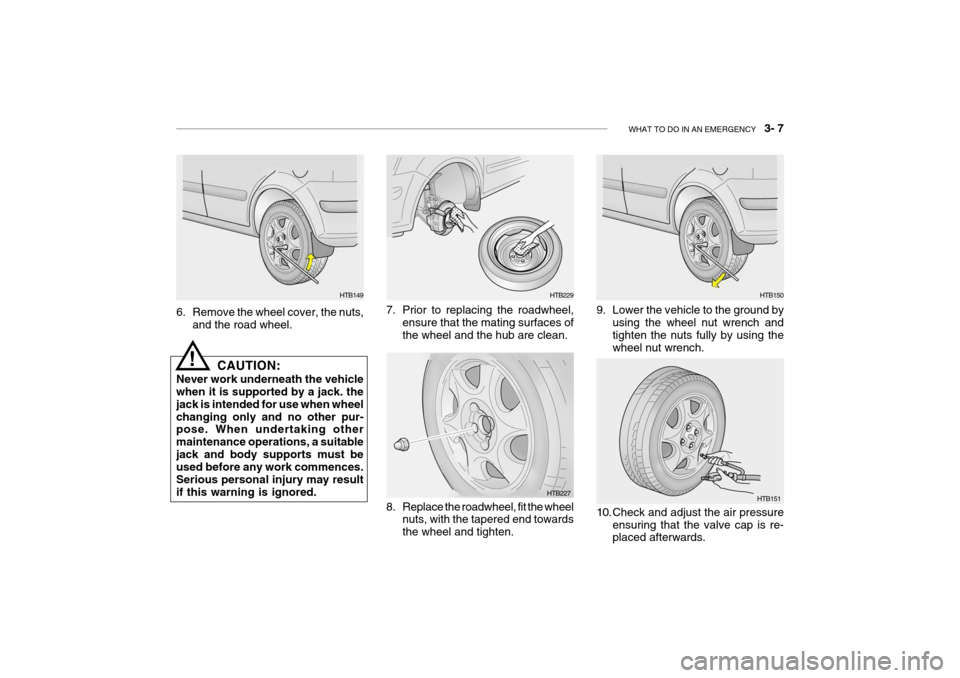
6. Remove the wheel cover, the nuts,
and the road wheel.
HTB149
CAUTION:
Never work underneath the vehicle when it is supported by a jack. the jack is intended for use when wheelchanging only and no other pur- pose. When undertaking other maintenance operations, a suitablejack and body supports must be used before any work commences. Serious personal injury may resultif this warning is ignored. 7. Prior to replacing the roadwheel,
ensure that the mating surfaces ofthe wheel and the hub are clean.
!
HTB229
8. Replace the roadwheel, fit the wheel nuts, with the tapered end towards the wheel and tighten.
HTB227 9. Lower the vehicle to the ground by
using the wheel nut wrench and tighten the nuts fully by using the wheel nut wrench.
HTB150
10. Check and adjust the air pressure ensuring that the valve cap is re- placed afterwards. HTB151
Page 134 of 191

5. VEHICLE MAINTENANCEREQUIREMENTS
Maintenance intervals ..................................................................... 5-2
Scheduled maintenance ................................................................. 5-4
Maintenance under severe usage conditions ................................ 5-6
Explanation of scheduled maintenance items ................................ 5-7
5
Page 135 of 191

5- 2 VEHICLE MAINTENANCE REQUIREMENTS
F010C01A-DAT
Specified Scheduled Proce- dures
These are the procedures such as
inspections, adjustments and replace- ments that are listed in the mainte- nance charts starting on page 5-4. These procedures must be performedat the intervals shown in the mainte- nance schedule to assure that your warranty remains in effect. Althoughit is strongly recommended that they be performed by the factory-trained or distributor-trained technicians atyour Hyundai dealer, these proce- dures may be performed at any quali- fied service facility. It is suggestedthat genuine Hyundai service parts be used for any required repairs or replacements. Other parts of equiva-lent quality such as engine oil, engine coolant, manual or auto transaxle oil, brake fluid and so on which are notsupplied by Hyundai Motor Company or its distributor may be used without affecting your warranty coverage butyou should always be sure these are equivalent
F010A01A-DAT
MAINTENANCE INTERVALS Service requirements
To ensure that you receive satisfying
operation from your Hyundai, certain maintenance procedures must be per- formed. Although careful design and engineering have reduced these to aminimum, those that are required are of the utmost importance.
It is your responsibility to have these
maintenance procedures performed to comply with the terms of the war-ranties covering your new Hyundai. The Service Passport supplied with your new vehicle provides further in-formation about these warranties. F010E02S-DAT
Do-It-Yourself Maintenance
See page (6-1 ~ 6-31).
F010D01A-DAT
General Checks
These are the regular checks youshould perform each time you drive your Hyundai or you fill the fuel tank. A list of these items will be found onpage 6-4. F010F02A-DAT
A Few Tips
Whenever you have your Hyundai serviced, keep copies of the servicerecords in your glovebox. This will help ensure that you have documen- tation when required. This is espe-cially important when an emergency service is not performed at an authorised Hyundai dealer.
F010B01A-AAT Maintenance Requirements The maintenance required for your Hyundai can be divided into three main areas:
o Specified scheduled procedures
o General checks
o Do-it-yourself maintenance to the quality of the original Hyundai
parts. Your Service Passport providesfurther information about your war-ranty coverage.