2009 Hyundai Getz power steering
[x] Cancel search: power steeringPage 138 of 191

VEHICLE MAINTENANCE REQUIREMENTS 5- 5
1 23456789
101112131415
Note : FOR THE FIRST TIME, REPLACE THE COOLANT AT 96,000 KM OR 60 MONTHS.
AFTER THAT, REPLACE IT EVERY 45,000 KM OR 24 MONTHS.
F030C06TB-DAT R : Replace I : Inspect and, after inspection, clean, adjust, repair or replace if necessary
GENERAL MAINTENANCE COOLING SYSTEMCOOLANTMANUAL TRANSAXLE OILAUTOMATIC TRANSAXLE FLUIDBRAKE HOSES AND LINESBRAKE FLUIDREAR BRAKE DRUMS/LININGS, PARKING BRAKEBRAKE PADS, CALIPERS AND ROTORSEXHAUST PIPE AND MUFFLERSUSPENSION MOUNTING BOLTSSTEERING GEAR BOX, LINKAGE & BOOTS/LOWER ARM BALL JOINTPOWER STEERING PUMP, BELT AND HOSESDRIVE SHAFTS AND BOOTSAIR CONDITIONING REFRIGERANT
AIR CONDITIONER FILTER (FOR EVAPORATOR AND BLOWER UNIT)
120
96
I I IIII I IIIII I
R
105
84
I I II I IIII I
R
90 72
75 60
6048
I I
R I II I IIIII I
R
I I I I I I I II I
R
II I IIIII I IIII
R
45 36
3024
I I II I IIII I
R
II IIII I IIII I I
R
15 12
I I II I IIII I
R
KILOMETERS X 1000 MONTHS
NO. DESCRIPTION
See Note
Page 142 of 191

VEHICLE MAINTENANCE REQUIREMENTS 5- 9
F070L01A-AAT
o Suspension Mounting Bolts
Check the suspension connections
for looseness or damage. Retighten to the specified torque. F070M01Y-AAT
o Steering Gear Box, Linkage &
Boots / Lower Arm Ball Joint, Upper Arm Ball Joint
With the vehicle stopped and engine off, check for excessive free-play inthe steering wheel.Check the linkage for bends or dam-age. Check the dust boots and balljoints for deterioration, cracks, or dam- age. Replace any damaged parts. F070N01A-AAT
o Power Steering Pump, Belt
and Hoses
Check the power steering pump and
hoses for leakage and damage. Re- place any damaged or leaking partsimmediately. Inspect the power steer- ing belt for evidence of cuts, cracks, excessive wear, oiliness and propertension. Replace or adjust it if neces- sary. F070P01A-AAT
o Driveshafts and Boots
Check the drive shafts, boots and clamps for cracks, deterioration, or damage. Replace any damaged parts and, if necessary, repack the grease. F070Q01A-AAT
o Air Conditioning Refrigerant Check the air conditioning lines and connections for leakage and damage. Check air conditioning performance according to the relevant shop manualif necessary.
F070J01A-AAT
o Brake Pads, Calipers and
Rotors
Check the pads for excessive wear,
discs for run out and wear, and cali-pers for fluid leakage.
F070K01A-AAT
o Exhaust Pipe and Muffler
Visually inspect the exhaust pipes,
muffler and hangers for cracks, dete-rioration, or damage. Start the engineand listen carefully for any exhaust gas leakage. Tighten connections or replace parts as necessary.
Page 143 of 191

6. Do-It-Yourself Maintenance
Engine compartment ........................................................................ 6-2
General checks ................................................................................ 6-3
Checking the engine oil .................................................................... 6-4
Checking the engine coolant ............................................................ 6-6
Changing the air cleaner filter ........................................................... 6-7
Filling the washer reservoir .............................................................. 6-9Checking the transaxle oil (manual)............................................... 6-10
Checking the transaxle fluid (Automatic)....................................... 6-11
Checking the brakes ...................................................................... 6-13
Air conditioning care ....................................................................... 6-14
Checking drive belts ...................................................................... 6-18
Checking and replacing fuses ........................................................ 6-18
Checking the battery ...................................................................... 6-20
Checking electric cooling fans ....................................................... 6-22
Power steering fluid level ............................................................... 6-22
Replacement of bulbs .................................................................... 6-24
Fuse panel description ................................................................... 6-30
6
Page 144 of 191

6- 2 DO-IT-YOURSELF MAINTENANCE
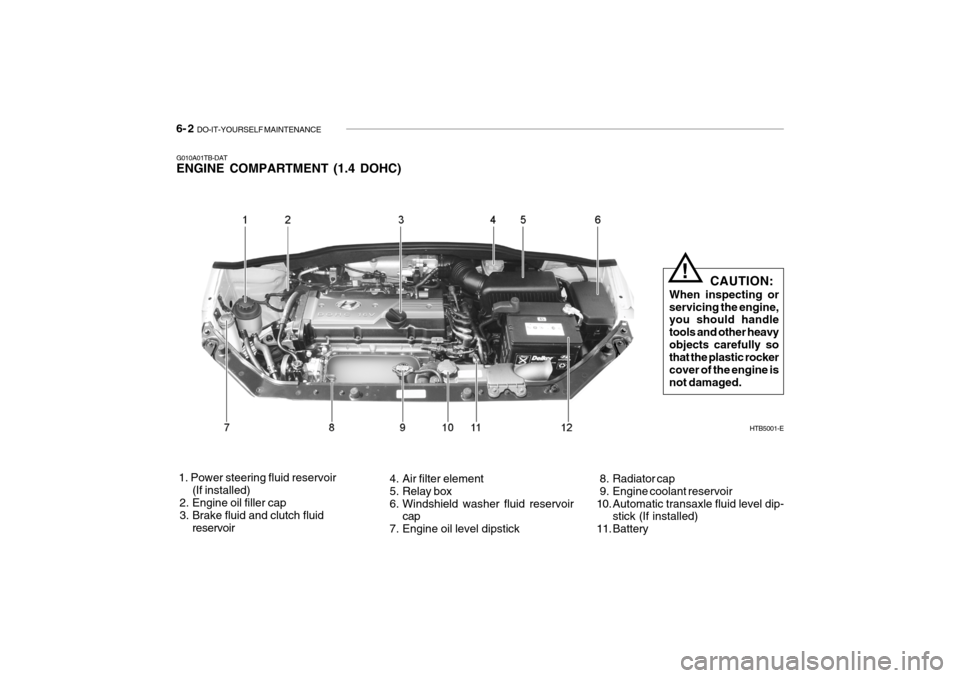
G010A01TB-DAT ENGINE COMPARTMENT (1.4 DOHC) 1. Power steering fluid reservoir
(If installed)
2. Engine oil filler cap
3. Brake fluid and clutch fluid
reservoir 4. Air filter element
5. Relay box
6. Windshield washer fluid reservoir
cap
7. Engine oil level dipstick 8. Radiator cap
9. Engine coolant reservoir
10. Automatic transaxle fluid level dip-
stick (If installed)
11. Battery HTB5001-E
CAUTION:
When inspecting or servicing the engine, you should handle tools and other heavyobjects carefully so that the plastic rocker cover of the engine isnot damaged.!
Page 145 of 191

DO-IT-YOURSELF MAINTENANCE 6- 3
G020A01A-AAT GENERAL CHECKS Engine Compartment The following should be checked regu-larly:
o Engine oil level and condition
o Transaxle fluid level and condition
o Brake fluid level
o Clutch fluid level
o Engine coolant level
o Windshield washer fluid level
o Accessory drive belt condition
o Engine coolant hose condition
o Fluid leaks (on or below compo-
nents)
o Power steering fluid level
o Battery condition G020C01A-DAT Vehicle Interior The following should be checked each time when the vehicle is driven:
o Lights operation
o Windshield wiper operation
o Horn operation
o Defroster, heating system operation
(and air conditioning, if installed)
o Steering operation and condition
o Mirror condition and operation
o Turn signal light operation
o Accelerator pedal operation
o Brake operation, including hand brake
o Manual transaxle operation, includ- ing clutch operation
o Automatic transaxle operation, in- cluding "Park" mechanism operation
o Seat control condition and operation
o Seat belt condition and operation
o Sunvisor operation If you notice anything that does not operate correctly or appears to be functioning incorrectly, inspect it care- fully and seek assistance from yourHyundai dealer if service is needed.
G020B01A-DAT Vehicle Exterior The following should be checked monthly:
o Overall appearance and condition
o Air filter condition
o Wheel condition and wheel nut torque
o Exhaust system condition
o Light condition and operation
o Windshield glass condition
o Wiper blade condition
o Paint condition and body corrosion
o Fluid leaks
o Door and bonnet lock condition
o Tyre pressure and condition (includ-
ing spare tyre)
Page 164 of 191

6- 22 DO-IT-YOURSELF MAINTENANCE
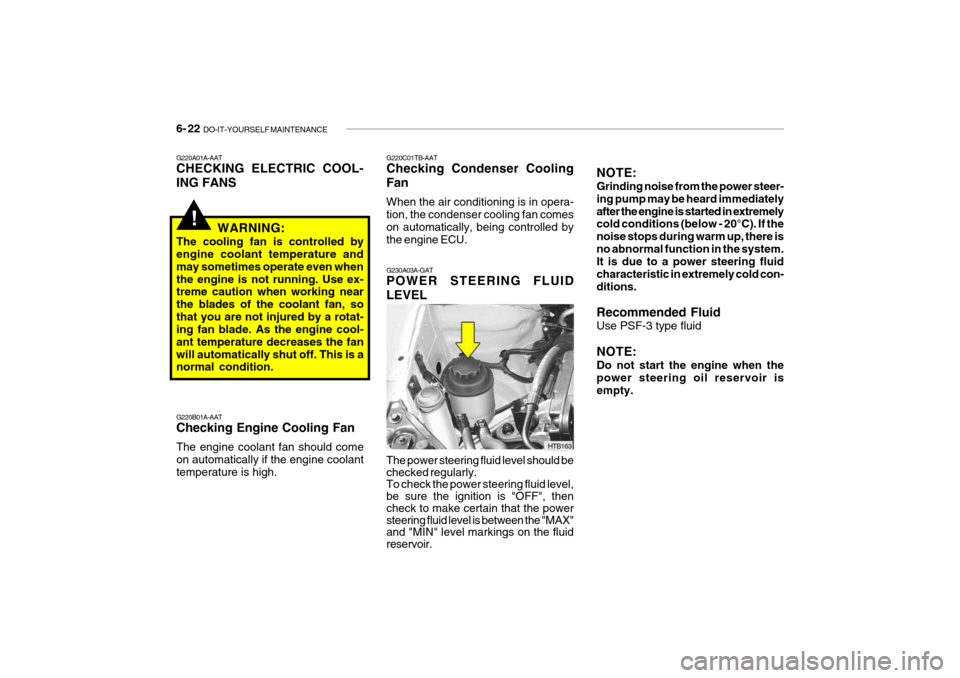
G230A03A-GAT POWER STEERING FLUID LEVEL The power steering fluid level should be checked regularly. To check the power steering fluid level, be sure the ignition is "OFF", then check to make certain that the power steering fluid level is between the "MAX" and "MIN" level markings on the fluid reservoir. HTB163NOTE: Grinding noise from the power steer- ing pump may be heard immediatelyafter the engine is started in extremely cold conditions (below - 20°C). If the noise stops during warm up, there isno abnormal function in the system. It is due to a power steering fluid characteristic in extremely cold con-ditions. Recommended Fluid Use PSF-3 type fluid NOTE: Do not start the engine when the power steering oil reservoir is empty.
!
G220A01A-AAT CHECKING ELECTRIC COOL- ING FANS
WARNING:
The cooling fan is controlled by engine coolant temperature and may sometimes operate even whenthe engine is not running. Use ex- treme caution when working near the blades of the coolant fan, sothat you are not injured by a rotat- ing fan blade. As the engine cool- ant temperature decreases the fanwill automatically shut off. This is a normal condition. G220B01A-AAT Checking Engine Cooling Fan The engine coolant fan should come on automatically if the engine coolanttemperature is high. G220C01TB-AAT Checking Condenser Cooling Fan When the air conditioning is in opera- tion, the condenser cooling fan comes on automatically, being controlled by
the engine ECU.
Page 165 of 191

DO-IT-YOURSELF MAINTENANCE 6- 23
G290A01FC-DAT HEADLIGHT AIMING ADJUSTMENT Before performing aiming adjustment, make sure of the following.
1. Keep all tyres inflated to the correct
pressure.
2. Place the vehicle on level ground
and press the front bumper & rear bumper down several times. Place the vehicle at a distance of 3,000 mm (118 in.) from the test wall.
3. See that the vehicle is unloaded (except for full levels of coolant,engine oil and fuel, and spare tyre,jack, and tools).
4. Clean the head light lenses and turn
on the headlights (low beam).
G240A01A-DAT POWER STEERING HOSES It is suggested that you check the power steering hose connections forfluid leakage at those intervals speci- fied in the vehicle maintenance schedule in Section 5. The power steer-ing hoses should be replaced if there is severe surface cracking, pulling, scuff- ing or worn spots. Deterioration of thehoses could cause premature failure.
HTB269
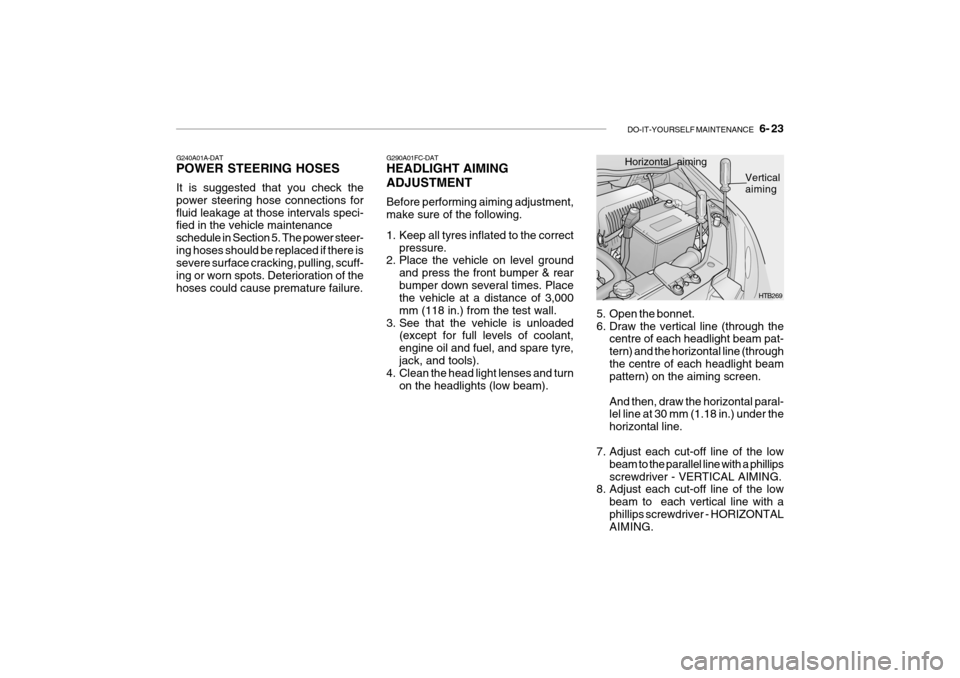
Horizontal aiming
Vertical
aiming
5. Open the bonnet.
6. Draw the vertical line (through the centre of each headlight beam pat-tern) and the horizontal line (throughthe centre of each headlight beam pattern) on the aiming screen. And then, draw the horizontal paral- lel line at 30 mm (1.18 in.) under the horizontal line.
7. Adjust each cut-off line of the low beam to the parallel line with a phillipsscrewdriver - VERTICAL AIMING.
8. Adjust each cut-off line of the low
beam to each vertical line with aphillips screwdriver - HORIZONTAL AIMING.
Page 172 of 191

6- 30 DO-IT-YOURSELF MAINTENANCE
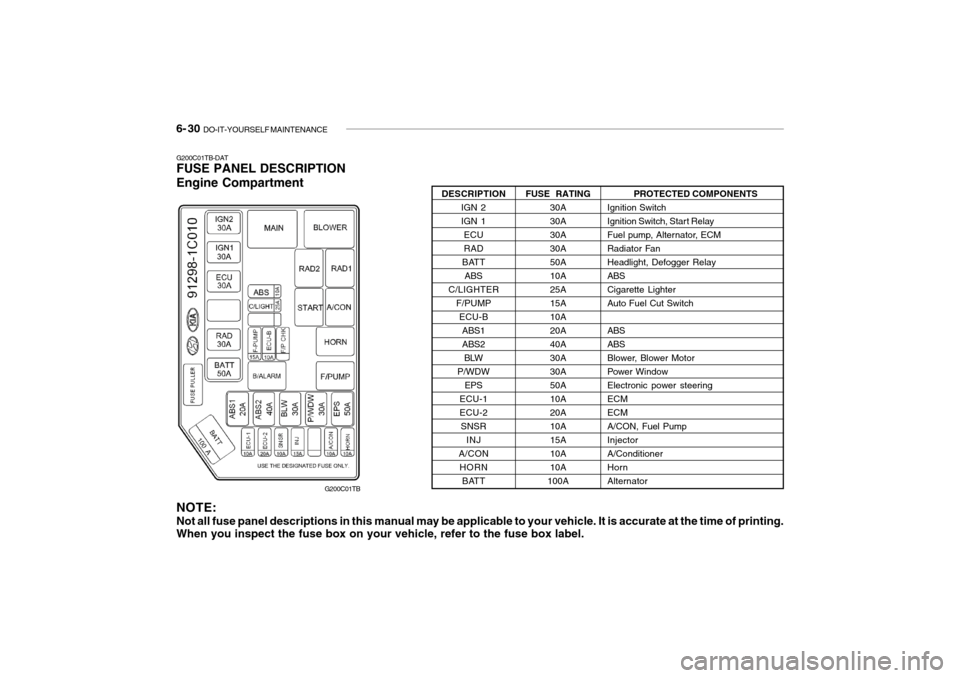
G200C01TB-DAT FUSE PANEL DESCRIPTION Engine Compartment
G200C01TB PROTECTED COMPONENTS
Ignition Switch
Ignition Switch, Start Relay
Fuel pump, Alternator, ECM
Radiator FanHeadlight, Defogger RelayABSCigarette LighterAuto Fuel Cut Switch ABS ABS
Blower, Blower Motor
Power WindowElectronic power steeringECMECMA/CON, Fuel PumpInjectorA/ConditionerHornAlternator
FUSE RATING
30A30A30A30A50A10A25A15A10A20A40A30A30A50A10A20A10A15A10A10A
100A
DESCRIPTION
IGN 2IGN 1ECURAD
BATT ABS
C/LIGHTER F/PUMPECU-BABS1ABS2BLW
P/WDW EPS
ECU-1ECU-2 SNSR INJ
A/CON HORN BATT
NOTE: Not all fuse panel descriptions in this manual may be applicable to your vehicle. It is accurate at the time of printing. When you inspect the fuse box on your vehicle, refer to the fuse box label.