Page 89 of 402

373
Features of your vehicle
Securing a child restraint seat Tether anchor system Child restraint hook holders are located
on the back of the rear seat cushions.1. Route the child restraint seat strap
over the seatback.
For vehicles with adjustable headrest,
route the tether strap under the head-
rest and between the headrest posts,
otherwise route the tether strap over
the top of the seatback.
2. Connect the tether strap hook to the
appropriate child restraint hook holder
and tighten to secure the seat.
WARNING
- Tether strap
A child can be seriously injured
or killed in a collision if the child
restraint is not properly
anchored. Always follow the child
seat manufacturer’s instructions
for installation and use.
Never mount more than one child
restraint to a single tether or to a
single lower anchorage point. The
increased load caused by multi-
ple seats may cause the tethers
or anchorage points to break,
causing serious injury or death.
WARNING
- Child restraint
check
Check that the child restraint sys-
tem is secure by pushing and
pulling it in different directions.
Incorrectly fitted child restraints
may swing, twist, tip or separate
causing death or serious injury.
OVQ036228NOVQ037229N
2nd row seat3rd row seat
OVQ036230R
Page 90 of 402

Features of your vehicle74 3
Child seat lower anchorsSome child seat manufacturers make
child restraint seats that are labeled as
LATCH or LATCH-compatible child
restraint system. LATCH stands for
"Lower Anchors and Tethers for Children".
These seats include two rigid or webbing
mounted attachments that connect to
two LATCH anchors at specific seating
positions in your vehicle. This type of
child restraint seat eliminates the need to
use seat belts to attach the child seat in
the rear seats.LATCH anchors have been provided in
your vehicle. The LATCH anchors are
located in the left and right outboard rear
seating positions. Their locations are
shown in the illustration. There is no
LATCH anchor provided for the center
rear seating position.
The LATCH anchors are located between
the seatback and the seat cushion of the
rear seat left and right outboard seating
positions.
Follow the child seat manufacturer’s
instructions to properly install child
restraint seats with LATCH or LATCH-
compatible attachments.
Once you have installed the LATCH child
restraint, assure that the seat is properly
attached to the LATCH and tether
anchors.
WARNING - Child restraint anchorage
Child restraint anchorages are
designed to withstand only those
loads imposed by correctly fitted
child restraints. Under no circum-
stances are they to be used for
adult seat belts or harnesses or
for attaching other items or
equipment to the vehicle.
The tether strap may not work
properly if attached somewhere
other than the correct tether
anchor.
OVQ037300N-1
OVQ036231N
Page 91 of 402

375
Features of your vehicle
Also, test the child restraint seat before
you place the child in it. Tilt the seat from
side to side. Also try to tug the seat for-
ward. Check to see if the anchors hold
the seat in place.
Placing a passenger seat belt
into the auto lock mode The use of the auto lock mode will
ensure that the normal movement of the
child in the vehicle does not cause the
seat belt to be pulled out and loosen the
firmness of its hold on the child restraint
system. To secure a child restraint sys-
tem, use the following procedure.
WARNING
A child can be seriously injured
or killed in a collision if the child
restraint is not properly
anchored. Always follow the child
seat manufacturer’s instructions
for installation and use.
Never install a child restraint
using the LATCH anchors at the
center position of the rear seat. In
a crash, the LATCH anchors may
break if a car seat is improperly
placed in the center position
resulting in serious or fatal
injuries. Only place a LATCH or
LATCH-compatible child seat in
the left or right out-board rear
seating positions (as shown) to
the appropriate LATCH anchors
provided.
Never mount more than one child
restraint to a single tether or to a
single lower anchorage point. The
increased load caused by multi-
ple seats may cause the tethers
or anchorage points to break,
causing serious injury or death.
WARNING
Install the child restraint seat fully
rearward against the seatback with
the seatback in a vertical position,
not reclined.
WARNING
When using the vehicle's "LATCH"
system to install a child restraint
system in the rear seat, all unused
vehicle rear seat belt metal latch
plates or tabs must be latched
securely in their seat belt buckles
and the seat belt webbing must be
retracted behind the child restraint
to prevent the child from reaching
and taking hold of unretracted seat
belts. Unlatched metal latch plates
or tabs may allow the child to reach
the unretracted seat belts which
may result in strangulation and a
serious injury or death to the child
in the child restraint.
CAUTION
Do not allow the rear seat belt web-
bing to get scratched or pinched by
the child seat latch and LATCH
anchor during the installation.
Page 92 of 402

Features of your vehicle76 3Installing a child restraint system by
lap/shoulder beltTo install a child restraint system on the
outboard or center rear seats, do the fol-
lowing:
1. Place the child restraint system in the
seat and route the lap/shoulder belt
around or through the restraint, follow-
ing the restraint manufacturer’s
instructions. Be sure the seat belt web-
bing is not twisted.2. Fasten the lap/shoulder belt latch into
the buckle. Listen for the distinct “click”
sound.
Position the release button so that it is
easy to access in case of an emergency.
3. Pull the shoulder portion of the seat
belt all the way out. When the shoulder
portion of the seat belt is fully extend-
ed, it will shift the retractor to the “Auto
Lock” (child restraint) mode.
E2MS103005
E2BLD310
MMSA3028
WARNING
A child can be seriously injured or
killed in a collision if the child
restraint is not properly anchored
to the car and the child is not prop-
erly restrained in the child restraint.
Always follow the child seat manu-
facturer’s instructions for installa-
tion and use.
Page 93 of 402

377
Features of your vehicle
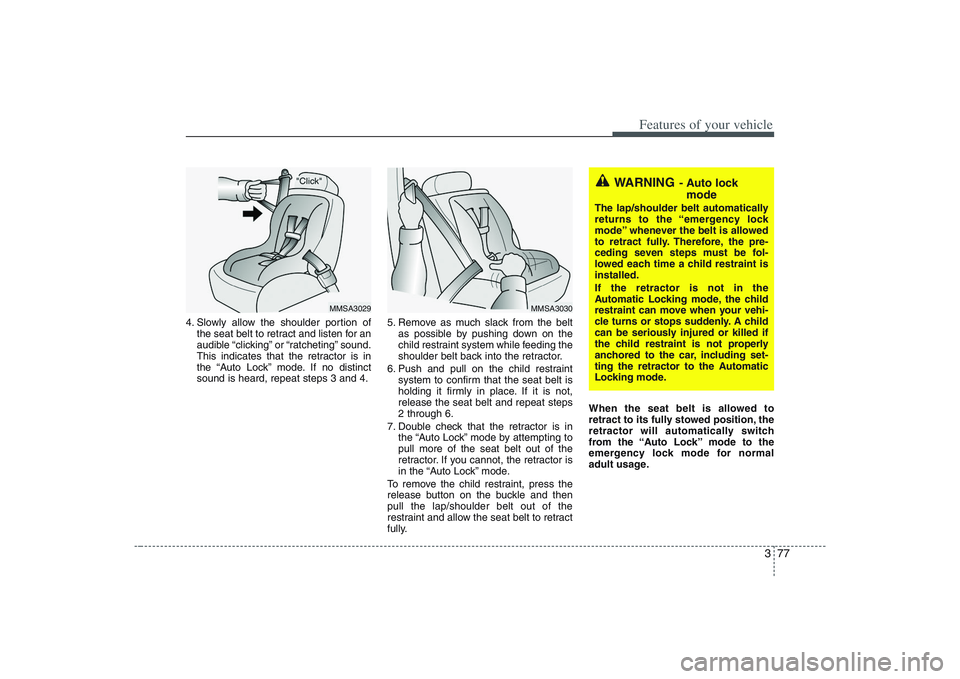
4. Slowly allow the shoulder portion of
the seat belt to retract and listen for an
audible “clicking” or “ratcheting” sound.
This indicates that the retractor is in
the “Auto Lock” mode. If no distinct
sound is heard, repeat steps 3 and 4.5. Remove as much slack from the belt
as possible by pushing down on the
child restraint system while feeding the
shoulder belt back into the retractor.
6. Push and pull on the child restraint
system to confirm that the seat belt is
holding it firmly in place. If it is not,
release the seat belt and repeat steps
2 through 6.
7. Double check that the retractor is in
the “Auto Lock” mode by attempting to
pull more of the seat belt out of the
retractor. If you cannot, the retractor is
in the “Auto Lock” mode.
To remove the child restraint, press the
release button on the buckle and then
pull the lap/shoulder belt out of the
restraint and allow the seat belt to retract
fully.When the seat belt is allowed to
retract to its fully stowed position, the
retractor will automatically switch
from the “Auto Lock” mode to the
emergency lock mode for normal
adult usage.
MMSA3029
MMSA3030
WARNING
- Auto lock
mode
The lap/shoulder belt automatically
returns to the “emergency lock
mode” whenever the belt is allowed
to retract fully. Therefore, the pre-
ceding seven steps must be fol-
lowed each time a child restraint is
installed.
If the retractor is not in the
Automatic Locking mode, the child
restraint can move when your vehi-
cle turns or stops suddenly. A child
can be seriously injured or killed if
the child restraint is not properly
anchored to the car, including set-
ting the retractor to the Automatic
Locking mode.
Page 94 of 402
Features of your vehicle78 3AIR BAG - ADVANCED SUPPLEMENTAL RESTRAINT SYSTEM
Driver’s air bagFront passenger’s
air bag
Curtain Air bag
SRS control module
OEP036094/1VQA2076/OVQ028077/OVQ037900N/OVQ036017N/1VQA2079/1VQA2323/OEP036080/OVQ036096N/OVQ036095N/1VQA2081
Side impact air bag
Occupant classi-
fication system
Front seat position
sensorSide impact sensor
Front impact sensor
Page 95 of 402

379
Features of your vehicle
Driver's and passenger's front air
bagYour Hyundai is equipped with an
advanced Supplemental Restraint (Air
bag) System and lap/shoulder belts at
both the driver and passenger seating
position. The indications of the system's
presence are the letters "SRS AIR BAG"
embossed on the air bag pad cover in the
steering wheel and the passenger's side
front panel pad above the glove box.
The Hyundai SRS consists of air bags
installed under the pad covers in the cen-
ter of the steering wheel and the passen-
ger's side front panel above the glove
box.The purpose of the SRS is to provide the
vehicle's driver and/or the front passen-
ger with additional protection than that
offered by the seat belt system alone in
case of a frontal impact of sufficient
severity. The SRS uses sensors to gath-
er information about the driver's seat
position, the driver's and front passen-
ger's seat belt usage and impact severi-
ty.
The driver's seat track position sensors,
which are installed on the seat track,
determine if the seat is fore or aft of a ref-
erence position. The seat belt buckle
sensors determine if the driver and front
passenger's seat belts are fastened.
These sensors provide the ability to con-
trol the SRS deployment based on how
close the driver's seat is to the steering
wheel, whether or not the seat belts are
fastened, and how severe the impact is.The advanced SRS offers the ability to
control the air bag inflation with two lev-
els. A first stage level is provided for mod-
erate-severity impacts. A second stage
level is provided for more severe impacts.
According to the impact severity, seating
position and seat belt usage, the
SRSCM(SRS Control Module) controls
the air bag inflation. Failure to properly
wear seat belts can increase the risk or
severity of injury in an accident.
Additionally, your Hyundai is equipped
with an occupant classification system in
the front passenger's seat. The occupant
classification system detects the pres-
ence of a passenger in the front passen-
ger's seat and will turn off the front pas-
senger's air bag under certain condi-
tions. For more detail, see "Occupant
Classification System" later in this sec-
tion.
1VQA2076
Driver’s front air bag
Page 96 of 402

Features of your vehicle80 3
✽
✽
NOTICE• Be sure to read information about the
SRS on the labels provided on the sun
visor and in the glove box.
• Advanced air bags are combined with
pre-tensioner seat belts to help pro-
vide enhanced occupant protection in
frontal crashes. Front air bags are not
intended to deploy in collisions in
which sufficient protection can be
provided by the pre-tensioner seat
belt.
• If you are considering modification of
your vehicle due to a disability, please
contact the Hyundai Customer
Assistance Center at 1-800-633-5151.
CAUTION
If a seat track position sensor or an
occupant classification system is
not working properly, the SRS air
bag warning light on the instru-
ment panel will illuminate because
the SRS air bag warning light is
connected with the seat track posi-
tion sensor and the occupant clas-
sification system. If the SRS air bag
warning light does not illuminate
when the ignition key is turned to
the "ON" position, remains illumi-
nated after approximately 6 sec-
onds when the ignition key is
turned to the "ON" position, or if it
illuminates while the vehicle is
being driven, have an authorized
Hyundai dealer inspect the
advanced SRS air bag system as
soon as possible.
AIR
BAG
WARNING
Modification to the seat structure
can adversely affect the seat
track position sensor and cause
the air bag to deploy at a different
level than should be provided.
Do not place any objects under-
neath the front seats as they
could damage the seat track posi-
tion sensor or interfere with the
occupant classification system.
Do not place any objects that may
cause magnetic fields near the
front seat. These may cause a
malfunction of the seat track
position sensor.