2009 Hyundai Elantra tyre pressure
[x] Cancel search: tyre pressurePage 180 of 308
Driving your vehicle
18
5
Anti-lock brake system (ABS) (if equipped) The ABS continuously senses the speed
of the wheels. If the wheels are going to
lock, the ABS system repeatedly modu-
lates the hydraulic brake pressure to the
wheels.
When you apply your brakes under con-
ditions which may lock the wheels, you
may hear a “tik-tik’’ sound from the
brakes, or feel a corresponding sensation
in the brake pedal. This is normal and it
means your ABS is active.
In order to obtain the maximum efficien-
cy from your ABS in an emergency situ-
ation, do not attempt to modulate your
brake pressure and do not try to pump
your brakes. Press your brake pedal as
hard as possible or as hard as the situa-
tion warrants and allow the ABS to con-
trol the force being delivered to the
brakes.
WARNING
ABS (ESP) will not prevent acci-
dents due to improper or danger-
ous driving manoeuvres. Even
though vehicle control is improved
during emergency braking, always
maintain a safe distance between
you and objects ahead. Vehicle
speeds should always be reduced
during extreme road conditions.
The braking distance for cars
equipped with an anti-lock braking
system (Electronic Stability
Program System) may be longer
than for those without it in the fol-
lowing road conditions.
During these conditions the vehicle should be driven at reducedspeeds:
Rough, gravel or snow-covered roads.
With tyre chains installed.
On roads where the road surface is pitted or has different surface height.
(Continued)
(Continued)
The safety features of an ABS
(ESP) equipped vehicle should not
be tested by high speed driving or
cornering. This could endanger the
safety of yourself or others.
Page 191 of 308
529
Driving your vehicle
Your vehicle's fuel economy depends
mainly on your style of driving, where you
drive and when you drive.
Each of these factors affects how many
kilometers you can get from a litre of fuel.
To operate your vehicle as economically
as possible, use the following driving
suggestions to help save money in bothfuel and repairs:
Drive smoothly. Accelerate at a moder-ate rate. Don't make “kangaroo” starts or full-throttle shifts and maintain a
steady cruising speed. Don't race
between stoplights. Try to adjust your
speed to that of the other traffic so you
don't have to change speeds unneces-
sarily. Avoid heavy traffic whenever
possible. Always maintain a safe dis-
tance from other vehicles so you can
avoid unnecessary braking. This also
reduces brake wear.
Drive at a moderate speed. The faster you drive, the more fuel your car uses.
Driving at a moderate speed, especial-
ly on the highway, is one of the most
effective ways to reduce fuel consump-tion. Don't "ride" the brake or clutch pedal.
This can increase fuel consumption
and also increase wear on these com-
ponents. In addition, driving with your
foot resting on the brake pedal may
cause the brakes to overheat, which
reduces their effectiveness and may
lead to more serious consequences.
Take care of your tyres. Keep them inflated to the recommended pressure.
Incorrect inflation, either too much or
too little, results in unnecessary tyre
wear. Check the tyre pressures at leastonce a month.
Be sure that the wheels are aligned correctly. Improper alignment can
result from hitting curbs or driving too
fast over irregular surfaces. Poor align-
ment causes faster tyre wear and may
also result in other problems as well as
greater fuel consumption.
Keep your car in good condition. For better fuel economy and reduced
maintenance costs, maintain your carin accordance with the maintenance
schedule in Section 7. If you drive your
car in severe conditions, more frequentmaintenance is required (see Section
7 for details). Keep your car clean. For maximum
service, your vehicle should be kept
clean and free of corrosive materials. It
is especially important that mud, dirt,
ice, etc. not be allowed to accumulate
on the underside of the car. This extra
weight can result in increased fuel con-
sumption and also contribute to corro-sion.
Travel lightly. Don't carry unnecessary weight in your car. Weight reduces fuel
economy.
Don't let the engine idle longer than necessary. If you are waiting (and not
in traffic), turn off your engine and
restart only when you're ready to go.
Remember, your vehicle does not require extended warm-up. After the
engine has started, allow the engine to
run for 10 to 20 seconds prior to plac-
ing the vehicle in gear. In very cold
weather, however, give your engine a
slightly longer warm-up period.
Don't “labour” or “over-rev” the engine. Labouring is driving too slowly in toohigh a gear resulting in the engine
bucking. If this happens, shift to a lower
gear. Over-revving is racing the engine
beyond its safe limit. This can be avoid-
ed by shifting at the recommended
speeds.
ECONOMICAL OPERATION
Page 195 of 308
533
Driving your vehicle
Higher speed motoring
Tyres:
Adjust the tyre inflation pressures to
specification. Low tyre inflation pressures
will result in overheating and possible
failure of the tyres.
Avoid using worn or damaged tyres
which may result in reduced traction or
tyre failure.
✽✽NOTICE
Never exceed the maximum tyre infla-
tion pressure shown on the tyres.
Fuel, engine coolant and engine oil:
High speed travel consumes more fuel
than urban motoring. Do not forget to
check both engine coolant and engineoil.
Drive belt:
A loose or damaged drive belt may result
in overheating of the engine.
WARNING
Underinflated or overinflated tyres can cause poor handling,
loss of vehicle control, and sud-den tyre failure leading to acci-
dents, injuries, and even death.
Always check the tyres for proper
inflation before driving. For prop-
er tyre pressures, refer to section
8, “Tyres and wheels”.
Driving on tyres with no or insuf- ficient tread is dangerous. Worn-out tyres can result in loss of
vehicle control, collisions, injury,
and even death. Worn-out tyresshould be replaced as soon as
possible and should never be
used for driving. Always check
the tyre tread before driving your
car. For further information and
tread limits, refer to section 7,
“Tyres and wheels”.
Page 219 of 308
611
What to do in an emergency
10. To reinstall the wheel, hold it on thestuds, put the wheel nuts on the studs and tighten them finger tight.
The nuts should be installed withtheir small diameter ends directed
inward. Jiggle the tyre to be sure it iscompletely seated, then tighten the
nuts as much as possible with yourfingers again.
11. Lower the car to the ground by turn- ing the wheel nut wrench counter-
clockwise.
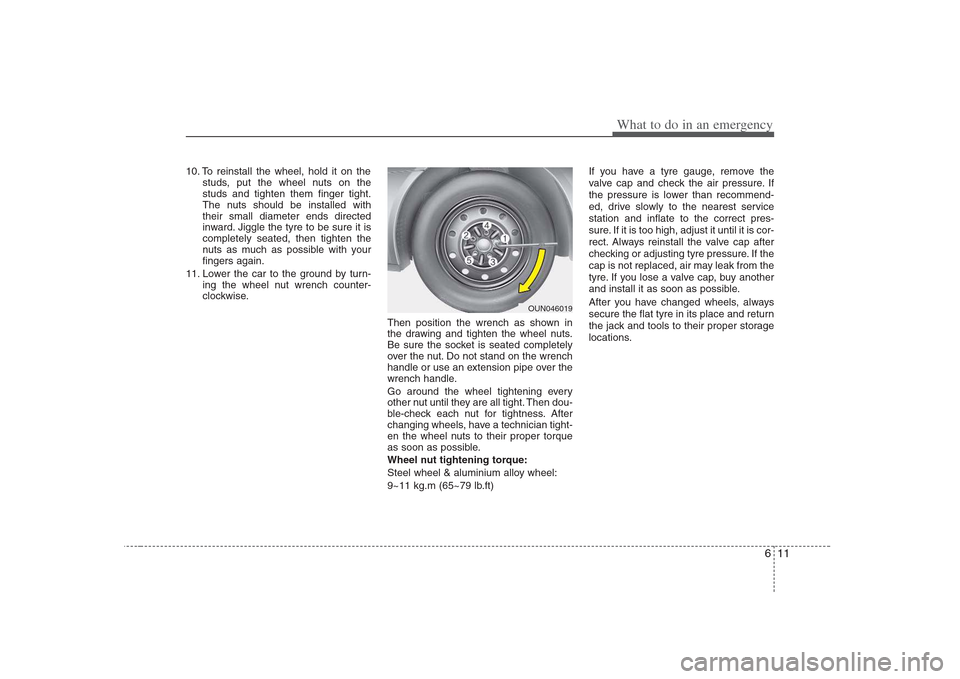
Then position the wrench as shown in
the drawing and tighten the wheel nuts.
Be sure the socket is seated completely
over the nut. Do not stand on the wrench
handle or use an extension pipe over the
wrench handle.
Go around the wheel tightening every
other nut until they are all tight. Then dou-
ble-check each nut for tightness. After
changing wheels, have a technician tight-
en the wheel nuts to their proper torque
as soon as possible.
Wheel nut tightening torque:
Steel wheel & aluminium alloy wheel:
9~11 kg.m (65~79 lb.ft) If you have a tyre gauge, remove the
valve cap and check the air pressure. If
the pressure is lower than recommend-
ed, drive slowly to the nearest servicestation and inflate to the correct pres-
sure. If it is too high, adjust it until it is cor-
rect. Always reinstall the valve cap after
checking or adjusting tyre pressure. If the
cap is not replaced, air may leak from the
tyre. If you lose a valve cap, buy another
and install it as soon as possible.
After you have changed wheels, always
secure the flat tyre in its place and return
the jack and tools to their proper storage
locations.
OUN046019
Page 220 of 308
What to do in an emergency
12
6
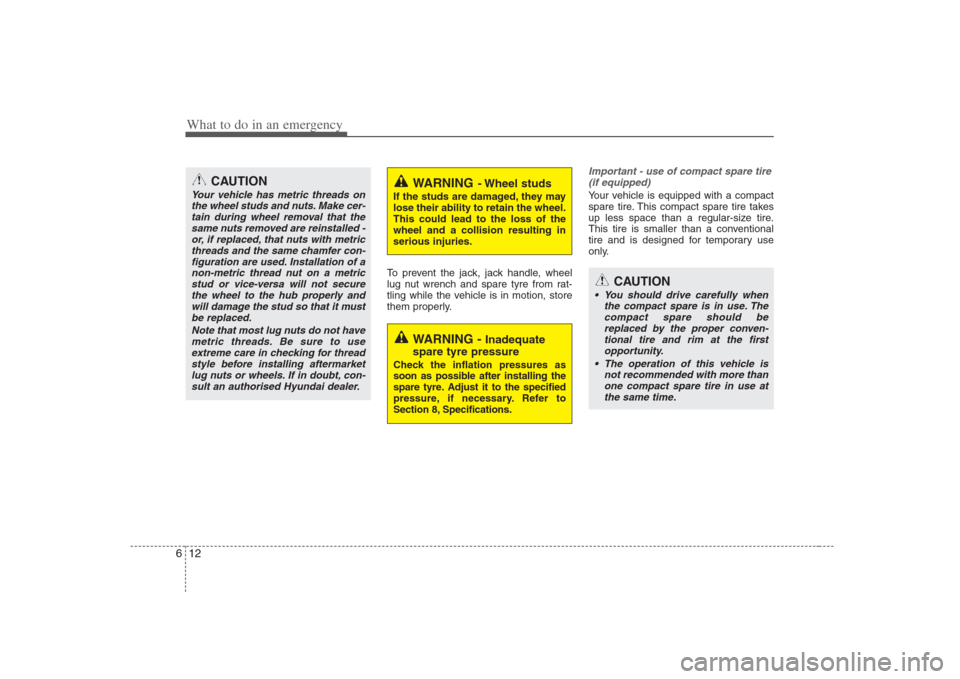
To prevent the jack, jack handle, wheel
lug nut wrench and spare tyre from rat-
tling while the vehicle is in motion, store
them properly.
Important - use of compact spare tire
(if equipped)
Your vehicle is equipped with a compact
spare tire. This compact spare tire takes
up less space than a regular-size tire.
This tire is smaller than a conventional
tire and is designed for temporary use
only.
CAUTION
Your vehicle has metric threads on
the wheel studs and nuts. Make cer-tain during wheel removal that the same nuts removed are reinstalled -
or, if replaced, that nuts with metricthreads and the same chamfer con-figuration are used. Installation of a non-metric thread nut on a metric
stud or vice-versa will not securethe wheel to the hub properly andwill damage the stud so that it must be replaced.
Note that most lug nuts do not havemetric threads. Be sure to useextreme care in checking for thread style before installing aftermarket
lug nuts or wheels. If in doubt, con-sult an authorised Hyundai dealer.WARNING - Wheel studs
If the studs are damaged, they may lose their ability to retain the wheel.This could lead to the loss of thewheel and a collision resulting inserious injuries.
WARNING - Inadequate
spare tyre pressure
Check the inflation pressures as
soon as possible after installing the
spare tyre. Adjust it to the specified
pressure, if necessary. Refer to
Section 8, Specifications.
CAUTION
You should drive carefully when the compact spare is in use. Thecompact spare should bereplaced by the proper conven-
tional tire and rim at the firstopportunity.
The operation of this vehicle is not recommended with more than
one compact spare tire in use atthe same time.
Page 229 of 308
Maintenance
4
7
OWNER MAINTENANCE
The following lists are vehicle checks and
inspections that should be performed by
the owner or an authorised Hyundaidealer at the frequencies indicated to
help ensure safe, dependable operation
of your vehicle.
Any adverse conditions should be
brought to the attention of your dealer as
soon as possible.
These Owner Maintenance Checks are
generally not covered by warranties and
you may be charged for labour, parts and
lubricants used. Owner maintenance schedule
When you stop for fuel:
Check the engine oil level.
Check coolant level in coolant reser-
voir.
Check the windshield washer fluid level.
Look for low or under-inflated tyres.
While operating your vehicle:
Note any changes in the sound of the exhaust or any smell of exhaust fumes
in the vehicle.
Check for vibrations in the steering wheel. Notice any increased steering
effort or looseness in the steering
wheel, or change in its straight-aheadposition.
Notice if your vehicle constantly turns slightly or “pulls” to one side when trav-
elling on smooth, level road.
When stopping, listen and check for unusual sounds, pulling to one side,
increased brake pedal travel or “hard-
to-push” brake pedal.
If any slipping or changes in the oper- ation of your transaxle occurs, check
the transaxle fluid level.
Check automatic transaxle P (Park) function.
Check hand brake.
Check for fluid leaks under your vehicle (water dripping from the air condition-
ing system during or after use is nor-mal).
WARNING
Be careful when checking your
engine coolant level when the
engine is hot. Scalding hot coolant
and steam may blow out under
pressure. This could cause burns
or other serious injury.
Page 230 of 308
75
Maintenance
At least monthly:
Check coolant level in the coolantrecovery reservoir.
Check the operation of all exterior lights, including the stoplights, turn sig-
nals and hazard warning flashers.
Check the inflation pressures of all tyres including the spare.
At least twice a year
(i.e., every Spring and Fall) :
Check radiator, heater and air condi- tioning hoses for leaks or damage.
Check windshield washer spray and wiper operation. Clean wiper blades
with clean cloth dampened with wash-er fluid.
Check headlight alignment.
Check muffler, exhaust pipes, shields and clamps.
Check the lap/shoulder belts for wear and function.
Check for worn tyres and loose wheel lug nuts.
At least once a year :
Clean body and door drain holes.
Lubricate door hinges and checks, and
bonnet hinges.
Lubricate door and bonnet locks and latches.
Lubricate door rubber weatherstrips.
Check the air conditioning system before the warm weather season.
Inspect and lubricate automatic transaxle linkage and controls.
Clean battery and terminals.
Check the brake (and clutch) fluid level.
Page 235 of 308
Maintenance
10
7
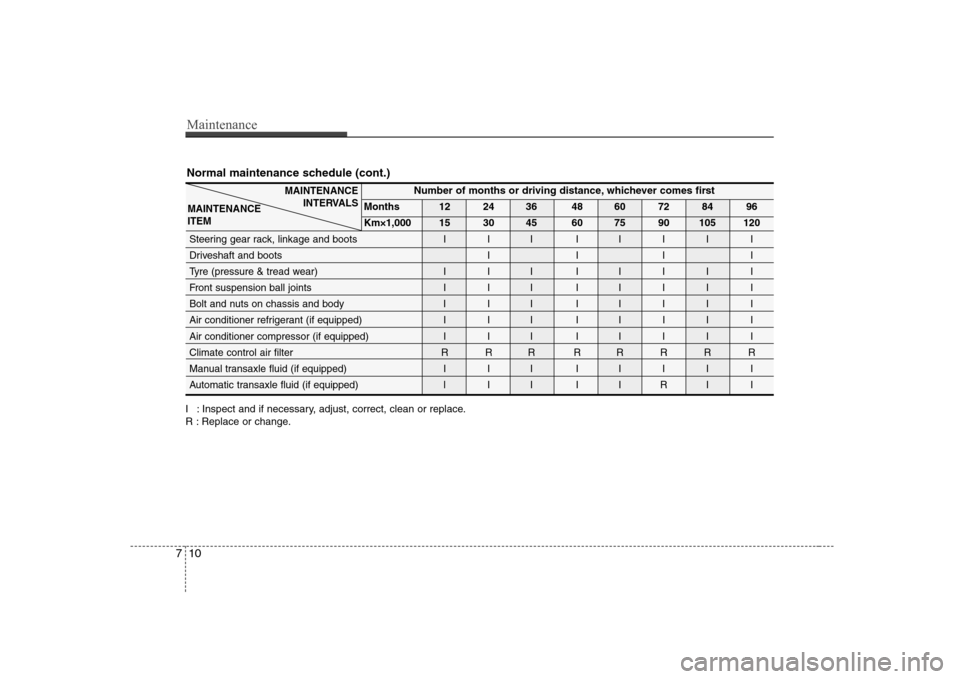
Normal maintenance schedule (cont.)
I : Inspect and if necessary, adjust, correct, clean or replace.
R : Replace or change.
Number of months or driving distance, whichever comes first
Months 12 24 36 48 60 72 84 96
Km×1,000 15 30 45 60 75 90 105 120
Steering gear rack, linkage and boots I I I I I I I I
Driveshaft and boots I I I I
Tyre (pressure & tread wear) I I I I I I I I
Front suspension ball joints I I I I I I I I
Bolt and nuts on chassis and body I I I I I I I I
Air conditioner refrigerant (if equipped) I I I I I I I I
Air conditioner compressor (if equipped) I I I I I I I I
Climate control air filter R R R R R R R R
Manual transaxle fluid (if equipped) I I I I I I I I
Automatic transaxle fluid (if equipped)
III IIRI I
MAINTENANCE INTERVALS
MAINTENANCE ITEM