Page 81 of 308

Features of your vehicle
26
4
STEERING WHEEL
Electronic power steering
Power steering uses the motor to assist
you in steering the vehicle. If the engine
is off or if the power steering system
becomes inoperative, the vehicle may
still be steered, but it will require
increased steering effort.
The motor driven power steering is con-
trolled by power steering control unit
which sense the steering wheel torque,
steering wheel position and vehicle
speed to command the motor.
The steering wheel becomes heavier as
the vehicle’s speed increases and
becomes lighter as the vehicle’s speed
decreases for the better control of the
steering wheel.
Should you notice any change in the
effort required to steer during normal
vehicle operation, have the power steer-
ing checked by an authorised Hyundai
dealer.
✽✽ NOTICE
The following symptoms may be
occurred during normal vehicle opera-
tion and if there is no illumination ofEPS warning light, it is not malfunction
of EPS system. After turning the igni-tion switch on, the steering wheel
becomes heavier while it performs EPS
system diagnostics for a few seconds,
then it returns to be normal steering
condition. The click sound of EPS relay
may occur after turning the ignition
switch on or off, this is normal opera-
tion. When it is steered in the stop posi-
tion or low driving speed, motor noise
may occur again, this is normal opera-tion.Tilt steering
A tilt steering wheel allows you to adjust
the steering wheel before you drive. You
can also raise it to the highest level to
give your legs more room when you exit
and enter the vehicle.
The steering wheel should be positioned
so that it is comfortable for you to drive,
while permitting you to see the instru-
ment panel warning lights and gauges.
Page 219 of 308

611
What to do in an emergency
10. To reinstall the wheel, hold it on thestuds, put the wheel nuts on the studs and tighten them finger tight.
The nuts should be installed withtheir small diameter ends directed
inward. Jiggle the tyre to be sure it iscompletely seated, then tighten the
nuts as much as possible with yourfingers again.
11. Lower the car to the ground by turn- ing the wheel nut wrench counter-
clockwise.
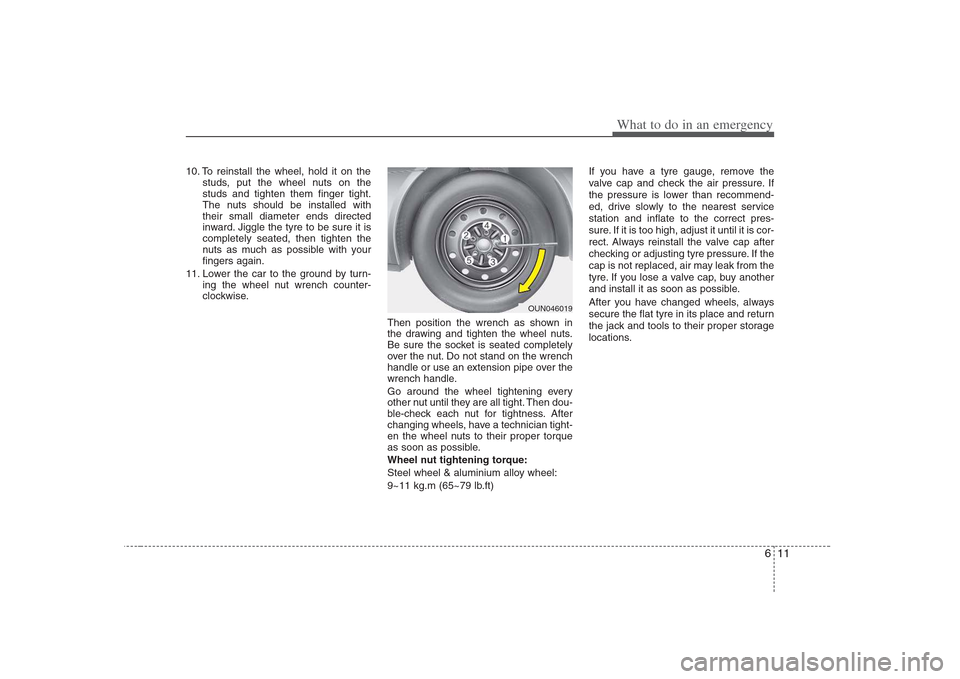
Then position the wrench as shown in
the drawing and tighten the wheel nuts.
Be sure the socket is seated completely
over the nut. Do not stand on the wrench
handle or use an extension pipe over the
wrench handle.
Go around the wheel tightening every
other nut until they are all tight. Then dou-
ble-check each nut for tightness. After
changing wheels, have a technician tight-
en the wheel nuts to their proper torque
as soon as possible.
Wheel nut tightening torque:
Steel wheel & aluminium alloy wheel:
9~11 kg.m (65~79 lb.ft) If you have a tyre gauge, remove the
valve cap and check the air pressure. If
the pressure is lower than recommend-
ed, drive slowly to the nearest servicestation and inflate to the correct pres-
sure. If it is too high, adjust it until it is cor-
rect. Always reinstall the valve cap after
checking or adjusting tyre pressure. If the
cap is not replaced, air may leak from the
tyre. If you lose a valve cap, buy another
and install it as soon as possible.
After you have changed wheels, always
secure the flat tyre in its place and return
the jack and tools to their proper storage
locations.
OUN046019
Page 240 of 308

715
Maintenance
Manual transaxle fluid (if equipped)
Inspect the manual transaxle fluid
according to the maintenance schedule.
✽✽NOTICE
If the oil level is low, check for possible
leaks before adding oil. Do not overfill.
Automatic transaxle fluid (if equipped)
The fluid level should be in the "HOT"
range of the dipstick, after the engine
and transaxle are at normal operating
temperature. Check the automatic
transaxle fluid level with the engine run-
ning and the transaxle in neutral, with the
hand brake properly applied. Brake hoses and lines
Visually check for proper installation,
chafing, cracks, deterioration and any
leakage. Replace any deteriorated or
damaged parts immediately. Brake fluid
Check brake fluid level in the brake fluid
reservoir. The level should be between
“MIN” and “MAX” marks on the side of
the reservoir. Use only hydraulic brake
fluid conforming to DOT 3 or DOT 4. Hand brake
Inspect the hand brake system including
the hand brake lever and cables. For
detailed service procedures, refer to the
Shop Manual.
Brake pads, calipers and rotors
Check the pads for excessive wear, discs
for run out and wear, and calipers for fluid
leakage. Suspension mounting bolts
Check the suspension connections for
looseness or damage. Retighten to the
specified torque.
Steering gear box, linkage &
boots/lower arm ball joint
With the vehicle stopped and engine off,
check for excessive free-play in the
steering wheel.
Check the linkage for bends or damage.
Check the dust boots and ball joints for
deterioration, cracks, or damage.
Replace any damaged parts. Drive shafts and boots
Check the drive shafts, boots and clamps
for cracks, deterioration, or damage.
Replace any damaged parts and, if nec-
essary, repack the grease.
Air conditioning refrigerant (if equipped)
Check the air conditioning lines and con-
nections for leakage and damage. Check
air conditioning performance according
to the relevant shop manual if necessary.
Page 292 of 308
83
Specifications & Consumer information
TYRES AND WHEELS
Inflation pressure kPa (psi)
Front Rear
185/65R15 88H 5.5J×15
195/65R15 91H 5.5J×15 220 (32) 220 (32)
205/55R16 91H 6.0J×16
T125/80D15 95M 4.0T×15 420 (60) 420 (60)
Full size tyre
Compact
spare tyre * Wheel lug nut torque kg•m
(lb N
9~11
(65~79 , 88~107)
Item
Tyre
size Wheel size
* : If equipped