2009 Hyundai Elantra length
[x] Cancel search: lengthPage 21 of 308
Safety system of your vehicle
12
3
Seat belt warning
If the driver's seat belt is not fastened
when the key is turned ON or if it is
unfastened after the key is turned ON,
the seat belt warning light will blink for
approximately 6 seconds.
If the driver's seat belt is not fastened
when the key is turned ON or if it is
unfastened after the key is ON, the seat
belt warning chime will sound for approx-
imately 6 seconds.Lap/shoulder belt
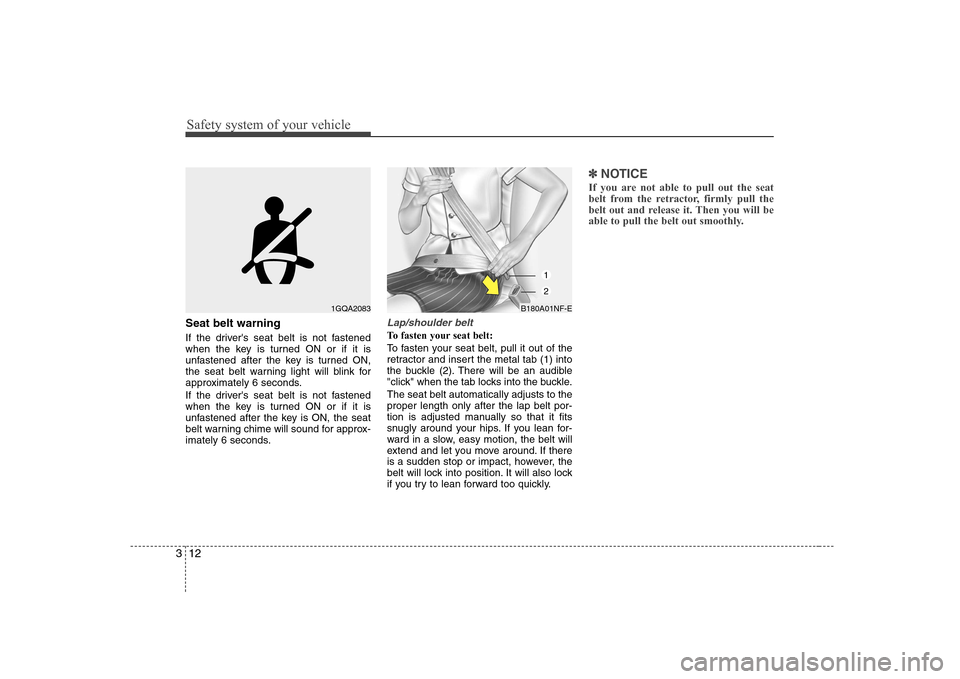
To fasten your seat belt:
To fasten your seat belt, pull it out of the
retractor and insert the metal tab (1) into
the buckle (2). There will be an audible
"click" when the tab locks into the buckle. The seat belt automatically adjusts to the proper length only after the lap belt por-
tion is adjusted manually so that it fits
snugly around your hips. If you lean for-
ward in a slow, easy motion, the belt will
extend and let you move around. If there
is a sudden stop or impact, however, the
belt will lock into position. It will also lock
if you try to lean forward too quickly.
✽✽
NOTICE
If you are not able to pull out the seat
belt from the retractor, firmly pull the
belt out and release it. Then you will be
able to pull the belt out smoothly.
B180A01NF-E
1
2
1GQA2083
Page 32 of 308
323
Safety system of your vehicle
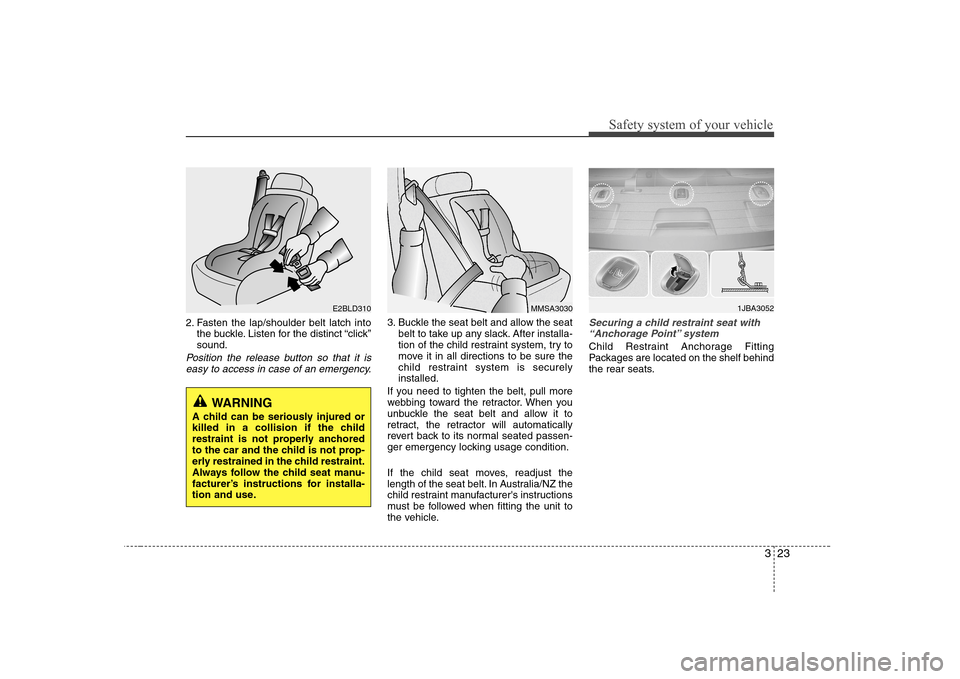
2. Fasten the lap/shoulder belt latch intothe buckle. Listen for the distinct “click” sound.
Position the release button so that it is
easy to access in case of an emergency.
3. Buckle the seat belt and allow the seat belt to take up any slack. After installa-
tion of the child restraint system, try to
move it in all directions to be sure the
child restraint system is securelyinstalled.
If you need to tighten the belt, pull more
webbing toward the retractor. When you
unbuckle the seat belt and allow it to
retract, the retractor will automatically
revert back to its normal seated passen-
ger emergency locking usage condition.
If the child seat moves, readjust the
length of the seat belt. In Australia/NZ the
child restraint manufacturer's instructions
must be followed when fitting the unit to
the vehicle.Securing a child restraint seat with “Anchorage Point” system
Child Restraint Anchorage Fitting
Packages are located on the shelf behind
the rear seats.
E2BLD310
WARNING
A child can be seriously injured or
killed in a collision if the child
restraint is not properly anchored
to the car and the child is not prop-
erly restrained in the child restraint.
Always follow the child seat manu-
facturer’s instructions for installa-
tion and use.
MMSA30301JBA3052
Page 34 of 308
325
Safety system of your vehicle
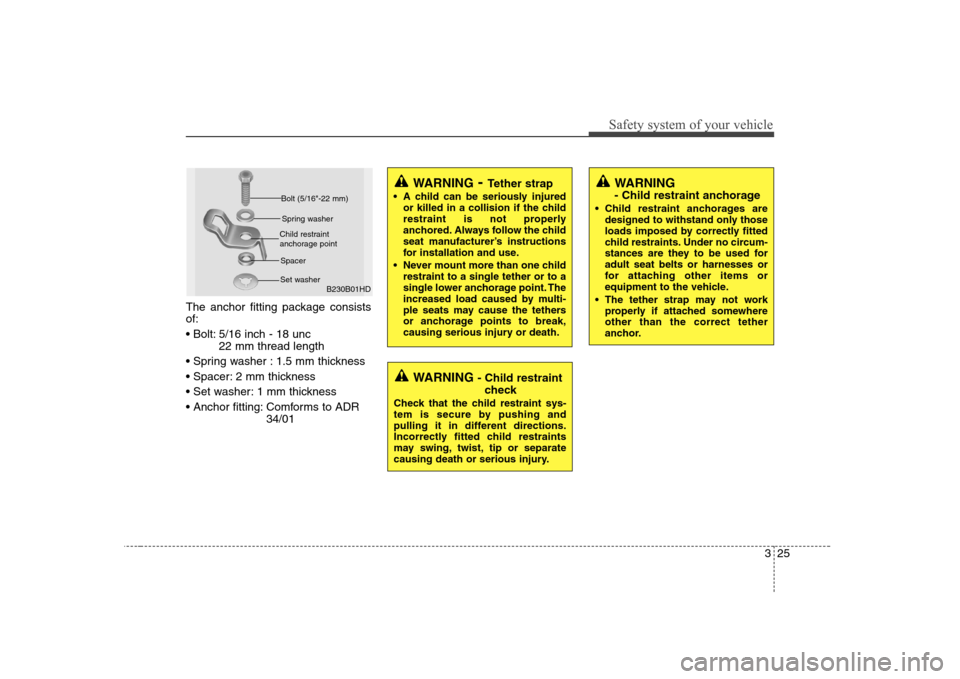
The anchor fitting package consists of:
5/16 inch - 18 unc22 mm thread length
1.5 mm thickness
2 mm thickness
1 mm thickness
Comforms to ADR 34/01
WARNING- Tether strap
A child can be seriously injured or killed in a collision if the child
restraint is not properly
anchored. Always follow the child
seat manufacturer’s instructions
for installation and use.
Never mount more than one child restraint to a single tether or to a
single lower anchorage point. The
increased load caused by multi-
ple seats may cause the tethers
or anchorage points to break,
causing serious injury or death.
WARNING - Child restraint
check
Check that the child restraint sys-
tem is secure by pushing and
pulling it in different directions.
Incorrectly fitted child restraints
may swing, twist, tip or separate
causing death or serious injury.
WARNING
- Child restraint anchorage
Child restraint anchorages are designed to withstand only those
loads imposed by correctly fitted
child restraints. Under no circum-
stances are they to be used foradult seat belts or harnesses or
for attaching other items or
equipment to the vehicle.
The tether strap may not work properly if attached somewhereother than the correct tether
anchor.
B230B01HD
Bolt (5/16"-22 mm)
Spring washer
Child restraint
anchorage point
Spacer
Set washer
Page 202 of 308
Driving your vehicle
40
5
Driving with a trailer
Towing a trailer requires a certain
amount of experience. Before setting out
for the open road, you must get to know
your trailer. Acquaint yourself with the
feel of handling and braking with the
added weight of the trailer. And always
keep in mind that the vehicle you are
driving is now a good deal longer and not
nearly so responsive as your vehicle is
by itself.
Before you start, check the trailer towbar
and platform, safety chains, electrical
connector(s), lights, tyres and mirror
adjustment. If the trailer has electric
brakes, start your vehicle and trailer mov-
ing and then apply the trailer brake con-
troller by hand to be sure the brakes are
working. This lets you check your electri-
cal connection at the same time.
During your trip, check occasionally to be
sure that the load is secure, and that the
lights and any trailer brakes are still work-ing.Following distance
Stay at least twice as far behind the vehi-
cle ahead as you would when driving
your vehicle without a trailer. This can
help you avoid situations that require
heavy braking and sudden turns.
Passing
You’ll need more passing distance up
ahead when you’re towing a trailer. Due
to the increased vehicle length, you’ll
need to go much farther beyond the
passed vehicle before you can return to
your lane.
Backing up
Hold the bottom of the steering wheel
with one hand. Then, to move the trailer
to the left, just move your hand to the left.
To move the trailer to the right, move your
hand to the right. Always back up slowly
and, if possible, have someone guide
you.
Making turns
When you’re turning with a trailer, make
wider turns than normal. Do this so your
trailer won’t strike soft shoulders, curbs,
road signs, trees, or other objects. Avoid
jerky or sudden manoeuvres. Signal well
in advance.
Turn signals when towing a trailer
When you tow a trailer, your vehicle has
to have a different turn signal flasher and
extra wiring. The green arrows on your
instrument panel will flash whenever you
signal a turn or lane change. Properly
connected, the trailer lights will also flash
to alert other drivers you’re about to turn,
change lanes, or stop.
When towing a trailer, the green arrows
on your instrument panel will flash for
turns even if the bulbs on the trailer are
burned out. Thus, you may think drivers
behind you are seeing your signals
when, in fact, they are not. It’s important
to check occasionally to be sure the trail-
er bulbs are still working. You must also
check the lights every time you discon-
nect and then reconnect the wires.
Do not connect a trailer lighting system
directly to your vehicle’s lighting system.
Use only an approved trailer wiring har-
ness.
An authorised Hyundai dealer can assist
you in installing the wiring harness.
WARNING
Failure to use an approved trailer wiring harness could result in dam-
age to the vehicle electrical system
and/or personal injury.
Page 291 of 308
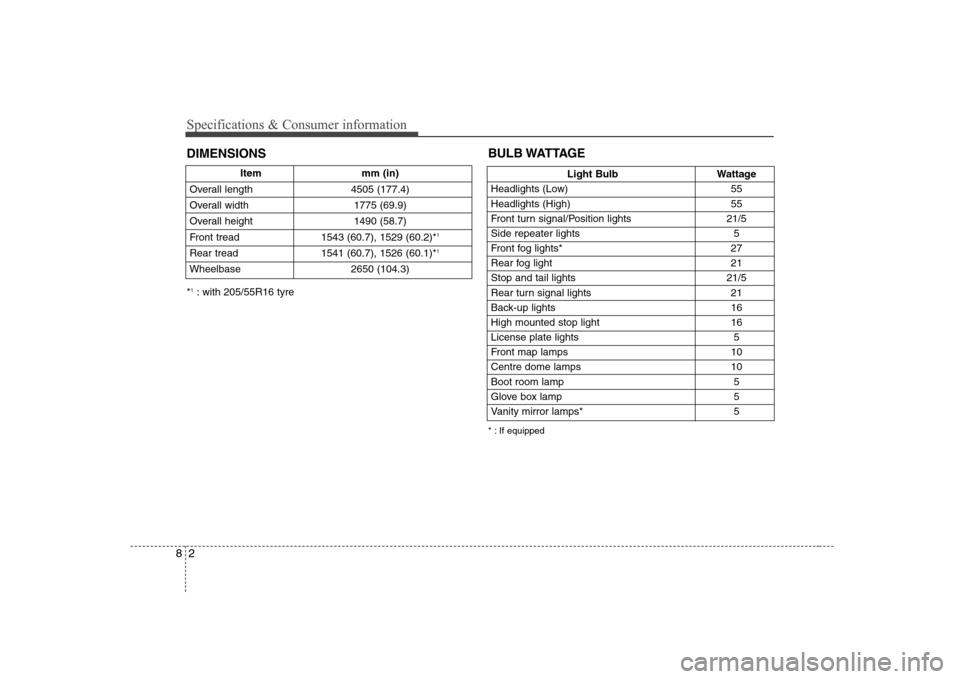
Specifications & Consumer information
2
8
Item mm (in)
Overall length 4505 (177.4)
Overall width 1775 (69.9)
Overall height 1490 (58.7)
Front tread 1543 (60.7), 1529 (60.2)* 1
Rear tread 1541 (60.7), 1526 (60.1)* 1
Wheelbase 2650 (104.3)
DIMENSIONS
Light Bulb Wattage
Headlights (Low) 55
Headlights (High) 55
Front turn signal/Position lights 21/5
Side repeater lights 5
Front fog lights* 27
Rear fog light 21
Stop and tail lights 21/5
Rear turn signal lights 21
Back-up lights 16
High mounted stop light 16
License plate lights 5
Front map lamps 10
Centre dome lamps 10Boot room lamp 5
Glove box lamp 5
Vanity mirror lamps* 5
BULB WATTAGE
* : If equipped
*
1
: with 205/55R16 tyre