2009 Hyundai Elantra buttons
[x] Cancel search: buttonsPage 77 of 308
Features of your vehicle
22
4
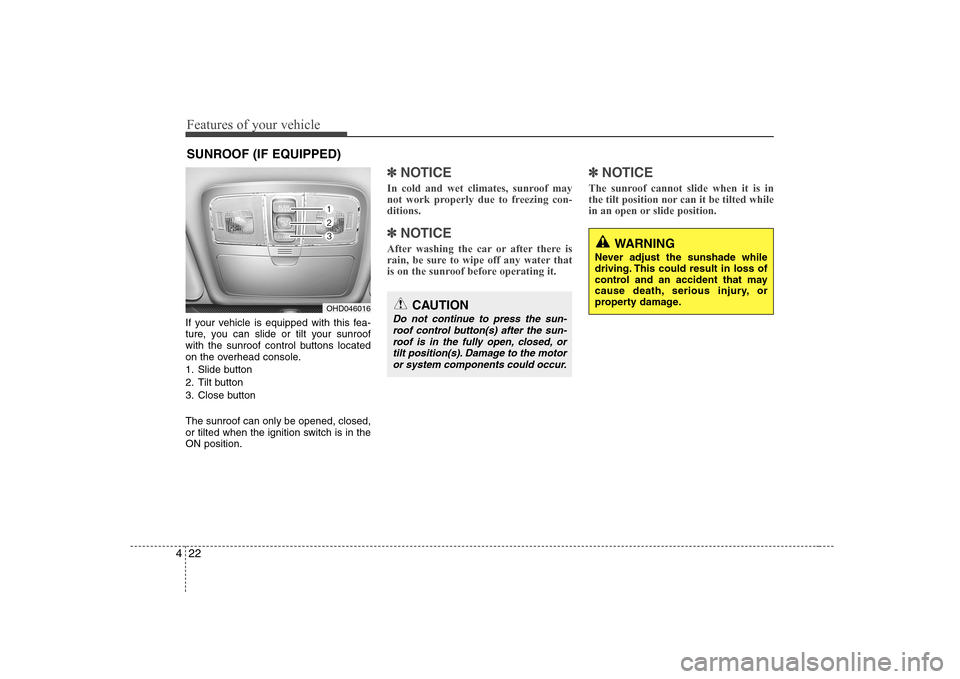
If your vehicle is equipped with this fea-
ture, you can slide or tilt your sunroof
with the sunroof control buttons located
on the overhead console.
1. Slide button
2. Tilt button
3. Close button The sunroof can only be opened, closed,
or tilted when the ignition switch is in theON position.
✽✽
NOTICE
In cold and wet climates, sunroof may
not work properly due to freezing con-ditions.
✽
✽ NOTICE
After washing the car or after there is
rain, be sure to wipe off any water that
is on the sunroof before operating it. ✽
✽
NOTICE
The sunroof cannot slide when it is in
the tilt position nor can it be tilted while
in an open or slide position.
SUNROOF (IF EQUIPPED)
OHD046016CAUTION
Do not continue to press the sun- roof control button(s) after the sun- roof is in the fully open, closed, ortilt position(s). Damage to the motoror system components could occur.
WARNING
Never adjust the sunshade while
driving. This could result in loss of
control and an accident that may
cause death, serious injury, or
property damage.
Page 121 of 308
Features of your vehicle
66
4
Manual heating and air condition- ing The heating and cooling system can be
controlled manually as well by pushing
buttons other than the AUTO button. In
this case, the system works sequentially
according to the order of buttons select-ed.
When pressing any button except AUTO
button while automatic operation, the
functions of the buttons not selected will
be controlled automatically.
1. Start the engine.
2. Set the mode to the desired position.
3. Set the temperature control to the
desired position.
4. Set the air intake control to the outside (fresh) air position.
5. Set the fan speed control to the desired speed.
6. If air conditioning is desired, turn the air conditioning system (if equipped) on.
Press the AUTO button in order to con-
vert to full automatic control of the sys-tem.
Mode selection
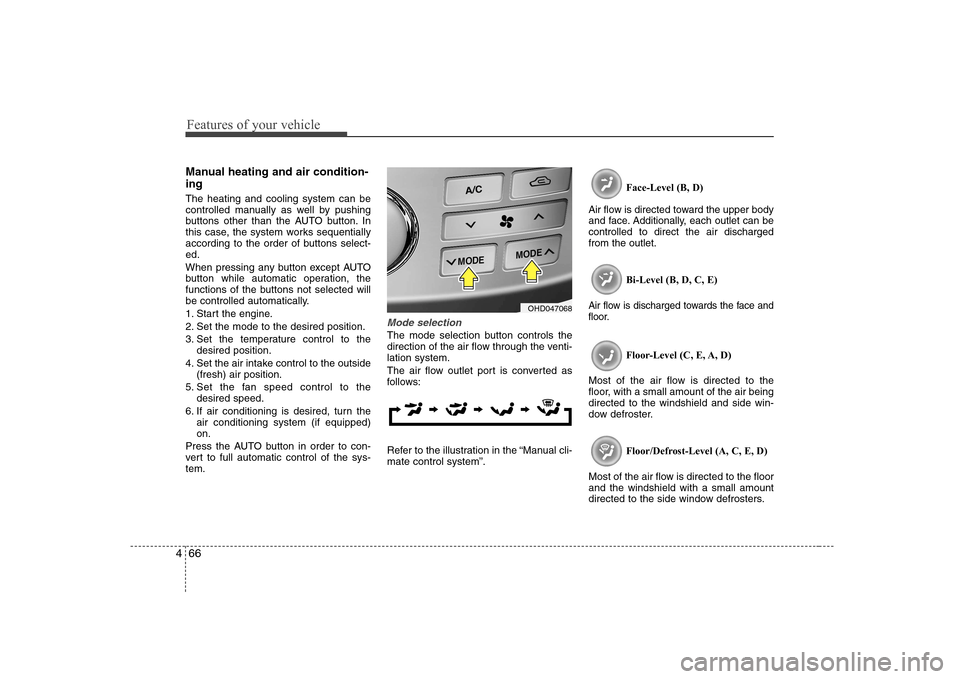
The mode selection button controls the
direction of the air flow through the venti-lation system.
The air flow outlet port is converted as
follows:
Refer to the illustration in the “Manual cli- mate control system”. Face-Level (B, D)
Air flow is directed toward the upper body
and face. Additionally, each outlet can becontrolled to direct the air dischargedfrom the outlet.
Bi-Level (B, D, C, E)
Air flow is discharged towards the face and
floor.
Floor-Level (C, E, A, D)
Most of the air flow is directed to the
floor, with a small amount of the air beingdirected to the windshield and side win-
dow defroster.
Floor/Defrost-Level (A, C, E, D)
Most of the air flow is directed to the floorand the windshield with a small amount
directed to the side window defrosters.
OHD047068
Page 134 of 308
479
Features of your vehicle
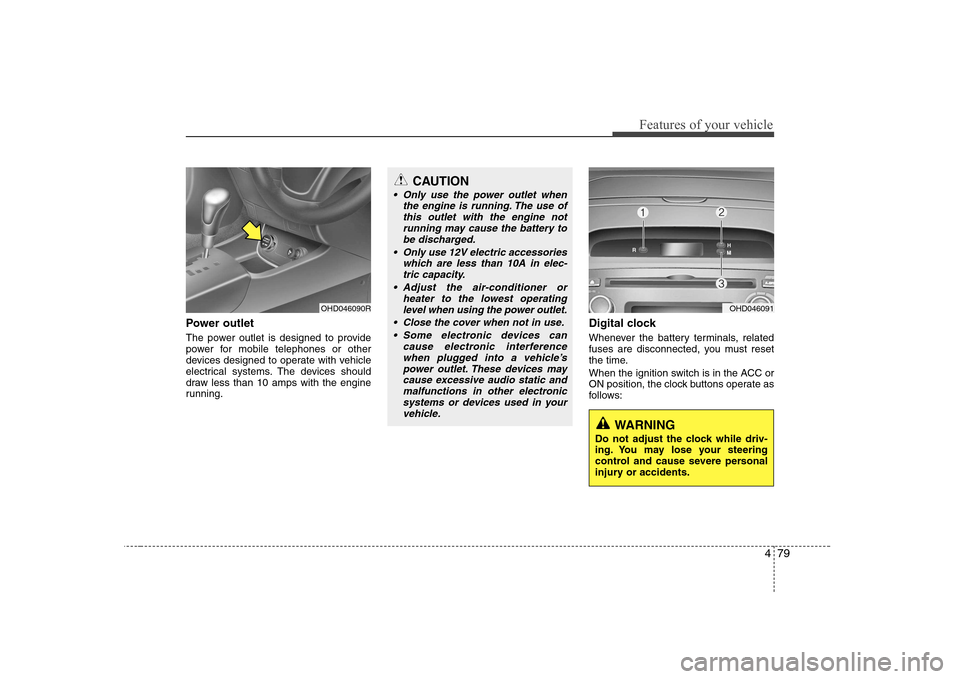
Power outlet
The power outlet is designed to provide
power for mobile telephones or other
devices designed to operate with vehicle
electrical systems. The devices should
draw less than 10 amps with the engine
running.Digital clock
Whenever the battery terminals, related
fuses are disconnected, you must reset
the time.
When the ignition switch is in the ACC or
ON position, the clock buttons operate as
follows:
OHD046090R
CAUTION
Only use the power outlet when
the engine is running. The use ofthis outlet with the engine notrunning may cause the battery to
be discharged.
Only use 12V electric accessories which are less than 10A in elec-tric capacity.
Adjust the air-conditioner or heater to the lowest operating
level when using the power outlet.
Close the cover when not in use. Some electronic devices can cause electronic interferencewhen plugged into a vehicle’s
power outlet. These devices maycause excessive audio static and malfunctions in other electronicsystems or devices used in your
vehicle.
OHD046091
WARNING
Do not adjust the clock while driv-
ing. You may lose your steering
control and cause severe personal
injury or accidents.
Page 138 of 308
483
Features of your vehicle
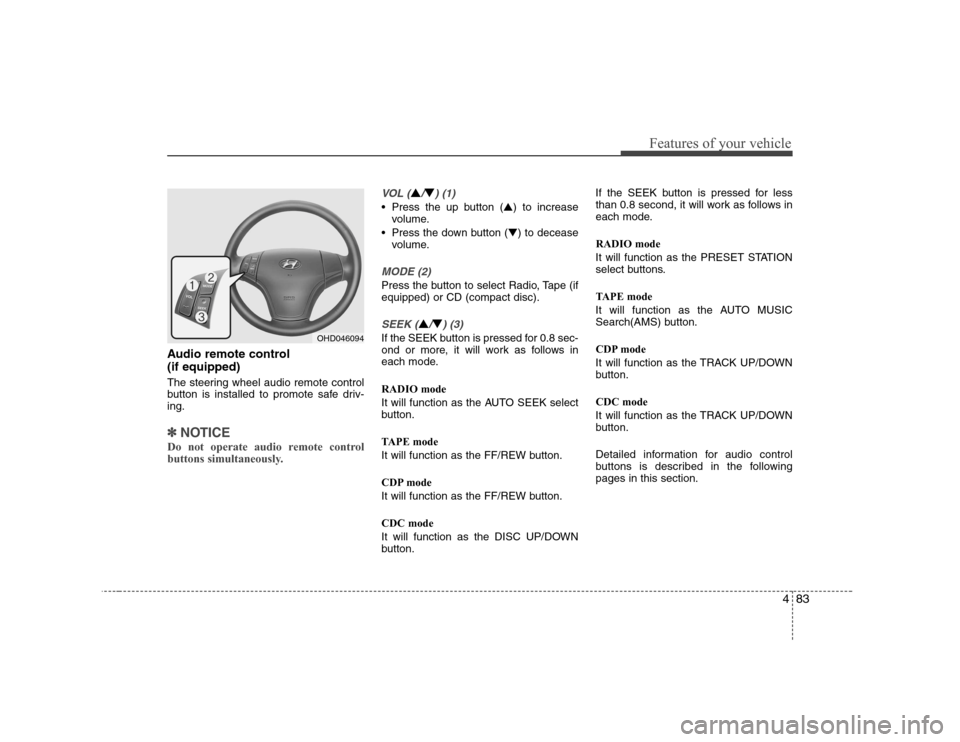
Audio remote control (if equipped)
The steering wheel audio remote control
button is installed to promote safe driv-ing.
✽✽NOTICE
Do not operate audio remote control
buttons simultaneously.
VOL (▲/▼) (1)
• Press the up button ( ▲) to increase
volume.
Press the down button ( ▼) to decease
volume.
MODE (2)
Press the button to select Radio, Tape (if equipped) or CD (compact disc).
SEEK (▲/▼) (3)
If the SEEK button is pressed for 0.8 sec-
ond or more, it will work as follows in
each mode. RADIO mode
It will function as the AUTO SEEK select
button.
TAPE mode
It will function as the FF/REW button.
CDP mode
It will function as the FF/REW button. CDC mode
It will function as the DISC UP/DOWN
button. If the SEEK button is pressed for less
than 0.8 second, it will work as follows in
each mode. RADIO mode
It will function as the PRESET STATION
select buttons.
TAPE mode
It will function as the AUTO MUSIC
Search(AMS) button.
CDP mode
It will function as the TRACK UP/DOWN
button. CDC mode
It will function as the TRACK UP/DOWN
button.
Detailed information for audio control
buttons is described in the followingpages in this section.OHD046094
Page 146 of 308
491
Features of your vehicle
1. Power ON/OFF Button &Volume Control Knob
Turns the set on/off when the ignition
switch is on ACC or ON. If the button is
turned to the right, it increases the vol-
ume and left,decreases the volume.
2. BAND(FM/AM) Selection Button
Pressing the FM button changes the
FM1 and FM2 bands.
Pressing the AM button selects AMband.
3. Automatic Channel Selection Button
] button is pressed, it increases the band frequency to auto-matically select a channel.
Stops at the previous frequency if no
channel is found.
] button is press- ed, it reduces the band frequency toautomatically select a channel.
Stops at the previous frequency if no
channel is found. 4. Preset Button
Push [1]~[6] buttons less than 0.8 sec-
ond to play the channel saved in each
button. Push [PRESET] button for 0.8
second or longer to save current channel
to the respective button with a beep.
5. Manual Channel Selection
Knob & SETUP Button
Manual Channel Selection knob
Turn this knob while listening to a radio
channel to manually adjust frequency.
Turn clockwise to increase frequency and
counterclockwise to reduce frequency. SETUP Button
Press this button to turn to the SCROLL
option and SOUND adjustment mode. If
no action is taken for 5 seconds after
pressing the button, it will return to the
play mode.(After entering SETUP mode,
move between items using the left, right
and PUSH functions of the [TUNE] but-ton.)
The setup item changes from SCROLL ➟ TONE ➟ POSITION... Audio Control Knob
In SETUP mode, SCROLL option or
TONE, POSITION settings can be adjust-
ed. After selecting each mode by pushing
Sound Control knob, rotate the knob to
adjust and push again to changes take
effect.
SCROLL option When "ON" is selected, long file name
scrolls continuously while playing.
TONE adjustment Sound tone(BASS/MIDDLE/TREBLE) can
be adjusted by rotating the knob. To select
next item, press the knob again.
POSITION adjustment
Sound position(FADER/BALANCE) can
be adjusted by rotating the knob. FADER
adjusts FRONT/REAR position, and BAL-ANCE adjusts LEFT/RIGHT position of
the speaker sound. To select next item,press the knob again.
RETURN
Exits SETUP mode and returns to play
mode. Pressing AM,FM or CD/AUX button
also exits SETUP mode and switches to
selected mode.
Page 147 of 308
![Hyundai Elantra 2009 Инструкция по эксплуатации (in Russian) Features of your vehicle
92
4
6. AST(AUTO STORE) Button
When the button is pressed, it automati-
cally selects and saves channels with
high reception rate to [PRESET] buttons
[1]~[6] and plays the c Hyundai Elantra 2009 Инструкция по эксплуатации (in Russian) Features of your vehicle
92
4
6. AST(AUTO STORE) Button
When the button is pressed, it automati-
cally selects and saves channels with
high reception rate to [PRESET] buttons
[1]~[6] and plays the c](/manual-img/35/14598/w960_14598-146.png)
Features of your vehicle
92
4
6. AST(AUTO STORE) Button
When the button is pressed, it automati-
cally selects and saves channels with
high reception rate to [PRESET] buttons
[1]~[6] and plays the channel saved in PRESET1.
If no channel is saved after AST, it will
play the previous channel.