2009 Hyundai Elantra engine
[x] Cancel search: enginePage 109 of 308
Features of your vehicle
54
4
Rear window defroster
The defroster heats the window to
remove frost, fog and thin ice from the
interior and exterior of the rear window,
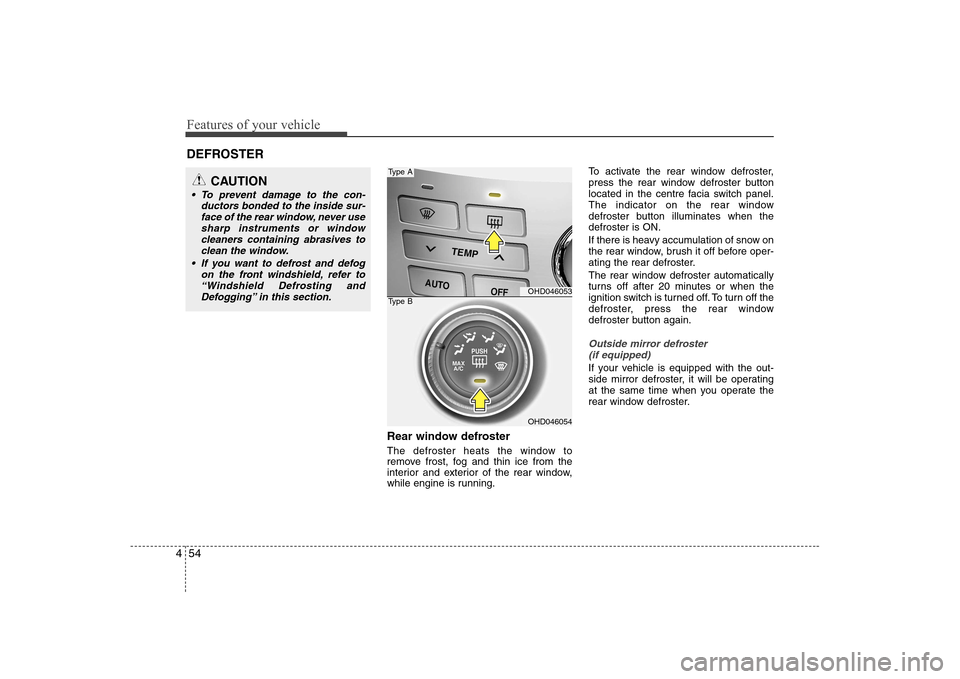
while engine is running. To activate the rear window defroster,
press the rear window defroster button
located in the centre facia switch panel.
The indicator on the rear window
defroster button illuminates when thedefroster is ON.
If there is heavy accumulation of snow on
the rear window, brush it off before oper-
ating the rear defroster.
The rear window defroster automatically
turns off after 20 minutes or when the
ignition switch is turned off. To turn off the
defroster, press the rear window
defroster button again.
Outside mirror defroster
(if equipped)
If your vehicle is equipped with the out-
side mirror defroster, it will be operating
at the same time when you operate the
rear window defroster.
DEFROSTER
OHD046053
OHD046054
Type A
Type B
CAUTION
To prevent damage to the con-
ductors bonded to the inside sur-face of the rear window, never use sharp instruments or window
cleaners containing abrasives toclean the window.
If you want to defrost and defog on the front windshield, refer to“Windshield Defrosting and
Defogging” in this section.
Page 111 of 308
Features of your vehicle
56
4
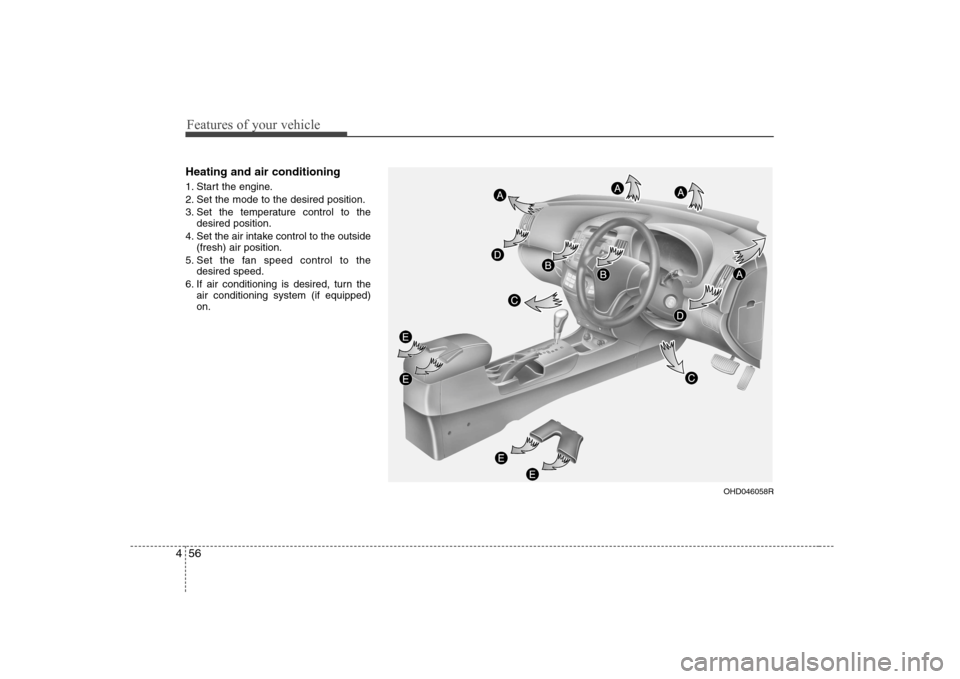
Heating and air conditioning
1. Start the engine.
2. Set the mode to the desired position.
3. Set the temperature control to the
desired position.
4. Set the air intake control to the outside (fresh) air position.
5. Set the fan speed control to the desired speed.
6. If air conditioning is desired, turn the air conditioning system (if equipped) on.
OHD046058R
Page 116 of 308
461
Features of your vehicle
Operation Tips
To keep dust or unpleasant fumes fromentering the car through the ventilation
system, temporarily set the air intakecontrol to the recirculated air position.
Be sure to return the control to the
fresh air position when the irritation
has passed to keep fresh air in the
vehicle. This will help keep the driver
alert and comfortable.
Air for the heating/cooling system is drawn in through the grilles just ahead
of the windshield. Care should be
taken that these are not blocked by
leaves, snow, ice or other obstructions.
To prevent interior fog on the wind- shield, set the air intake control to the
fresh air position and fan speed to the
desired position, turn on the air condi-
tioning system, and adjust temperature
control to desired temperature.
Air conditioning (if equipped)
All Hyundai Air Conditioning Systems are
filled with environmentally friendly
R-134a refrigerant which is not damag-
ing to the ozone layer.
1. Start the engine. Push the air condi- tioning button.
2. Set the mode to the position.
3. Set the air intake control to the outside air or recirculated air position.
4. Adjust the fan speed control and tem- perature control to maintain maximum
comfort.
When maximum cooling is desired, set the temperature control to the extremeleft position, set the mode control to
the MAX A/C position, then set the fanspeed control to the highest speed.✽✽ NOTICE
Page 117 of 308
Features of your vehicle
62
4
Air conditioning system operation tips
If the vehicle has been parked in direct
sunlight during hot weather, open the
windows for a short time to let the hot
air inside the vehicle escape.
To help reduce moisture inside of win- dows on rainy or humid days, decrease
the humidity inside the vehicle by oper-ating the air conditioning system.
During air conditioning system opera- tion, you may occasionally notice aslight change in engine speed as the
air conditioning compressor cycles.
This is a normal system operation
characteristic.
Use the air conditioning system every month if only for a few minutes to
ensure maximum system perform-
ance.
When using the air conditioning sys- tem, you may notice clear water drip-
ping (or even puddling) on the ground
under the passenger side of the vehi-
cle. This is a normal system operation
characteristic.
Operating the air conditioning system in the recirculated air position does
provide maximum cooling, however,
continual operation in this mode may
cause the air inside the vehicle to
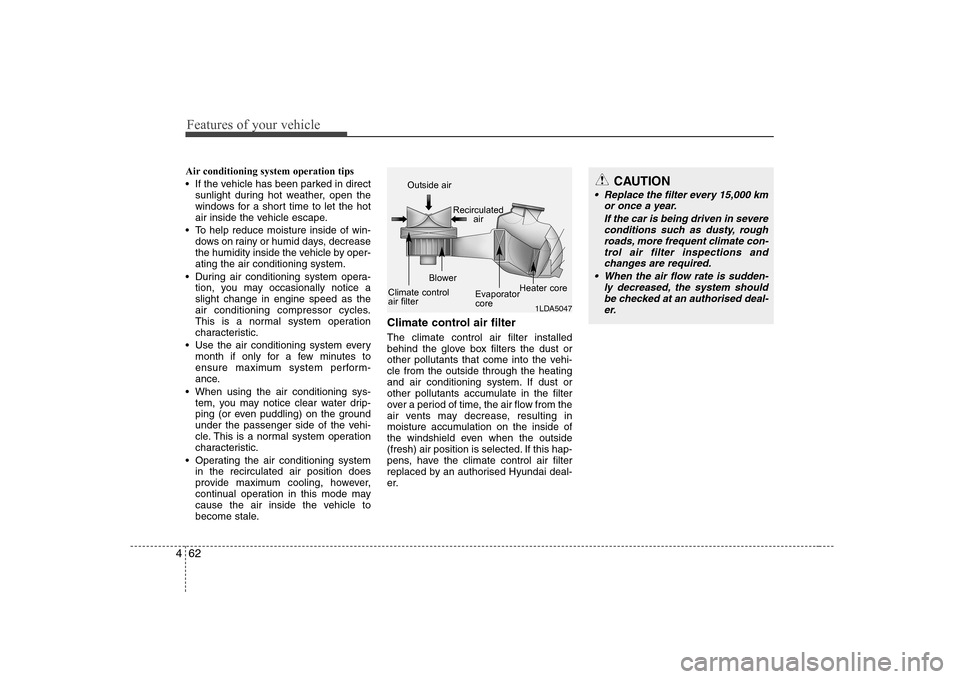
become stale. Climate control air filter The climate control air filter installed
behind the glove box filters the dust or
other pollutants that come into the vehi-cle from the outside through the heating
and air conditioning system. If dust or
other pollutants accumulate in the filter
over a period of time, the air flow from the
air vents may decrease, resulting in
moisture accumulation on the inside of
the windshield even when the outside
(fresh) air position is selected. If this hap-
pens, have the climate control air filter
replaced by an authorised Hyundai deal-
er.
1LDA5047
Outside air
Recirculatedair
Climate control air filter Blower
EvaporatorcoreHeater core
CAUTION
Replace the filter every 15,000 km
or once a year.
If the car is being driven in severeconditions such as dusty, roughroads, more frequent climate con-
trol air filter inspections and changes are required.
When the air flow rate is sudden- ly decreased, the system shouldbe checked at an authorised deal-
er.
Page 121 of 308
Features of your vehicle
66
4
Manual heating and air condition- ing The heating and cooling system can be
controlled manually as well by pushing
buttons other than the AUTO button. In
this case, the system works sequentially
according to the order of buttons select-ed.
When pressing any button except AUTO
button while automatic operation, the
functions of the buttons not selected will
be controlled automatically.
1. Start the engine.
2. Set the mode to the desired position.
3. Set the temperature control to the
desired position.
4. Set the air intake control to the outside (fresh) air position.
5. Set the fan speed control to the desired speed.
6. If air conditioning is desired, turn the air conditioning system (if equipped) on.
Press the AUTO button in order to con-
vert to full automatic control of the sys-tem.
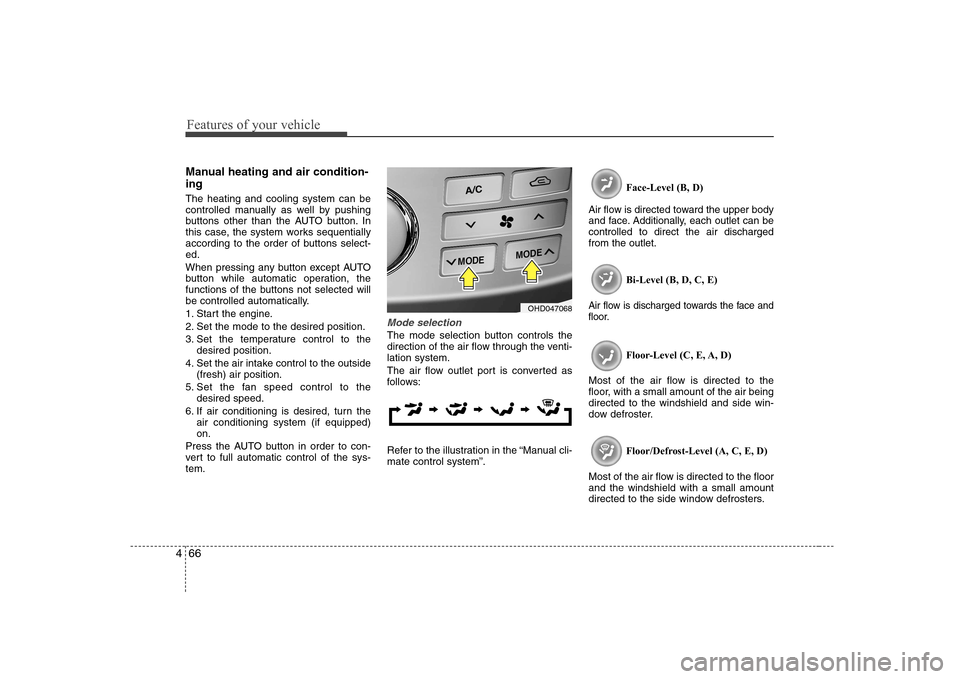
Mode selection
The mode selection button controls the
direction of the air flow through the venti-lation system.
The air flow outlet port is converted as
follows:
Refer to the illustration in the “Manual cli- mate control system”. Face-Level (B, D)
Air flow is directed toward the upper body
and face. Additionally, each outlet can becontrolled to direct the air dischargedfrom the outlet.
Bi-Level (B, D, C, E)
Air flow is discharged towards the face and
floor.
Floor-Level (C, E, A, D)
Most of the air flow is directed to the
floor, with a small amount of the air beingdirected to the windshield and side win-
dow defroster.
Floor/Defrost-Level (A, C, E, D)
Most of the air flow is directed to the floorand the windshield with a small amount
directed to the side window defrosters.
OHD047068
Page 134 of 308
479
Features of your vehicle
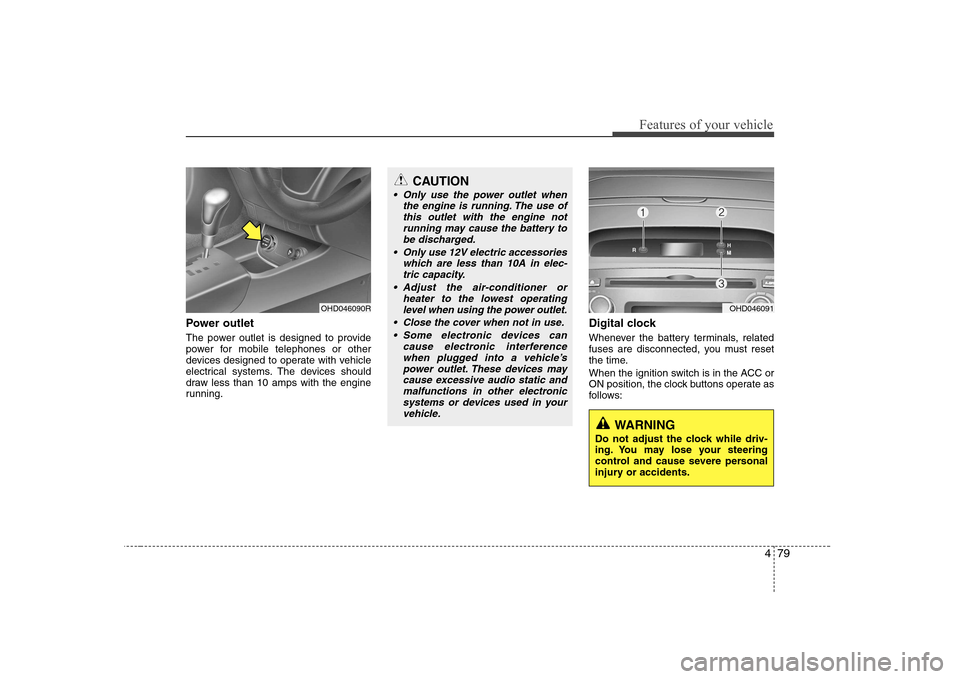
Power outlet
The power outlet is designed to provide
power for mobile telephones or other
devices designed to operate with vehicle
electrical systems. The devices should
draw less than 10 amps with the engine
running.Digital clock
Whenever the battery terminals, related
fuses are disconnected, you must reset
the time.
When the ignition switch is in the ACC or
ON position, the clock buttons operate as
follows:
OHD046090R
CAUTION
Only use the power outlet when
the engine is running. The use ofthis outlet with the engine notrunning may cause the battery to
be discharged.
Only use 12V electric accessories which are less than 10A in elec-tric capacity.
Adjust the air-conditioner or heater to the lowest operating
level when using the power outlet.
Close the cover when not in use. Some electronic devices can cause electronic interferencewhen plugged into a vehicle’s
power outlet. These devices maycause excessive audio static and malfunctions in other electronicsystems or devices used in your
vehicle.
OHD046091
WARNING
Do not adjust the clock while driv-
ing. You may lose your steering
control and cause severe personal
injury or accidents.
Page 139 of 308
Features of your vehicle
84
4
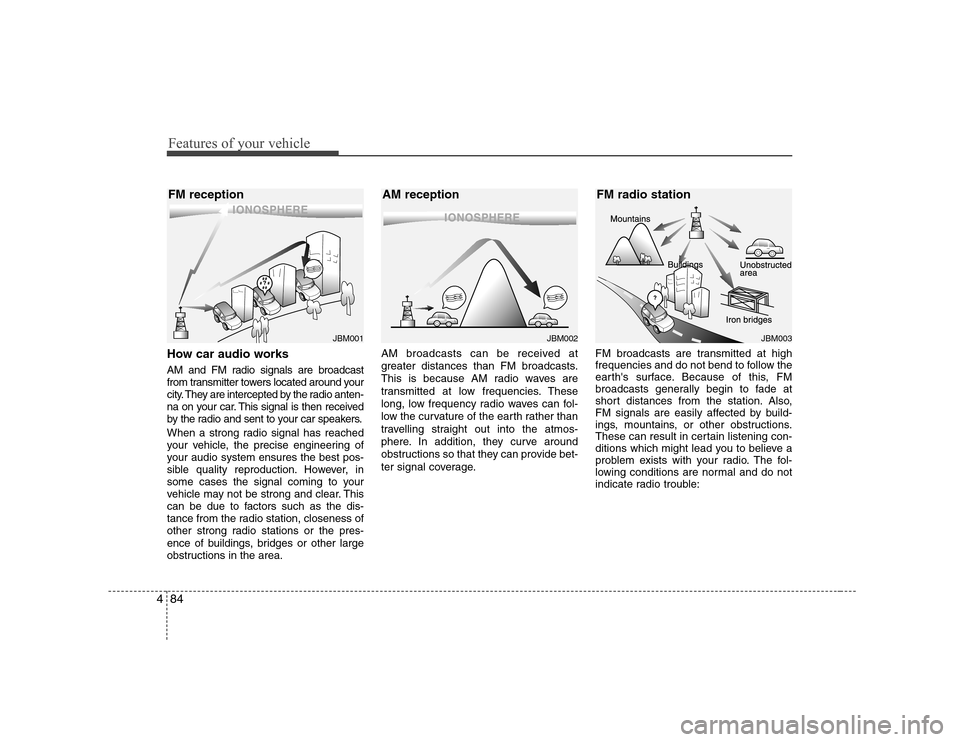
How car audio works
AM and FM radio signals are broadcast
from transmitter towers located around your
city. They are intercepted by the radio anten-
na on your car. This signal is then received
by the radio and sent to your car speakers.
When a strong radio signal has reached
your vehicle, the precise engineering of
your audio system ensures the best pos-
sible quality reproduction. However, in
some cases the signal coming to your
vehicle may not be strong and clear. This
can be due to factors such as the dis-
tance from the radio station, closeness of
other strong radio stations or the pres-
ence of buildings, bridges or other large
obstructions in the area. AM broadcasts can be received at
greater distances than FM broadcasts.
This is because AM radio waves are
transmitted at low frequencies. These
long, low frequency radio waves can fol-
low the curvature of the earth rather than
travelling straight out into the atmos-
phere. In addition, they curve around
obstructions so that they can provide bet-
ter signal coverage.
FM broadcasts are transmitted at high
frequencies and do not bend to follow the
earth's surface. Because of this, FM
broadcasts generally begin to fade at
short distances from the station. Also,
FM signals are easily affected by build-
ings, mountains, or other obstructions.
These can result in certain listening con-
ditions which might lead you to believe a
problem exists with your radio. The fol-
lowing conditions are normal and do not
indicate radio trouble:
¢¢¢
JBM001
¢¢¢¢¢¢
JBM002JBM003
FM reception AM reception FM radio station
Page 156 of 308
4101
Features of your vehicle
CAUTION IN USING
USB DEVICE
To use an external USB device, make sure the device is notmounted when starting up the
vehicle and mount the deviceafter starting up.
If you start the vehicle when the USB device is mounted, it maydamage the USB device. (USB is
not ESA)
If the vehicle is started up or turned off while the external USBdevice is connected, the external
USB device may not work.
It may not play inauthentic MP3 or WMA files.
1) It can only play MP3 files with the compression rate between8Kbps~320Kbps.
2) It can only play WMA music files with the compression ratebetween 8Kbps~320Kbps.
Take cautions for static electricity when mounting or dismountingthe external USB device.
An encoded MP3 player is not recognizable.
(Continued)
(Continued) Depending on the condition of the external USB device, the con-nected external USB device can
be unrecognizable.
When the formatted byte/sector setting of External USB devices isnot either 512BYTE or 2048BYTE,
then the device will not be recog-nized.
Use only a USB device formatted to FAT 12/16/32.
USB devices without USB I/F authentication may not be recog-nizable.
Make sure the USB connection terminal does not come in contactwith a human body or any object.
If you repeat mounting or dis- mounting USB device in a shortperiod of time, it may break thedevice.
You might hear a strange noise when mounting or dismounting aUSB device.
(Continued)(Continued) If you dismount the external USB device during playback in USBmode, the external USB device can
be damaged or malfunction.Therefore, mount the external USBdevice when the engine is turned
off or in another mode.
Depending on the type and capac- ity of the external USB device orthe type of the files stored in the
device, there is a difference in thetime taken for recognition of the device, but this is not an indicatorof trouble and you only have to
wait.
Do not use the USB device for other purposes than playing music files.
Use of USB accessories such as recharger or heater using USB I/Fmay lower performance or cause
trouble.
If you use devices such as a USB hub you purchased separately,the vehicle’s audio system may
not recognize the USB device. Connect the USB device directlyto the multimedia terminal of the vehicle.
(Continued)