2009 Hyundai Azera audio
[x] Cancel search: audioPage 199 of 335
1FEATURES OF YOUR HYUNDAI
186
In case USB is connected to the multiple
terminal inside the console on the right
hand side of the driver’s seat. When USB
is connected, the ‘USB’ icon will be dis-
played on the top right corner of the display
screen.1.AUX Selection ButtonIf USB is not connected, it switches to the
USB mode from the Radio and CD mode
to play the song files stored in the USB.
If AUX is not connected, it is invalid key.2. Track Moving Buttono Press the [SEEK
] button for less than
0.8 second to play from the beginning of
the song currently played.
Press the button for less than 0.8 sec-
ond and press it again within 1 second
to move and play the previous track.
Press the button for 0.8 second or longer
to play the song in reverse direction in
fast speed.
o Press the [SEEK ] button for less than
0.8 second to move to the next track.
Press the button for 0.8 second or longer
to play the song in forward direction in
fast speed.
3. INFO ButtonDisplays the information of the file cur-
rently played in the order of FILE NAME
➟TITLE➟ARTIST➟ALBUM➟FOLDER➟
TOTAL FILE➟NORMAL DISPLAY➟FILE
NAME➟… (Displays no information if the
file has no song information.)4. Folder moving Buttono Moves [FLDR
] button child folder of
the current folder and displays the first
song in the folder. Press TUNE/ENTER
button to move to the folder displayed.
It will play the first song in the folder.
o Moves [FLDR ] button parent folder
and displays the first song in the folder.
Press TUNE/ENTER button to move to
the folder displayed. It will play the first
song in the folder.
5. TUNE/ENTER ButtonTurn this button clockwise to display the
songs next to the currently played song.
Turn the button counterclockwise to dis-
play the songs before the currently played
song.
Press the button to skip and play the se-
lected song.Pressing the button changes the BASS,
MIDDLE, TREBLE, FADER and BALANCE
TUNE mode. The mode selected is shown
on the display. After selecting each mode,
rotate the Audio control knob clockwise or
counterclockwise.
o BASS Control
To increase the BASS, rotate the knob
clockwise, while to decrease the BASS,
rotate the knob counterclockwise.
o MIDDLE Control
To increase the MIDDLE, rotate the knob
clockwise, while to decrease the MIDDLE,
rotate the knob counterclockwise.
o TREBLE Control
To increase the TREBLE, rotate the knob
clockwise, while to decrease the TREBLE,
rotate the knob counterclockwise.
o FADER Control
Turn the control knob clockwise to empha-
size rear speaker sound (front speaker
sound will be attenuated). When the con-
trol knob is turned counterclockwise, front
speaker sound will be emphasized (rear
speaker sound will be attenuated).
Page 200 of 335
1
FEATURES OF YOUR HYUNDAI
187
o BALANCE Control
Rotate the knob clockwise to emphasize
right speaker sound (left speaker sound
will be attenuated). When the control knob
is turned counter clockwise, left speaker
sound will be emphasized (right speaker
sound will be attenuated).6. RANDOM Playback ButtonPress the button for less than 0.8 second
to start or stop the random playback of the
songs in the current folder.
Press the button for more than 0.8 second
to randomly play the entire songs in the
USB device.
Press the button again to cancel the mode.7. REPEAT ButtonPress the button for less than 0.8 second
to repeat the song currently played.
Press the button for more than 0.8 second
to repeat the entire songs in the USB
device.8. SCAN ButtonPlays 10 seconds of each song in the USB
device.
Press the button once again to cancel
scanning.
NOTE FOR USING i-Pod DEVICE:o Some i-Pod models might not support
the communication protocol and the
files will not be played. (i-Pod models
supported: Mini, 4G, Photo, Nano, 5G)
o The order of search or playback of
songs in the i-Pod can be different
from the order searched in the audio
system.
o If the i-Pod crashes due to its own
trouble, reset i-Pod. (Reset: Refer to
i-Pod manual)
o i-Pod may not operate normally on
low battery.
!
CAUTION IN USING i-Pod
DEVICE:
o You need the power cable exclusive
for i-Pod in order to operate i-Pod with
the buttons on the audio system. The
PC cable provided by Apple may cause
malfunction and do not use it for ve-
hicle use.
o When connecting the device with i-
Pod cable, push in the jack fully not to
interfere with communication.
o When adjusting the sound effects of i-
Pod and the audio system, the sound
effects of both devices will overlap
each and might cause reduce or dis-
tort the quality of the sound.
o Deactivate (turn off) the equalizer
function of i-Pod when adjusting the
audio system’s volume, and turn off
the equalizer of the audio system
when using the equalizer of i-Pod.
o When the i-Pod cable is connected,
the system can be switched to the
AUX mode even without the i-Pod
device and can cause noise. Discon-
nect i-Pod cable when you are not
using the i-Pod device.
Page 201 of 335
1FEATURES OF YOUR HYUNDAI
188
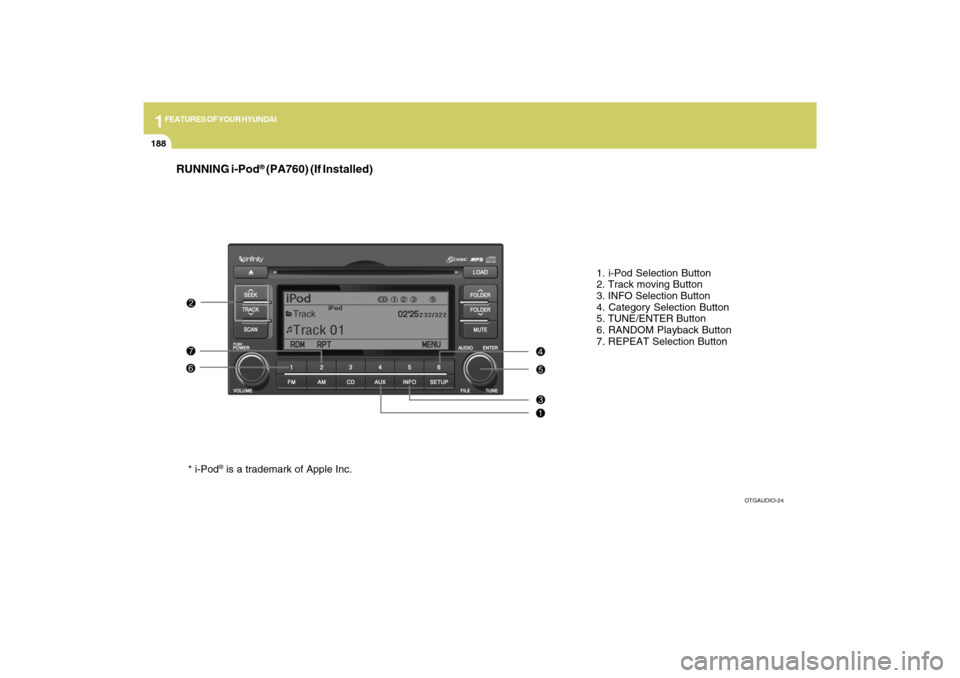
RUNNING i-Pod
® (PA760) (If Installed)
1. i-Pod Selection Button
2. Track moving Button
3. INFO Selection Button
4. Category Selection Button
5. TUNE/ENTER Button
6. RANDOM Playback Button
7. REPEAT Selection Button
OTGAUDIO-24
* i-Pod
® is a trademark of Apple Inc.
Page 202 of 335
1
FEATURES OF YOUR HYUNDAI
189
In case the i-Pod exclusive cable is con-
nected to the multiple terminal inside the
console on the right hand side of the driver’s
seat. When the i-Pod is connected, the ‘i-
Pod’ icon will be displayed on the top right
corner of the display screen.1. i-Pod Selection ButtonIf i-Pod is connected, it switches to the i-
Pod mode from the Radio and CD mode to
play the song files stored in the i-Pod.
If there are no CD and AUX mode from the
Radio mode, it displays ‘NO MEDIA’.2. Track Moving Buttono Press the [SEEK
] button for less than
0.8 second to play from the beginning of
the song currently played.
Press the button for less than 0.8 sec-
ond and press it again within 1 second
to move and play the previous track.
Press the button for 0.8 second or longer
to play the song in reverse direction in
fast speed.
o Press the [SEEK ] button for less than
0.8 second to move to the next track.
Press the button for 0.8 second or longer
to play the song in forward direction in
fast speed.
3. INFO ButtonDisplays the information of the file cur-
rently played in the order of TITLE➟
ARTIST➟ALBUM➟NORMAL DISPLAY
➟TITLE➟… (Displays no information if the
file has no song information.)4. Category Selection ButtonMoves to the upper category from currently
played category of the i-Pod.
To move to (play) the category (song)
displayed, press MENU(Preset 6).
You will be able to search through the
lower category of the selected category.
The order of i-Pod’s category is SONG,
ALBUMES, ARTISTS, GENRES, and i-
Pod.5. TUNE/ENTER ButtonWhen you turn the button clockwise, it will
display the songs (category) next to the
song currently played (category in the same
level).
Also, when you turn the button counter-
clockwise, it will display the songs (cat-
egory) before the song currently played
(category in the same level).
If you want to listen to the song displayed
in the song category, press the button, then
it will skip to the selected song and play.Pressing the button changes the BASS,
MIDDLE, TREBLE, FADER and BALANCE
TUNE mode. The mode selected is shown
on the display. After selecting each mode,
rotate the Audio control knob clockwise or
counterclockwise.
o BASS Control
To increase the BASS, rotate the knob
clockwise, while to decrease the BASS,
rotate the knob counterclockwise.
o MIDDLE Control
To increase the MIDDLE, rotate the knob
clockwise, while to decrease the MIDDLE,
rotate the knob counterclockwise.
o TREBLE Control
To increase the TREBLE, rotate the knob
clockwise, while to decrease the TREBLE,
rotate the knob counterclockwise.
o FADER Control
Turn the control knob clockwise to empha-
size rear speaker sound (front speaker
sound will be attenuated). When the con-
trol knob is turned counterclockwise, front
speaker sound will be emphasized (rear
speaker sound will be attenuated).
Page 286 of 335
6
DO-IT-YOURSELF MAINTENANCE
20
!
CAUTION:
An open fuse indicates that there is a
problem in the electrical circuit. If you
replace a fuse and it blows as soon as the
accessory is turned on, the problem is
serious and should be referred to a
Hyundai dealer for diagnosis and repair.
Never replace a fuse with anything ex-
cept a fuse with the same or a lower
amperage rating. A higher capacity fuse
could cause damage and create a fire
hazard.NOTE:See page 6-33 for the fuse panel descrip-
tions.
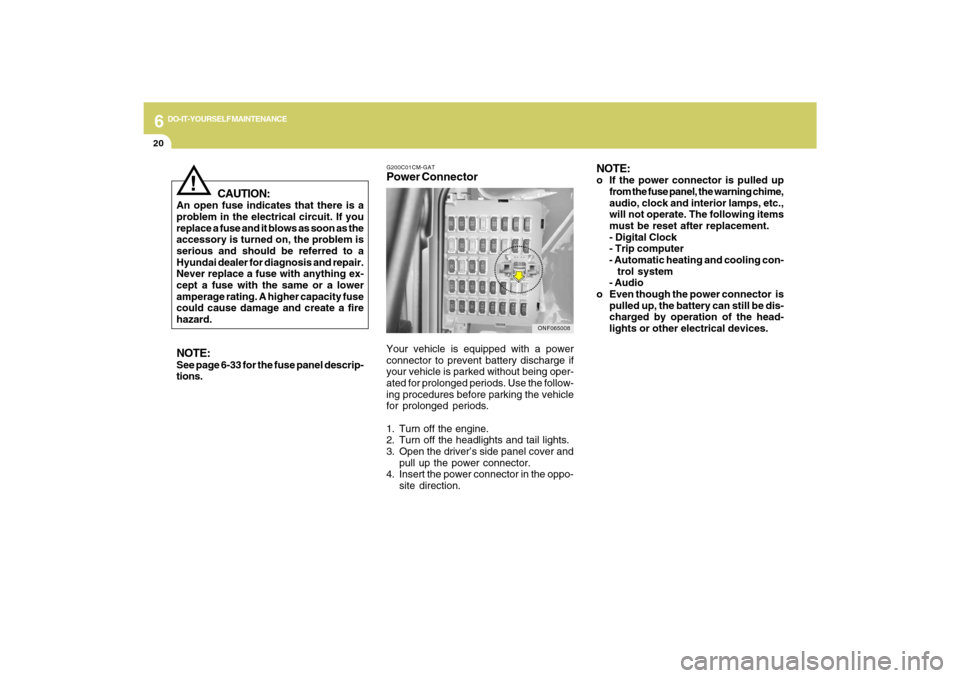
G200C01CM-GATPower ConnectorNOTE:
o If the power connector is pulled up
from the fuse panel, the warning chime,
audio, clock and interior lamps, etc.,
will not operate. The following items
must be reset after replacement.
- Digital Clock
- Trip computer
- Automatic heating and cooling con-
trol system
- Audio
o Even though the power connector is
pulled up, the battery can still be dis-
charged by operation of the head-
lights or other electrical devices.
Your vehicle is equipped with a power
connector to prevent battery discharge if
your vehicle is parked without being oper-
ated for prolonged periods. Use the follow-
ing procedures before parking the vehicle
for prolonged periods.
1. Turn off the engine.
2. Turn off the headlights and tail lights.
3. Open the driver’s side panel cover and
pull up the power connector.
4. Insert the power connector in the oppo-
site direction.
ONF065008
Page 302 of 335
6
DO-IT-YOURSELF MAINTENANCE
36
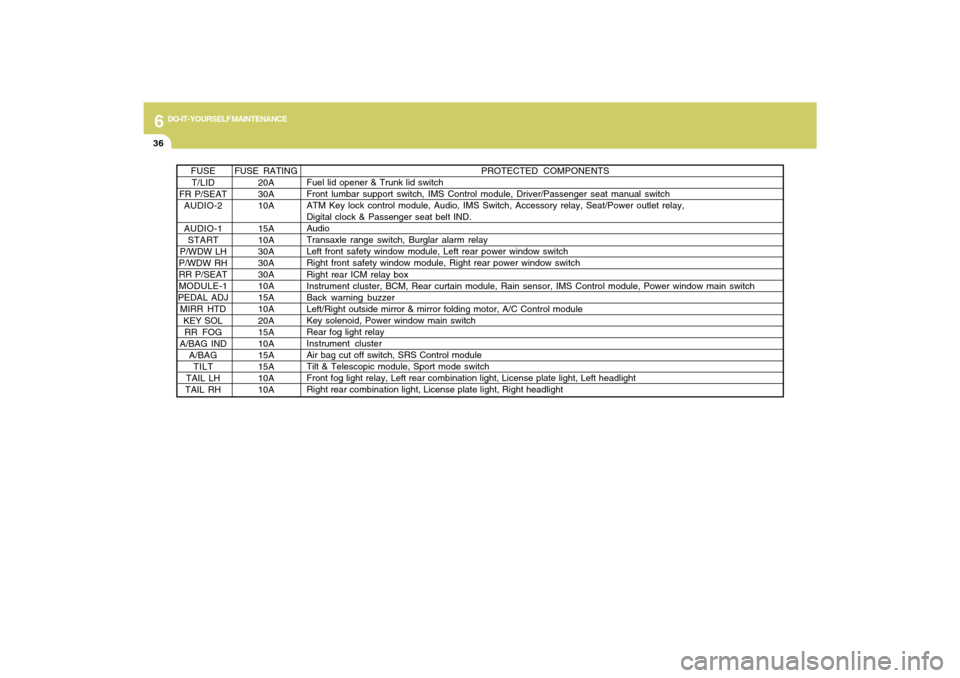
FUSE RATING
20A
30A
10A
15A
10A
30A
30A
30A
10A
15A
10A
20A
15A
10A
15A
15A
10A
10A FUSE
T/LID
FR P/SEAT
AUDIO-2
AUDIO-1
START
P/WDW LH
P/WDW RH
RR P/SEAT
MODULE-1
PEDAL ADJ
MIRR HTD
KEY SOL
RR FOG
A/BAG IND
A/BAG
TILT
TAIL LH
TAIL RH
PROTECTED COMPONENTS
Fuel lid opener & Trunk lid switch
Front lumbar support switch, IMS Control module, Driver/Passenger seat manual switch
ATM Key lock control module, Audio, IMS Switch, Accessory relay, Seat/Power outlet relay,
Digital clock & Passenger seat belt IND.
Audio
Transaxle range switch, Burglar alarm relay
Left front safety window module, Left rear power window switch
Right front safety window module, Right rear power window switch
Right rear ICM relay box
Instrument cluster, BCM, Rear curtain module, Rain sensor, IMS Control module, Power window main switch
Back warning buzzer
Left/Right outside mirror & mirror folding motor, A/C Control module
Key solenoid, Power window main switch
Rear fog light relay
Instrument cluster
Air bag cut off switch, SRS Control module
Tilt & Telescopic module, Sport mode switch
Front fog light relay, Left rear combination light, License plate light, Left headlight
Right rear combination light, License plate light, Right headlight
Page 303 of 335
6
DO-IT-YOURSELF MAINTENANCE
37
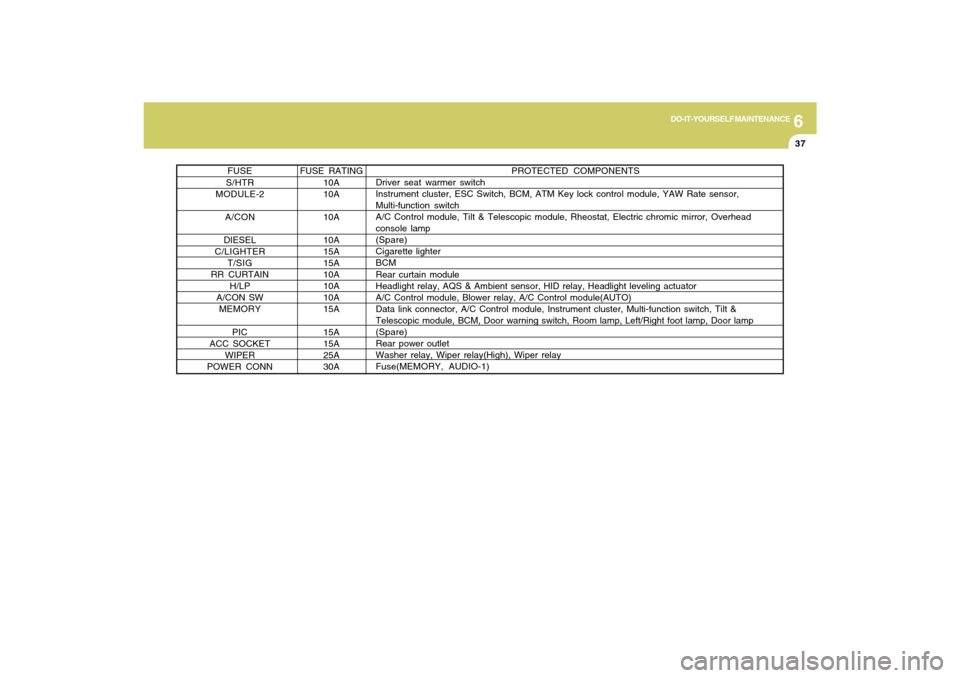
PROTECTED COMPONENTS
Driver seat warmer switch
Instrument cluster, ESC Switch, BCM, ATM Key lock control module, YAW Rate sensor,
Multi-function switch
A/C Control module, Tilt & Telescopic module, Rheostat, Electric chromic mirror, Overhead
console lamp
(Spare)
Cigarette lighter
BCM
Rear curtain module
Headlight relay, AQS & Ambient sensor, HID relay, Headlight leveling actuator
A/C Control module, Blower relay, A/C Control module(AUTO)
Data link connector, A/C Control module, Instrument cluster, Multi-function switch, Tilt &
Telescopic module, BCM, Door warning switch, Room lamp, Left/Right foot lamp, Door lamp
(Spare)
Rear power outlet
Washer relay, Wiper relay(High), Wiper relay
Fuse(MEMORY, AUDIO-1)
FUSE RATING
10A
10A
10A
10A
15A
15A
10A
10A
10A
15A
15A
15A
25A
30A FUSE
S/HTR
MODULE-2
A/CON
DIESEL
C/LIGHTER
T/SIG
RR CURTAIN
H/LP
A/CON SW
MEMORY
PIC
ACC SOCKET
WIPER
POWER CONN
Page 330 of 335
10
INDEX
2
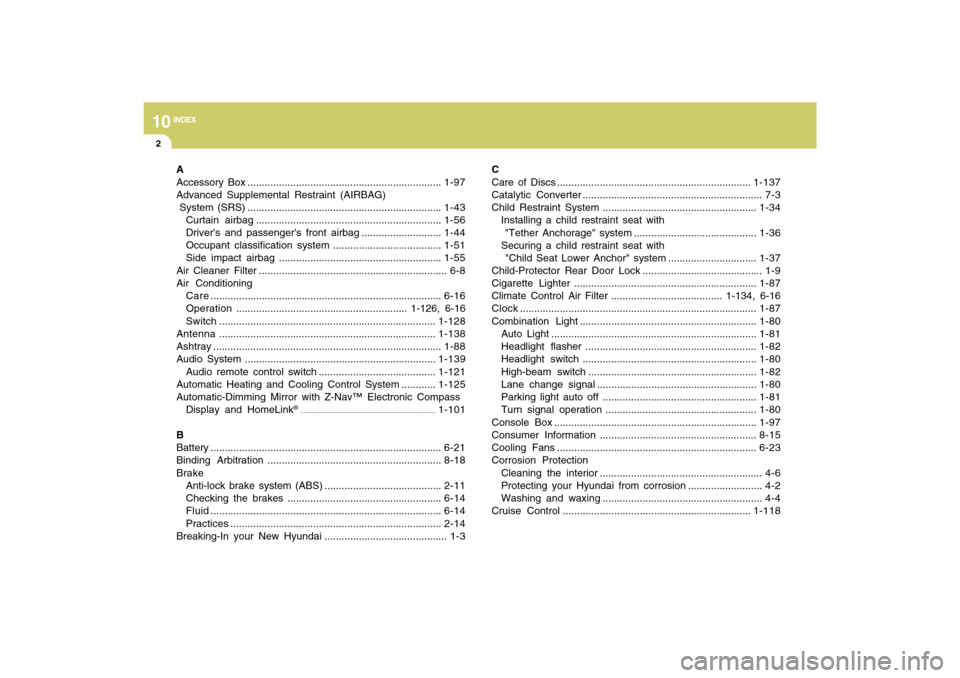
A
Accessory Box ....................................................................1-97
Advanced Supplemental Restraint (AIRBAG)
System (SRS) ....................................................................1-43
Curtain airbag .................................................................1-56
Driver's and passenger's front airbag ............................1-44
Occupant classification system ......................................1-51
Side impact airbag .........................................................1-55
Air Cleaner Filter .................................................................. 6-8
Air Conditioning
Care.................................................................................6-16
Operation............................................................ 1-126, 6-16
Switch............................................................................1-128
Antenna ............................................................................1-138
Ashtray................................................................................1-88
Audio System ...................................................................1-139
Audio remote control switch .........................................1-121
Automatic Heating and Cooling Control System ............1-125
Automatic-Dimming Mirror with Z-Nav™ Electronic Compass
Display and HomeLink
®
..................................................................................
1-101
B
Battery .................................................................................6-21
Binding Arbitration .............................................................8-18
Brake
Anti-lock brake system (ABS) .........................................2-11
Checking the brakes ......................................................6-14
Fluid.................................................................................6-14
Practices..........................................................................2-14
Breaking-In your New Hyundai ........................................... 1-3C
Care of Discs ....................................................................1-137
Catalytic Converter ............................................................... 7-3
Child Restraint System ......................................................1-34
Installing a child restraint seat with
"Tether Anchorage" system ...........................................1-36
Securing a child restraint seat with
"Child Seat Lower Anchor" system ...............................1-37
Child-Protector Rear Door Lock .......................................... 1-9
Cigarette Lighter ................................................................1-87
Climate Control Air Filter ....................................... 1-134, 6-16
Clock...................................................................................1-87
Combination Light ..............................................................1-80
Auto Light ........................................................................1-81
Headlight flasher ............................................................1-82
Headlight switch .............................................................1-80
High-beam switch ...........................................................1-82
Lane change signal ........................................................1-80
Parking light auto off ......................................................1-81
Turn signal operation .....................................................1-80
Console Box .......................................................................1-97
Consumer Information .......................................................8-15
Cooling Fans ......................................................................6-23
Corrosion Protection
Cleaning the interior ......................................................... 4-6
Protecting your Hyundai from corrosion .......................... 4-2
Washing and waxing ........................................................ 4-4
Cruise Control ..................................................................1-118