Page 177 of 266

3
WHAT TO DO IN AN EMERGENCY
9
!
!
!
CAUTION:
o Do not use any tire sealant if your
vehicle is equipped with a Tire
Pressure Monitoring System. The
liquid sealant can damage the
tire pressure sensors.
o In order for the system to cor-
rectly monitor tires for under-in-
flation, there should be a total of
exactly 4 sensors fitted to each of
the four driven wheel positions.
There should be no other sen-
sors in the vehicle including spare
tire since this could cause the
system to monitor the wrong sen-
sors.
WARNING:
Tampering with, modifying, or dis-
abling the Tire Pressure Monitoring
System (TPMS) components may
interfere with the system's ability to
warn the driver of low tire pressure
conditions and/or TPMS malfunc-
tions. Tampering with, modifying,
or disabling the Tire Pressure Moni-
toring System (TPMS) components
may void the warranty for that por-
tion of the vehicle.
!
WARNING - TPMS
o The TPMS cannot alert you to
severe and sudden tire damage
caused by external factors such
as nails or road debris.
o If you feel any vehicle instability,
immediately take your foot off the
accelerator, apply the brakes
gradually and with light force,
and slowly move to a safe posi-
tion off the road.This device complies with Part 15
of the FCC rules.
Operation is subject to the following
two conditions:
1. This device may not cause harmful
interference, and
2. This device must accept any inter-
ference received, including interfer-
ence that may cause undesired op-
eration.
WARNING:
Changes or modifications not ex-
pressly approved by the party re-
sponsible for compliance could void
the user’s authority to operate the
equipment.
Page 181 of 266

3
WHAT TO DO IN AN EMERGENCY
13
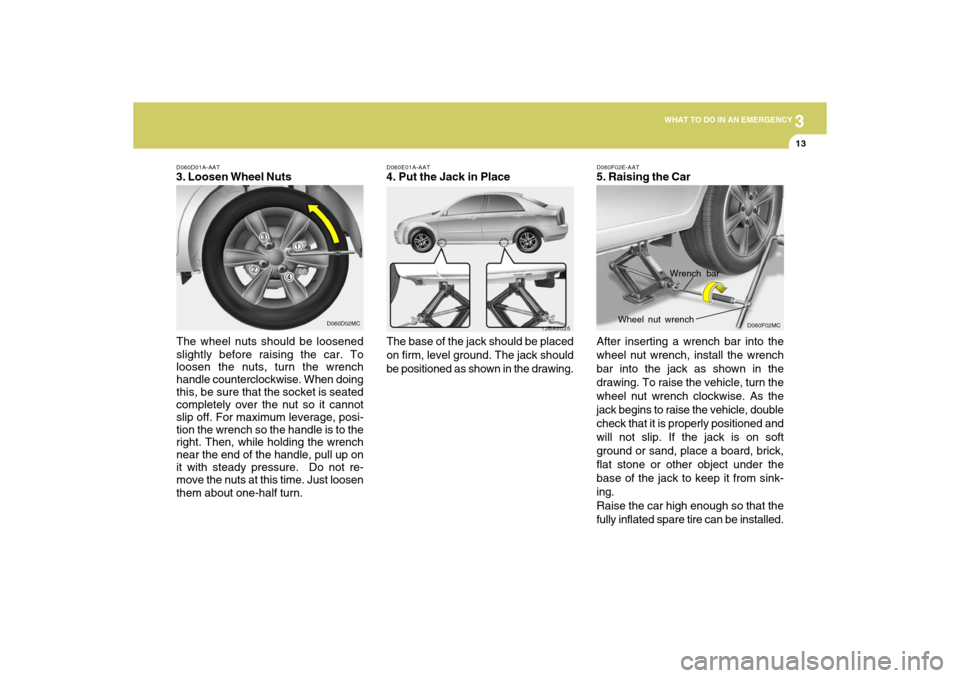
D060E01A-AAT4. Put the Jack in Place
The base of the jack should be placed
on firm, level ground. The jack should
be positioned as shown in the drawing.
1JBA6025
D060D01A-AAT3. Loosen Wheel Nuts
The wheel nuts should be loosened
slightly before raising the car. To
loosen the nuts, turn the wrench
handle counterclockwise. When doing
this, be sure that the socket is seated
completely over the nut so it cannot
slip off. For maximum leverage, posi-
tion the wrench so the handle is to the
right. Then, while holding the wrench
near the end of the handle, pull up on
it with steady pressure. Do not re-
move the nuts at this time. Just loosen
them about one-half turn.
D060D02MC
D060F02E-AAT5. Raising the Car
After inserting a wrench bar into the
wheel nut wrench, install the wrench
bar into the jack as shown in the
drawing. To raise the vehicle, turn the
wheel nut wrench clockwise. As the
jack begins to raise the vehicle, double
check that it is properly positioned and
will not slip. If the jack is on soft
ground or sand, place a board, brick,
flat stone or other object under the
base of the jack to keep it from sink-
ing.
Raise the car high enough so that the
fully inflated spare tire can be installed.
Wrench bar
Wheel nut wrench
D060F02MC
Page 182 of 266

314
WHAT TO DO IN AN EMERGENCY
!
To do this, you will need more ground
clearance than is required to remove
the flat tire.
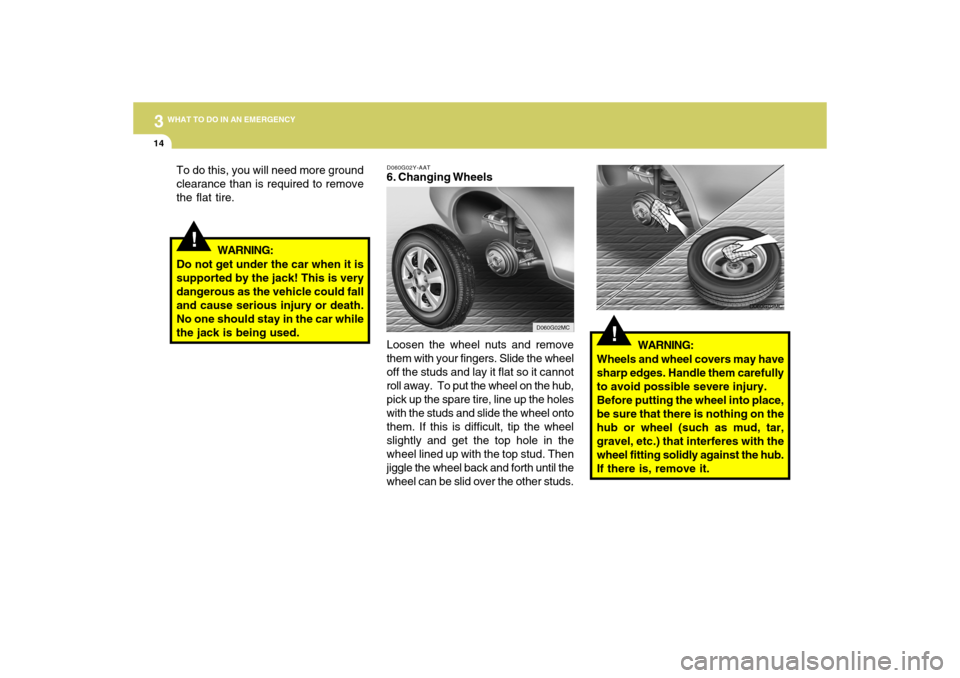
D060G02Y-AAT6. Changing Wheels
Loosen the wheel nuts and remove
them with your fingers. Slide the wheel
off the studs and lay it flat so it cannot
roll away. To put the wheel on the hub,
pick up the spare tire, line up the holes
with the studs and slide the wheel onto
them. If this is difficult, tip the wheel
slightly and get the top hole in the
wheel lined up with the top stud. Then
jiggle the wheel back and forth until the
wheel can be slid over the other studs. WARNING:
Do not get under the car when it is
supported by the jack! This is very
dangerous as the vehicle could fall
and cause serious injury or death.
No one should stay in the car while
the jack is being used.
!
WARNING:
Wheels and wheel covers may have
sharp edges. Handle them carefully
to avoid possible severe injury.
Before putting the wheel into place,
be sure that there is nothing on the
hub or wheel (such as mud, tar,
gravel, etc.) that interferes with the
wheel fitting solidly against the hub.
If there is, remove it.
D060G03MC
D060G02MC
Page 206 of 266

Engine Compartment .................................................... 6-2
General Checks ............................................................ 6-3
Maintenance Precautions ............................................. 6-4
Checking the Engine Oil ............................................... 6-4
Checking and Changing the Engine Coolant ................ 6-7
Changing the Air Cleaner Filter ..................................... 6-8
Checking the Transaxle Oil (Manual) .........................6-11
Checking the Transaxle Fluid (Automatic)..................6-11
Checking the Brakes ..................................................6-13
Air Conditioning Care..................................................6-14
Changing the Climate Control Air Filter .......................6-15
Checking and Replacing Fuses..................................6-16
Checking the Battery..................................................6-19
Power Steering Fluid Level .........................................6-21
Replacement of Light Bulbs ........................................6-22
Bulb Wattages.............................................................6-27
Fuse Panel Description...............................................6-28
DO-IT-YOURSELF MAINTENANCE
6
6
Page 208 of 266

6
DO-IT-YOURSELF MAINTENANCE
3
GENERAL CHECKS
G020C01A-AATVehicle InteriorThe following should be checked each
time when the vehicle is driven:
o Light operation
o Windshield wiper operation
o Horn operation
o Defroster, heater system operation (and
air conditioning, if installed)
o Steering operation and condition
o Mirror condition and operation
o Turn signal operation
o Accelerator pedal operation
o Brake operation, including parking
brake
o Manual transaxle operation, including
clutchoperation
o Automatic transaxle operation, includ-
ing "Park" mechanism operation
o Seat control condition and operation
o Seat belt condition and operation
o Sun visor operation
If you notice anything that does not oper-
ate correctly or appear to be functioning
correctly, inspect it carefully and seek
assistance from your Hyundai dealer if
service is needed.
G020A01A-AATEngine Compartment
The following should be checked regu-
larly:
o Engine oil level and condition
o Transaxle fluid level and condition
o Brake fluid level
o Clutch fluid level
o Engine coolant level
o Windshield washer fluid level
o Accessory drive belt condition
o Engine coolant hose condition
o Fluid leaks (on or below components)
o Power steering fluid level and condi-
tion
o Battery condition
o Air cleaner filter condition
G020B01A-AATVehicle ExteriorThe following should be checked monthly:
o Overall appearance and condition
o Wheel condition and wheel nut tight-
ness
o Exhaust system condition
o Light condition and operation
o Windshield glass condition
o Wiper blade condition
o Paint condition and body corrosion
o Fluid leaks
o Door and hood lock condition
o Tire pressure and condition
(including spare tire)
Page 214 of 266
6
DO-IT-YOURSELF MAINTENANCE
9
WINDSHIELD WIPER
BLADESG080A02A-AATThe wiper blades should be carefully
inspected from time to time and cleaned
to remove accumulations of road film or
other debris. To clean the wiper blades
and arms, use a clean sponge or cloth
with a mild soap or detergent and water.
If the wipers continue to streak or smear
the glass, replace them with genuine
Hyundai replacement parts or their
equivalent.
CAUTION:
o Do not operate the wipers on dry
glass. This can result in more rapid
wear of the wiper blades and may
scratch the glass.
o Keep the blade rubber out of contact
with petroleum products such as
engine oil, gasoline, etc.
!
2. Raise the wiper blade lightly and pull
up it.
HHR5049
G080B01HR-GATReplacing the Wiper BladesTo replace the wiper blades, raise the
wiper to the vertical.To remove the wiper blade1. Push down the wiper blade with the
locking clip (1) pressed to detach it
from the wiper arm.
HHR5048
(1)
Page 222 of 266

6
DO-IT-YOURSELF MAINTENANCE
17
G200B02HP-AATReplacing Accessory FusesThe fuse box for the lights and other
electrical accessories will be found low
on the dashboard on the driver's side.
Inside the box you will find a list showing
the circuits protected by each fuse.
If any of your car's lights or other electrical
accessories stop working, a blown (open)
fuse could be the reason. If the fuse has
opened, you will see that the metal strip
inside the fuse has melted through. If you
suspect a blown fuse, follow this proce-
dure:1. Turn off the ignition and all other
switches.
2. Open the fuse box and examine each
fuse. Remove each fuse by pulling it
toward you (a small "fuse puller" tool is
contained in the relay and fuse box of
the engine room to simplify this opera-
tion).
3. Be sure to check all other fuses, even
if you find one that appears to have
opened.
4. Replace the blown fuse by pressing a
new fuse of the same rating into place.
The fuse should be a snug fit. If it is not,
have the fuse clip repaired or replaced
by a Hyundai dealer. If you do not
have a spare fuse, you may be able to
borrow a fuse of the same or lower
rating from an accessory you can tem-
porarily get along without (the radio or
cigarette lighter, for example). Always
remember to replace the borrowed
fuse.
OMC045001
G200B02MC
Page 223 of 266

6
DO-IT-YOURSELF MAINTENANCE
18
CAUTION:
An open fuse indicates that there is a
problem in the electrical circuit. If you
replace a fuse and it blows as soon as
the accessory is turned on, the prob-
lem is serious and should be referred to
a Hyundai dealer for diagnosis and re-
pair. Never replace a fuse with anything
except a fuse with the same or a lower
amperage rating. A higher capacity fuse
could cause damage and create a fire
hazard.
!
NOTE:
See page 6-28 for the fuse panel de-
scriptions.
G200C01CM-GATPower Connector
NOTE:
o If the power connector is pulled up
from the fuse panel, the warning
chime, audio, clock and interior
lamps, etc., will not operate. The fol-
lowing items must be reset after re-
placement.
- Digital Clock
- Trip computer
- Automatic heating and cooling con-
trol system
- Audio
o Even though the power connector is
pulled up, the battery can still be
discharged by operation of the head-
lights or other electrical devices.
Your vehicle is equipped with a power
connector to prevent battery discharge if
your vehicle is parked without being op-
erated for prolonged periods. Use the
following procedures before parking the
vehicle for prolonged periods.
1. Turn off the engine.
2. Turn off the headlights and tail lights.
3. Open the driver’s side panel cover and
pull up the power connector.
4. Insert the power connector in the op-
posite direction.
G200F01MC
G200B02L
GoodOpen-Replace