2009 Hyundai Accent FRONT
[x] Cancel search: FRONTPage 164 of 266

DRIVING YOUR HYUNDAI
212
Steps for Determining Correct Load
Limit
(1)Locate the statement "The com-
bined weight of occupants and cargo
should never exceed XXX pounds''
on your vehicle's placard.
(2)Determine the combined weight of
the driver and passengers that will
be riding in your vehicle.
(3)Subtract the combined weight of the
driver and passengers from XXX
kilograms or XXX pounds.
(4)The resulting figure equals the avail-
able amount of cargo and luggage
load capacity. For example, if the
"XXX" amount equals 1400 lbs, and
there will be five 150 lb. passengers
in your vehicle, the amount of avail-
able cargo and luggage load capac-
ity is 650 lbs. (1400-750 (5 x 150) =
650 lbs.)
(5)Determine the combined weight of
luggage and cargo being loaded on
the vehicle. That weight may not
safely exceed the available cargo
and luggage load capacity calcu-
lated in Step 4. The tire label located on the driver's
side of the center pillar outer panel
gives the original tire size, cold tire
pressures recommended for your ve-
hicle, the number of people that can be
in your vehicle and vehicle capacity
weight.
Vehicle capacity weight:
849 lbs (385 kg)
Vehicle capacity weight is the maxi-
mum combined weight of occupants
and cargo. If your vehicle is equipped
with a trailer, the combined weight
includes the tongue load.
Seating capacity:
Total: 5 persons
(Front seat: 2 persons,
Rear seat: 3 persons)
Seating capacity is the maximum num-
ber of occupants including a driver,
your vehicle may carry.However the seating capacity may be
reduced based upon the weight of all
of the occupants, and the weight of the
cargo being carried or towed. Do not
overload the vehicle as there is a limit
to the total weight, or load limit includ-
ing occupants and cargo, the vehicle
can carry.
Towing capacity:
We do not recommend using this ve-
hicle for trailer towing.
Cargo capacity:
The cargo capacity of your vehicle will
increase or decrease depending on the
weight and the number of occupants
and the tongue load, if your vehicle is
equipped with a trailer.
Page 167 of 266

2
DRIVING YOUR HYUNDAI
24
!
WARNING:
o Never exceed the GVWR for your
vehicle, the GAWR for either the
front or rear axle and vehicle ca-
pacity weight. Exceeding these
ratings can cause an accident or
vehicle damage. You can calcu-
late the weight of your load by
weighing the items (or people)
before putting them in the ve-
hicle. Be careful not to overload
your vehicle.
o Do not load your vehicle any
heavier than the GVWR, either the
maximum front or rear GAWR
and vehicle capacity weight. If
you do, parts, including tires on
your vehicle can break, and it can
change the way your vehicle
handles and braking ability. This
could cause you to lose control
and crash. Also, overloading can
shorten the life of your vehicle. This label also tells you the maximum
weights that can be supported by the
front and rear axles, called Gross Axle
Weight Rating (GAWR). To find out the
actual loads on your front and rear
axles, you need to go to a weigh
station and weigh your vehicle. Your
dealer can help you with this. Be sure
to spread out your load equally on the
left and right sides of the centerline.
!
WARNING:
o Overloading your vehicle can
cause heat buildup in your
vehicle's tires and possible tire
failure that could lead to a crash.
o Overloading your vehicle can
cause increased stopping dis-
tances that could lead to a crash.
o A crash resulting from poor han-
dling vehicle damage, tire failure,
or increased stopping dis-
tances could result in serious
injury or death.
Page 175 of 266

3
WHAT TO DO IN AN EMERGENCY
7
!
CAUTION:
In winter or cold weather, the low
tire pressure telltale may be illumi-
nated if the tire pressure was ad-
justed to the recommended tire in-
flation pressure in warm weather. It
does not mean your TPMS is mal-
functioning because the decreased
temperature leads to a proportional
lowering of tire pressure.
When you drive your vehicle from a
warm area to a cold area or from a
cold area to a warm area, or the
outside temperature is greatly
higher or lower, you should check
the tire inflation pressure and ad-
just the tires to the recommended
tire inflation pressure.
WARNING:
Significantly low tire pressure
makes the vehicle unstable and can
contribute to loss of vehicle control
and increased braking distances.
Continued driving on low pressure
tires will cause the tires to overheat
and fail.
TPMS (Tire Pressure Moni-
toring System) Malfunction
Indicator
The TPMS malfunction indicator comes
on and stays on when there is a
problem with the Tire Pressure Moni-
toring System. If the system is able to
correctly detect an under-inflation warn-
ing at the same time as system failure
then it will illuminate both the TPMS
malfunction and the low tire pressure
telltale e.g. if Front Left sensor fails,
the TPMS malfunction indicator turns
on, but if Front Right, Rear Left, or
!
Rear Right tire is under-inflated, the
low tire pressure telltale may turn on at
the same time as the TPMS malfunc-
tion indicator. Have the system
checked by an authorized Hyundai
dealer as soon as possible to deter-
mine the cause of the problem.
NOTE:
o The TPMS malfunction indicator
may be illuminated if the vehicle is
moving around electric power sup-
ply cables or radio transmitters
such as police stations, govern-
ment and public offices, broad-
casting stations, military installa-
tions, airports, or transmitting tow-
ers, etc. which can interfere with
normal operation of the Tire Pres-
sure Monitoring System (TPMS).
o The TPMS malfunction indicator
may be illuminated if snow chains
or some electronic devices, such
as notebook computers, are used
in the vehicle. This can interfere
with normal operation of the Tire
Pressure Monitoring System
(TPMS).
Page 185 of 266

3
WHAT TO DO IN AN EMERGENCY
17
CAUTION:
o When towing the vehicle, take care
not to cause damage to the bumper
or underbody of the vehicle.
!
1) If the vehicle is being towed with the
rear wheels on the ground, be sure the
parking brake is released.
NOTE:
Before towing, check the level of the
automatic transaxle fluid. If it is below
the "HOT" range on the dipstick, add
fluid. If you cannot add fluid, a towing
dolly must be used.
2) If any of the loaded wheels or suspen-
sion components are damaged or the
vehicle is being towed with the front
wheels on the ground, use a towing
dolly under the front wheels.
o Manual Transaxle:
If you do not use a towing dolly, place
the ignition key in the "ACC" position
and put the transaxle in "N (Neutral)".
CAUTION:
Do not tow with the key removed or in
the "LOCK" position when towing from
the rear without a towing dolly.
D080B02MC
!
o Do not tow with sling type truck as
this may cause damage to the
bumper or underbody of the vehicle.
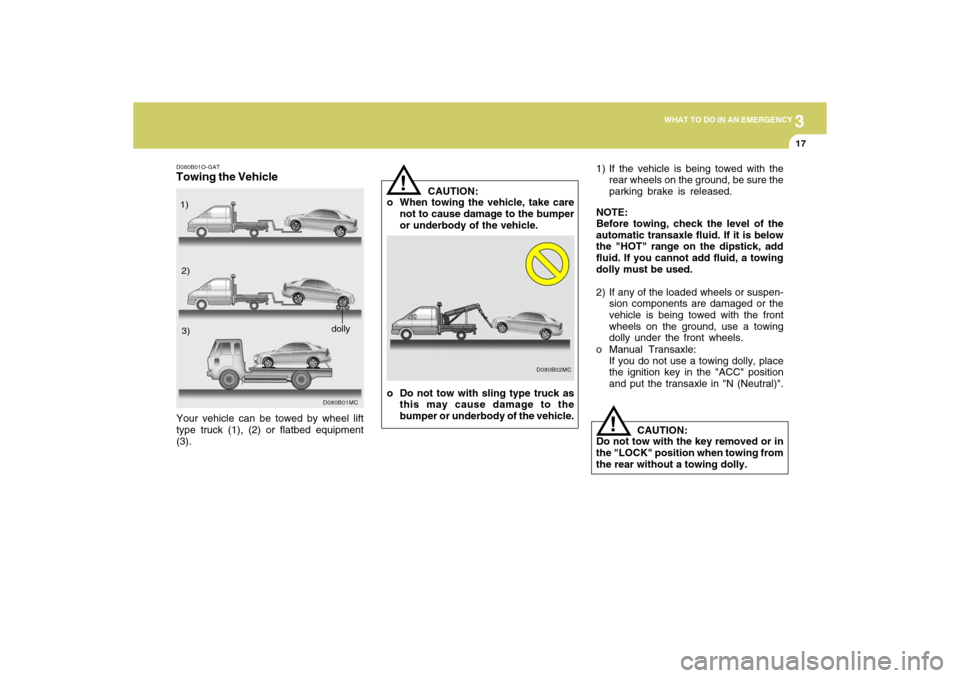
D080B01O-GATTowing the Vehicle
D080B01MC
Your vehicle can be towed by wheel lift
type truck (1), (2) or flatbed equipment
(3).1)
2)
3)
dolly
Page 186 of 266

318
WHAT TO DO IN AN EMERGENCY
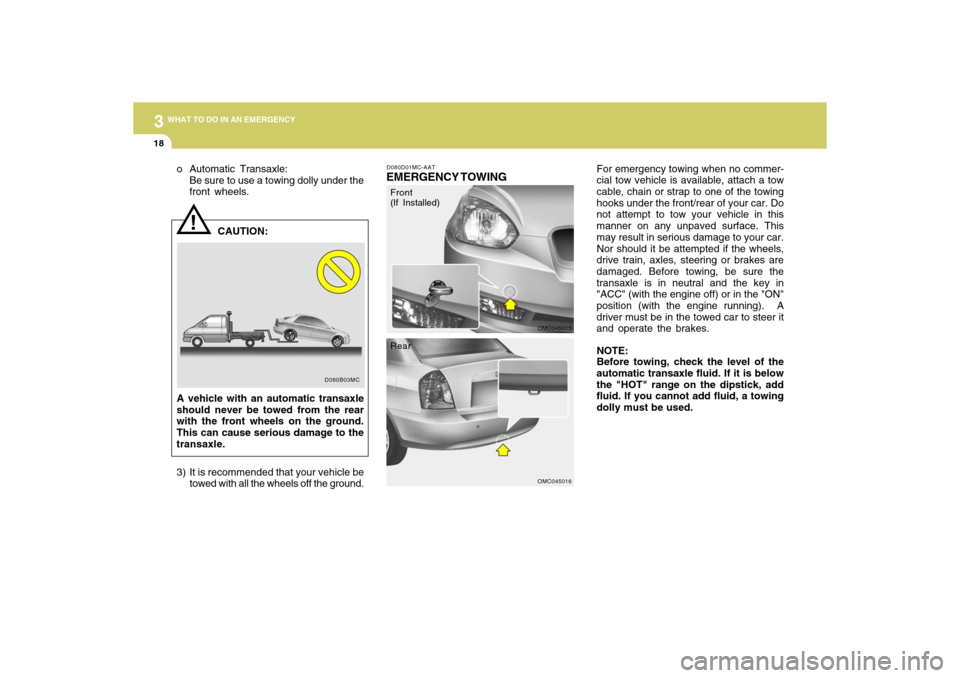
D080D01MC-AATEMERGENCY TOWING
For emergency towing when no commer-
cial tow vehicle is available, attach a tow
cable, chain or strap to one of the towing
hooks under the front/rear of your car. Do
not attempt to tow your vehicle in this
manner on any unpaved surface. This
may result in serious damage to your car.
Nor should it be attempted if the wheels,
drive train, axles, steering or brakes are
damaged. Before towing, be sure the
transaxle is in neutral and the key in
"ACC" (with the engine off) or in the "ON"
position (with the engine running). A
driver must be in the towed car to steer it
and operate the brakes.
NOTE:
Before towing, check the level of the
automatic transaxle fluid. If it is below
the "HOT" range on the dipstick, add
fluid. If you cannot add fluid, a towing
dolly must be used.
OMC045015OMC045016
!
D080B03MC
CAUTION: o Automatic Transaxle:
Be sure to use a towing dolly under the
front wheels.
A vehicle with an automatic transaxle
should never be towed from the rear
with the front wheels on the ground.
This can cause serious damage to the
transaxle.
3) It is recommended that your vehicle be
towed with all the wheels off the ground.
Front
(If Installed)
Rear
Page 187 of 266

3
WHAT TO DO IN AN EMERGENCY
19
CAUTION:
- Automatic Transaxle
If the car is being towed with all four
wheels on the ground, it can be towed
only from the front. Be sure that the
transaxle is in neutral. Do not tow at
speeds greater than 30 mph (50 km/h)
and for more than 15 miles (25 km). Be
sure the steering is unlocked by plac-
ing the key in the "ACC" position. A
driver must be in the towed vehicle to
operate the steering and brakes.
!
OMC045013
OMC045014
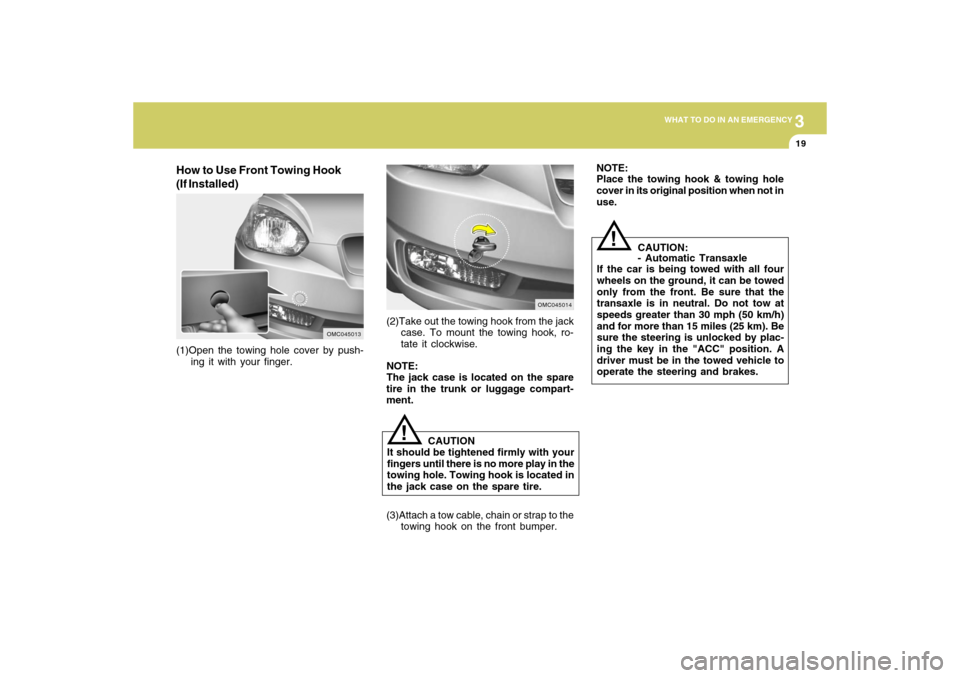
(1)Open the towing hole cover by push-
ing it with your finger.(2)Take out the towing hook from the jack
case. To mount the towing hook, ro-
tate it clockwise.
NOTE:
The jack case is located on the spare
tire in the trunk or luggage compart-
ment.
!
CAUTION
It should be tightened firmly with your
fingers until there is no more play in the
towing hole. Towing hook is located in
the jack case on the spare tire.
How to Use Front Towing Hook
(If Installed)
NOTE:
Place the towing hook & towing hole
cover in its original position when not in
use.
(3)Attach a tow cable, chain or strap to the
towing hook on the front bumper.
Page 220 of 266

6
DO-IT-YOURSELF MAINTENANCE
15
G140C01A-AATLubricationTo lubricate the compressor and the seals
in the system, the air conditioner should
be run for at least 10 minutes each week.
This is particularly important during cool
weather when the air conditioning sys-
tem is not otherwise in use.
2. Pull out the climate control air filter with
the hooks on both sides pressed.
CAUTION:
Be careful not to press the hooks in the
opposite direction.
!
CHANGING THE CLIMATE
CONTROL AIR FILTERB145A02MC-GAT(For Evaporator and Blower Unit)The climate control air filter is located in
front of the evaporator unit behind the
glove box.
It helps to decrease the amount of pollut-
ants entering the car.
1. Open the glove box and remove the
adjusting pins on both sides of the
glove box.
B145A01MC
OMC055012
Page 227 of 266

6
DO-IT-YOURSELF MAINTENANCE
22
Headlight
1. Allow the bulb to cool. Wear eye pro-
tection.
2. Open the engine hood and disconnect
the negative (-) post of the battery.
3. Always grasp the bulb by its plastic
base, avoid touching the glass.
4. Disconnect the power cord from the
back of the headlight.
REPLACEMENT OF LIGHT
BULBS!
G260A01MC-AATBefore attempting to replace a light bulb,
be sure the switch is turned to the "OFF"
position.
The next paragraph shows how to reach
the light bulbs so they may be changed.
Be sure to replace the burned-out bulb
with one of the same number and watt-
age rating.
See page 6-27 for the wattage descrip-
tions.
CAUTION:
o Keep the lamps out of contact with
petroleum products, such as oil,
gasoline, etc.
o If you don't have necessary tools,
the correct bulbs and the expertise,
consult your authorized Hyundai
dealer.
G270A02MC-GATHeadlight, Front Turn Signal Light
and Front Fog Light
CAUTION:
o The headlight aiming should be
checked by an authorized Hyundai
dealer after replacing the headlight
bulbs.
!
OMC055021
Turn signal
light
Headlight
Fog light
o After heavy, driving rain or washing,
headlight and taillight lenses could
appear frosty. This condition is
caused by the temperature differ-
ence between the lamp inside and
outside. This is similar to the con-
densation on your windows inside
your vehicle during the rain and
doesn’t indicate a problem with your
vehicle. If the water leaks into the
lamp bulb circuitry, have the vehicle
checked by an authorized Hyundai
dealer.