Page 301 of 578

�Î
�ΠThis audio system can operate the
audio f iles on a USB f lash memory
device with the same controls used
f or the in-dash disc changer. To play
a USB f lash memory device, connect
it to the USB adapter cable in the
console compartment, then press the
AUX button. The ignition switch
must be in the ACCESSORY (I) or
ON (II) position.Only AAC f ormat f iles recorded
with iTunes are playable on this
audio unit. Do not keep the USB f lash
memory device in the vehicle.
Direct sunlight and high heat will
damage it.
We recommend backing up your
data bef ore playing a USB f lash
memory device.
Depending on the type and
number of f iles, it may take some
time bef ore they begin to play.
Depending on the sof tware the
f iles were made with, it may not be
possibletoplaysomefiles,or
display some text data.
You can select the AUX mode by
using the navigation system voice
control buttons, but cannot operate
theplaymodefunctions.
The recommended USB f lash
memory devices are 256 Mbyte or
higher USB f lash memory devices.
Some digital audio players may be
compatible as well.
The audio system reads and plays
the audio f iles on the USB f lash
memory device in MP3, WMA or
AAC f ormats. Depending on the
f ormat, the display shows MP3,
WMA or AAC when a USB flash
memory device is playing. The USB
f lash memory device limit is up to
700 f olders or up to 65535 f iles. Some USB f lash memory device
(such as devices with security lock-
out f eatures, etc.) will not work in
this audio unit.
Do not use a device such as a card
reader or hard drive as the device
or your f iles may be damaged.
Do not connect your USB f lash
memory device using a HUB.
Do not use an extension cable to
the USB adapter cable equipped
with your vehicle.
:
CONT INUED
To Play a USB Flash Memory
Device
Voice Cont rol Syst em
Playing a USB Flash Memory Device (Models with navigation system)
Features
297
NOTE:
�����—�����—�
���y�
���������
���y���
�(�/���������y���������y
2009 Pilot
Page 304 of 578

�µ�µ
�´ �µ
You can also change files with the
interf ace dial. Press the AUDIO
button to show the audio control
display on the navigation screen.
Push the selector knob to the right
to skip to the beginning to the next
file,andtothelefttoskiptothe
beginning of the current f ile.
Pushing it to the lef t again skips to
the beginning of the previous f ile.
Use the SKIP bar or button while a
USB f lash memory device is playing
to select passages and change f iles.
Each time you press and
releasethe sideof theSKIPbar
or button, the system skips forward
to the beginning of the next file.
Press and release the side of
the bar or button, to skip backward
to the beginning of the current f ile.
Press it again to skip to the
beginning of the previous f ile.
To move rapidly within a f ile, press
andholdeitherside( or )
of the SKIP bar or button. To select a
dif f erent f older, press and release
either side of the CATEGORY bar.
Press the side to skip to the next
f older, and press the side to skip
to the beginning of the previous
f older.
T o Change or Select Files
Playing a USB Flash Memory Device (Models with navigation system)
SK IP Folder Selection
300
SKIP
DIRECTION
SKIP
DIRECTION
�����—�����—�
���y�
�������������y���
�(�/���������y���������y
2009 Pilot
Page 313 of 578

�Û�Ý�´
�µ
�´�µ �´
�µ
�´ �µ
�´
�µ
CONT INUED
Three controls f or the audio system
are mounted in the steering wheel
hub. These let you control basic
f unctions without removing your
hand f rom the wheel.
The VOL button adjusts the volume
up ( ) or down ( ). Press the top
or bottom of the button, hold it until
the desired volume is reached, then
release it. The MODE button changes the
mode. Pressing the button
repeatedly selects FM1, FM2, AM,
XM1, XM2 (if equipped), CD (if a
disc is loaded), DVD video (if
equipped), USB (if a USB memory
device is connected), AUX-Audio or
AUX-Video (if equipped).
If you are listening to the radio, use
the CH button to change stations.
Each time you press the top ( ) of
the button, the system goes to the
next preset station on the band you
are listening to. Press the bottom
( ) to go back to the previous
station.
To search up and down from the
current f requency and f ind a station
with a strong signal, press the top
( ) or bottom ( ) of the button for
1 second.
If you are playing a disc, the system
skips to the beginning of the next
track each time you press the top
( ) of the CH button. Press the
bottom ( ) to return to the
beginning of the current track. Press
it again to return to the previous
track. You will see the disc and track
numbers in the upper display.
To go to the next disc, press the top
( ) of the button for 1 second.
Press the bottom ( ) f or 1 second
to go back to the previous disc.
When you play an MP3/WMA disc,
press the top ( ) of the button for 1
second to go to the next folder. Press
the bottom ( ) for 1 second to go
back to the previous folder.
Except LX models
Remote Audio Controls
Features
309
VOL BUTTON
CH BUTTON
MODE BUTTON
�����—�����—�
���y�
�������������y���
�(�/���������y�����
���y
2009 Pilot
Page 314 of 578
�´�µ
�´ �µ �´
�µ
If you are listening to XM Satellite
Radio, use the CH button to change
channels. Each time you press the
top ( ) of the button, the system
goes to the next preset channel.
Pressthebottom( )togobackto
the previous preset channel.
To go to the next channel of the
category you are listening to, press
the top ( ) of the button for 1
second. Press the bottom ( ) f or 1
second to go back to the previous
channel. If youareplayingaDVDvideo,use
the channel button to change
chapters. Each time you press the
top ( ) of the button, the system
goes to the next chapter. Press the
bottom ( ) to return to the
beginning of the current chapter.
Press it again to return to the
previous chapter.
On vehicles with rear entertainment
system
Remote Audio Controls
310
�����—�����—�
���y�
�������������y���
�(�/���������y�����
���y
2009 Pilot
Page 316 of 578
 button to set the time back to
the previous")
You can quickly set the time to the
nearest hour. If the displayed time is
bef ore the half hour, press and hold
the CLOCK button, then press the R
(reset) button to set the time back to
the previous hour. If the displayed
time is af ter the half hour, the same
procedure sets the time f orward to
the beginning of the next hour.
For example: 1:06 will reset to 1:001:52 will reset to 2:00
The navigation system receives
signals f rom the global positioning
system (GPS), and the displayed
time is updated automatically by the
GPS. Ref er to the navigation system
manual f or how to adjust the time.
If your vehicle’s battery is
disconnected or goes dead, you may
need to set the clock.
To set the time, press the CLOCK
button until you hear a beep. The
displayed time begins to blink. Change the hours by pressing the H
(hour) button until the numbers
advance to the desired time. Change
the minutes by pressing the M
(minute) button until the numbers
advance to the desired time.
Press the CLOCK button again to
enter the set time.
Except Touring models
On Touring models
Setting the Clock
312
HOUR BUTTON
(PRESET 4)
CLOCK
BUTTONEX and EX-L models
RESET
BUTTON
(PRESET 6) HOUR
BUTTON
(PRESET 4) MINUTE
BUTTON
(PRESET 5)
MINUTE BUTTON
(PRESET 5) SELECTOR KNOB
MENU BUTTON
EX-L model with rear
entertainment system is shown.
LX models
CLOCK BUTTON
RESET BUTTON
(PRESET 6)
�����—�����—�
���y�
�������������y���
�(�/���������y�����
���y
2009 Pilot
Page 318 of 578

To set the time, turn the selector
knob and select the hours or the
minutes, then press the knob to
enter your selection. The display
changes to the setting display.
Turn the selector knob up or down
to count the numbers up or down.
Press the selector knob (ENTER)
to enter your selection. The
display will return to the clock
adjusting display.While setting the clock, pressing
the RETURN button will go back
to the previous display.
Pressing the MENU button again
will cancel this setting mode.
Turn the selector knob to change
the setting between 12H and 24H.
Press the selector knob (ENTER)
to enter your selection. The
display will return to the clock
adjusting display. To enter the clock setting, turn
the selector knob to select ‘‘SET,’’
then press the knob. The display
will return to the menu item
display.
Press either the RETURN or
MENUbuttontogobacktothe
normal display.
5.
6.
7.
8.
9.10.
11.
Setting the Clock
314
MINUTE SETTING
�����—�����—�
���y�
�������������y���
�(�/���������y�����
���y
2009 Pilot
Page 327 of 578
When you press the MENU
SCROLL button while a DVD is
playing, the DVD Menu appears.
ThemenuoptionsareTOPMENU,
MENU, PLAY MODE, SEARCH,
and NumInput.
To go to your selected menu, use theor button to highlight the
icon and press the ENT button. To
return to the DVD video screen,
select EXIT. When you select ‘‘TOP MENU’’, the
screen changes to the DVD’s title
menu. This menu also appears when
you press the MENU SCROLL
button while a DVD is not playing.
To go back to play, press the
RETURN button. Top Menu
When you press the DISP MODE
button while a DVD is playing, the
current status of title, chapter,
elapsed time, angle, subtitle, audio,
and sound characteristics, with the
personal surround logo are displayed.
To return to the DVD video screen,
press the DISP MODE button again.
CONT INUED
Rear Entertainment System
MENU SCROLL Button
DISP MODE Button
Features
323
�����—�����—�
���y�
����
������
�y���
�(�/���������y���������y
2009 Pilot
Page 344 of 578
�Û
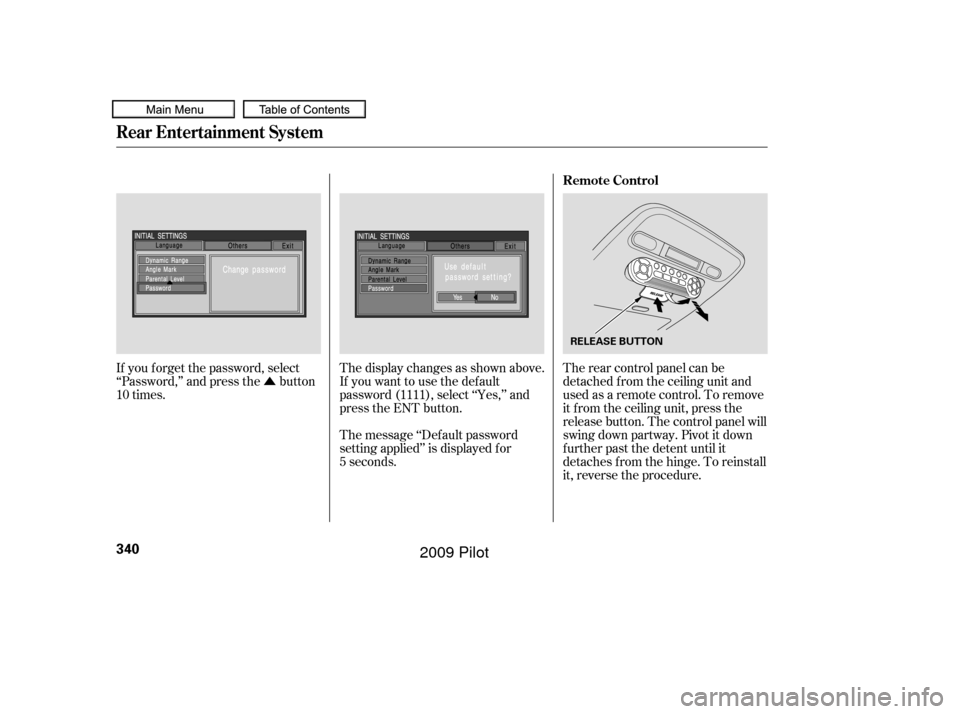
If you f orget the password, select
‘‘Password,’’ and press the button
10 times. The display changes as shown above.
If you want to use the def ault
password (1111), select ‘‘Yes,’’ and
press the ENT button.
The message ‘‘Def ault password
setting applied’’ is displayed f or
5 seconds.The rear control panel can be
detached f rom the ceiling unit and
used as a remote control. To remove
it f rom the ceiling unit, press the
release button. The control panel will
swing down partway. Pivot it down
f urther past the detent until it
detaches from the hinge. To reinstall
it, reverse the procedure.
Rear Entertainment System
Remote Control
340
RELEASE BUTTON
�����—�����—�
���y�
����
������
�y���
�(�/���������y���������y
2009 Pilot