Page 347 of 578

Thechartontherightexplainsthe
error messages you may see in the
display while playing a disc.
If you see an error message in the
display while playing a disc, press
the eject button. After ejecting the
disc, check it for damage or
deformation. If there is no damage,
insert the disc again.
Theaudiosystemwilltrytoplaythe
disc. If there is still a problem, the
error message will reappear. Press
the eject button, and pull out the disc.
Insert a dif f erent disc. If the new
disc plays, there is a problem with
the f irst disc. If the error message
cycle repeats and you cannot clear it,
take your vehicle to a dealer.Solution
Cause
Error Message
Press the disc eject button, and remove the disc.
Check for an error indication. Insert the disc
again. If the code does not disappear or the disc
cannot be removed, consult your dealer.
Press the disc eject button, and remove the disc.
Check for an error indication. Insert the disc
again. If the code does not disappear or the disc
cannot be removed, consult your dealer.
Will disappear when the temperature returns to
normal.
The disc is not playable in this unit. Eject the
disc, and insert a disc compatible with this
system.
Reinsert the disc, and increase the parental
control level (see page 337).
FOCUS Error
Mechanical Error
High Temperature
Invalid region code
Invalid parental
control level
Rear Entertainment System
DVD Player Error Messages
Features
343
CHECK DISC
MECH ERROR HEAT ERRORREGION ERR
PARENTAL CHECK
�����—�����—�
���y�
����
��������y���
�(�/���������y���������y
2009 Pilot
Page 355 of 578

CONT INUED
The compass may need to be
manually calibrated af ter exposure to
a strong magnetic field. If the
compassseemstobecontinually
showing the wrong direction and is
not self -calibrating, or the compass
display is blinking with the CAL
indicator on, do the f ollowing.Turn the ignition switch to the ON
(II) position. Press and hold the MENU button
f or about 5 seconds until you hear
a beep. The display shows you the
compass setting menu items.
Compass operation can be af f ected
by driving near power lines or
stations, across bridges, through
tunnels, over railroad crossings, past
large vehicles, or driving near large
objects that can cause a magnetic
disturbance. It can also be af f ected
by accessories such as antennas and
roof racks that are mounted by
magnets.
If the compass display is blinking
and the CAL indicator is shown, the
compassisself-calibrating.
Press and hold the RPT button
and TUNE/SOUND knob f or
about 2 seconds until you hear a
beep. The display shows you the
compass setting menu items.
1. 2.
Except Touring models
On EX and EX-L modelsOn LX models
Compass
Compass Calibration
Compass Operation
Features
351
COMPASS COMPASS SETTING MENU ITEMS
�����—�����—�
���y�
�������������y���
�(�/���������y���������y
2009 Pilot
Page 356 of 578

Turn the selector or TUNE/
SOUND knob to select
‘‘CALIBRATION.’’Press the selector or TUNE/
SOUND knob to enter your
selection. The display shows you
‘‘PUSH CAL START.’’
While setting the compass,
pressing the RETURN button (on
EX and EX-L models) will go back
to the previous display. Pressing
the MENU button will cancel the
compass setting mode.Press the selector or TUNE/
SOUND knob. The compass
display is blinking and the CAL
indicator is shown.
Drive the vehicle slowly in two
complete circles.
When the calibration is successf ully
completed, the CAL indicator goes
of f and the compass display will stop
blinking and show an actual heading.
The audio system is not related to
the compass system. Even if the
compasssystemiscalibrating,the
display returns to the normal display
which you last selected. Do this procedure in an open
area, away f rom buildings, power
lines, and other vehicles. 5.
6.
4.
3.
Compass
352
NOTE:
�����—�����—�
���y�
����
��������y���
�(�/���������y���������y
2009 Pilot
Page 357 of 578

In most areas, there is a variation
between magnetic north and true
north. Zone selection is required so
the compass can compensate f or this
variation. To check and select the
zone, do this:Turn the ignition switch to the ON
(II) position.
Find the zone f or your area on the
map (see page ). If the correct
zone is not shown, turn the
selector or TUNE/SOUND knob
to cycle the zone lists up or down.
Press and hold the MENU button
f or about 5 seconds until you hear
a beep. The display shows you the
compass setting menu items.
Press and hold the RPT button
and TUNE/SOUND knob f or
about 2 seconds until you hear a
beep. The display shows you the
compass setting menu items.
Turn the selector or TUNE/
SOUND knob to select ‘‘ZONE.’’
Press the selector knob to enter
your selection. The display shows
you the currently selected zone
number.
If necessary, press the RETURN
button(onEXandEX-Lmodels)
to return to the previous display.
Pressing the MENU button will
cancel the compass setting mode.
Once the correct zone is displayed,
press the selector or TUNE/
SOUND knob. The display then
returns to normal.
4.
1.
2.
3.
354 5.
On EX and EX-L models
On LX models
Compass
Compass Zone Selection
Features
353
ZONE NUMBER
�����—�����—�
���y�
����
��������y���
�(�/���������y���������y
2009 Pilot
Page 358 of 578
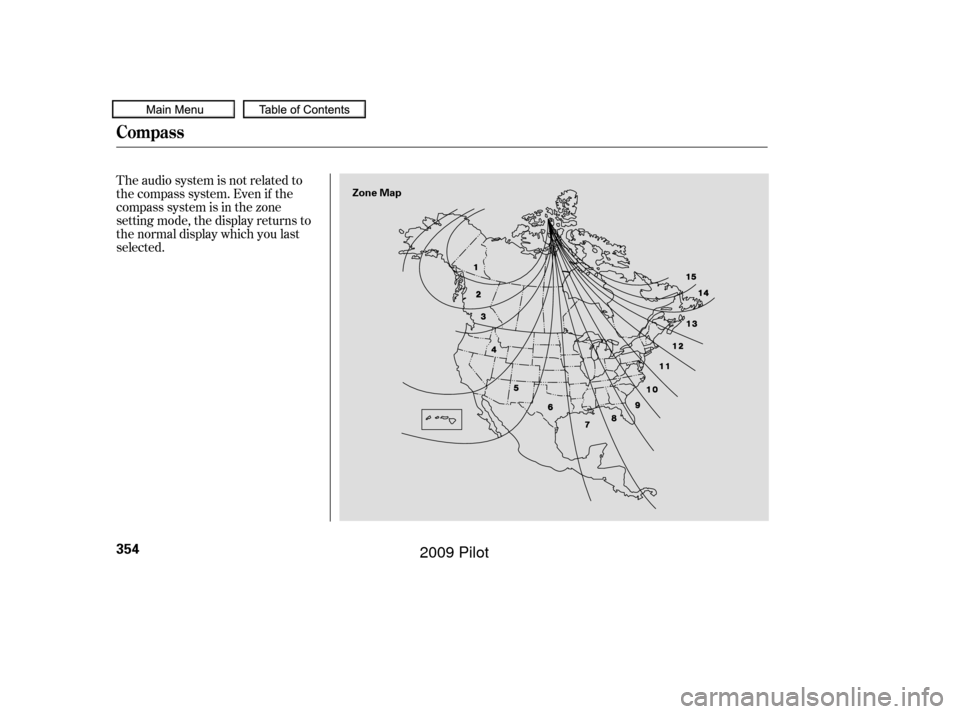
The audio system is not related to
the compass system. Even if the
compasssystemisinthezone
setting mode, the display returns to
the normal display which you last
selected.
Compass
354
Zone Map
�����—�����—�
���y�
����
��������y���
�(�/���������y���������y
2009 Pilot
Page 365 of 578

To operate the HFL, use the HFL
Talk and Back buttons on the left
side of the steering wheel.
The HFL buttons are used as
f ollows:
HFLTalk:Thisbuttonisusedbefore
you give a command, to answer
incoming calls, and to conf irm
system inf ormation.
The HFL microphone is on the
ceiling, between the f ront map lights
and the console buttons. On models
with navigation system, the
microphone is shared with the
navigation system.
When the HFL is in use, the sound
comes through the vehicle’s f ront
audio system speakers. If the audio
system is in use while operating
either of the HFL buttons or making
a call, the HFL over-rides the audio
system. To change the volume level,
use the audio system volume knob,
or the steering wheel volume
controls.
Your vehicle’s HFL system has the
cellular phonebook import f unction.
This allows you to import your
cellular phonebook to the HFL.
Using the navigation system, you can
makeacalldirectlyandstorea
desired number in the HFL f rom the
list shown on the navigation display.
For more inf ormation on how to
import the phonebook or to make a
call, see page .
You can also store the desired
number to the HFL directly f rom
your mobile phone using the receive
contact f unction in the HFL.
372
CONT INUED
BluetoothHandsFreeL ink
HFL Buttons
Microphone
Audio System
Features
361
HFL TALK BUTTON
HFL BACK BUTTON
�����—�����—�
���y�
����
��������y���
�(�/���������y���������y
2009 Pilot
Page 366 of 578
Press and release the button, then
wait f or a beep bef ore giving a
command.
HFLBack:Thisbuttonisusedto
end a call, go back to the previous
voice control command, and to
cancel an operation.When you are dialing or receiving
calls with the audio system in use,
you will see the HFL screen on the
navigation display.
You will also see ‘‘HANDS FREE
LINK’’ on the center display.
‘‘ ’’ indicator will be displayed on
the center display if your phone is
linked to the Bluetooth compatible
cell phone.
BluetoothHandsFreeL ink
Inf ormation Display
362
�����—�����—�
���y�
����
��������y���
�(�/���������y���������y
2009 Pilot
Page 367 of 578
�Î
�Î �Î�µ
�µ �µ
�µ
When you are operating the HFL, or
when you manually select HFL on
the multi-information display, you
will see this inf ormation on the
screen: Signal Strength Indicates the
network signal strength of the
current phone. Five bars equals
f ull strength.
ROAM Status Indicates your
phone is roaming.
Battery Level Status Indicates
the power currently remaining in
your phone’s battery. Five bars
equals f ull battery strength.
HFL Mode Indicates when you
are dialing and receiving calls.
BluetoothHandsFreeL ink
Multi-Inf ormation Display
Features
363
SIGNAL
STRENGTH
BATTERY
LEVEL STATUS
HFL
MODE
ROAM STATUS PHONE DIALING
�����—�����—�
���y�
����
��������y���
�(�/���������y���������y
2009 Pilot