Page 13 of 156

Navigation System13
Getting Started
Voice Control Basics
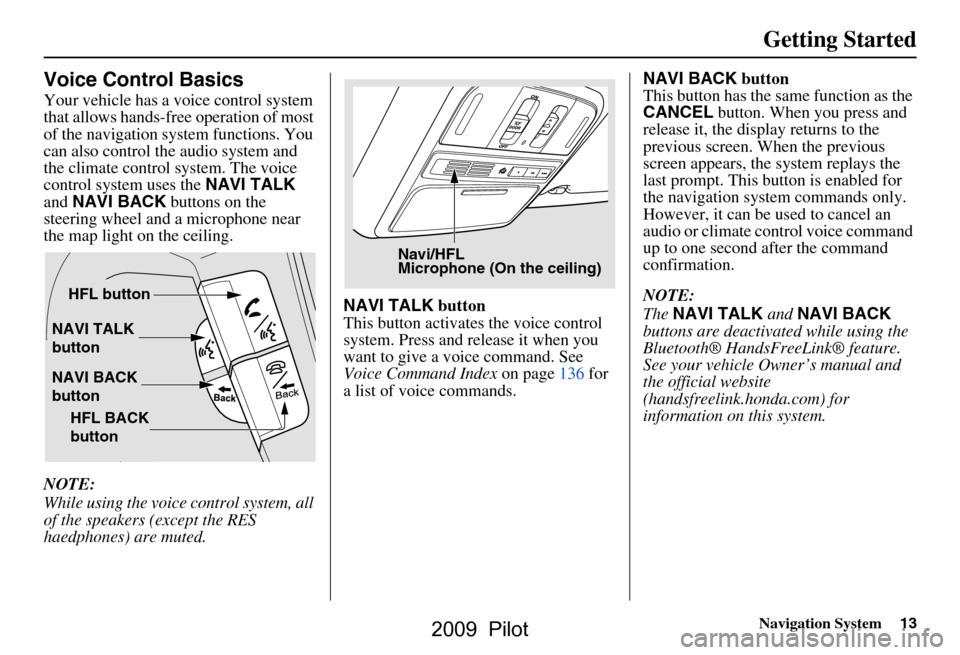
Your vehicle has a voice control system
that allows hands-free operation of most
of the navigation system functions. You
can also control the audio system and
the climate control system. The voice
control system uses the NAVI TALK
and NAVI BACK buttons on the
steering wheel and a microphone near
the map light on the ceiling.
NOTE:
While using the voice control system, all
of the speakers (except the RES
haedphones) are muted. NAVI TALK
button
This button activates the voice control
system. Press and release it when you
want to give a voice command. See
Voice Command Index on page136 for
a list of voice commands. NAVI BACK
button
This button has the same function as the
CANCEL button. When you press and
release it, the disp lay returns to the
previous screen. When the previous
screen appears, the system replays the
last prompt. This button is enabled for
the navigation system commands only.
However, it can be used to cancel an
audio or climate control voice command
up to one second after the command
confirmation.
NOTE:
The NAVI TALK and NAVI BACK
buttons are deactivated while using the
Bluetooth® HandsFreeLink® feature.
See your vehicle Owner’s manual and
the official website
(handsfreelink.honda.com) for
information on this system.
NAVI TALK
button
NAVI BACK
button HFL button
HFL BACK
button
Navi/HFL
Microphone (On the ceiling)
2009 Pilot
Page 57 of 156

Navigation System57
Driving to Your Destination
Map Orientation
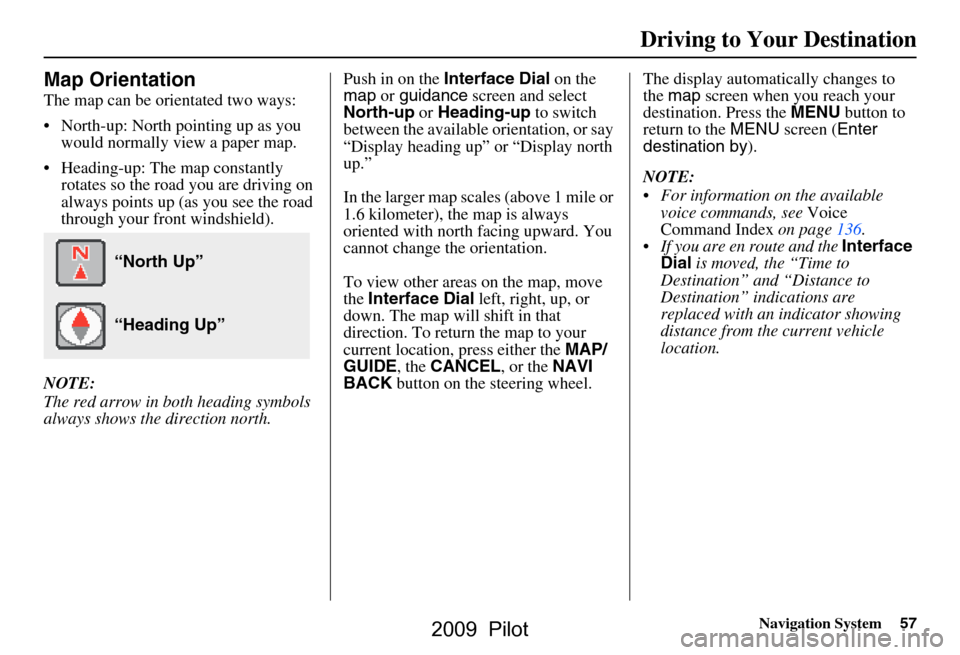
The map can be orientated two ways:
North-up: North pointing up as you
would normally view a paper map.
Heading-up: The map constantly rotates so the road you are driving on
always points up (as you see the road
through your front windshield).
NOTE:
The red arrow in both heading symbols
always shows the direction north. Push in on the
Interface Dial on the
map or guidance screen and select
North-up or Heading-up to switch
between the available orientation, or say
“Display heading up” or “Display north
up.”
In the larger map scales (above 1 mile or
1.6 kilometer), the map is always
oriented with north facing upward. You
cannot change the orientation.
To view other areas on the map, move
the Interface Dial left, right, up, or
down. The map will shift in that
direction. To return the map to your
current location, press either the MAP/
GUIDE , the CANCEL , or the NAVI
BACK button on the steering wheel. The display automati
cally changes to
the map screen when you reach your
destination. Press the MENU button to
return to the MENU screen ( Enter
destination by ).
NOTE:
For information on the available voice commands, see Voice
Command Index on page136.
If you are en route and the Interface
Dial is moved, the “Time to
Destination” and “Distance to
Destination” indications are
replaced with an indicator showing
distance from the current vehicle
location.
“North Up”
“Heading Up”
2009 Pilot
Page 69 of 156

Navigation System69
When the pop-up menu is displayed,
select Set as Dest. to set your location
as a replacement destination, or Set as
Waypoint to set as a waypoint.
The system will return to the map
screen and recalculat e the route to your
new destination or waypoint.
NOTE:
When you scroll the map screen while
en route to a destination, some voice
controls will not function. These
include:
Display “Heading up”
Display “North up”Entering a Destination from the
Menu Screen (while en route)
If you say “Menu,” or press the MENU
button and select the “Enter destination
by” tab, the system displays the MENU
screen ( Enter destination by ). Follow
the procedure described in Entering a
Destination , which begins on page22.
When the Calculate route to screen is
displayed, select OK and push in on the
Interface Dial . You can select either
Set as New Destination or Set as
Waypoint for your specified position.
When the pop-up menu is displayed,
select Set as Dest. to set your location
as a replacement destination, or Set as
Waypoint to set as a waypoint.
The system will return to the map
screen, and recalculate the route to your
specified new destination or waypoint.
Tip:
You can also press the MENU button
twice to display the MENU screen
( Enter destination by ).
Continue Trip Screen
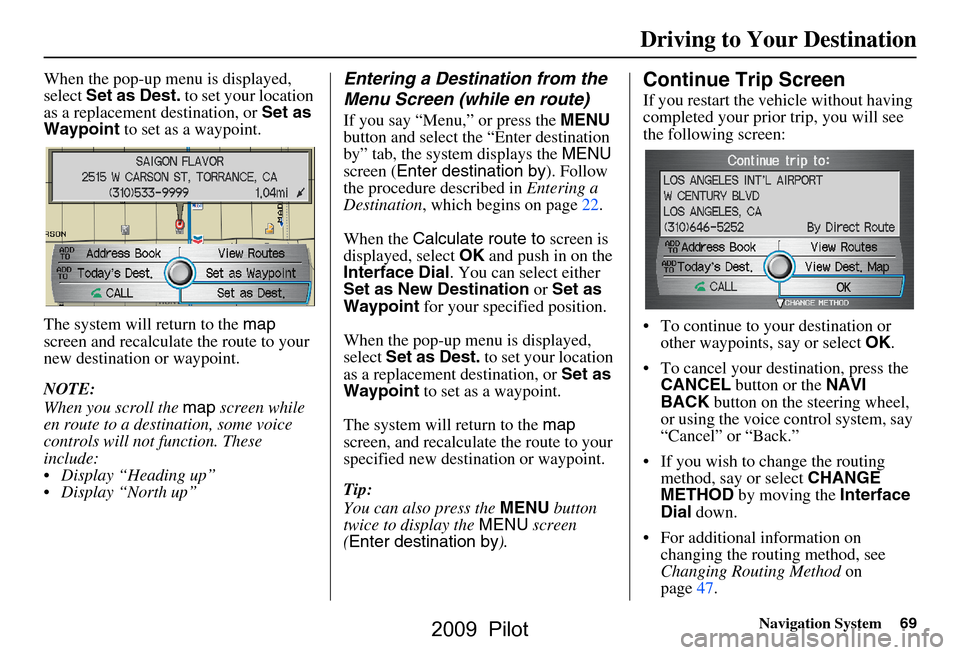
If you restart the vehicle without having
completed your prior trip, you will see
the following screen:
To continue to your destination or
other waypoints, say or select OK.
To cancel your destination, press the CANCEL button or the NAVI
BACK button on the steering wheel,
or using the voice control system, say
“Cancel” or “Back.”
If you wish to change the routing method, say or select CHANGE
METHOD by moving the Interface
Dial down.
For additional information on changing the routing method, see
Changing Routing Method on
page47.
Driving to Your Destination
2009 Pilot
Page 141 of 156

Navigation System141
Voice Command Index
Radio Voice Commands
The system accepts these commands on
most screens.
Audio on*
Audio off*
Radio on* (or Radio play )
Radio off*
Radio select FM1
Radio select FM2
Radio select AM
Radio tune to # FM (#: frequency.
Example Radio 95.5 FM )
Radio tune to # AM (#: frequency.
Example Radio 1020 AM )
Radio seek up
Radio seek down
Radio next station (same as Radio
seek )
Radio preset # (#: 1-6)
Radio FM preset # (#: 1-6)
Radio FM1 preset # (#: 1-6)
Radio FM2 preset # (#: 1-6)
Radio AM preset # (#: 1-6)
Radio auto select*
Radio scan*
Radio select XM1
Radio select XM2 XM channel #
(#: 1-255)
XM channel up
XM channel down
XM category up
XM category down
XM preset # (#: 1-6)
XM1 preset # (#: 1-6)
XM2 preset # (#: 1-6)
XM scan*
XM category scan*
XM channel scan*
XM category mode
XM channel mode
* Repeating these commands switches (toggles) the function between On
and Off, so the action that occurs
may not match the command you
speak.
NOTE:
Radio volume l evels cannot be
controlled using voice control. Use the
buttons on your stee ring wheel. See your
vehicle Owner’s manual for more
information.
CD Voice Commands
The system accepts these commands on
most screens.
CD play
CD play disc # (#: 1-6)
CD play track # (#: 1-30)
CD play disc #1 track #2 (#1: 1-6,
#2: 1-30)
CD skip forward
CD skip back
CD play next disc
CD play previous disc
CD track random*
CD track repeat*
CD disc repeat*
CD track scan*
CD disc scan*
CD normal play (resumes “Play”
from these commands: “CD track
random,” “CD track repeat,” and
“CD track scan”)
CD track list
2009 Pilot