Page 180 of 532
Both seats can be removed to give
more cargo capacity.
Toinstallthefloormatinanouter
position or the center position, insert
thetabsintotheslitsonthefloor,
then snap the two buttons in place.
Ref er to the illustrations above.
Do not remove the seats while
driving.
To remove a second row seat:
Pull up the seat-back angle
adjustment lever, and fold the
seat-back forward.
1.
CONT INUED
Removing the Bucket Seats in the
Second Row
Seats
Inst rument s and Cont rols
177
SLITS
Outer position
SLIT
Center position
SEAT-BACK LEVER
TABS
TAB TABS
BUTTONS
BUTTONSTAB
LOCK RELEASE LEVER
�\f���—�\f���—���
�y�
�
�������\f���y���
�(���������\f�y�\f�
�����y
2009 Odyssey
Page 181 of 532
To reinstall the seat, hook the f ront
of the seat to the f loor, then push the
rear of the seat-back until it locks in
place. Make sure the seat is securely
latched bef ore driving.
Unlock the seat f rom the f loor by
pulling the lock release lever
under the seat cushion’s f ront
edge and lif ting the rear of the
seat.
Unhook the f ront of the seat f rom
the f loor by pulling it back slightly,
then pivoting it upward. Your vehicle has a plus-one seat for
the second row center position.
You can remove the plus-one seat
when it is not used. Do not remove
the seat while driving.
2.
3.
Except U.S. LX and Canadian DX models
Removing the Second Row
Plus-One Seat
Seats
178
�\f���—�\f���—���
�y�
�
�������\f���y���
�(���������\f�y�\f�
�����y
2009 Odyssey
Page 182 of 532
To remove the plus-one seat:Unlock the seat from the floor by
pulling the lock release lever and
lifting the rear of the seat.Unhook the f ront of the seat f rom
the f loor by pulling it back slightly,
then pivoting it upward.
Fold the seat-back forward by
pulling the seat-back strap.
Remove the seat cushion by
pulling the seat cushion strap.
Lower the head restraints f ully.
1.
2.
3. 4.5.
Seats
Inst rument s and Cont rols
179
SEAT CUSHION STRAP
SEAT-BACK STRAP LOCK RELEASE LEVER
�\f���—�\f���—���
�y�
�
�������
���y���
�(���������\f�y�\f�
�����y
2009 Odyssey
Page 183 of 532
To install the plus-one seat:Install the seat cushion on the seat
bottom plate. To install the cushion,
hook the f ront of the cushion f irst,
then push down the rear until the
cushion is securely positioned. To use the plus-one seat as a center
console, remove its seat cushion by
pulling up the seat cushion strap.
Then pivot the seat-back forward
until it is f lat. Store the seat cushion
in the f loor storage area.
Make sure the seats are securely
locked in place bef ore driving. A seat
thatisnotlockedinplacecouldfly
around and cause injury in a sudden
stop or crash.
Hook the f ront of the seat to the
f loor, then push down the back until
it locks. Make sure both the f ront
and back of the seat are securely
latched. Pull up the seat-back, and
adjust the seat-back angle to the
desired position while pulling the
seat-back strap on the outside of the
seat bottom.
Seats
180
SEAT-BACK STRAP
�\f���—�\f���—���
�y�
�
�����������y���
�(���������\f�y�\f�
�����y
2009 Odyssey
Page 184 of 532
To create more cargo space, you can
f old the one-motion third row ‘‘Magic
Seat’’ into the floor recess.Unlatch the center seat detachable
seat belt anchor, and let the belt
retract all the way into the ceiling.
Place the latch plate and anchor
latch into their holding slots. Make
sure both seat belts on the outer
seats are out of the way.
Lower the head restraints f ully. Pull the handle on each seat-back
to unlock the f ront legs of the
third row seat.
Pivot the seat into the cargo area
f loor recess.Make sure all items in the cargo
area are secured. Loose items can
fly forward and cause injury if you
have to brake hard. See
on page .
3.
4.
1.
2.
378
CONT INUED
Folding the One-Motion T hird
Row ‘‘Magic Seat’’
Carrying
Cargo
Seats
Inst rument s and Cont rols
181
HANDLES
�\f���—�\f���—���
�y�
�
���������
�y���
�(���������\f�y�\f�
�����y
2009 Odyssey
Page 185 of 532
To return the seat to the upright
position:Pull the seat-back upright with the
strap. Make sure the seat is
securely locked into position
bef ore driving.
Pull the seat out of the recess by
pulling on the handle. Pivot the
seat forward all the way. The front
legs of the third row seat will
automatically latch.
1.
2.
Seats
182
STRAPS
�\f���—�\f���—���
�y�
�
�����������y���
�(���������\f�y�\f�
�����y
2009 Odyssey
Page 186 of 532

If the engine is lef t idling f or an
extended period, do not use the
seat heaters, even on the LO
setting. It can weaken the battery,
causing hard starting.
Use the HI setting only to heat the
seats quickly, because it draws
large amounts of current f rom the
battery.
Follow these precautions when using
the seat heaters:
In the HI setting, the heater turns off
when the seat gets warm, and turns
back on after the seat’s temperature
drops.
In LO, the heater does not cycle with
temperature change.
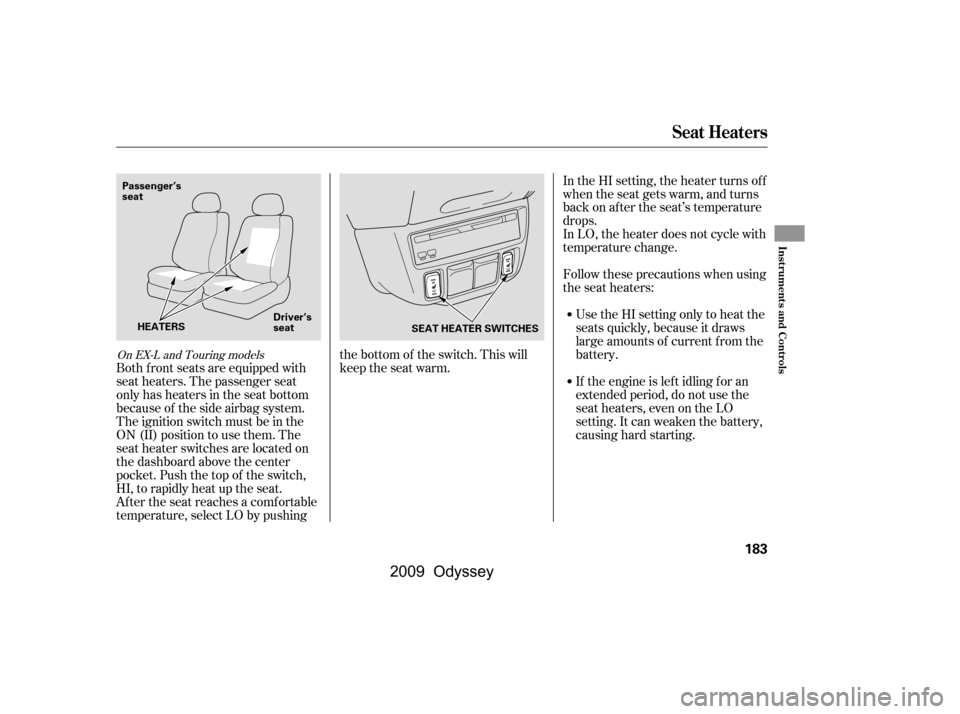
Both f ront seats are equipped with
seat heaters. The passenger seat
only has heaters in the seat bottom
because of the side airbag system.
The ignition switch must be in the
ON (II) position to use them. The
seat heater switches are located on
the dashboard above the center
pocket. Push the top of the switch,
HI, to rapidly heat up the seat.
After the seat reaches a comfortable
temperature, select LO by pushing the bottom of the switch. This will
keep the seat warm.
On EX-L and Touring models
Seat Heaters
Inst rument s and Cont rols
183
SEAT HEATER SWITCHES
Passenger’s
seat
Driver’s
seat
HEATERS
�\f���—�\f���—���
�y�
�
�����������y���
�(���������\f�y�\f�
�����y
2009 Odyssey
Page 203 of 532

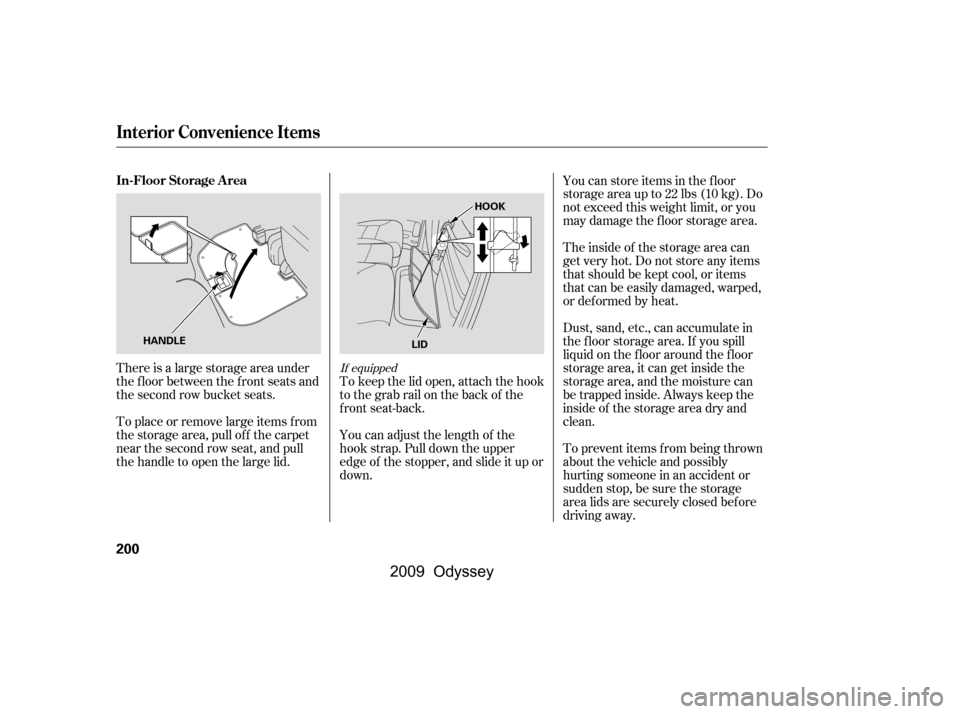
There is a large storage area under
the floor between the front seats and
the second row bucket seats.
To place or remove large items f rom
the storage area, pull off the carpet
near the second row seat, and pull
thehandletoopenthelargelid.You can store items in the f loor
storageareaupto22lbs(10kg).Do
not exceed this weight limit, or you
may damage the floor storage area.
Theinsideof thestorageareacan
get very hot. Do not store any items
that should be kept cool, or items
that can be easily damaged, warped,
or def ormed by heat.
Dust, sand, etc., can accumulate in
the f loor storage area. If you spill
liquid on the f loor around the f loor
storage area, it can get inside the
storage area, and the moisture can
be trapped inside. Always keep the
inside of the storage area dry and
clean.
To prevent items f rom being thrown
about the vehicle and possibly
hurting someone in an accident or
sudden stop, be sure the storage
area lids are securely closed bef ore
driving away.
You can adjust the length of the
hook strap. Pull down the upper
edge of the stopper, and slide it up or
down.
To keep the lid open, attach the hook
to the grab rail on the back of the
f ront seat-back.If equipped
In-Floor Storage A rea
Interior Convenience Items
200
HANDLE HOOK
LID
�\f���—�\f���—���
�y�
�
����
��\f�\f�y���
�(���������\f�y�\f���\f���y
2009 Odyssey