Page 136 of 532

�Î�Î
�Î
�Î �Î
�Î �Î �Î�Î
�Î
�Î
�Î
�Î
�Î
�Î
�ÎOnly on vehicles equipped with navigation system. Ref er to the navigation system manual.
To use the horn, press the center pad of the steering wheel.
1:
2:
3: If equipped
Controls Near the Steering Wheel
Inst rument s and Cont rols
133
HAZARD WARNING
BUTTON
WINDSHIELD WIPERS/WASHERS
REAR WINDOW WIPER/WASHER
CRUISE CONTROL
BUTTONS
VEHICLE STABILITY
ASSIST (VSA) OFF
SWITCH PASSENGER
AIRBAG OFF
INDICATOR
LIGHT CONTROL
SWITCH
STEERING WHEEL
ADJUSTMENT (P.35)
NAVIGATION
SYSTEM
BUTTONS HORN
(P.193)
(P.189) (P.282)
(P.352) (P.141) (P.134)
(P.135)
(P.319)
(P.281)
(P.140)
(P.221,285)
(P.205) REAR WINDOW
DEFOGGER BUTTON
(P.140)
PEDAL POSITION
ADJUSTMENT SWITCH
POWER SLIDING DOOR
SWITCH
MOONROOF SWITCH
POWER TAILGATE
SWITCHPARKING SENSOR
SYSTEM SWITCH MULTI-INFORMATION
BUTTONSAUDIO SYSTEM/
REAR
ENTERTAINMENT
SYSTEM
CLOCK
HEADLIGHTS/TURN SIGNAL/
FOG LIGHTS
(P.162)
(P.158)/
(P.82)
(P.135,138)
REMOTE AUDIO
CONTROL BUTTONS (P.395)
VEHICLE STABILITY
ASSIST (VSA) OFF
SWITCH (P.395) BLUETOOTH
HANDSFREELINKBUTTONS (P.327)
2 1
3
3 3
3 3 33
3
3
3
3
�\f���—�\f���—���
�y�
�
����
������y���
�(���������\f�y�\f�
�����y
2009 Odyssey
Page 138 of 532
�µ�µ
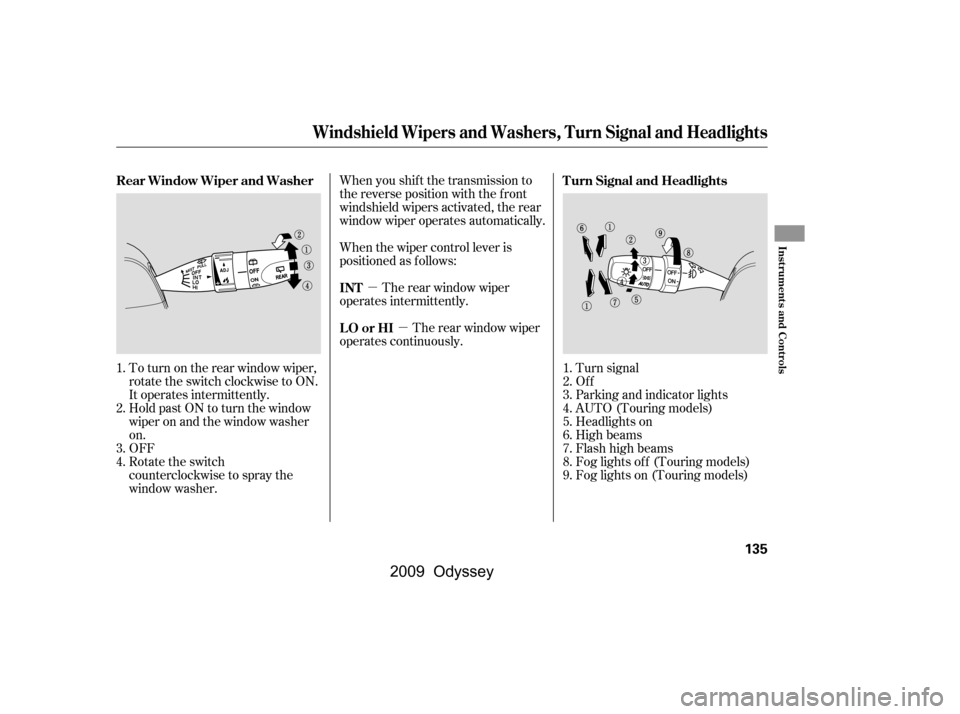
To turn on the rear window wiper,
rotate the switch clockwise to ON.
It operates intermittently.
OFF
Hold past ON to turn the window
wiper on and the window washer
on. When you shif t the transmission to
the reverse position with the f ront
windshield wipers activated, the rear
window wiper operates automatically.
When the wiper control lever is
positioned as f ollows:
The rear window wiper
operates intermittently.
The rear window wiper
operates continuously.
Rotate the switch
counterclockwise to spray the
window washer. Turn signal
Of f
Parking and indicator lights
AUTO (Touring models)
Headlights on
High beams
Flashhighbeams
Fog lights of f (Touring models)
Fog lights on (Touring models)
1.
2.
3.
4.
1.
2.
3.
4.
5.
6.
7.
8.
9.
Turn Signal and Headlights
Rear Window Wiper and Washer
INT
LO or HI
Windshield Wipers and Washers, Turn Signal and Headlights
Inst rument s and Cont rols
135
�\f���—�\f���—���
�y�
�
�������
�\f�y���
�(���������\f�y�\f�
���\f�y
2009 Odyssey
Page 139 of 532

�µ�µ�µ
Push down on the
lever to signal a lef t turn and up to
signal a right turn. To signal a lane
change, push lightly on the lever,
and hold it. The lever will return to
center when you release it or
complete a turn. The rotating switch
on the lef t lever controls the lights.
Turning this switch to the ‘‘ ’’
position turns on the parking lights,
taillights, instrument panel lights,
side-marker lights, and rear license
plate lights.
Turning the switch to the ‘‘ ’’
position turns on the headlights. If you leave the lights on with the
key removed f rom the ignition
switch, you will hear a reminder
chime when you open the driver’s
door.
When the light switch is in the
‘‘ ’’ or ‘‘ ’’ position, the
lights on indicator comes on as a
reminder. This indicator stays on if
you leave the light switch on and
turn the ignition switch to the
ACCESSORY (I) or the LOCK (0)
position. To switch f rom low
beams to high beams, push the lef t
lever f orward until you hear a click.
The high beam indicator will come
on (see page ). Pull it back to
return to low beams. To flash the
high beams, pull the lever back
lightly, then release it. The high
beams will stay on as long as you
hold the lever back. 73
Turn Signal
Headlights
High Beams
Turn Signal, Headlights
136
�\f���—�\f���—���
�y�
�
�������
���y���
�(���������\f�y�\f�
���
�y
2009 Odyssey
Page 140 of 532
 position. To turn them
on again, either turn the ignition
switch to the ON (II) position, or
turn the light swi")
�µThe lights turn of f automatically
when you turn the ignition switch to
the LOCK (0) position. To turn them
on again, either turn the ignition
switch to the ON (II) position, or
turn the light switch to the
position.
Even with the automatic lighting
f eature turned on, we recommend
thatyouturnonthelightsmanually
when driving at night or in a dense
f og, or when you enter dark areas
such as long tunnels or parking
f acilities. The automatic lighting f eature is
controlledbyasensorlocatedontop
of the dashboard. Do not cover this
sensor or spill liquids on it.
The automatic lighting
f eature turns on the headlights, all
other exterior lights, and the
instrument panel lights when it
senses low ambient light.
To turn on the automatic lighting,
turn the light switch to the AUTO
position at any time. The lights will
come on automatically when the
outside light level becomes low (at
dusk, f or example). The lights on
indicator comes on as a reminder.
The lights and indicator turn of f
automatically when the system
senses high ambient light.
On Touring models
Headlights
AUTO
Inst rument s and Cont rols
137
SENSOR
�\f���—�\f���—���
�y�
�
�����������y���
�(���������\f�y�\f�
�����y
2009 Odyssey
Page 141 of 532

�Î
�Î
�ÎIf you unlock the door, but do not
open it within 15 seconds, the lights
go of f . With the driver’s door open,
you will hear a lights-on reminder
chime.
The lights turn on again when you
unlock or open the driver’s door.
On the Touring models, this time is
changeable. See page f or how to
select and set the time.
Turn the f og lights on and of f by
turning the switch next to the
headlight switch.
You can use the f og lights only when
the headlights are on low beam.
They will go of f when the headlights
are turned of f .
With the headlight switch off, the
high beam headlights and the high
beam indicator come on with
reduced brightness when you turn
the ignition switch to the ON (II)
position and release the parking
brake. They remain on until you turn
the ignition switch of f , even if you
set the parking brake.
The headlights revert to normal
operation when you turn them on
with the switch. This turns of f the headlights,
parking lights, taillights, side marker
lights, license plate lights, and
instrument panel lights within 15
seconds of removing the key f rom
the ignition switch and closing the
driver’s door.
This feature activates if you leave
the headlight switch in the or
position, remove the key, then
open and close the driver’s door.
If you remove the key f rom the
ignition switch with the headlight
switch on, but do not open the door
and get out, the lights turn off after
10 minutes. 118
On Touring models
On EX, EX-L and Touring models only
Automatic Lighting Of f Feature
Fog Lights
Daytime Running L ights
Headlights
138
�\f���—�\f���—���
�y�
�
�����������y���
�(���������\f�y�\f�
�����y
2009 Odyssey
Page 142 of 532

The select/reset knob on the
instrument panel controls the
brightness of the instrument panel
lights. Turn the knob to adjust the
brightness.
Separate adjustments can be made
when the headlights are on and of f .
You will hear a beep when maximum
or minimum brightness is reached.
You will also hear a beep when the
maximum level is canceled by
turning the knob a click to the lef t.To reduce glare at night, the
instrument panel illumination dims
when you turn the light switch to
or . Turning the select/
reset knob to the right until you hear
a beep will cancel the reduced
brightness.
The level of brightness is shown on
the multi-information display
(Touring models) or on the
inf ormation display (LX, EX, EX-L
and Canadian DX models) while you
adjust it. It goes out 5 seconds af ter
you f inish adjusting.
Instrument Panel Brightness
Inst rument s and Cont rols
139
BRIGHTNESS LEVEL
SELECT/RESET KNOB Touring model is shown.
�\f���—�\f���—���
�y�
�
�����������y���
�(���������\f�y�\f�
�����y
2009 Odyssey
Page 193 of 532

Keeptheinsideandoutsidemirrors
clean and adjusted f or best visibility.
Be sure to adjust the mirrors bef ore
you start driving.
The inside mirror has day and night
positions. The night position reduces
glare f rom headlights behind you.
Flip the tab on the bottom edge of
the mirror to select the day or night
position.When you shif t to reverse with the
ignition switch in the ON (II)
position, the rear view is shown on
the lef t side of the inside mirror. For
more information, see page .
The inside mirror can automatically
darken to reduce glare. To turn on
this feature, press the button on the
bottom of the mirror. The AUTO
indicator comes on as a reminder.
When it is on, the mirror darkens
when it senses the headlights of a
vehicle behind you, then returns to
normal visibility when the lights are
gone. Press the button again to turn
of f this f eature. 366
On U.S. EX-L without navigation system
and Canadian EX-L models
On LX, EX and Canadian DX models On EX-L and Touring models
Mirrors
190
�\f���—�\f���—���
�y�
�
�����������y���
�(���������\f�y�\f�
�����y
2009 Odyssey
Page 321 of 532

Once the security system is set,
opening any door, the tailgate, or the
hood without using the key or the
remote transmitter, will cause it to
alarm. It also alarms if the audio unit
is removed f rom the dashboard or
the wiring is cut.The alarm will also be activated if a
passenger inside the locked vehicle
turns the ignition switch on.
The security system will not set if
the hood, tailgate, or any door is not
f ully closed. Bef ore you leave the
vehicle, make sure the doors,
tailgate, and hood are securely
closed.
To see if the system is set
af ter you exit the vehicle, press the
LOCK button on the remote
transmitter within 5 seconds. If the
system is set, the horn will beep
once.
Do not attempt to alter this system
or add other devices to it.
The security system automatically
sets 15 seconds after you lock the
doors, hood, and the tailgate. For the
system to activate, you must lock the
doorsandthetailgatefromthe
outside with the key, driver’s lock
tab, door lock master switch, or
remote transmitter. The security
system indicator on the instrument
panel starts blinking immediately to
show you the system is setting itself .
The security system helps to protect
your vehicle and valuables f rom thef t.
The horn sounds and a combination
of headlights, parking lights, side
marker lights, and taillights f lashes if
someone attempts to break into your
vehicleorremovetheradio.This
alarm continues f or 2 minutes, then
the system resets. To reset an
activated system before the 2
minutes have elapsed, unlock the
driver’s door with the key or the
remote transmitter.
On EX, EX-L and Touring models
Security System
318
NOTE:SECURITY SYSTEM INDICATOR
�\f���—�\f���—���
�y�
�
�����������y���
�(���������\f�y�\f�������y
2009 Odyssey