2009 HONDA FIT ABS
[x] Cancel search: ABSPage 65 of 352

Anti-lock Brake System
(ABS) Indicator
This indicator normally comes on for
a few seconds when you turn the
ignition switch to the ON (II)
position, and when the ignition
switch is turned to the START (III)
position. If it comes on at any other
time, there is a problem with the
ABS. If this happens, have your
vehicle checked at a dealer. With this
indicator on, your vehicle still has
normal braking ability but no anti-
lock function. For more information,
see page231.
Electric Power Steering
(EPS) Indicator
This indicator normally comes on when
you turn the ignition switch to the ON
(II) position and goes off after the
engine starts. If it comes on at any
other time, there is a problem in the
electric power steering system. If this
happens, stop the vehicle in a safe
place and turn off the engine. Reset the
system by restarting the engine. The
indicator will not turn off immediately.
If it does not go off after driving a short
distance, or comes back on again while
driving, take the vehicle to your dealer
to have it checked. With the indicator
on, the EPS may be turned off, making
the vehicle harder to steer.
If you turn the steering wheel to the
full left or right position repeatedly
while stopping or driving at very low
speed, you may feel slightly harder
steering in order to prevent damage to
the steering box caused by
overheating.
Low Fuel Indicator
This indicator comes on as a
reminder that you must refuel soon.
When the indicator comes on, there
is about 1.64 US gal (6.2 L) of fuel
remaining in the tank before the
needle reaches E. There is a small
reserve of fuel remaining in the tank
when the needle does reach E.Door and Tailgate Open
Indicator
This indicator comes on if any door
or the tailgate is not closed tightly.
Instrument Panel Indicators62
2009 Fit
Page 216 of 352

This section gives you tips on
starting the engine under various
conditions, and how to operate the
manual and automatic transmissions.
It also includes important information
on parking your vehicle, the braking
system, the vehicle stability assist
(VSA
®), and the tire pressure
monitoring system (TPMS). Driving Guidelines
......................
214
Preparing to Drive
......................
215
Starting the Engine
.....................
216
Manual Transmission
.................
217
Automatic Transmission
.............
219
Driving with the Paddle Shifters
(Sport only)
.............................
224
Parking
.......................................
229
Braking System
..........................
230
Anti-lock Brakes (ABS)
...............
231
Vehicle Stability Assist (VSA
®),
aka Electronic Stability Control
(ESC), System
.....................
233
Tire Pressure Monitoring System (TPMS)
...................................
235
Towing a Trailer
..........................
238
Towing Your Vehicle Behind a
Motorhome
.............................
238
Driving
213
Driving
2009 Fit
Page 233 of 352

Your vehicle is equipped with front
disc brakes. The brakes on the rear
wheels are drum. A power assist
helps reduce the effort needed on the
brake pedal. The anti-lock brake
system (ABS) helps you retain
steering control when braking very
hard.
Resting your foot on the pedal keeps
the brakes applied lightly, builds up
heat, and reduces their effectiveness
and reduces brake pad life. In
addition, fuel economy can be
reduced. It also keeps your brake
lights on all the time, confusing
drivers behind you.
Constant application of the brakes
when going down a long hill builds
up heat and reduces their
effectiveness. Use the engine to
assist the brakes by taking your foot
off the accelerator and downshifting
to a lower gear.Check your brakes after driving
through deep water. Apply the
brakes moderately to see if they feel
normal. If not, apply them gently and
frequently until they do. Be extra
cautious and alert in your driving.
Braking System Design
The hydraulic system that operates
the brakes has two separate circuits.
Each circuit works diagonally across
the vehicle (the left-front brake is
connected with the right-rear brake,
etc.). If one circuit should develop a
problem, you will still have braking
at two wheels.
Brake Pad Wear Indicators
If the front brake pads need
replacing, you will hear a distinctive,
metallic screeching sound when you
apply the brake pedal. If you do not
have the brake pads replaced, they
will screech all the time. It is normal
for the brakes to occasionally squeal
or squeak when you apply them.Braking System230
2009 Fit
Page 234 of 352

The anti-lock brake system (ABS)
helps prevent the wheels from
locking up, and helps you retain
steering control by pumping the
brakes rapidly, much faster than a
person can do it.
The electronic brake distribution
(EBD) system, which is part of the
ABS, also balances the front-to-rear
braking distribution according to
vehicle loading.You should never pump the brake pedal.Let the ABS work for you by always
keeping firm, steady pressure on the
brake pedal. This is sometimes
referred to as‘‘stomp and steer. ’’You will feel a pulsation in the brake
pedal when the ABS activates, and
you may hear some noise. This is
normal: it is the ABS rapidly
pumping the brakes. On dry
pavement, you will need to press on
the brake pedal very hard before the
ABS activates. However, you may
feel the ABS activate immediately if
you are trying to stop on snow or ice.
ABS Indicator
If the ABS indicator comes on, the
anti-lock function of the braking
system has shut down. The brakes
still work like a conventional system,
but without anti-lock. You should
have your dealer inspect your vehicle
as soon as possible.
If the ABS indicator comes on while
driving, test the brakes as shown on
page305.
CONTINUED
Anti-lock Brakes (ABS)
231
Driving
2009 Fit
Page 235 of 352

If the ABS indicator and the brake
system indicator come on together,
and the parking brake is fully
released, the EBD system may also
be shut down.
Test your brakes as instructed on
page305.If the brakes feel normal,
drive slowly and have your vehicle
repaired by your dealer as soon as
possible. Avoid sudden hard braking
which could cause the rear wheels to
lock up and possibly lead to a loss of
control.On vehicles with VSA systemThe VSA indicator will come on
along with the ABS indicator.Important Safety Reminders
ABS does not reduce the time or
distance it takes to stop the
vehicle.
It only helps with the
steering control during braking.
ABS will not prevent a skid that
results from changing direction
abruptly, such as trying to take a
corner too fast or making a sudden
lane change. Always drive at a safe
speed for the road and weather
conditions.
ABS cannot prevent a loss of
stability. Always steer moderately
when you are braking hard. Severe
or sharp steering wheel movement
can still cause your vehicle to veer
into oncoming traffic or off the road. A vehicle with ABS may require a
longer distance to stop
on loose or
uneven surfaces, such as gravel or
snow, than a vehicle without anti-
lock.Anti-lock Brakes (ABS)232
2009 Fit
Page 254 of 352

SymbolMaintenance Main Items
A
●Replace engine oil
ꭧ 1
B
●Replace engine oil and oil filter●Inspect front and rear brakes●Check parking brake adjustment●Inspect these items:●Tie rod ends, steering gear box, and boots●Suspension components●Driveshaft boots●Brake hoses and lines (including ABS)●All fluid levels and condition of fluids●Exhaust system
#
●Fuel lines and connections
#
ꭧ 1: If the message ‘‘SERVICE ’’does not appear more than 12 months after the
display is reset, change the engine oil every year.
# : See information on maintenance and emissions warranty on page 249.
NOTE:
●Independent of maintenance message in the information display, replace
the brake fluid every 3 years.●Inspect idle speed every 160,000 miles (256,000 km).●Adjust the valves during services A, B, 1, 2, or 3 only if they are noisy.
Symbol Maintenance Sub Items
1
●Rotate tires
2●Replace air cleaner element If you drive in dusty conditions, replace every 15,000
miles (24,000 km).●Replace dust and pollen filterIf you drive primarily in urban areas that have high
concentrations of soot in the air from industry and from
diesel-powered vehicles, replace every 15,000 miles
(24,000 km).●Inspect drive belt
3●Replace transmission fluid Driving in mountainous areas at very low vehicle
speeds results in higher transmission temperatures.
This requires transmission fluid changes more
frequently than recommended by the maintenance
minder. If you regularly drive your vehicle under these
conditions, have the transmission fluid changed at
60,000 miles (100,000 km), then every 30,000 miles
(48,000 km). (For A/T only)
If you tow a FIT behind a motorhome, the transmission
fluid must be changed every 2 years or 30,000 miles
(48,000 km), whichever comes first. (For A/T only)
4●Replace spark plugs●Inspect valve clearance
5●Replace engine coolant
Maintenance Minder
Maintenance Minder
251
2009 Fit
Page 266 of 352

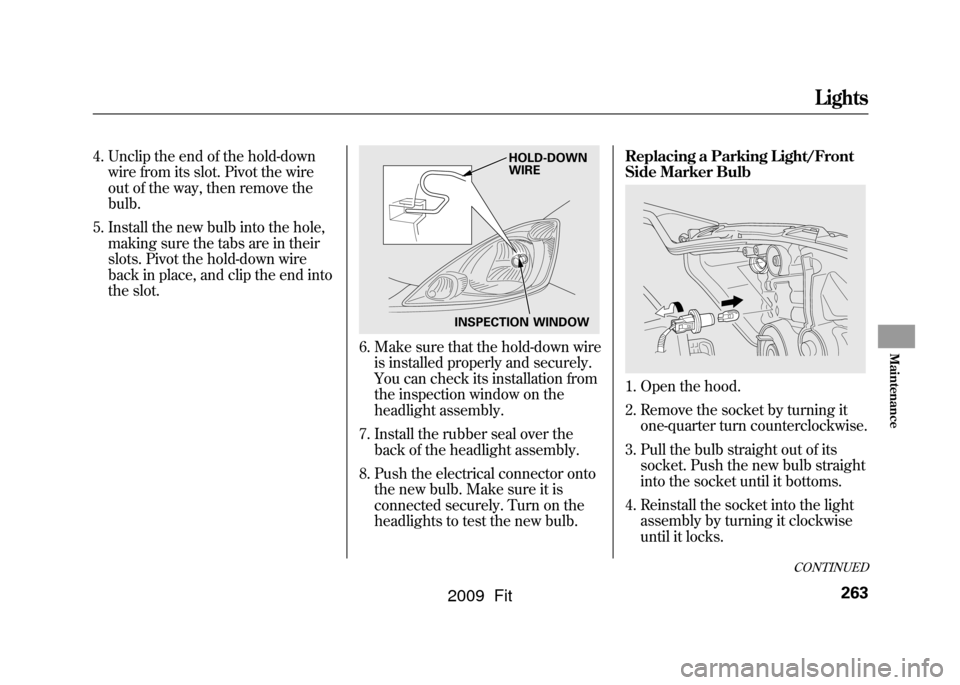
4. Unclip the end of the hold-downwire from its slot. Pivot the wire
out of the way, then remove the
bulb.
5. Install the new bulb into the hole, making sure the tabs are in their
slots. Pivot the hold-down wire
back in place, and clip the end into
the slot.
6. Make sure that the hold-down wireis installed properly and securely.
You can check its installation from
the inspection window on the
headlight assembly.
7. Install the rubber seal over the back of the headlight assembly.
8. Push the electrical connector onto the new bulb. Make sure it is
connected securely. Turn on the
headlights to test the new bulb. Replacing a Parking Light/Front
Side Marker Bulb
1. Open the hood.
2. Remove the socket by turning it
one-quarter turn counterclockwise.
3. Pull the bulb straight out of its socket. Push the new bulb straight
into the socket until it bottoms.
4. Reinstall the socket into the light assembly by turning it clockwise
until it locks.
INSPECTION WINDOW HOLD-DOWN
WIRE
CONTINUED
Lights
263
Maintenance
2009 Fit
Page 273 of 352

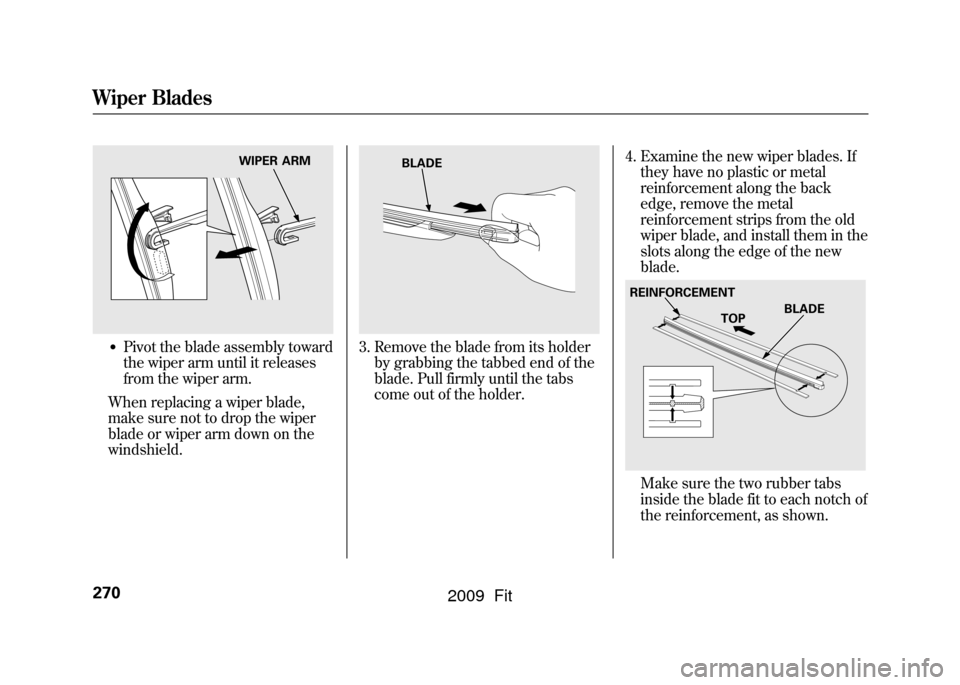
●Pivot the blade assembly toward
the wiper arm until it releases
from the wiper arm.
When replacing a wiper blade,
make sure not to drop the wiper
blade or wiper arm down on the
windshield.
3. Remove the blade from its holder by grabbing the tabbed end of the
blade. Pull firmly until the tabs
come out of the holder. 4. Examine the new wiper blades. If
they have no plastic or metal
reinforcement along the back
edge, remove the metal
reinforcement strips from the old
wiper blade, and install them in the
slots along the edge of the new
blade.
Make sure the two rubber tabs
inside the blade fit to each notch of
the reinforcement, as shown.
WIPER ARM
BLADE
REINFORCEMENT
TOPBLADE
Wiper Blades270
2009 Fit