Page 261 of 352

Check the fluid level in the
windshield washer reservoir at least
monthly during normal use. This
reservoir supplies the windshield and
rear window washers.
On U.S. models:
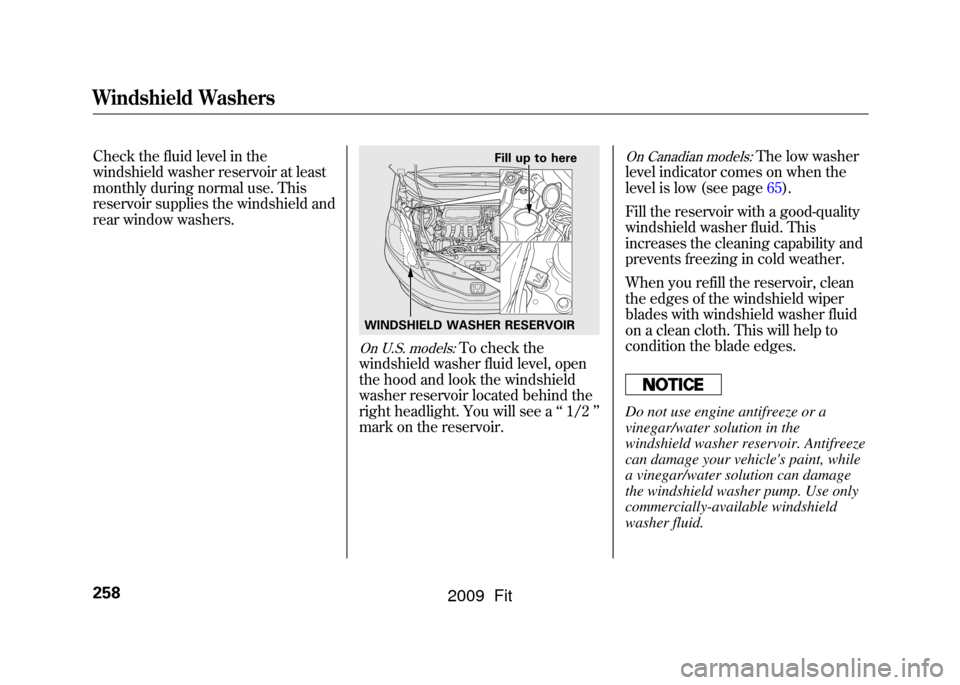
To check the
windshield washer fluid level, open
the hood and look the windshield
washer reservoir located behind the
right headlight. You will see a ‘‘1/2 ’’
mark on the reservoir.
On Canadian models:
The low washer
level indicator comes on when the
level is low (see page65).
Fill the reservoir with a good-quality
windshield washer fluid. This
increases the cleaning capability and
prevents freezing in cold weather.
When you refill the reservoir, clean
the edges of the windshield wiper
blades with windshield washer fluid
on a clean cloth. This will help to
condition the blade edges.
Do not use engine antifreeze or a
vinegar/water solution in the
windshield washer reservoir. Antifreeze
can damage your vehicle's paint, while
a vinegar/water solution can damage
the windshield washer pump. Use only
commercially-available windshield
washer fluid.
WINDSHIELD WASHER RESERVOIR Fill up to here
Windshield Washers258
2009 Fit
Page 262 of 352

Automatic Transmission FluidCheck the fluid level with the engine
at normal operating temperature.
1. Park the vehicle on level ground.Start the engine, let it run until the
radiator fan comes on, then shut
off the engine. For accurate
results, wait about 60 seconds (but
no longer than 90 seconds) before
doing step 2.
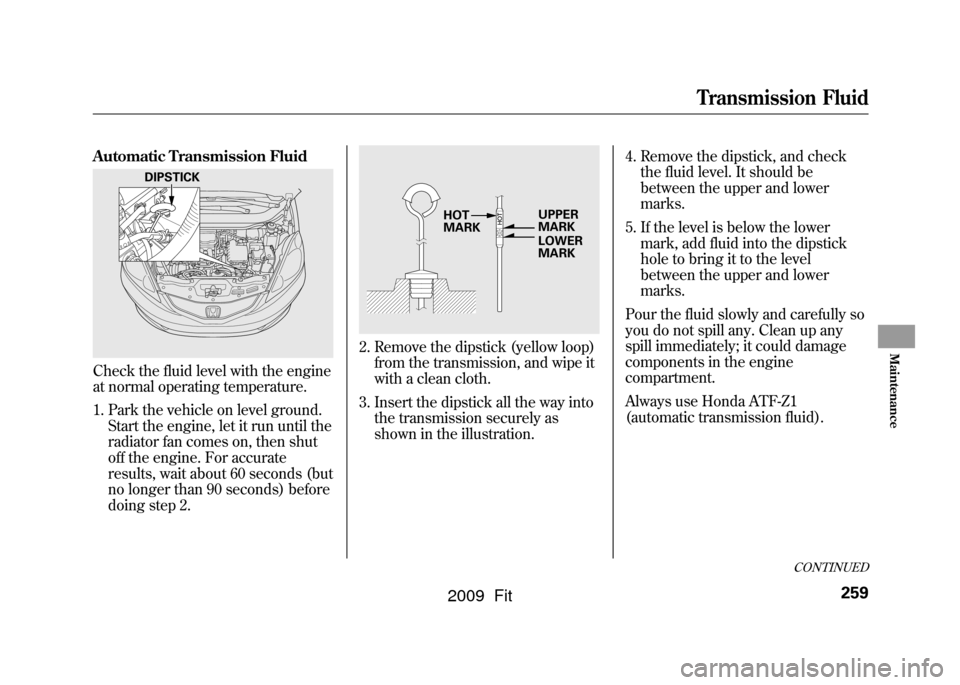
2. Remove the dipstick (yellow loop)from the transmission, and wipe it
with a clean cloth.
3. Insert the dipstick all the way into the transmission securely as
shown in the illustration. 4. Remove the dipstick, and check
the fluid level. It should be
between the upper and lower
marks.
5. If the level is below the lower mark, add fluid into the dipstick
hole to bring it to the level
between the upper and lower
marks.
Pour the fluid slowly and carefully so
you do not spill any. Clean up any
spill immediately; it could damage
components in the engine
compartment.
Always use Honda ATF-Z1
(automatic transmission fluid).
DIPSTICK
UPPER
MARK
LOWER
MARK
HOT
MARK
CONTINUED
Transmission Fluid
259
Maintenance
2009 Fit
Page 263 of 352

Use only Honda Genuine ATF-Z1
(Automatic Transmission Fluid). Do not
mix with other transmission fluids.
Using transmission fluid other than
Honda Genuine ATF-Z1 may cause
deterioration in transmission operation
and durability, and could result in
damage to the transmission.
Damage resulting from the use of
transmission fluid other than Honda
Genuine ATF-Z1 is not covered by the
Honda new vehicle warranty.
6. Insert the dipstick all the way backinto the transmission securely as
shown in the illustration.
If you are not sure how to add fluid,
contact your dealer. Manual Transmission Fluid
Check the fluid level with the
transmission at normal operating
temperature and the vehicle on level
ground.
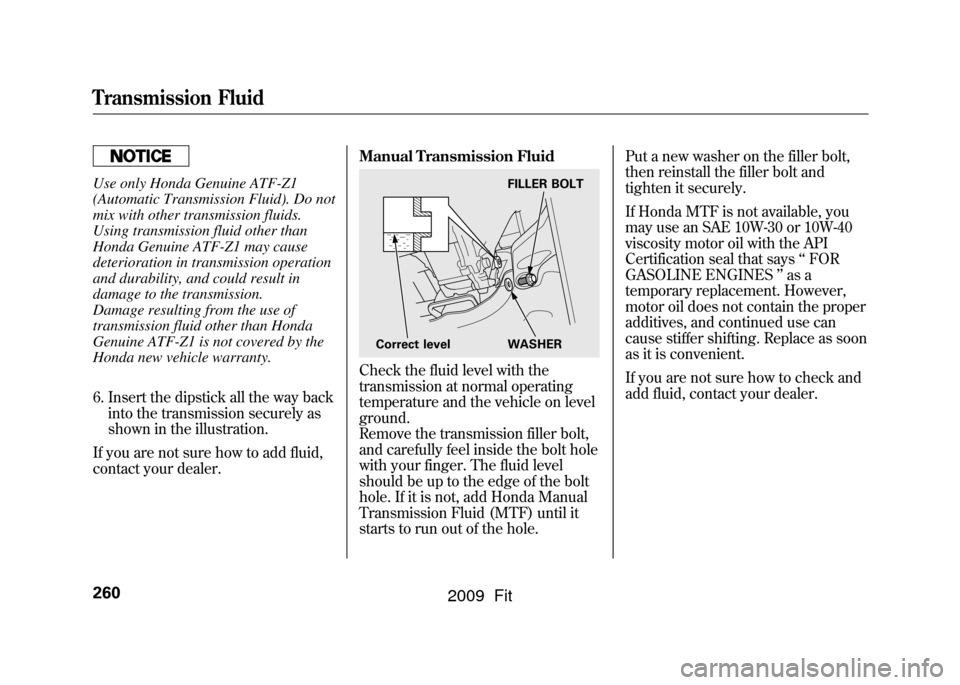
Remove the transmission filler bolt,
and carefully feel inside the bolt hole
with your finger. The fluid level
should be up to the edge of the bolt
hole. If it is not, add Honda Manual
Transmission Fluid (MTF) until it
starts to run out of the hole.Put a new washer on the filler bolt,
then reinstall the filler bolt and
tighten it securely.
If Honda MTF is not available, you
may use an SAE 10W-30 or 10W-40
viscosity motor oil with the API
Certification seal that says
‘‘FOR
GASOLINE ENGINES ’’as a
temporary replacement. However,
motor oil does not contain the proper
additives, and continued use can
cause stiffer shifting. Replace as soon
as it is convenient.
If you are not sure how to check and
add fluid, contact your dealer.
FILLER BOLT
Correct level WASHER
Transmission Fluid260
2009 Fit
Page 284 of 352

If you need to park your vehicle for
an extended period (more than 1
month), there are several things you
should do to prepare it for storage.
Proper preparation helps prevent
deterioration and makes it easier to
get your vehicle back on the road. If
possible, store your vehicle indoors.●Fill the fuel tank.●Wash and dry the exterior
completely.●Clean the interior. Make sure the
carpeting, floor mats, etc., are
completely dry.●Leave the parking brake off. Put
the transmission in reverse
(manual) or Park (automatic).●Block the rear wheels.
●If the vehicle is to be stored for a
longer period, it should be
supported on jackstands so the
tires are off the ground.●Leave one window open slightly (if
the vehicle is being stored
indoors).●Disconnect the battery.●Support the front and rear wiper
blade arms with a folded towel or
rag so they do not touch the
windshield.●To minimize sticking, apply a
silicone spray lubricant to all door
and tailgate seals. Also, apply a
vehicle body wax to the painted
surfaces that mate with the door
and tailgate seals.
●Cover the vehicle with a
‘‘breathable ’’cover, one made
from a porous material such as
cotton. Non-porous materials, such
as plastic sheeting, trap moisture,
which can damage the paint.●If possible, periodically run the
engine until it reaches full
operating temperature (the cooling
fans cycle on and off twice).
Preferably, do this once a month.
Vehicle Storage
281
Maintenance
2009 Fit
Page 286 of 352

This section covers the more
common problems that motorists
experience with their vehicles. It
gives you information about how to
safely evaluate the problem and what
to do to correct it. If the problem has
stranded you on the side of the road,
you may be able to get going again. If
not, you will also find instructions on
getting your vehicle towed.Compact Spare Tire
....................
284
Changing a Flat Tire
...................
285
Temporarily Repairing a Flat Tire
.........................................
291
If the Engine Won't Start
.............
297
Jump Starting
..............................
299
If the Engine Overheats
..............
301
Low Oil Pressure Indicator
.........
303
Charging System Indicator
.........
303
Malfunction Indicator Lamp
........
304
Brake System Indicator
...............
305
Fuses
..........................................
306
Fuse Locations
............................
309
Emergency Towing
.....................
311
If Your Vehicle Gets Stuck
..........
312
Taking Care of the Unexpected
283
Taking Care of the Unexpected
2009 Fit
Page 297 of 352

In freezing temperatures, turn the
engine on and leave it running
while the flat tire is being serviced.
Prolonged exposure to the cold
may cause the vehicle's battery to
weaken. Under cold conditions,
safely start the vehicle's engine and
keep the engine running at idle
when operating the air pump.Running the engine with the
vehicle in an enclosed or even
partly enclosed area can cause
a rapid build-up of toxic carbon
monoxide.
Breathing this colorless,
odorless gas can cause
unconsciousness and even
death. Only run the engine to
power the air pump with the
vehicle outdoors.
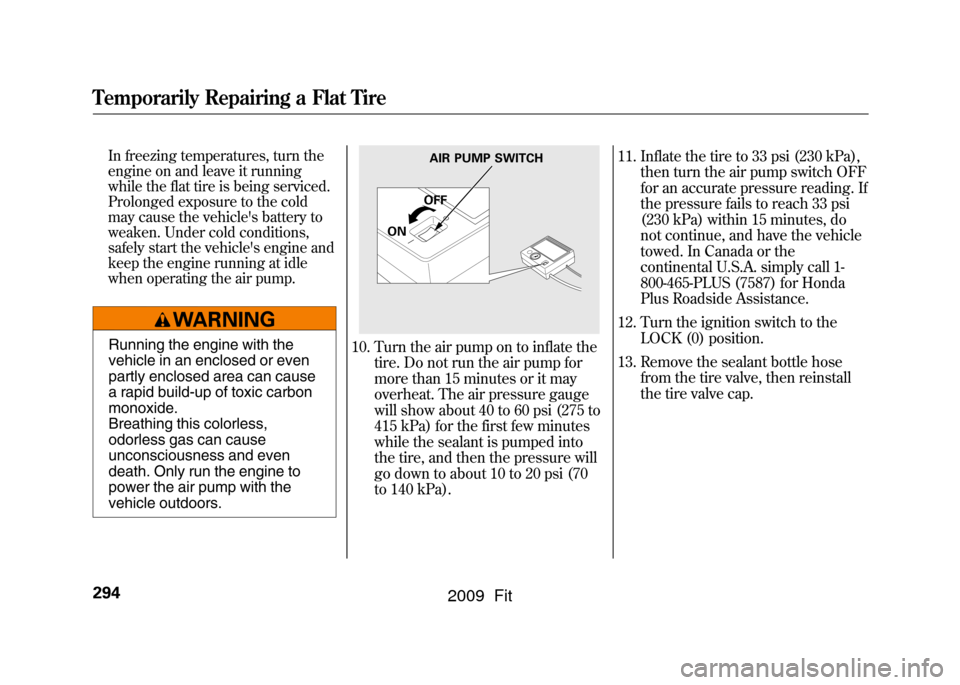
10. Turn the air pump on to inflate thetire. Do not run the air pump for
more than 15 minutes or it may
overheat. The air pressure gauge
will show about 40 to 60 psi (275 to
415 kPa) for the first few minutes
while the sealant is pumped into
the tire, and then the pressure will
go down to about 10 to 20 psi (70
to 140 kPa). 11. Inflate the tire to 33 psi (230 kPa),
then turn the air pump switch OFF
for an accurate pressure reading. If
the pressure fails to reach 33 psi
(230 kPa) within 15 minutes, do
not continue, and have the vehicle
towed. In Canada or the
continental U.S.A. simply call 1-
800-465-PLUS (7587) for Honda
Plus Roadside Assistance.
12. Turn the ignition switch to the LOCK (0) position.
13. Remove the sealant bottle hose from the tire valve, then reinstall
the tire valve cap.
AIR PUMP SWITCH
OFF
ON
Temporarily Repairing a Flat Tire294
2009 Fit
Page 300 of 352

If the pressure is lower than 32 psi
(220 kPa) and higher than 19 psi
(130 kPa), use the air pump to
bring air to the desired level as
described in step 11. Then drive to
the nearest service station at no
more than 50 mph (80 km/h).
If the pressure is below 19 psi, do
not continue. Have the vehicle
towed (see page311).
In any case, be sure to have the
damaged tire permanently repaired
as soon as possible.
Remember to return the tire sealant
bottle to your Honda service center
for proper disposal. If the Engine Won't Start
Diagnosing why the engine won't
start falls into two areas, depending
on what you hear when you turn the
ignition switch to the START (III)
position:
●You hear nothing, or almost
nothing. The engine's starter
motor does not operate at all, or
operates very slowly.●You can hear the starter motor
operating normally, or the starter
motor sounds like it is spinning
faster than normal, but the engine
does not start up and run.
Nothing Happens or the Starter
Motor Operates Very Slowly
When you turn the ignition switch to
the START (III) position, you do not
hear the normal noise of the engine
trying to start. You may hear a
clicking sound, a series of clicks, or
nothing at all.
Check these things:
●Check the transmission interlock.
If you have a manual transmission,
the clutch pedal must be pushed
all the way to the floor or the
starter will not operate. With an
automatic transmission, it must be
in Park or neutral.●Turn the ignition switch to the ON
(II) position. Turn on the
headlights, and check their
brightness. If the headlights are
very dim or do not come on at all,
the battery is discharged. See
Jump Starting
on page299.
CONTINUED
Temporarily Repairing a Flat Tire, If the Engine Won't Start
297
Taking Care of the Unexpected
2009 Fit
Page 301 of 352

●Turn the ignition switch to the
START (III) position. If the
headlights do not dim, check the
condition of the fuses. If the fuses
are OK, there is probably
something wrong with the
electrical circuit for the ignition
switch or starter motor. You will
need a qualified technician to
determine the problem. See
Emergency Towingon page311.
If the headlights dim noticeably or go
out when you try to start the engine,
either the battery is discharged or
the connections are corroded. Check
the condition of the battery and
terminal connections (see page 279).
You can then try jump starting the
vehicle from a booster battery (see
page 299). The Starter Operates Normally
In this case, the starter motor's speed
sounds normal, or even faster than
normal, when you turn the ignition
switch to the START (III) position,
but the engine does not run.
●Are you using a properly coded
key? An improperly coded key will
cause the immobilizer system
indicator in the instrument panel
to blink rapidly (see page79).●Are you using the proper starting
procedure? Refer to
Starting the
Engine on page216.
●Do you have fuel? Check the fuel
gauge; the low fuel indicator may
not be working.●There may be an electrical
problem, such as no power to the
fuel pump. Check all the fuses (see
page306).
If you find nothing wrong, you will
need a qualified technician to find the
problem. See Emergency Towing on
page311.
If the Engine Won't Start298
2009 Fit