Page 218 of 352
You should do the following checks
and adjustments before you drive
your vehicle.
1. Make sure all windows, mirrors,and outside lights are clean and
unobstructed. Remove frost, snow,
or ice.
2. Check that the hood is fully closed.
3. Visually check the tires. If a tire looks low, use a gauge to check its
pressure (see page273).
4. Check that any items you may be carrying are stored properly or
fastened down securely. 5. Check the seat adjustment (see
page 93).
6. Check the adjustment of the inside and outside mirrors (see page
101).
7. Check the steering wheel adjustment (see page 77).
8. Make sure the doors and the tailgate are securely closed and
locked.
9. Fasten your seat belt. Check that your passengers have fastened
their seat belts (see page 14).
10. When you start the engine, check the gauges and indicators in the
instrument panel (see page 59).
Preparing to Drive
215
Driving
2009 Fit
Page 222 of 352
Shift Lever Position IndicatorsThese indicators on the instrument
panel show which position the shift
lever is in.
The‘‘D ’’indicator comes on for a
few seconds when you turn the
ignition switch to the ON (II)
position. If it flashes while driving (in
any shift position), it indicates a
possible problem in the transmission.
If the malfunction indicator lamp
comes on along with the ‘‘D ’’
indicator, there is a problem with the
automatic transmission control
system. Avoid rapid acceleration, and
have the transmission checked by
your dealer as soon as possible. Shifting
To shift from Park to any position,
press firmly on the brake pedal and
press the release button on the front
of the shift lever, then pull the lever.
You cannot shift out of Park when
the ignition switch is in the LOCK
(0) or the ACCESSORY (I) position.
U.S. Sport model
All models except U.S. Sport
U.S. Sport model is shown
RELEASE
BUTTON SHIFT LEVER
CONTINUED
Automatic Transmission
219
Driving
2009 Fit
Page 227 of 352
Using the Paddle Shifters in D
position (D-Paddle Shift Mode)U.S. models onlyWhen you are driving in D position,
you can shift the transmission up or
down manually with the paddle
shifters.
To shift up or down, use the+
(right) or -(left) paddle shifter on
each side of the steering wheel.
Each time you pull the +(right)
paddle, the transmission shifts to a
higher gear. Pull the -(left) paddle
to downshift. You will see the
selected gear number on the
instrument panel.
When you pull either paddle shifter,
the gear position indicator shows you
the selected gear number.
When the transmission returns to
drive mode (D), the displayed gear
number disappears.GEAR POSITION INDICATOR
Driving with the Paddle Shifters (Sport only)224
2009 Fit
Page 232 of 352

Always use the parking brake when
you park your vehicle. Make sure the
parking brake is set firmly, or your
vehicle may roll if it is parked on an
incline.
If your vehicle has an automatic
transmission, set the parking brake
before you put the transmission in
Park. This keeps the vehicle from
moving and putting pressure on the
parking mechanism in the
transmission.Parking Tips
●Make sure the windows are
closed.●Turn off the lights.●Place any packages, valuables, etc.
in the cargo area or take them with
you.●Lock the doors and the tailgate.On Sport modelCheck the indicator on the
instrument panel to verify that the
security system is set.●Never park over dry leaves, tall
grass, or other flammable
materials. The hot three way
catalytic converter could cause
these materials to catch on fire.
●If the vehicle is facing uphill, turn
the front wheels away from the
curb. If your vehicle has a manual
transmission, put it in first gear
and set the parking brake.●If the vehicle is facing downhill,
turn the front wheels toward the
curb. If your vehicle has a manual
transmission, put it in reverse gear
and set the parking brake.●Make sure the parking brake is
fully released before driving away.
Driving with the parking brake
partially set can overheat or
damage the rear brakes.
Parking
229
Driving
2009 Fit
Page 250 of 352

The maintenance item code or codes
indicate the main and sub items
required at the time of the oil change
(see page248).
You can switch the information
display from the engine oil life
display to the odometer or the trip
meter. Press and release the select/
reset knob on the instrument panel.
When the engine oil life is 15 to 1
percent, the maintenance minder
indicator (
) comes on every time
you turn the ignition switch to the
ON (II) position, then it goes out if
you switch the information display.
When you see this message, have
the indicated maintenance performed
by your dealer as soon as possible.
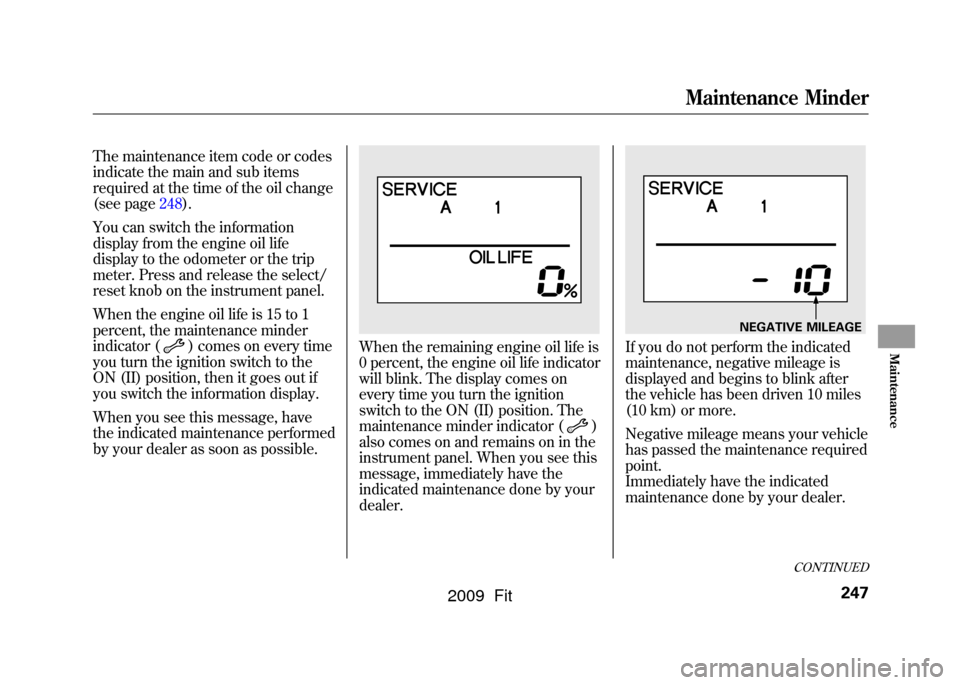
When the remaining engine oil life is
0 percent, the engine oil life indicator
will blink. The display comes on
every time you turn the ignition
switch to the ON (II) position. The
maintenance minder indicator (
)
also comes on and remains on in the
instrument panel. When you see this
message, immediately have the
indicated maintenance done by your
dealer.
If you do not perform the indicated
maintenance, negative mileage is
displayed and begins to blink after
the vehicle has been driven 10 miles
(10 km) or more.
Negative mileage means your vehicle
has passed the maintenance required
point.
Immediately have the indicated
maintenance done by your dealer.
NEGATIVE MILEAGE
CONTINUED
Maintenance Minder
247
Maintenance
2009 Fit
Page 295 of 352

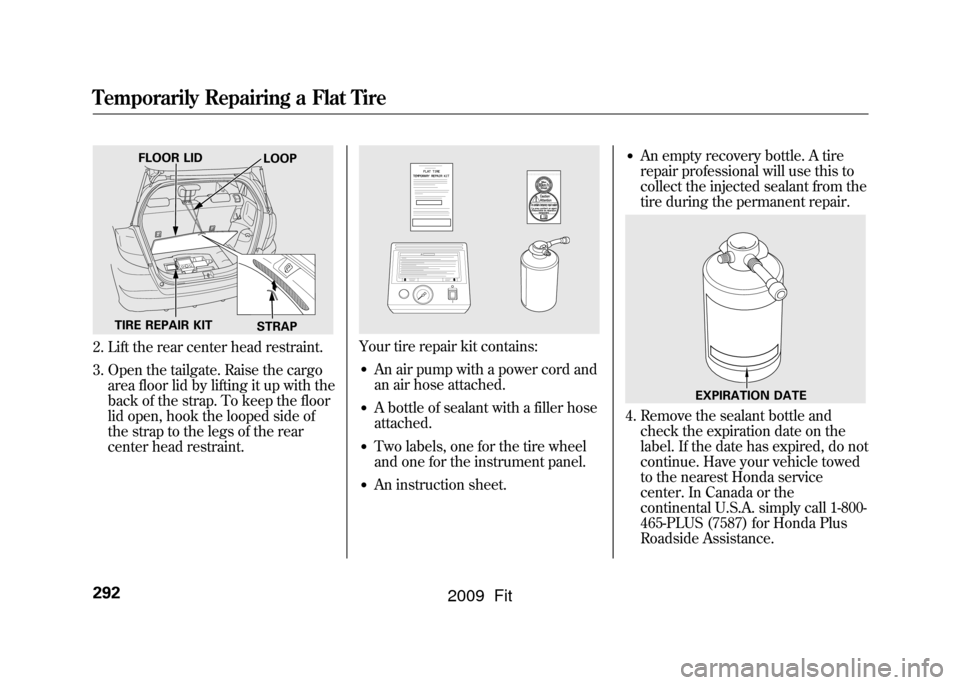
2. Lift the rear center head restraint.
3. Open the tailgate. Raise the cargoarea floor lid by lifting it up with the
back of the strap. To keep the floor
lid open, hook the looped side of
the strap to the legs of the rear
center head restraint.
Your tire repair kit contains:●An air pump with a power cord and
an air hose attached.●A bottle of sealant with a filler hose
attached.●Two labels, one for the tire wheel
and one for the instrument panel.●An instruction sheet.
●An empty recovery bottle. A tire
repair professional will use this to
collect the injected sealant from the
tire during the permanent repair.
4. Remove the sealant bottle and check the expiration date on the
label. If the date has expired, do not
continue. Have your vehicle towed
to the nearest Honda service
center. In Canada or the
continental U.S.A. simply call 1-800-
465-PLUS (7587) for Honda Plus
Roadside Assistance.
FLOOR LID LOOP
TIRE REPAIR KIT STRAP
EXPIRATION DATE
Temporarily Repairing a Flat Tire292
2009 Fit
Page 301 of 352

●Turn the ignition switch to the
START (III) position. If the
headlights do not dim, check the
condition of the fuses. If the fuses
are OK, there is probably
something wrong with the
electrical circuit for the ignition
switch or starter motor. You will
need a qualified technician to
determine the problem. See
Emergency Towingon page311.
If the headlights dim noticeably or go
out when you try to start the engine,
either the battery is discharged or
the connections are corroded. Check
the condition of the battery and
terminal connections (see page 279).
You can then try jump starting the
vehicle from a booster battery (see
page 299). The Starter Operates Normally
In this case, the starter motor's speed
sounds normal, or even faster than
normal, when you turn the ignition
switch to the START (III) position,
but the engine does not run.
●Are you using a properly coded
key? An improperly coded key will
cause the immobilizer system
indicator in the instrument panel
to blink rapidly (see page79).●Are you using the proper starting
procedure? Refer to
Starting the
Engine on page216.
●Do you have fuel? Check the fuel
gauge; the low fuel indicator may
not be working.●There may be an electrical
problem, such as no power to the
fuel pump. Check all the fuses (see
page306).
If you find nothing wrong, you will
need a qualified technician to find the
problem. See Emergency Towing on
page311.
If the Engine Won't Start298
2009 Fit
Page 344 of 352

Gross Vehicle Weight Rating(GVWR)
.................................
209
H
Halogen Headlight Bulbs
...........
262
Hazard Warning Flashers
............
76
Headlights
.............................
74, 75
Aiming
....................................
262
Daytime Running Lights (Canada only)
.....................................
75
High Beam Indicator
................
65
High Beams, Turning on
..........
74
Lights On Indicator
..................
64
Low Beams, Turning on
...........
74
Reminder Chime
......................
75
Replacing Halogen Bulbs
........
262
Turning on
...............................
74
Head Restraints
............................
94
Heated Mirror
............................
102
Heating and Cooling
..................
110
High Beam Lever
.........................
75
High-Low Beam Switch
................
74
Hood, Opening and Closing the
..........................................
200 Horn
............................................
72
Hydraulic Clutch
........................
261
I
Identification Number, Vehicle
...................................
316
Ignition Keys
.........................................
78
Switch
......................................
80
Timing Control System
...........
327
Immobilizer System
.....................
79
Important Safety Precautions
.........
6
Indicators, Instrument Panel
........
59
ABS (Anti-lock Brake)
.......
62, 231
Brake (Parking and Brake System)
.........................
60, 305
Charging System
..............
60, 303
Check Fuel Cap
.......................
70
Cruise Control
..........................
65
Cruise Main
.............................
65
Door and Tailgate Open
...........
62
DRL (Daytime Running Lights) (Canada only)
.......................
65
Electric Power Steering
............
62 Fog Lights
................................
64
High Beam
...............................
65
High Temperature
...................
63
Key (Immobilizer System)
.......
66
Lights On
.................................
64
Low Fuel
..................................
62
Low Oil Pressure
..............
60, 303
Low Temperature
.....................
63
Low Tire Pressure (U.S. only)
..............................
64, 235
Maintenance Minder
.........
66, 245
Malfunction Indicator Lamp....
304
Passenger Airbag Off
...............
31
Seat Belt Reminder
.............
18, 60
Security System
.......................
66
Side Airbag Off
.........................
61
SRS
.....................................
30, 61
TPMS (U.S. only)
..............
64, 236
Turn Signal and Hazard Warning
...............................
63
VSA System
.............................
67
Washer Level
...........................
65
Infant Restraint
............................
39
Infant Seats
..................................
39
Tether Anchorage Point
...........
47
CONTINUED
Index
V
INDEX
2009 Fit