2009 HONDA FIT window
[x] Cancel search: windowPage 266 of 352
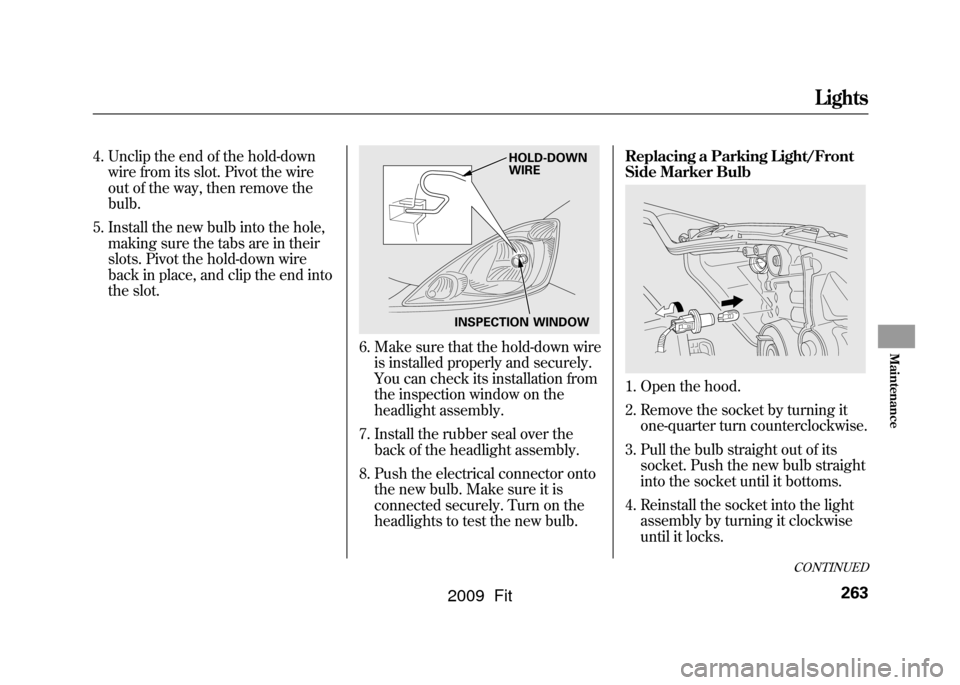
4. Unclip the end of the hold-downwire from its slot. Pivot the wire
out of the way, then remove the
bulb.
5. Install the new bulb into the hole, making sure the tabs are in their
slots. Pivot the hold-down wire
back in place, and clip the end into
the slot.
6. Make sure that the hold-down wireis installed properly and securely.
You can check its installation from
the inspection window on the
headlight assembly.
7. Install the rubber seal over the back of the headlight assembly.
8. Push the electrical connector onto the new bulb. Make sure it is
connected securely. Turn on the
headlights to test the new bulb. Replacing a Parking Light/Front
Side Marker Bulb
1. Open the hood.
2. Remove the socket by turning it
one-quarter turn counterclockwise.
3. Pull the bulb straight out of its socket. Push the new bulb straight
into the socket until it bottoms.
4. Reinstall the socket into the light assembly by turning it clockwise
until it locks.
INSPECTION WINDOW HOLD-DOWN
WIRE
CONTINUED
Lights
263
Maintenance
2009 Fit
Page 274 of 352
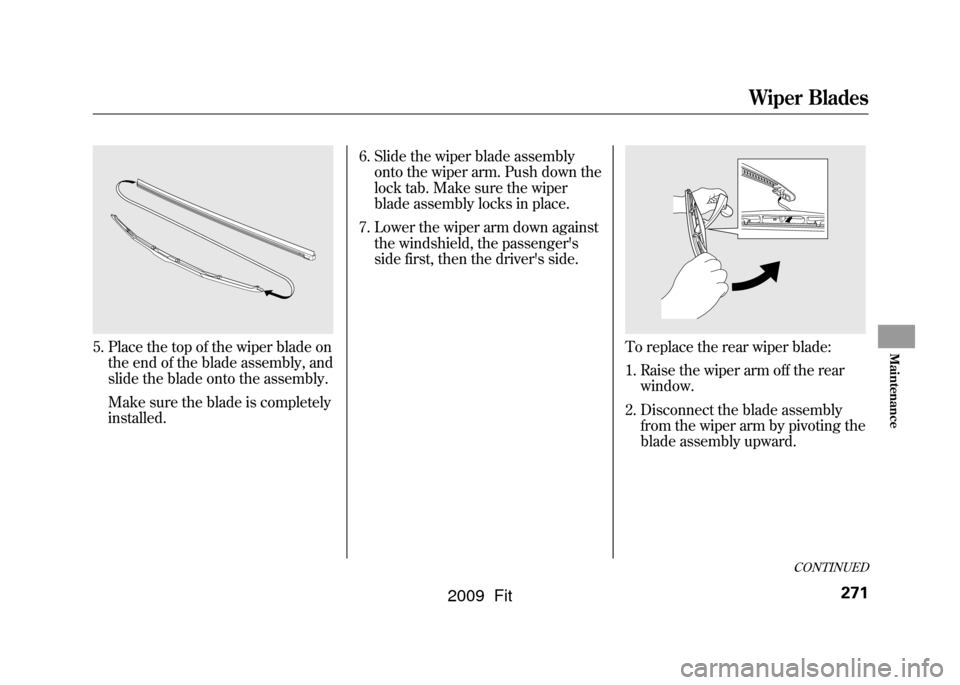
5. Place the top of the wiper blade onthe end of the blade assembly, and
slide the blade onto the assembly.
Make sure the blade is completely
installed. 6. Slide the wiper blade assembly
onto the wiper arm. Push down the
lock tab. Make sure the wiper
blade assembly locks in place.
7. Lower the wiper arm down against the windshield, the passenger's
side first, then the driver's side.
To replace the rear wiper blade:
1. Raise the wiper arm off the rearwindow.
2. Disconnect the blade assembly from the wiper arm by pivoting the
blade assembly upward.
CONTINUED
Wiper Blades
271
Maintenance
2009 Fit
Page 282 of 352
Wheels
Clean the wheels as you would the
rest of the exterior. Wash them with
the same solution, and rinse them
thoroughly.If equippedAluminum alloy wheels have a
protective clear-coat that keeps the
aluminum from corroding and
tarnishing. Cleaning the wheels with
harsh chemicals (including some
commercial wheel cleaners) or a stiff
brush can damage the clear-coat. To
clean the wheels, use a mild
detergent and a soft brush or sponge.Checking the Battery
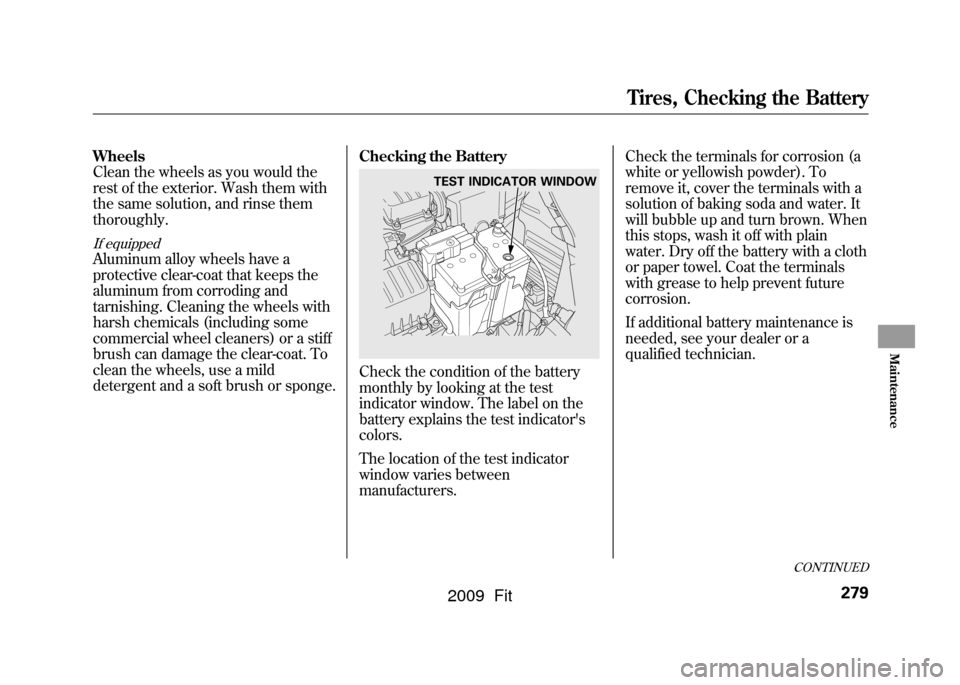
Check the condition of the battery
monthly by looking at the test
indicator window. The label on the
battery explains the test indicator's
colors.
The location of the test indicator
window varies between
manufacturers.Check the terminals for corrosion (a
white or yellowish powder). To
remove it, cover the terminals with a
solution of baking soda and water. It
will bubble up and turn brown. When
this stops, wash it off with plain
water. Dry off the battery with a cloth
or paper towel. Coat the terminals
with grease to help prevent future
corrosion.
If additional battery maintenance is
needed, see your dealer or a
qualified technician.
TEST INDICATOR WINDOW
CONTINUED
Tires, Checking the Battery
279
Maintenance
2009 Fit
Page 284 of 352

If you need to park your vehicle for
an extended period (more than 1
month), there are several things you
should do to prepare it for storage.
Proper preparation helps prevent
deterioration and makes it easier to
get your vehicle back on the road. If
possible, store your vehicle indoors.●Fill the fuel tank.●Wash and dry the exterior
completely.●Clean the interior. Make sure the
carpeting, floor mats, etc., are
completely dry.●Leave the parking brake off. Put
the transmission in reverse
(manual) or Park (automatic).●Block the rear wheels.
●If the vehicle is to be stored for a
longer period, it should be
supported on jackstands so the
tires are off the ground.●Leave one window open slightly (if
the vehicle is being stored
indoors).●Disconnect the battery.●Support the front and rear wiper
blade arms with a folded towel or
rag so they do not touch the
windshield.●To minimize sticking, apply a
silicone spray lubricant to all door
and tailgate seals. Also, apply a
vehicle body wax to the painted
surfaces that mate with the door
and tailgate seals.
●Cover the vehicle with a
‘‘breathable ’’cover, one made
from a porous material such as
cotton. Non-porous materials, such
as plastic sheeting, trap moisture,
which can damage the paint.●If possible, periodically run the
engine until it reaches full
operating temperature (the cooling
fans cycle on and off twice).
Preferably, do this once a month.
Vehicle Storage
281
Maintenance
2009 Fit
Page 306 of 352
Low Oil Pressure Indicator
This indicator should never
come on when the engine is
running. If it starts flashing or stays
on, the oil pressure has dropped very
low or lost pressure. Serious engine
damage is possible, and you should
take immediate action.
Running the engine with low oil
pressure can cause serious mechanical
damage almost immediately. Turn off
the engine as soon as you can safely get
the vehicle stopped. 1. Safely pull off the road, and shut
off the engine. Turn on the hazard
warning lights.
2. Let the vehicle sit for a minute. Open the hood, and check the oil
level (see page201).An engine
very low on oil can lose pressure
during cornering and other driving
maneuvers.
3. If necessary, add oil to bring the level back to the full mark on the
dipstick (see page253).
4. Start the engine, and watch the oil pressure indicator. If it does not go
out within 10 seconds, turn off the
engine. There is a mechanical
problem that needs to be repaired
before you can continue driving
(see Emergency Towing on page
311). Charging System Indicator
If the charging system
indicator comes on brightly
when the engine is running, the
battery is not being charged.
Immediately turn off all electrical
accessories. Try not to use other
electrically operated controls such as
the power windows. Keep the engine
running; starting the engine will
discharge the battery rapidly.
Go to a service station or garage
where you can get technical
assistance.
Low Oil Pressure Indicator, Charging System Indicator
303
Taking Care of the Unexpected
2009 Fit
Page 312 of 352
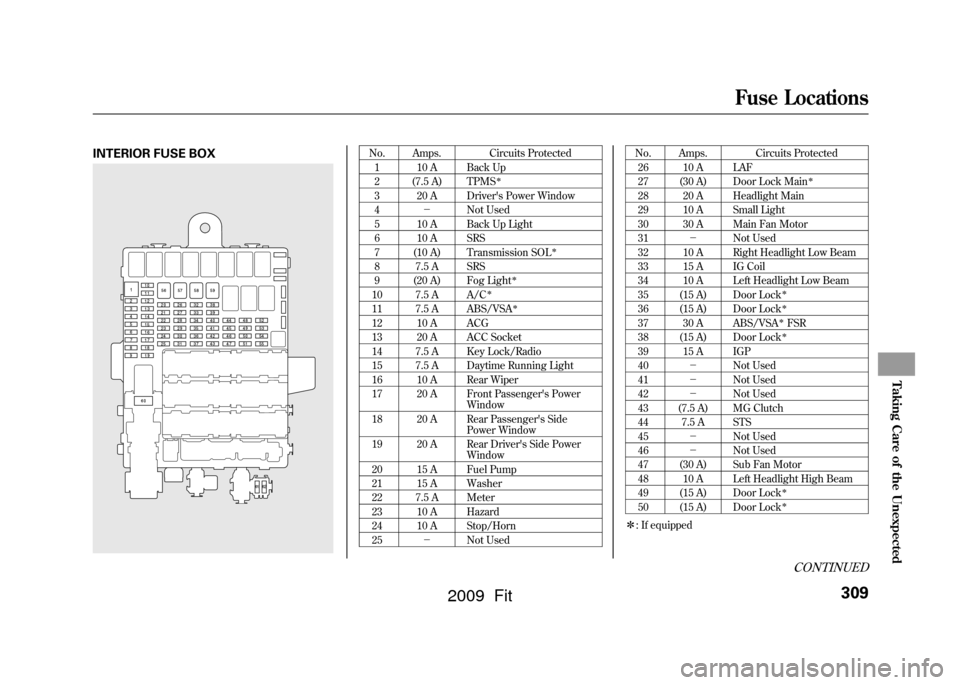
INTERIOR FUSE BOX
No. Amps. Circuits Protected1 10 A Back Up
2 (7.5 A) TPMS
ꭧ
3 20 A Driver's Power Window
4 -Not Used
5 10 A Back Up Light
6 10 A SRS
7 (10 A) Transmission SOL
ꭧ
8 7.5 A SRS
9 (20 A) Fog Light
ꭧ
10 7.5 A A/C
ꭧ
11 7.5 A ABS/VSA
ꭧ
12 10 A ACG
13 20 A ACC Socket
14 7.5 A Key Lock/Radio
15 7.5 A Daytime Running Light
16 10 A Rear Wiper
17 20 A Front Passenger's Power Window
18 20 A Rear Passenger's Side Power Window
19 20 A Rear Driver's Side Power Window
20 15 A Fuel Pump
21 15 A Washer
22 7.5 A Meter
23 10 A Hazard
24 10 A Stop/Horn
25 -Not Used No. Amps. Circuits Protected
26 10 A LAF
27 (30 A) Door Lock Main
ꭧ
28 20 A Headlight Main
29 10 A Small Light
30 30 A Main Fan Motor
31 -Not Used
32 10 A Right Headlight Low Beam
33 15 A IG Coil
34 10 A Left Headlight Low Beam
35 (15 A) Door Lock
ꭧ
36 (15 A) Door Lock
ꭧ
37 30 A ABS/VSA
ꭧFSR
38 (15 A) Door Lockꭧ
39 15 A IGP
40 -Not Used
41 -Not Used
42 -Not Used
43 (7.5 A) MG Clutch
44 7.5 A STS
45 -Not Used
46 -Not Used
47 (30 A) Sub Fan Motor
48 10 A Left Headlight High Beam
49 (15 A) Door Lock
ꭧ
50 (15 A) Door Lock
ꭧ
ꭧ : If equipped
CONTINUED
Fuse Locations
309
Taking Care of the Unexpected
2009 Fit
Page 342 of 352

D
DANGER, Explanation of
.............
iii
Dashboard
...............................
3, 58
Daytime Running Lights (Canada only)
.........................................
75
Daytime Running Lights Indicator (Canada only)
...........................
65
Dead Battery
..............................
299
Defects, Reporting Safety
...........
334
Defogger, Rear Window
...............
76
Defrosting the Windows
............
113
Detachable Anchor
......................
99
Dimensions
................................
318
Dimming the Headlights
..............
74
Dipstick Automatic Transmission
.........
259
Engine Oil
...............................
201
Directional Signals
.......................
63
Disc Brake Wear Indicators
.......
230
Disc Care
...................................
186
Disc Player Error Messages
........................
128, 157
Disposal of Used Oil
...................
255 Doors
Childproof Door Locks
.............
82
Locking and Unlocking
............
81
Power Door Locks
...................
81
DOT Tire Quality Grading (U.S. Vehicles)
................................
321
Downshifting, Manual Transmission
..........................
217
Driver and Passenger Safety
..........
5
Driving
.......................................
213
Economy
.................................
203
Driving Guidelines
.....................
214
Driving with the Paddle Shifters (Sport only)
............................
224
Dust and Pollen Filter
................
268
E
Economy, Fuel
...........................
203
Electric Power Steering (EPS) Indicator
...................................
62
Emergencies on the Road
..........
283
Battery, Jump Starting
.............
299
Brake System Indicator
...........
305
Changing a Flat Tire
...............
285 Charging System Indicator
.....
303
Checking the Fuses
................
307
Driving with a Flat Tire
...........
284
Hazard Warning Flashers
........
76
Jump Starting
..........................
299
Low Oil Pressure Indicator
.....
303
Malfunction Indicator Lamp
....
304
Overheated Engine
.................
301
Towing
....................................
311
Emergency Brake
......................
102
Emergency Flashers
....................
76
Emergency Towing
....................
311
Emissions Controls
....................
326
Emissions Testing
......................
329
CONTINUED
Index
III
INDEX
2009 Fit
Page 346 of 352
N
Neutral Gear Position
.................
221
New Vehicle Break-in
.................
198
Normal Shift Speeds
..................
218
NOTICE, Explanation of
................
i
Numbers, Identification
.............
316
O
Odometer
.....................................
70
Odometer, Trip
............................
69
Oil Change, How to
......................
254
Change, When to
....................
245
Checking Engine
....................
201
Life, Engine
.............................
245
Pressure Indicator
.............
60, 303
Selecting Proper Viscosity Chart
...................................
253
Onboard Refueling Vapor Recovery
................................
326
ON (Ignition Key Position)
..........
80
Outside Mirrors
.........................
101
Overheating, Engine
..................
301 Owner's Maintenance Checks
....
250
Oxygenated Fuels
......................
198
P
Paddle Shifters
...........................
224
Panel Brightness Control
.............
76
Park Gear Position
.....................
220
Parking
......................................
229
Parking Brake
............................
102
Parking Brake and Brake System Indicator
...........................
60, 305
Parking Lights
.............................
74
Parking Over Things that Burn
................................
229, 328
Passenger Airbag Off Indicator
....
31
PGM-FI System
..........................
327
Playing a Disc
.....................
122, 149
Playing an iPod
®..................
129, 170
Playing a PC card
.......................
158
Playing a USB Flash Memory Device
.............................
136, 177
Playing the AM/FM Radio.........
143
Playing the FM/AM Radio
.........
115
Pollen Filter
...............................
268 Power Door Locks
.......................
81
Power Socket Locations
.............
106
Power Windows
.........................
100
Pregnancy, Using Seat Belts
........
16
Preparing to Drive
......................
215
Protecting Adults and Teens
........
11
Additional Safety Precautions
...
17
Advice for Pregnant Women
....
16
Protecting Children
......................
34
General Guidelines
..................
34
Protecting Infants
.....................
39
Protecting Larger Children
......
49
Protecting Small Children
........
40
Using Child Seats with Tethers
.................................
47
Using LATCH
..........................
43
R
Radiator Overheating
.................
301
Radio/CD Sound System
...........
115
Radio Theft Protection
...............
191
Readiness Codes
........................
329
Rear Lights, Bulb Replacement
...........................
266
CONTINUED
Index
VII
INDEX
2009 Fit