Page 47 of 352
Other LATCH-compatible seats
have a flexible-type connector as
shown above.
4. Whatever type you have, follow the child seat maker's instructions for
adjusting or tightening the fit.
5. Lift the head restraint (see page94),then route the tether strap
through the legs of the head
restraint and over the seat-back,
making sure the strap is not
twisted.
6. Attach the tether strap hook to theanchor, then tighten the strap as
instructed by the child seat maker.
7. Push and pull the child seat forward and from side-to-side to
verify that it is secure.
Flexible type
ANCHOR
TETHER STRAP HOOK
Installing a Child Seat44
2009 Fit
Page 48 of 352

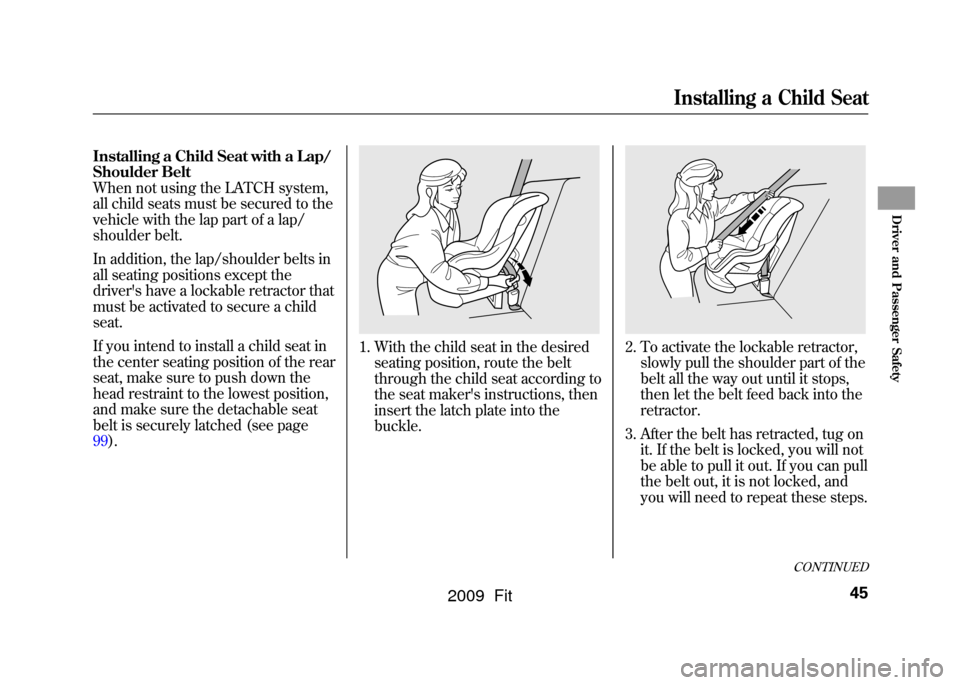
Installing a Child Seat with a Lap/
Shoulder Belt
When not using the LATCH system,
all child seats must be secured to the
vehicle with the lap part of a lap/
shoulder belt.
In addition, the lap/shoulder belts in
all seating positions except the
driver's have a lockable retractor that
must be activated to secure a child
seat.
If you intend to install a child seat in
the center seating position of the rear
seat, make sure to push down the
head restraint to the lowest position,
and make sure the detachable seat
belt is securely latched (see page
99).
1. With the child seat in the desiredseating position, route the belt
through the child seat according to
the seat maker's instructions, then
insert the latch plate into the
buckle.
2. To activate the lockable retractor,slowly pull the shoulder part of the
belt all the way out until it stops,
then let the belt feed back into the
retractor.
3. After the belt has retracted, tug on it. If the belt is locked, you will not
be able to pull it out. If you can pull
the belt out, it is not locked, and
you will need to repeat these steps.
CONTINUED
Installing a Child Seat
45
Driver and Passenger Safety
2009 Fit
Page 49 of 352
4. After confirming that the belt islocked, grab the shoulder part of
the belt near the buckle, and pull
up to remove any slack from the
lap part of the belt. Remember, if
the lap part of the belt is not tight,
the child seat will not be secure.
To remove slack, it may help to put
weight on the child seat, or push
on the back of the seat while
pulling up on the belt.
5. Push and pull the child seatforward and from side-to-side to
verify that it is secure enough to
stay upright during normal driving
maneuvers. If the child seat is not
secure, unlatch the belt, allow it to
retract fully, then repeat these
steps. To deactivate the lockable retractor
and remove a child seat, unlatch the
buckle, unroute the seat belt, and let
the belt fully retract.
Installing a Child Seat46
2009 Fit
Page 50 of 352
Installing a Child Seat with a
Tether
A child seat with a tether can be
installed in any seating position in
the back seat.
Each rear outside seating position
has an anchorage point on the seat-
back, and the center seating position
has an anchorage point in the ceiling
near the tailgate.
Since a tether can provide additional
security to the lap/shoulder belt
installation, we recommend using a
tether whenever one is required or
available.
Using an Outer Anchor1. After properly securing the childseat (see page45),lift the head
restraint, then route the tether
strap over the seat-back and
through the head restraint legs.
2. Attach the tether strap hook to theanchor, making sure the tether
strap is not twisted.
3. Tighten the strap according to the seat maker's instructions.
ANCHOR
TETHER STRAP HOOK ANCHOR
CONTINUED
Installing a Child Seat
47
Driver and Passenger Safety
2009 Fit
Page 51 of 352
Using the Center Anchor1. Lower the head restraint to itslowest position.
2. After properly securing the child seat (see page45),open the
anchor cover.
3. Route the tether strap over thehead restraint, then attach the
tether strap hook to the anchor,
making sure the tether strap is not
twisted.
4. Tighten the strap according to the seat maker's instructions.
ANCHOR
COVER
ANCHOR
TETHER STRAP HOOK
Installing a Child Seat48
2009 Fit
Page 55 of 352

If you decide that a child can safely
ride up front, be sure to:●Carefully read the owner's manual,
and make sure you understand all
seat belt instructions and all safety
information.●Move the vehicle seat to the rear-
most position.●Have the child sit up straight, back
against the seat, and feet on or
near the floor.●Check that the child's seat belt is
properly and securely positioned.●Supervise the child. Even mature
children sometimes need to be
reminded to fasten the seat belts
or sit properly.Additional Safety Precautions
●Do not let a child wear a seat belt
across the neck.
This could result
in serious neck injuries during a
crash.
●Do not let a child put the shoulder part of a seat belt behind the back
or under the arm.
This could cause
very serious injuries during a
crash. It also increases the chance
that the child will slide under the
belt in a crash and be injured.
●Two children should never use the
same seat belt.
If they do, they
could be very seriously injured in a
crash.
●Do not put any accessories on a
seat belt.
Devices intended to
improve a child's comfort or
reposition the shoulder part of a
seat belt can make the belt less
effective and increase the chance
of serious injury in a crash.
Protecting Larger Children52
2009 Fit
Page 62 of 352

ꭧ: If equippedSECURITY SYSTEM INDICATOR
ꭧ(P. 66, 193)
WASHER LEVEL
INDICATOR
ꭧ(P.65)
MALFUNCTION
INDICATOR LAMP (P. 304)
CHARGING SYSTEM
INDICATOR (P. 60,303)
LOW OIL PRESSURE
INDICATOR (P. 60,303) IMMOBILIZER SYSTEM
INDICATOR (P.
66)
FOG LIGHT INDICATOR
ꭧ(P.
64) LIGHTS ON INDICATOR (P.
64)
SUPPLEMENTAL RESTRAINT
SYSTEM INDICATOR (P. 30,61)
MAINTENANCE MINDER
INDICATOR (P.
66) CRUISE MAIN INDICATOR
ꭧ(P.
65)
CRUISE CONTROL
INDICATOR
ꭧ(P. 65)
LOW TEMPERATURE INDICATOR (P. 63)
ELECTRIC POWER
STEERING (EPS)
INDICATOR (P.
62)
HIGH BEAM INDICATOR (P.
65)
LOW FUEL INDICATOR
(P.62)
TPMS INDICATOR
ꭧ(P.
64)
SEAT BELT REMINDER
INDICATOR (P. 60)
PARKING BRAKE AND
BRAKE SYSTEM INDICATOR
(P. 60, 305)
DAYTIME RUNNING LIGHTS INDICATOR (P.
65)
HIGH TEMPERATURE
INDICATOR (P. 63)
VEHICLE STABILITY ASSIST (VSA)
SYSTEM INDICATOR
ꭧ(P.
67)
VSA OFF INDICATORꭧ
(P. 67) SIDE AIRBAG OFF INDICATOR (P.
31,61)
LOW TIRE PRESSURE INDICATOR
ꭧ(P. 64)
ANTI-LOCK BRAKE SYSTEM
INDICATOR (P. 62)
DOOR AND TAILGATE OPEN
INDICATOR (P.
62)
Instrument Panel
59
Instruments and Controls
2009 Fit
Page 69 of 352

Maintenance Minder
Indicator
This indicator comes on for a few
seconds when you turn the ignition
switch to the ON (II) position. It
reminds you that it is time to take
your vehicle in for scheduled
maintenance. The maintenance main
items and sub items will be displayed
in the information display. See page
245for more information on the
maintenance minder.
This indicator goes off when your
dealer resets it after completing the
required maintenance service.
Immobilizer System
Indicator
This indicator comes on briefly when
you turn the ignition switch to the
ON (II) position. It will go off if you
have inserted a properly coded
ignition key. If it is not a properly
coded key, the indicator will blink,
and the engine's fuel system will be
disabled (see page79). Security System Indicator
On Sport modelThis indicator comes on when the
security system is set. See page193
for more information on the security
system.
SECURITY SYSTEM INDICATOR
Instrument Panel Indicators66
2009 Fit