Page 57 of 150

Navigation System57
Driving to Your Destination
Showing Icons on the Map
Touching the ICON button on the map
screen displays the following screen:
The screen consists of the following
items:
Icon Bar (row of icon symbols)
The icon bar allows you to manually
select the icons that are displayed on the
map (see page55 for a list of these
icons). In the screen above, both gas
stations and restaurants are selected.
Touch the icons to select (goes blue) or
remove them (goes gray). You can also
display or hide the same icons by using
the “Display” or “Hide” voice
commands (see page138).
Icon Options
This feature allows you to “fine tune”
some of the icons on the Icon bar (see
Icon Options for more information).
Guidance Mode
When en route, this item allows you to
select between a single-screen (with
occasional pop-up guidance windows),
or a split-screen (containing one-half
map and one-half guidance/directions
list window). See page52 for an
explanation of this feature, and see
page89 for Setup.
Exit Screen
Select Return to return to the map
screen.
Icon Options
Selecting Icon Options displays the
following screen:
This feature allows you to “fine tune”
some of the icons on the Icon bar. The
three icon choices – “Parking” (lot or
garage), “Restaurant” (specific type or
types of food), and “Other icons”
(hospitals, schools, etc.) – can each be
tailored to your needs.
2009 Element
Page 58 of 150
58Navigation System
For instance, let’s assume that your
hospital icons are not displayed on the
map. You would do the following:
First, you would ensure that the OTHER ICON button on the Icon
bar is blue (see Icon Bar on page57).
Second, you select Icon Options
and verify that hospital option is also
on (blue). This procedure is explained
below.
If you select Other Icons from the
Select category for icon settings
screen, the other icons options are
displayed: In the example above, POST OFFICE
and
SCHOOL are selected and will
show up on the map. To also see
HOSPITAL on the map, this would
need to be turned on to select it so it
appears as below.
Exit, and save your settings by selecting
Done . NOTE:
When viewing the
map screen, you
can turn some icons on using voice
control.
See Navigation Display Commands
on page138 for the available
“Display” and “Hide” icon
command.
Driving to Your Destination
2009 Element
Page 59 of 150

Navigation System59
Driving to Your Destination
Going Off the Route
If you leave the calculated route,
“Recalculating...” is displayed at the top
of the screen. The system will
recalculate the route from your current
location and direction to the desired
destination, and then give you a new
route instruction. This is done
automatically if you have set
Rerouting to Automatic on the
Setup screen (second) (see page81).
If the Rerouting option in Setup is set
to Manual , “Off route” appears at the
top of the screen when you leave the
calculated route. Sa y “Recalculate” or
select Recalculation whenever you
wish the system to perform a
recalculation.
Off-road Tracking
If you drive more than half a mile from
a mapped road, “Not on a digitized
road” appears at the bottom of the
screen.
The map screen starts displaying a
series of dots (breadcrumbs) to show the
path you have taken if Off-road
Tracking on the Setup screen (second)
is set to On (see page89). By following the dots, you can
backtrack to the mapped road you
originally left. “Breadcrumbs” may
occasionally be displayed in urban
areas, such as larg
e parking lots in
shopping malls, or in new subdivisions
where the roads are not yet in the
database. In other cases, you may see
dots if the system temporarily goes off
route, like in a parking garage where the
GPS signal is unavailable.
These dots appear only in the 1/20, 1/8,
1/4, and 1/2 mile (or 80, 200, 400, and
800 meter) map scales.
Use the ZOOM buttons to change scales
if necessary.
Tracking continues for approximately
150 miles; dots at the beginning of the
trail will start disappearing when you
exceed that distance . When you reach a
mapped road, th e system stops
displaying dots.
2009 Element
Page 60 of 150

60Navigation System
Viewing/Saving the Current
Location
Whenever you are on a map screen, you
can always obtain your current location
either by touching the Vehicle Position
icon or by using the voice control
system and saying “Display current
location.” A screen pops up which
shows the address of your current
location, as well as the latitude,
longitude, and elevation. NOTE:
The elevation will not appear when the
system is temporarily lacking proper
GPS information. The system elevation
may not agree with elevations shown on
roadside elevation signs, and may
fluctuate plus or minus 100 feet or more.
You can store the current location for
later use. It does not change or cancel
your current route.
For example, you
are following the
system’s directions to get to a
destination. While sitting at a stoplight
you notice a store on the corner, but do
not have time to visit it right now. You
can save the location to select as a
destination at a later date. To save the location, say “Save current
location” or select
Save on the screen.
When you select “User 1” or “User 2,”
the Edit address book screen with the
current location data will appear. You
can edit the name, phone number, or
category name to be saved in your
personal Address Book.
After the location is saved, select
Return to return to the map screen.
You can then use Address Book from
the Enter destination by screen to
select the saved location and return to
the same spot.
Driving to Your Destination
2009 Element
Page 61 of 150
Navigation System61
Driving to Your Destination
Pop-Ups and Disclaimers
When you say “OK” in the Calculate
Route to screen, or if you change your
route, the system checks your route and
provides you with pop-up messages for
the following situations:
Your route takes you into an area that
you previously set as an “Avoid
Area” (see Edit Avoid Area on
page86). Your route passes near an unverified
area (see Unverified Area Routing on
page82).
Your route includes unverified areas (see Unverified Area Routing on
page82). You are about to enter an unverified
area (see Unverified Area Routing on
page82).
You actually ente red an unverified
area (see Unverified Area Routing on
page82).
2009 Element
Page 62 of 150
, choose a different destination,
or cancel your current destinatio")
62Navigation System
Changing the Route
While en route, you may wish to alter
your route, add an interim “Waypoint”
(pit stop), choose a different destination,
or cancel your current destination.
To change your present route, you can
do any of the following:
Say “Menu,” or press the MENU button
to view the Change route by screen:
Search waypoint (page62)
Delete waypoint (page64)
Avoid streets (page64)
Detour (page64)
Change routing method (page64)
Cancel the current route (page65)
Back to the current route (page65) Choose a different destination (other
methods) by:
Saying “Find nearest...” to find a POI
(page65).
Saying “Go home” (page65).
Using the joystick to select a different POI or address on the map (page65).
Pressing the MENU button twice to get to the Enter destination by
screen (page67).
Change Route By Screen
Pressing the MENU button displays the
Change route by screen:
Waypoints
Waypoints allow you to add an interim
“pit stop” while traveling to a
destination. For inst ance, you may want
to stop for gas or food, and then
continue on to your destination.
Although you can enter up to five
waypoints at a time, typically you may
never use more than one at a time.
Waypoints are routed to in the order
they were entered (number 1 first, etc.),
with your final destination routed to last.
If you wish to create a custom route of
several destinations , and then control
the order of routing, the function
“Today’s Destinations” is probably a
better choice (see By Today’s
Destinations on page40).
Driving to Your Destination
2009 Element
Page 63 of 150

Navigation System63
Driving to Your Destination
When you enter waypoi nts, they appear
on the map screen as small red flags
numbered 1-5.Adding Waypoints
From the Change route by screen, if
you say or select Search Places on
Route , then the Select a search
method screen is displayed. Select
either Places Along the Route or
Places Around the Destination.
Next, select your “Waypoint Category,”
then follow the menu prompts to select a
destination. When the system performs
a search from Places Along the
Route , it displays matches that lie
within a corridor on either side and in
front of you along your route. From
Places Around the
Destination , the system displays
matches in a spiral pattern outward from
the destination. Th e search “corridor”
distance value can be changed in Edit
Waypoint Search Area in Setup (see
page88).
To add another waypoint, press the
MENU button and repeat the procedure.
If Search Places on Route is grayed
out, the maximum of five waypoints has
been entered.
NOTE:
The system does not allow you to select
the roads you want to use to get to a
destination. However, after you enter a
destination, you can select intersections
or POI waypoints that the system will
use to tailor your route.
2009 Element
Page 64 of 150

64Navigation System
Deleting Waypoints
From the Change route by screen, if
you say “Delete” or select Delete, then
the Select a waypoint to delete screen
is displayed. Say the line number of the
waypoint(s) you wish to delete, or select
them by using the joystick. Say or select
Done to return to the map screen.
The route is recalculated to reflect the
changes you made to the waypoint(s).
Reroute: Avoid Streets
From the Change route by screen, if
you say or select Avoid Streets, the
system displays a list of streets that will
get you to your destination. This feature
allows you to avoid a street or streets
along your route. This is helpful if you
know of road construction, closures, or
excessive traffic along the route. Simply
select the street or streets you wish to
avoid. You cannot avoid your current
street, or the streets of your waypoint(s)
or destination (system beeps if selected).
NOTE:
Although you can choose streets to
avoid, you cannot choose specific
streets you want to use.
Reroute: Detour
Calculates a detour route for you if you
encounter an unexp ected obstacle such
as a closed road or extremely heavy
traffic congestion. If a detour is
selected, the system will attempt to
recalculate a new route, avoiding the
next 2 miles (while on a freeway) or 1/2
mile (while on a surface street).
Reroute: Change Routing
Method
From the Change route by screen, if
you say or select Change Routing
Method , then the Select routing
method screen is displayed. See
Changing the Routing Method on
page45 for details.
Driving to Your Destination
2009 Element
 1
1 2
2 3
3 4
4 5
5 6
6 7
7 8
8 9
9 10
10 11
11 12
12 13
13 14
14 15
15 16
16 17
17 18
18 19
19 20
20 21
21 22
22 23
23 24
24 25
25 26
26 27
27 28
28 29
29 30
30 31
31 32
32 33
33 34
34 35
35 36
36 37
37 38
38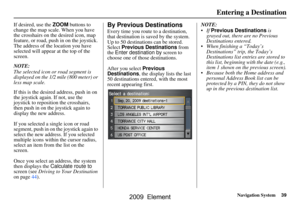 39
39 40
40 41
41 42
42 43
43 44
44 45
45 46
46 47
47 48
48 49
49 50
50 51
51 52
52 53
53 54
54 55
55 56
56 57
57 58
58 59
59 60
60 61
61 62
62 63
63 64
64 65
65 66
66 67
67 68
68 69
69 70
70 71
71 72
72 73
73 74
74 75
75 76
76 77
77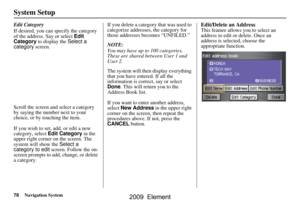 78
78 79
79 80
80 81
81 82
82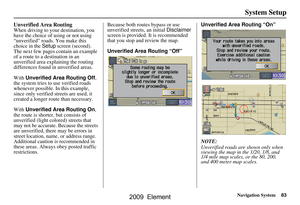 83
83 84
84 85
85 86
86 87
87 88
88 89
89 90
90 91
91 92
92 93
93 94
94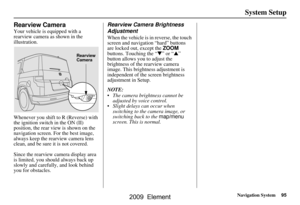 95
95 96
96 97
97 98
98 99
99 100
100 101
101 102
102 103
103 104
104 105
105 106
106 107
107 108
108 109
109 110
110 111
111 112
112 113
113 114
114 115
115 116
116 117
117 118
118 119
119 120
120 121
121 122
122 123
123 124
124 125
125 126
126 127
127 128
128 129
129 130
130 131
131 132
132 133
133 134
134 135
135 136
136 137
137 138
138 139
139 140
140 141
141 142
142 143
143 144
144 145
145 146
146 147
147 148
148 149
149
