2009 GMC SIERRA 1500 key
[x] Cancel search: keyPage 298 of 602

Playing an MP3/WMA (In Either the DVD or
CD Slot)
Insert a CD-R or CD-RW partway into either the top or
bottom slot, label side up. The player pulls it in, and
the CD-R or CD-RW should begin playing.
Depending on the format of the disc, a softkey menu
appears and allows navigation of the disc. The menu
reads left to right as RDM (Randomize song play order), a
Folder icon with left and right arrows (to move up or down
through available folders), a PL tag if the disc has a
Playlist available, and a Music Navigator tag. If a Playlist
tag is shown, toggling this key brings up a Folder softkey
only or the menu as previously described.
If the ignition or radio is turned off with a CD-R or CD-RW
in the player it stays in the player. When the ignition or
radio is turned back on, the CD-R starts to play where it
stopped, if it was the last selected audio source.
As each new track starts to play, the track number and
song title displays.
ZCD (Eject):Press and release this button to eject
the CD-R or CD-RW that is currently playing in the
bottom slot. A beep sounds and Ejecting Disc displays.
Once the disc is ejected, Remove Disc displays. The
CD-R or CD-RW can be removed. If the CD-R or
CD-RW is not removed, after several seconds, the CD-R
or CD-RW automatically pulls back into the player.If loading and reading of a CD cannot be completed,
such as unknown format, etc., and the disc fails to eject,
press and hold this button for more than �ve seconds
to force the disc to eject.
ZDVD (Eject):Press and release this button to eject
the CD-R or CD-RW that is currently playing in the top
slot. A beep sounds and Ejecting Disc displays. Once the
disc is ejected, Remove Disc displays. The CD-R or
CD-RW can be removed. If the CD-R or CD-RW is not
removed, after several seconds, the CD-R automatically
pulls back into the player. If loading and reading of a CD
cannot be completed, such as unknown format, etc., and
the disc fails to eject, press and hold this button for more
than �ve seconds to force the disc to eject.
f(Tune):Turn this knob to select MP3/WMA �les on
the CD-R or CD-RW that is currently playing.
©SEEK¨:Press the left SEEK arrow to go to the
start of the current MP3/WMA �le, if more than
�ve seconds have played. If less than �ve seconds have
played, the previous MP3/WMA �le plays. Press the right
SEEK arrow to go to the next MP3/WMA �le. If either
SEEK arrow is held, or pressed multiple times, the player
continues moving backward or forward through the
MP3/WMA �les on the CD.
3-114
Page 302 of 602

Navigation/Radio System
For vehicles with a navigation radio system, see the
separate Navigation System manual.
Bluetooth®
Vehicles with a Bluetooth system can use a Bluetooth
capable cell phone with a Hands Free Pro�le to make and
receive phone calls. The system can be used while the
key is in ON/RUN or ACC/ACCESSORY position. The
range of the Bluetooth system can be up to 30 ft. (9.1 m).
Not all phones support all functions, and not all phones
are guaranteed to work with the in-vehicle Bluetooth
system. See gm.com/bluetooth for more information on
compatible phones.
Voice Recognition
The Bluetooth system uses voice recognition to interpret
voice commands to dial phone numbers and name tags.
Noise:Keep interior noise levels to a minimum. The
system may not recognize voice commands if there is
too much background noise.
When to Speak:A short tone sounds after the system
responds indicating when it is waiting for a voice
command. Wait until the tone and then speak.
How to Speak:Speak clearly in a calm and natural
voice.
Audio System
When using the in-vehicle Bluetooth system, sound
comes through the vehicle’s front audio system speakers
and overrides the audio system. Use the audio system
volume knob, during a call, to change the volume level.
The adjusted volume level remains in memory for later
calls. To prevent missed calls, a minimum volume level is
used if the volume is turned down too low.
3-118
Page 311 of 602

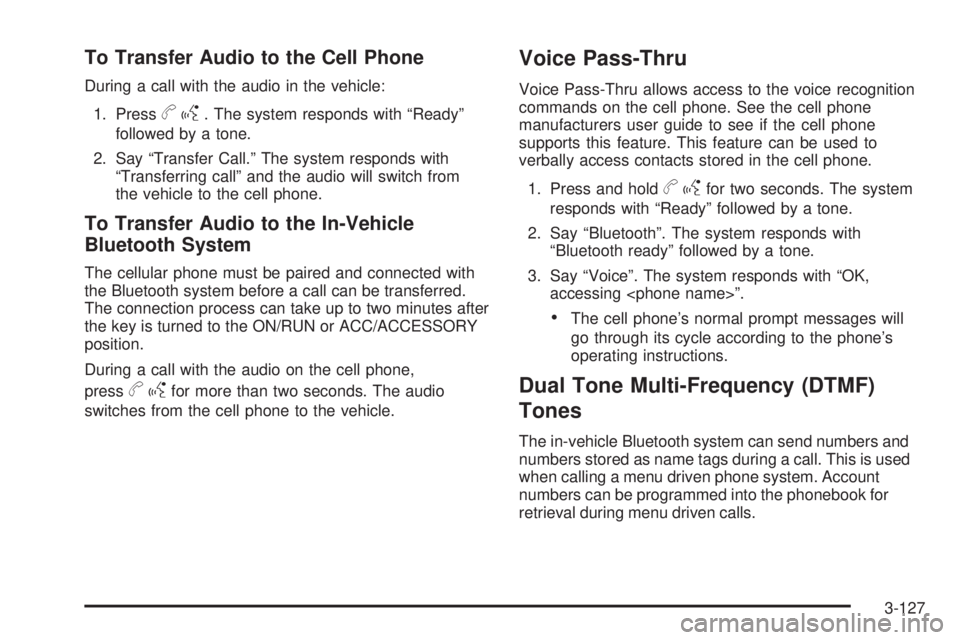
To Transfer Audio to the Cell Phone
During a call with the audio in the vehicle:
1. Press
bg. The system responds with “Ready”
followed by a tone.
2. Say “Transfer Call.” The system responds with
“Transferring call” and the audio will switch from
the vehicle to the cell phone.
To Transfer Audio to the In-Vehicle
Bluetooth System
The cellular phone must be paired and connected with
the Bluetooth system before a call can be transferred.
The connection process can take up to two minutes after
the key is turned to the ON/RUN or ACC/ACCESSORY
position.
During a call with the audio on the cell phone,
press
bgfor more than two seconds. The audio
switches from the cell phone to the vehicle.
Voice Pass-Thru
Voice Pass-Thru allows access to the voice recognition
commands on the cell phone. See the cell phone
manufacturers user guide to see if the cell phone
supports this feature. This feature can be used to
verbally access contacts stored in the cell phone.
1. Press and hold
bgfor two seconds. The system
responds with “Ready” followed by a tone.
2. Say “Bluetooth”. The system responds with
“Bluetooth ready” followed by a tone.
3. Say “Voice”. The system responds with “OK,
accessing
The cell phone’s normal prompt messages will
go through its cycle according to the phone’s
operating instructions.
Dual Tone Multi-Frequency (DTMF)
Tones
The in-vehicle Bluetooth system can send numbers and
numbers stored as name tags during a call. This is used
when calling a menu driven phone system. Account
numbers can be programmed into the phonebook for
retrieval during menu driven calls.
3-127
Page 320 of 602

d(Camera):Press this button to change camera
angles on DVDs that have this feature while a DVD is
playing. The format and content of this function vary for
each disc.
1 through 0 (Numeric Keypad):The numeric keypad
provides the capability of direct chapter or track
number selection.
\(Clear):Press this button within three seconds after
entering a numeric selection, to clear all numerical inputs.
}10 (Double Digit Entries):Press this button to
select chapter or track numbers greater than nine.
Press this button before entering the number.
Battery Replacement
To change the remote control batteries, do the following:
1. Slide the rear cover back on the remote control.
2. Replace the two batteries in the compartment. Make
sure they are installed correctly using the diagram
on the inside of the remote control.
3. Replace the battery cover.If the remote control is to be stored for a long period of
time, remove the batteries and keep them in a cool,
dry place.
Problem Recommended Action
No power. The ignition might not be
turned ON/RUN or in
ACC/ACCESSORY.
The picture does not �ll the
screen. There are black
borders on the top and
bottom or on both sides or
it looks stretched out.Check the display mode
settings in the setup menu
by pressing the display
menu button on the remote
control.
In auxiliary mode, the
picture moves or scrolls.Check the auxiliary input
connections at both
devices.
The remote control does
not work.Check to make sure there
is no obstruction between
the remote control and the
transmitter window.
Check the batteries to
make sure they are not
dead or installed
incorrectly.
3-136
Page 342 of 602

Getting Familiar with Off-Road Driving
It is a good idea to practice in an area that is safe
and close to home before you go into the wilderness.
Off-roading requires some new and different skills.
Tune your senses to different kinds of signals. Your eyes
need to constantly sweep the terrain for unexpected
obstacles. Your ears need to listen for unusual tire
or engine sounds. Use your arms, hands, feet, and body
to respond to vibrations and vehicle bounce.
Controlling the vehicle is the key to successful off-road
driving. One of the best ways to control the vehicle
is to control the speed. At higher speeds:
You approach things faster and have less time to
react.
There is less time to scan the terrain for obstacles.
The vehicle has more bounce when driving over
obstacles.
More braking distance is needed, especially on an
unpaved surface.
{CAUTION:
When you are driving off-road, bouncing and quick
changes in direction can easily throw you out of
position. This could cause you to lose control and
crash. So, whether you are driving on or off the
road, you and your passengers should wear
safety belts.
4-16
Page 375 of 602

{CAUTION:
Shifting a four-wheel-drive vehicle’s transfer case
into N (Neutral) can cause the vehicle to roll even
if the transmission is in P (Park). The driver or
others could be injured. Make sure the parking
brake is �rmly set before the transfer case is
shifted to N (Neutral).
4. Shift the transfer case to N (Neutral). See “Shifting
into Neutral” underFour-Wheel Drive on page 2-37
for the proper procedure to select the Neutral
position for the vehicle.
5. Release the parking brake only after the vehicle
being towed is �rmly attached to the towing
vehicle.
6. Turn the ignition to LOCK/OFF and remove the
key — the steering wheel will still turn.
After towing, see “Shifting Out of Neutral” under
Four-Wheel Drive on page 2-37for the proper procedure
to take the vehicle out of the Neutral position.
Dolly Towing
Front Towing (Front Wheels Off the Ground)
Two-Wheel-Drive Vehicles
Notice:If a two-wheel-drive vehicle is towed with the
rear wheels on the ground, the transmission could be
damaged. The repairs would not be covered by the
vehicle warranty. Never tow the vehicle with the rear
wheels on the ground.
Two-wheel-drive vehicles should not be towed with
the rear wheels on the ground. Two-wheel-drive
transmissions have no provisions for internal lubrication
while being towed.
4-49
Page 415 of 602

California Proposition 65 Warning
Most motor vehicles, including this one, contain and/or
emit chemicals known to the State of California to cause
cancer and birth defects or other reproductive harm.
Engine exhaust, many parts and systems (including
some inside the vehicle), many �uids, and some
component wear by-products contain and/or emit
these chemicals.
California Perchlorate Materials
Requirements
Certain types of automotive applications, such as
airbag initiators, seat belt pretensioners, and lithium
batteries contained in remote keyless transmitters,
may contain perchlorate materials. Special handling
may be necessary. For additional information, see
www.dtsc.ca.gov/hazardouswaste/perchlorate.
Doing Your Own Service Work
If this vehicle is a Two-mode Hybrid, see the Two-mode
Hybrid manual for more information.
{CAUTION:
You can be injured and the vehicle could be
damaged if you try to do service work on a
vehicle without knowing enough about it.
Be sure you have sufficient knowledge,
experience, the proper replacement parts,
and tools before attempting any vehicle
maintenance task.
Be sure to use the proper nuts, bolts, and
other fasteners. English and metric fasteners
can be easily confused. If the wrong fasteners
are used, parts can later break or fall off.
You could be hurt.
If doing some of your own service work, use the
proper service manual. It tells you much more about
how to service the vehicle than this manual can. To order
the proper service manual, seeService Publications
Ordering Information on page 7-16.
5-5
Page 450 of 602

How to Check Power Steering Fluid
To check the power steering �uid:
1. Turn the key off and let the engine compartment
cool down.
2. Wipe the cap and the top of the reservoir clean.
3. Unscrew the cap and wipe the dipstick with a
clean rag.
4. Replace the cap and completely tighten it.
5. Remove the cap again and look at the �uid level on
the dipstick.
The level should be at the FULL COLD mark.
If necessary, add only enough �uid to bring the level
up to the mark.
What to Use
To determine what kind of �uid to use, see
Recommended Fluids and Lubricants on page 6-15.
Always use the proper �uid.
Notice:Use of the incorrect �uid may damage
the vehicle and the damages may not be covered
by the vehicle’s warranty. Always use the correct
�uid listed inRecommended Fluids and Lubricants
on page 6-15.
Windshield Washer Fluid
What to Use
When windshield washer �uid needs to be added,
be sure to read the manufacturer’s instructions before
use. Use a �uid that has sufficient protection against
freezing in an area where the temperature may
fall below freezing.
Adding Washer Fluid
The vehicle has a low washer �uid message in the DIC
that comes on when the washer �uid is low. The message
is displayed for 15 seconds at the start of each ignition
cycle. When the WASHER FLUID LOW ADD FLUID
message displays, you will need to add washer �uid
to the windshield washer �uid reservoir.
Open the cap with the
washer symbol on it.
Add washer �uid until the
tank is full. SeeEngine
Compartment Overview
on page 5-16for reservoir
location.
5-40