2009 GMC SIERRA 1500 turn signal
[x] Cancel search: turn signalPage 474 of 602

A. Stoplamp/Taillamp/Turn Signal Lamp
B. Back-up Lamp
C. Stoplamp/Taillamp/Turn Signal Lamp
4. Press the tab, if the vehicle has one, and turn the
bulb socket counterclockwise to remove it from the
taillamp assembly.A. Stoplamp/Taillamp/Turn Signal Lamp
B. Stoplamp/Taillamp/Turn Signal Lamp
C. Back-up Lamp
D. Sidemarker Lamp
5. Pull the old bulb straight out from the socket.
6. Press a new bulb into the socket and turn the socket
clockwise into the taillamp assembly.
7. Reinstall the taillamp assembly. Dually Models
All Other Models
5-64
Page 475 of 602

Taillamps (Chassis Cab Models)
A. Backup Lamp
B. Stoplamp/Taillamp/Turn Signal Lamp
To replace one of these bulbs:
1. Remove the four screws.
2. Lift the lens off the lamp assembly.
3. Turn the old bulb counterclockwise and pull the it
straight out from the socket.
4. Install a new bulb into the socket, turn it clockwise,
and press it in until it is tight.
5. Reinstall the lens and the four screws.
License Plate Lamp
To replace one of these bulbs:
1. Reach under the rear bumper for the bulb socket.
2. Turn the bulb socket counterclockwise and pull the
bulb socket out of the connector.
3. Pull the old bulb from the bulb socket, keeping the
bulb straight as you pull it out.
4. Install the new bulb.
5. Reverse Steps 1 through 3 to reinstall the bulb
socket.
5-65
Page 476 of 602

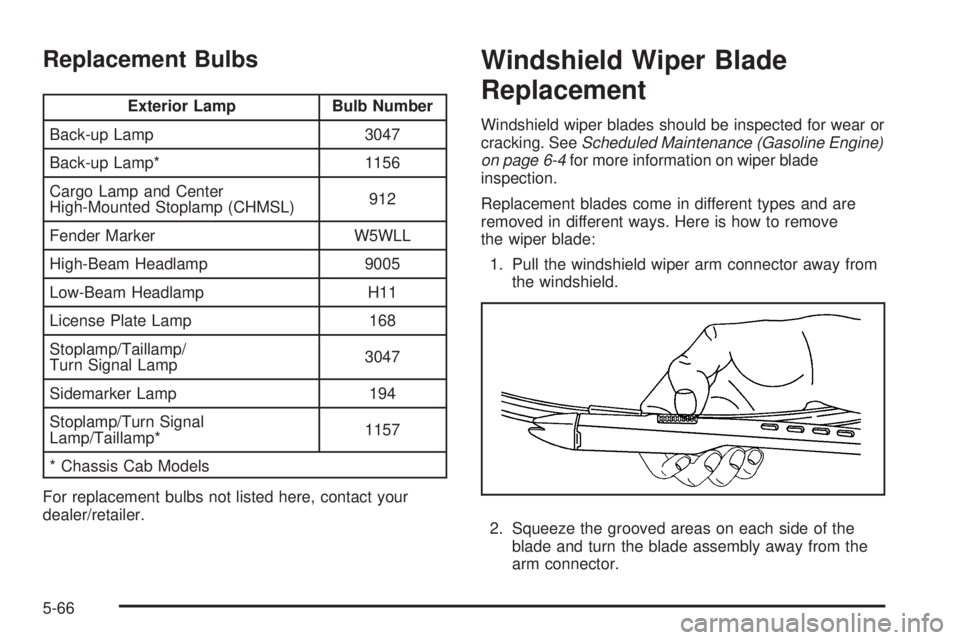
Replacement Bulbs
Exterior Lamp Bulb Number
Back-up Lamp 3047
Back-up Lamp* 1156
Cargo Lamp and Center
High-Mounted Stoplamp (CHMSL)912
Fender Marker W5WLL
High-Beam Headlamp 9005
Low-Beam Headlamp H11
License Plate Lamp 168
Stoplamp/Taillamp/
Turn Signal Lamp3047
Sidemarker Lamp 194
Stoplamp/Turn Signal
Lamp/Taillamp*1157
* Chassis Cab Models
For replacement bulbs not listed here, contact your
dealer/retailer.
Windshield Wiper Blade
Replacement
Windshield wiper blades should be inspected for wear or
cracking. SeeScheduled Maintenance (Gasoline Engine)
on page 6-4for more information on wiper blade
inspection.
Replacement blades come in different types and are
removed in different ways. Here is how to remove
the wiper blade:
1. Pull the windshield wiper arm connector away from
the windshield.
2. Squeeze the grooved areas on each side of the
blade and turn the blade assembly away from the
arm connector.
5-66
Page 493 of 602

The TPMS sensor matching process is outlined below:
1. Set the parking brake.
2. Turn the ignition switch to ON/RUN with the
engine off.
3. Press the Remote Keyless Entry (RKE) transmitter’s
LOCK and UNLOCK buttons at the same time for
approximately �ve seconds. The horn sounds twice
to signal the receiver is in relearn mode and TIRE
LEARNING ACTIVE message displays on the DIC
screen.
If your vehicle does not have RKE, press the Driver
Information Center (DIC) vehicle information button
until the PRESS
VTO RELEARN TIRE POSITIONS
message displays. The horn sounds twice to signal
the receiver is in relearn mode and TIRE LEARNING
ACTIVE message displays on the DIC screen.
If your vehicle does not have RKE or DIC buttons,
press the trip odometer reset stem located on the
instrument panel cluster until the PRESS
VTO
RELEARN TIRE POSITIONS message displays.
The horn sounds twice to signal the receiver is
in relearn mode and TIRE LEARNING ACTIVE
message displays on the DIC screen.
4. Start with the driver side front tire.5. Remove the valve cap from the valve cap stem.
Activate the TPMS sensor by increasing or
decreasing the tire’s air pressure for �ve seconds,
or until a horn chirp sounds. The horn chirp,
which may take up to 30 seconds to sound,
con�rms that the sensor identi�cation code has
been matched to this tire and wheel position.
6. Proceed to the passenger side front tire, and repeat
the procedure in Step 5.
7. Proceed to the passenger side rear tire, and repeat
the procedure in Step 5.
8. Proceed to the driver side rear tire, and repeat the
procedure in Step 5. The horn sounds two times
to indicate the sensor identi�cation code has been
matched to the driver side rear tire, and that the
TPMS sensor matching process is no longer active.
The TIRE LEARNING ACTIVE message on the DIC
display screen goes off.
9. Turn the ignition switch to LOCK/OFF.
10. Set all four tires to the recommended air pressure
level as indicated on the Tire and Loading
Information label.
11. Put the valve caps back on the valve stems.
5-83
Page 535 of 602

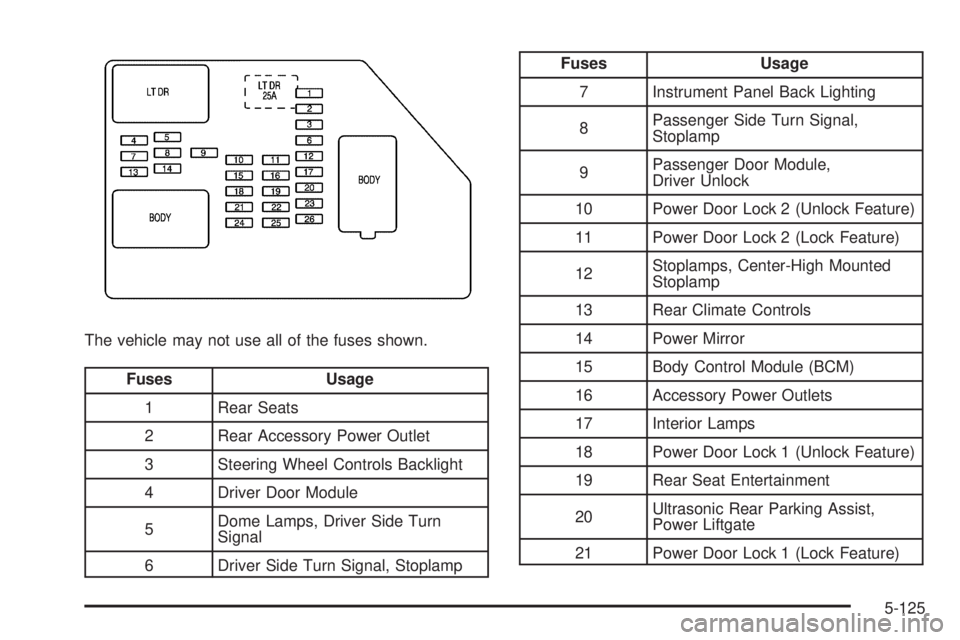
The vehicle may not use all of the fuses shown.
Fuses Usage
1 Rear Seats
2 Rear Accessory Power Outlet
3 Steering Wheel Controls Backlight
4 Driver Door Module
5Dome Lamps, Driver Side Turn
Signal
6 Driver Side Turn Signal, Stoplamp
Fuses Usage
7 Instrument Panel Back Lighting
8Passenger Side Turn Signal,
Stoplamp
9Passenger Door Module,
Driver Unlock
10 Power Door Lock 2 (Unlock Feature)
11 Power Door Lock 2 (Lock Feature)
12Stoplamps, Center-High Mounted
Stoplamp
13 Rear Climate Controls
14 Power Mirror
15 Body Control Module (BCM)
16 Accessory Power Outlets
17 Interior Lamps
18 Power Door Lock 1 (Unlock Feature)
19 Rear Seat Entertainment
20Ultrasonic Rear Parking Assist,
Power Liftgate
21 Power Door Lock 1 (Lock Feature)
5-125
Page 589 of 602

Bulb Replacement (cont.)
License Plate Lamps....................................5-65
Pickup Box Identi�cation and Fender Marker
Lamps ....................................................5-63
Taillamps, Turn Signal, Stoplamps and
Back-up Lamps........................................5-63
Buying New Tires...........................................5-86
C
Calibration.....................................................3-63
California
Perchlorate Materials Requirements................. 5-5
California Fuel.................................................. 5-7
California Proposition 65 Warning....................... 5-5
Camera, Rear Vision.......................................2-64
Canadian Owners............................................... iii
Capacities and Speci�cations..........................5-131
Carbon Monoxide
Engine Exhaust...........................................2-55
Tailgate......................................................2-13
Winter Driving.............................................4-30
Care of
Safety Belts..............................................5-118
Cargo
Lamp .........................................................3-21Cargo Management System.............................2-83
CD, MP3 ............................................3-106, 3-111
Center Console Storage...................................2-81
Center High-Mounted Stoplamp (CHMSL) and
Cargo Lamp...............................................5-62
Center Seat...................................................1-13
Chains, Tire...................................................5-92
Charging System Light....................................3-41
Check
Engine Lamp..............................................3-45
Checking Things Under the Hood......................5-14
Chemical Paint Spotting.................................5-122
Child Restraints
Infants and Young Children...........................1-41
Lower Anchors and Tethers for Children..........1-49
Older Children.............................................1-38
Securing a Child Restraint in a Rear Seat
Position..................................................1-58
Securing a Child Restraint in the Center
Front Seat Position...................................1-61
Securing a Child Restraint in the Right
Front Seat Position..................1-62, 1-66, 1-70
Systems.....................................................1-45
Where to Put the Restraint...........................1-48
Cigarette Lighter.............................................3-23
Circuit Breakers............................................5-124
3
Page 599 of 602

S
Safety Belt Reminders.....................................3-36
Safety Belts
Care of ....................................................5-118
Extender....................................................1-37
How to Wear Safety Belts Properly................1-22
Lap Belt.....................................................1-36
Lap-Shoulder Belt........................................1-30
Safety Belts Are for Everyone.......................1-16
Use During Pregnancy.................................1-36
Safety Defects
Reporting to Canadian Government................7-15
Reporting to General Motors.........................7-15
Reporting to the U.S. Government.................7-15
Safety Warnings and Symbols.............................. iv
Scheduled Maintenance..................................... 6-4
Additional Required Services........................... 6-7
Scheduling Appointments.................................7-10
Seatback Latches...........................................1-13
Seats
Center Seat................................................1-13
Head Restraints............................................ 1-3
Heated Seats............................................... 1-8
Manual Lumbar............................................. 1-6
Memory, Mirrors and Pedals........................... 1-8
Power Lumbar .............................................. 1-7Seats (cont.)
Power Seats................................................. 1-5
Rear Seat Operation............................1-14, 1-15
Reclining Seatbacks.....................................1-10
Secondary Latch System................................5-107
Securing a Child Restraint
Center Front Seat Position............................1-61
Rear Seat Position......................................1-58
Right Front Seat Position..............1-62, 1-66, 1-70
Security Light.................................................3-50
Service........................................................... 5-4
Accessories and Modi�cations......................... 5-4
Adding Equipment to the Outside of the
Vehicle..................................................... 5-6
Doing Your Own Work................................... 5-5
Engine Soon Lamp......................................3-45
Publications Ordering Information...................7-16
Scheduling Appointments..............................
7-10
Service Parts Identi�cation Label.....................5-123
Servicing Your Airbag-Equipped Vehicle..............1-89
Setting the Clock............................................3-85
Sheet Metal Damage.....................................5-121
Shifting
Out of Park................................................2-54
Shifting Into Park............................................2-52
Signals, Turn and Lane-Change.......................... 3-9
Sliding Rear Window, Power.............................2-17
13
Page 600 of 602

Snow Plow....................................................4-40
Spare Tire....................................................5-114
Installing...................................................5-100
Removing...................................................5-95
Storing.....................................................5-110
Speci�cations and Capacities..........................5-131
Speedometer..................................................3-35
StabiliTrak
®Indicator Light...............................3-44
StabiliTrak®System.......................................... 4-6
Start Vehicle, Remote....................................... 2-7
Starting the Engine.........................................2-24
Steering.......................................................... 4-9
Steering Wheel Controls, Audio.......................3-140
Steering Wheel, Tilt Wheel................................. 3-8
Storage Areas
Cargo Management System..........................2-83
Center Console...........................................2-81
Cupholders.................................................2-80
Glove Box..................................................2-80
Instrument Panel.........................................2-81
Luggage Carrier..........................................2-82
Rear Seat Armrest.......................................2-82
Stuck in Sand, Mud, Ice, or Snow.....................4-32
Sun Visors.....................................................2-18
Sunroof.........................................................2-84
T
Tachometer....................................................3-35
Tailgate.........................................................2-13
Taillamps
Turn Signal, Stoplamps and Back-up Lamps....5-63
Tampering with Noise Control System
Prohibited...................................................5-57
Text Telephone (TTY) Users............................... 7-6
Theft-Deterrent Feature..................................3-140
Theft-Deterrent Systems...................................2-18
Content Theft-Deterrent................................2-18
PASS-Key
®III+ Electronic Immobilizer............2-20
PASS-Key®III+ Electronic Immobilizer
Operation................................................2-20
Throttle, Adjustable..........................................2-26
Tilt Wheel........................................................ 3-8
Time, Setting..................................................3-85
Tire
Pressure Light.............................................3-45
Tires.............................................................5-67
Aluminum or Chrome-Plated Wheels,
Cleaning...............................................5-120
Buying New Tires........................................5-86
Chains.......................................................5-92
Changing a Flat Tire....................................5-94
14