2009 GMC SAVANA PASSENGER spare wheel
[x] Cancel search: spare wheelPage 244 of 406
Tires..............................................................5-55
Tire Sidewall Labeling...................................5-56
Tire Terminology and Definitions.....................5-60
Inflation - Tire Pressure.................................5-63
Dual Tire Operation.......................................5-64
Tire Pressure Monitor System.........................5-65
Tire Pressure Monitor Operation.....................5-66
Tire Inspection and Rotation...........................5-70
When It Is Time for New Tires.......................5-72
Buying New Tires.........................................5-73
Different Size Tires and Wheels......................5-75
Uniform Tire Quality Grading..........................5-75
Wheel Alignment and Tire Balance..................5-77
Wheel Replacement......................................5-77
Tire Chains..................................................5-78
If a Tire Goes Flat........................................5-79
Changing a Flat Tire.....................................5-80
Removing the Spare Tire and Tools................5-81
Removing the Flat Tire and Installing the
Spare Tire................................................5-84
Secondary Latch System...............................5-91
Storing a Flat or Spare Tire and Tools............5-94
Spare Tire...................................................5-95
Appearance Care............................................5-96
Interior Cleaning...........................................5-96
Fabric/Carpet...............................................5-97Instrument Panel, Vinyl, and Other Plastic
Surfaces..................................................5-98
Care of Safety Belts......................................5-98
Weatherstrips...............................................5-98
Washing Your Vehicle...................................5-99
Cleaning Exterior Lamps/Lenses.....................5-99
Finish Care................................................5-100
Windshield and Wiper Blades.......................5-100
Aluminum Wheels.......................................5-101
Tires.........................................................5-101
Sheet Metal Damage...................................5-101
Finish Damage...........................................5-102
Underbody Maintenance...............................5-102
Chemical Paint Spotting...............................5-102
Vehicle Identi�cation.....................................5-103
Vehicle Identification Number (VIN)................5-103
Service Parts Identification Label...................5-103
Electrical System..........................................5-103
Add-On Electrical Equipment.........................5-103
Headlamp Wiring........................................5-104
Windshield Wiper Fuses...............................5-104
Fuses and Circuit Breakers..........................5-104
Floor Console Fuse Block............................5-104
Engine Compartment Fuse Block...................5-106
Capacities and Speci�cations........................5-110
Section 5 Service and Appearance Care
5-2
Page 306 of 406
How to Check
Use a good quality pocket-type gage to check tire
pressure. You cannot tell if your tires are properly
inflated simply by looking at them. Radial tires
may look properly inflated even when they are
underinflated. Check the tire’s inflation pressure
when the tires are cold. Cold means your vehicle
has been sitting for at least three hours or driven
no more than 1 mile (1.6 km).
Remove the valve cap from the tire valve stem.
Press the tire gage firmly onto the valve to
get a pressure measurement. If the cold tire
inflation pressure matches the recommended
pressure on the Tire and Loading Information
label, no further adjustment is necessary.
If the pressure is low, add air until you reach
the recommended amount.
If you overfill the tire, release air by pushing on
the metal stem in the center of the tire valve.
Recheck the tire pressure with the tire gage.
Be sure to put the valve caps back on the valve
stems. They help prevent leaks by keeping out dirt
and moisture.
Dual Tire Operation
When the vehicle is new, or whenever a wheel,
wheel bolt or wheel nut is replaced, check the wheel nut
torque after 100, 1,000 and 6,000 miles (160, 1 600 and
10 000 km) of driving. For proper wheel nut tightening
information, see “Removing the Flat Tire and Installing
the Spare Tire” later in this section, underChanging a
Flat Tire on page 5-80. Also see “Wheel Nut Torque”
underCapacities and Specifications on page 5-110.
The outer tire on a dual wheel setup generally wears
faster than the inner tire. Your tires will wear more
evenly and last longer if you rotate the tires periodically.
SeeTire Inspection and Rotation on page 5-70.
Also seeScheduled Maintenance on page 6-4.
{CAUTION:
If you operate your vehicle with a tire that is badly
underinflated, the tire can overheat. An overheated
tire can lose air suddenly or catch fire. You or
others could be injured. Be sure all tires (including
the spare) are properly inflated.
SeeTires on page 5-55andInflation - Tire Pressure on
page 5-63for more information on proper tire inflation.
5-64
Page 307 of 406

Tire Pressure Monitor System
The Tire Pressure Monitor System (TPMS) uses radio
and sensor technology to check tire pressure levels.
The TPMS sensors monitor the air pressure in
your vehicle’s tires and transmit tire pressure
readings to a receiver located in the vehicle.
Each tire, including the spare (if provided), should be
checked monthly when cold and inflated to the inflation
pressure recommended by the vehicle manufacturer
on the vehicle placard or tire inflation pressure label.
(If your vehicle has tires of a different size than the
size indicated on the vehicle placard or tire inflation
pressure label, you should determine the proper
tire inflation pressure for those tires.)
As an added safety feature, your vehicle has been
equipped with a tire pressure monitoring system (TPMS)
that illuminates a low tire pressure telltale when one
or more of your tires is significantly under-inflated.
Accordingly, when the low tire pressure telltale
illuminates, you should stop and check your tires
as soon as possible, and inflate them to the proper
pressure. Driving on a significantly under-inflated
tire causes the tire to overheat and can lead to tire
failure. Under-inflation also reduces fuel efficiency
and tire tread life, and may affect the vehicle’s
handling and stopping ability.Please note that the TPMS is not a substitute for proper
tire maintenance, and it is the driver’s responsibility to
maintain correct tire pressure, even if under-inflation
has not reached the level to trigger illumination of
the TPMS low tire pressure telltale.
Your vehicle has also been equipped with a TPMS
malfunction indicator to indicate when the system is
not operating properly. The TPMS malfunction indicator
is combined with the low tire pressure telltale. When the
system detects a malfunction, the telltale will flash for
approximately one minute and then remain continuously
illuminated. This sequence will continue upon
subsequent vehicle start-ups as long as the malfunction
exists.
When the malfunction indicator is illuminated, the
system may not be able to detect or signal low tire
pressure as intended. TPMS malfunctions may occur
for a variety of reasons, including the installation of
replacement or alternate tires or wheels on the vehicle
that prevent the TPMS from functioning properly. Always
check the TPMS malfunction telltale after replacing one
or more tires or wheels on your vehicle to ensure that
the replacement or alternate tires and wheels allow the
TPMS to continue to function properly.
SeeTire Pressure Monitor Operation on page 5-66for
additional information.
5-65
Page 308 of 406

Federal Communications
Commission (FCC) and Industry
and Science Canada
The Tire Pressure Monitor System (TPMS) operates
on a radio frequency and complies with Part 15 of
the FCC Rules. Operation is subject to the following
two conditions:
1. This device may not cause harmful interference.
2. This device must accept any interference received,
including interference that may cause undesired
operation.
Vehicles with TPMS operate on a radio frequency and
comply with RSS-210 of Industry and Science Canada.
Operation is subject to the following two conditions:
1. This device may not cause interference.
2. This device must accept any interference received,
including interference that may cause undesired
operation of the device.
Changes or modifications to this system by other than
an authorized service facility could void authorization to
use this equipment.
Tire Pressure Monitor Operation
This vehicle may have a Tire Pressure Monitor
System (TPMS). The TPMS is designed to warn
the driver when a low tire pressure condition exists.
TPMS sensors are mounted onto each tire and wheel
assembly, excluding the spare tire and wheel assembly.
The TPMS sensors monitor the air pressure in the
vehicle’s tires and transmits the tire pressure readings
to a receiver located in the vehicle.
When a low tire pressure
condition is detected, the
TPMS will illuminate the
low tire pressure warning
symbol located on the
instrument panel cluster.
At the same time a message to check the pressure
in a specific tire appears on the Driver Information
Center (DIC) display. The low tire pressure warning
light and the DIC warning message come on at each
ignition cycle until the tires are inflated to the correct
inflation pressure. If your vehicle has DIC buttons,
tire pressure levels can be viewed by the driver.
5-66
Page 312 of 406
Tire Inspection and Rotation
Inspect tires regularly for signs of wear or damage.
Also inspect the spare tire. For more information
on tire inspection, seeWhen It Is Time for
New Tires on page 5-72.
Tires should be rotated every 5,000 to 8,000 miles
(8 000 to 13 000 km). SeeScheduled Maintenance
on page 6-4.
The purpose of a regular tire rotation is to
achieve a uniform wear for all tires on the vehicle.
This will ensure that the vehicle continues to
perform most like it did when the tires were new.
Any time you notice unusual wear, rotate the
tires as soon as possible and check wheel
alignment. Also check for damaged tires or wheels.
SeeWhen It Is Time for New Tires on page 5-72
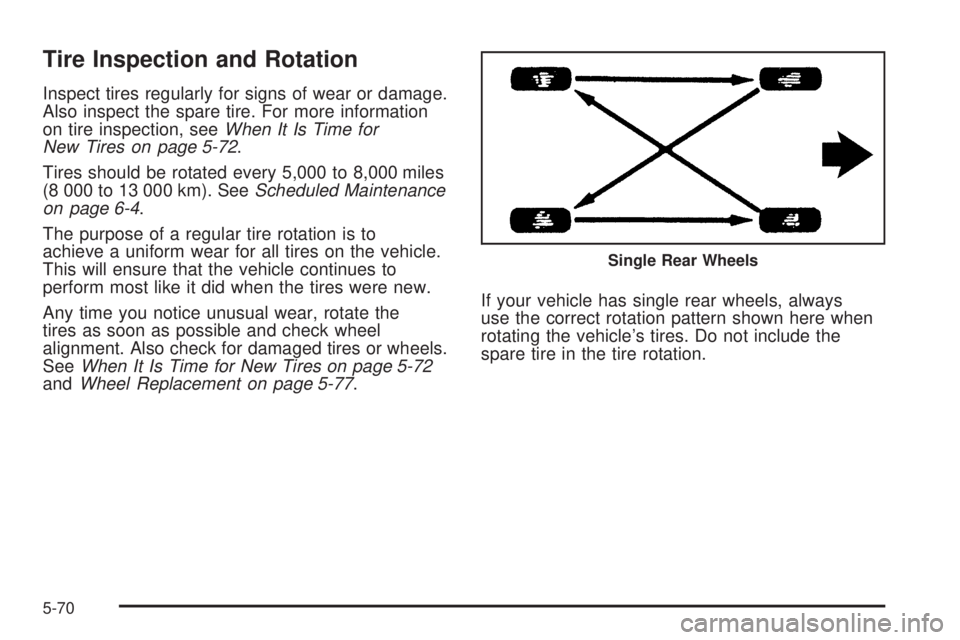
andWheel Replacement on page 5-77.If your vehicle has single rear wheels, always
use the correct rotation pattern shown here when
rotating the vehicle’s tires. Do not include the
spare tire in the tire rotation.
Single Rear Wheels
5-70
Page 314 of 406

SeeInflation - Tire Pressure on page 5-63and
Loading the Vehicle on page 4-18. Make certain
that all wheel nuts are properly tightened.
See “Wheel Nut Torque” underCapacities
and Specifications on page 5-110.
{CAUTION:
Rust or dirt on a wheel, or on the parts to
which it is fastened, can make wheel nuts
become loose after time. The wheel could
come off and cause an accident. When you
change a wheel, remove any rust or dirt from
places where the wheel attaches to the
vehicle. In an emergency, you can use a cloth
or a paper towel to do this; but be sure to use a
scraper or wire brush later, if needed, to get all
the rust or dirt off. SeeChanging a Flat Tire on
page 5-80.
If your vehicle has a Tire Pressure Monitor
System (TPMS), reset the TPMS sensors after
rotating the tires. SeeTire Pressure Monitor
Operation on page 5-66.
Make sure the spare tire is stored securely.
Push, pull, and then try to rotate or turn the tire.
If it moves, tighten the cable. SeeStoring a
Flat or Spare Tire and Tools on page 5-94.
When It Is Time for New Tires
Various factors, such as maintenance, temperatures,
driving speeds, vehicle loading, and road conditions,
influence when you need new tires.
One way to tell when it
is time for new tires is to
check the treadwear
indicators, which appear
when your tires have only
1/16 inch (1.6 mm) or less
of tread remaining.
Some commercial truck tires, including Goodyear
LT225/75R16 G949 RSA and Goodyear LT225/75R16
G933 RSD, may not have treadwear indicators.
If the tires do not have treadwear indicators, replace
the tires when the tread depth is down to 1/8 inch
(3.2 mm) for the front tires, or 1/16 inch (1.6 mm)
for the rear tires.
5-72
Page 317 of 406
Different Size Tires and Wheels
If you add wheels or tires that are a different size than
your original equipment wheels and tires, this could affect
the way your vehicle performs, including its braking,
ride and handling characteristics, stability, and resistance
to rollover. Additionally, if your vehicle has electronic
systems such as anti-lock brakes, rollover airbags,
traction control, and electronic stability control, the
performance of these systems can be affected.
{CAUTION:
If you add different sized wheels, your vehicle may
not provide an acceptable level of performance and
safety if tires not recommended for those wheels
are selected. You may increase the chance that you
will crash and suffer serious injury. Only use GM
specific wheel and tire systems developed for your
vehicle, and have them properly installed by a GM
certified technician.
SeeBuying New Tires on page 5-73andAccessories
and Modifications on page 5-3for additional information.
Uniform Tire Quality Grading
Quality grades can be found where applicable
on the tire sidewall between tread shoulder
and maximum section width. For example:
Treadwear 200 Traction AA
Temperature A
The following information relates to the system
developed by the United States National Highway
Traffic Safety Administration (NHTSA), which
grades tires by treadwear, traction, and
temperature performance. This applies only to
vehicles sold in the United States. The grades are
molded on the sidewalls of most passenger car
tires. The Uniform Tire Quality Grading (UTQG)
system does not apply to deep tread, winter-type
snow tires, space-saver, or temporary use
spare tires, tires with nominal rim diameters
of 10 to 12 inches (25 to 30 cm), or to some
limited-production tires.
While the tires available on General Motors
passenger cars and light trucks may vary with
respect to these grades, they must also conform
to federal safety requirements and additional
General Motors Tire Performance Criteria (TPC)
standards.
5-75
Page 324 of 406
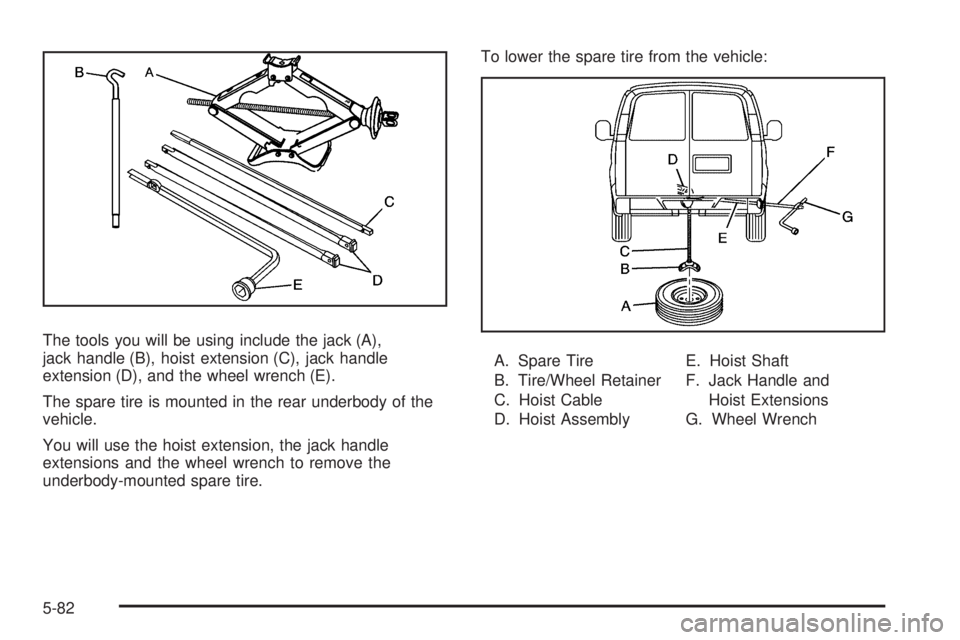
The tools you will be using include the jack (A),
jack handle (B), hoist extension (C), jack handle
extension (D), and the wheel wrench (E).
The spare tire is mounted in the rear underbody of the
vehicle.
You will use the hoist extension, the jack handle
extensions and the wheel wrench to remove the
underbody-mounted spare tire.To lower the spare tire from the vehicle:
A. Spare Tire
B. Tire/Wheel Retainer
C. Hoist Cable
D. Hoist AssemblyE. Hoist Shaft
F. Jack Handle and
Hoist Extensions
G. Wheel Wrench
5-82