2009 GMC SAVANA PASSENGER oil change
[x] Cancel search: oil changePage 4 of 406
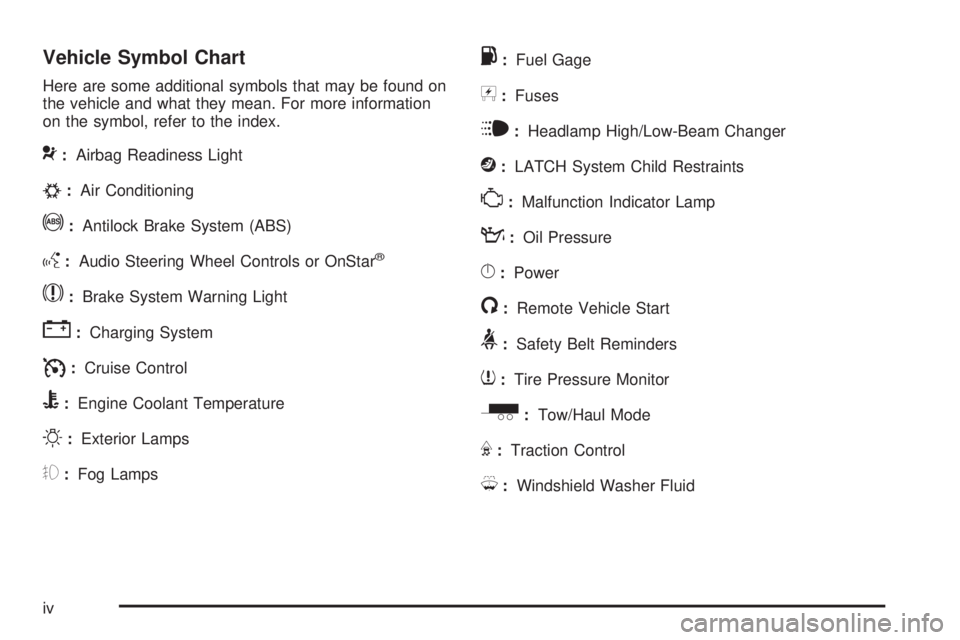
Vehicle Symbol Chart
Here are some additional symbols that may be found on
the vehicle and what they mean. For more information
on the symbol, refer to the index.
9:Airbag Readiness Light
#:Air Conditioning
!:Antilock Brake System (ABS)
g:Audio Steering Wheel Controls or OnStar®
$:Brake System Warning Light
":Charging System
I:Cruise Control
B:Engine Coolant Temperature
O:Exterior Lamps
#:Fog Lamps
.:Fuel Gage
+:Fuses
i:Headlamp High/Low-Beam Changer
j:LATCH System Child Restraints
*:Malfunction Indicator Lamp
::Oil Pressure
}:Power
/:Remote Vehicle Start
>:Safety Belt Reminders
7:Tire Pressure Monitor
_:Tow/Haul Mode
F:Traction Control
M:Windshield Washer Fluid
iv
Page 105 of 406
2. If the engine does not start after 5-10 seconds,
especially in very cold weather (below 0°F or−18°C),
it could be flooded with too much gasoline. Try
pushing the accelerator pedal all the way to the floor
and holding it there as you hold the key in START for
up to 15 seconds. Wait at least 15 seconds between
each try, to allow the cranking motor to cool down.
When the engine starts, let go of the key and
accelerator. If the vehicle starts briefly but then stops
again, do the same thing. This clears the extra
gasoline from the engine. Do not race the engine
immediately after starting it. Operate the engine and
transmission gently until the oil warms up and
lubricates all moving parts.
Notice:The engine is designed to work with the
electronics in the vehicle. If you add electrical parts
or accessories, you could change the way the
engine operates. Before adding electrical equipment,
check with your dealer/retailer. If you do not, the
engine might not perform properly. Any resulting
damage would not be covered by the vehicle
warranty.Fast Idle System
Fast Idle System with Switch
If the vehicle has this feature it is available only with
cruise control. The manual fast idle switch is operated
using the cruise control buttons located on the left
hand side of the steering wheel.
This system can be used to increase engine idle speed
whenever the following conditions are met:
•The park brake is set.
•The brake pedal is not pressed.
•The vehicle must not be moving and the accelerator
must not be pressed.
To control the fast idle:
•To Enable the Fast idle, press and release the
Cruise Control On/Off button and ensure that
the LED is lit.
•For the preset Fast Idle, press and release the
cruise set switch. This will set the preset fast
idle speed.
•For the variable fast idle, press and hold the
accelerator at the desired RPM, then press
and release the cruise control cruise set switch to
set the desired idle speed.
2-21
Page 119 of 406

Instrument Panel Overview...............................3-4
Hazard Warning Flashers................................3-6
Horn .............................................................3-6
Tilt Wheel.....................................................3-6
Turn Signal/Multifunction Lever.........................3-7
Turn and Lane-Change Signals........................3-7
Headlamp High/Low-Beam Changer..................3-8
Flash-to-Pass.................................................3-8
Windshield Wipers..........................................3-8
Windshield Washer.........................................3-9
Cruise Control................................................3-9
Exterior Lamps.............................................3-12
Headlamps on Reminder................................3-13
Daytime Running Lamps (DRL).......................3-14
Automatic Headlamp System..........................3-14
Instrument Panel Brightness...........................3-15
Dome Lamps ...............................................3-15
Dome Lamp Override....................................3-15
Entry/Exit Lighting.........................................3-16
Reading Lamps............................................3-16
Electric Power Management...........................3-16
Battery Run-Down Protection..........................3-17
Accessory Power Outlet(s).............................3-17
Ashtray(s) and Cigarette Lighter......................3-18Climate Controls............................................3-18
Climate Control System.................................3-18
Outlet Adjustment.........................................3-20
Rear Heating System....................................3-21
Rear Air Conditioning and Heating System.......3-22
Warning Lights, Gages, and Indicators............3-23
Instrument Panel Cluster................................3-24
Speedometer and Odometer...........................3-25
Trip Odometer..............................................3-25
Safety Belt Reminders...................................3-26
Airbag Readiness Light
..................................3-27
Airbag Off Light............................................3-28
Passenger Airbag Status Indicator...................3-29
Charging System Light..................................3-30
Voltmeter Gage............................................3-31
Brake System Warning Light..........................3-31
Antilock Brake System (ABS) Warning Light.....3-32
StabiliTrak
®Indicator Light.............................3-33
Engine Coolant Temperature Gage..................3-33
Tire Pressure Light.......................................3-34
Malfunction Indicator Lamp.............................3-34
Oil Pressure Gage........................................3-37
Oil Pressure Light.........................................3-38
Section 3 Instrument Panel
3-1
Page 157 of 406
This light comes on briefly while starting the engine.
If it does not, have the vehicle serviced by your
dealer/retailer. If the system is working normally the
indicator light then goes off.
If the light comes on and stays on, it means that oil is
not flowing through the engine properly. The vehicle
could be low on oil and it might have some other system
problem.
Security Light
For information regarding
this light and the vehicle’s
security system, see
PASS-Key
®III+ Electronic
Immobilizer Operation
on page 2-17.
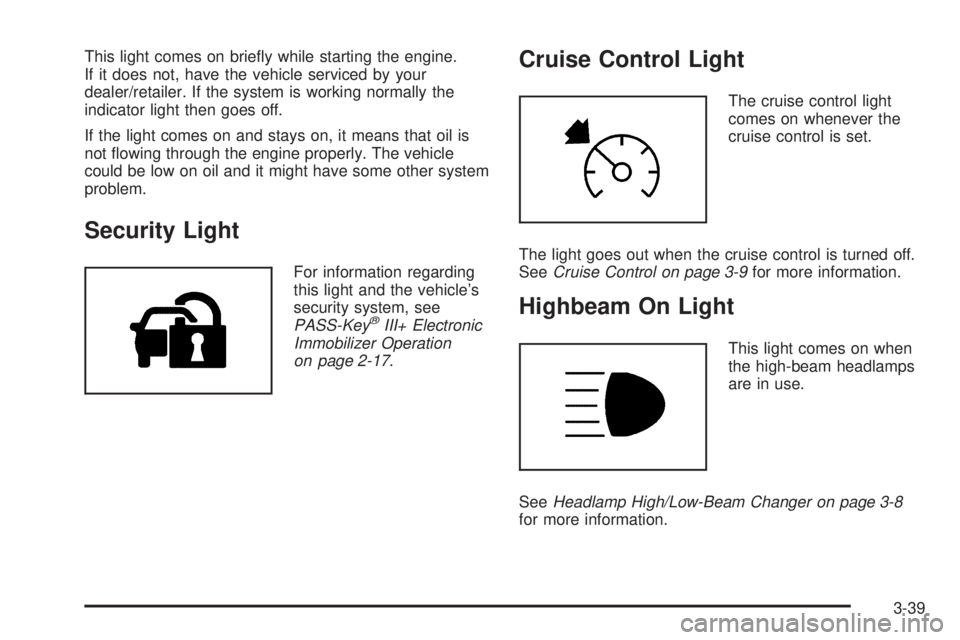
Cruise Control Light
The cruise control light
comes on whenever the
cruise control is set.
The light goes out when the cruise control is turned off.
SeeCruise Control on page 3-9for more information.
Highbeam On Light
This light comes on when
the high-beam headlamps
are in use.
SeeHeadlamp High/Low-Beam Changer on page 3-8
for more information.
3-39
Page 162 of 406
To stop the timer, press the set/reset button briefly while
TIMER is displayed.
To reset the timer to zero, press and hold the set/reset
button while TIMER is displayed.
Average Speed
Press the trip/fuel button until AVERAGE SPEED
displays. This display shows the average speed
of the vehicle in miles per hour (mph) or kilometers
per hour (km/h). This average is calculated based on the
various vehicle speeds recorded since the last reset of
this value. To reset the value, press and hold the
set/reset button. The display will return to zero.
Digital Tachometer
Press the trip/fuel button until Tachometer ##00 RPM
displays. This display shows the engine speed in
revolutions per minute (RPM).
Blank Display
This display shows no information.
Vehicle Information Menu Items
T
(Vehicle Information):Press this button to scroll
through the following menu items:
Oil Life
Press the vehicle information button until OIL LIFE
REMAINING displays. This display shows an estimate
of the oil’s remaining useful life. If you see 99% OIL LIFE
REMAINING on the display, that means 99% of the
current oil life remains. The engine oil life system
will alert you to change the oil on a schedule consistent
with your driving conditions.
When the remaining oil life is low, the CHANGE
ENGINE OIL SOON message will appear on the display.
See “CHANGE ENGINE OIL SOON” underDIC
Warnings and Messages on page 3-48. You should
change the oil as soon as possible. SeeEngine Oil on
page 5-15. In addition to the engine oil life system
monitoring the oil life, additional maintenance is
recommended in the Maintenance Schedule in this
manual. SeeScheduled Maintenance on page 6-4for
more information.
Remember, you must reset the OIL LIFE yourself after
each oil change. It will not reset itself. Also, be careful not
to reset the OIL LIFE accidentally at any time other than
when the oil has just been changed. It cannot be reset
accurately until the next oil change. To reset the engine
oil life system, seeEngine Oil Life System on page 5-18.
3-44
Page 167 of 406
AUTOMATIC LIGHT CONTROL OFF
This message displays when the automatic headlamps
are turned off. SeeExterior Lamps on page 3-12for
more information.
AUTOMATIC LIGHT CONTROL ON
This message displays when the automatic headlamps
are turned on. SeeExterior Lamps on page 3-12for
more information.
CALIBRATING: DRIVE IN CIRCLES
This message displays when calibrating the compass.
Drive the vehicle in circles at less than 5 mph (8 km/h) to
complete the calibration. SeeDIC Compass on
page 3-46for more information.
CALIBRATION COMPLETE
This message displays when the compass calibration is
complete. SeeDIC Compass on page 3-46for more
information.
CARGO DOOR OPEN
This message displays and a chime sounds if the cargo
door is open while the ignition is in ON/RUN. Turn off
the vehicle and check the cargo door. Restart the
vehicle and check for the message on the DIC display.
CHANGE ENGINE OIL SOON
This message displays when the engine oil needs to be
changed. When you change the engine oil, be sure
to reset the CHANGE ENGINE OIL SOON message.
SeeEngine Oil Life System on page 5-18for information
on how to reset the message. SeeEngine Oil on
page 5-15andScheduled Maintenance on page 6-4for
more information.
CHECK TIRE PRESSURE
If your vehicle has the Tire Pressure Monitor System
(TPMS), this message displays when the pressure
in one or more of the vehicle’s tires needs to be
checked. This message also displays LEFT FRONT,
RIGHT FRONT, LEFT REAR, or RIGHT REAR to
indicate which tire needs to be checked. You can
receive more than one tire pressure message at a time.
To read the other messages that may have been
sent at the same time, press the set/reset button. If a
tire pressure message appears on the DIC, stop as soon
as you can. Have the tire pressures checked and set
to those shown on the Tire Loading Information
label. SeeTires on page 5-55,Loading the Vehicle on
page 4-18, andInflation - Tire Pressure on page 5-63.
The DIC also shows the tire pressure values. See
DIC Operation and Displays on page 3-41. If the tire
pressure is low, the low tire pressure warning light
comes on. SeeTire Pressure Light on page 3-34.
3-49
Page 240 of 406
Turn Signals When Towing a Trailer
The arrows on the instrument panel flash whenever
signaling a turn or lane change. Properly hooked up, the
trailer lamps also flash, telling other drivers the vehicle
is turning, changing lanes or stopping.
When towing a trailer, the arrows on the instrument
panel flash for turns even if the bulbs on the trailer
are burned out. For this reason you may think other
drivers are seeing the signal when they are not.
It is important to check occasionally to be sure the
trailer bulbs are still working.
Driving On Grades
Reduce speed and shift to a lower gearbeforestarting
down a long or steep downgrade. If the transmission is
not shifted down, the brakes might have to be used so
much that they would get hot and no longer work well.The vehicle can tow in D (Drive). Shift the transmission
to a lower gear if the transmission shifts too often
under heavy loads and/or hilly conditions.
When towing at high altitude on steep uphill grades,
consider the following: Engine coolant will boil at a lower
temperature than at normal altitudes. If the engine is
turned off immediately after towing at high altitude on
steep uphill grades, the vehicle may show signs similar to
engine overheating. To avoid this, let the engine run while
parked, preferably on level ground, with the automatic
transmission in P (Park) for a few minutes before turning
the engine off. If the overheat warning comes on, see
Engine Overheating on page 5-31.
4-38
Page 249 of 406
Additives
To provide cleaner air, all gasolines in the United States
are now required to contain additives that help prevent
engine and fuel system deposits from forming, allowing
the emission control system to work properly. In most
cases, you should not have to add anything to the fuel.
However, some gasolines contain only the minimum
amount of additive required to meet U.S. Environmental
Protection Agency regulations. To help keep fuel injectors
and intake valves clean, or if the vehicle experiences
problems due to dirty injectors or valves, look for gasoline
that is advertised as TOP TIER Detergent Gasoline.
For customers who do not use TOP TIER Detergent
Gasoline regularly, one bottle of GM Fuel System
Treatment PLUS, added to the fuel tank at every engine
oil change, can help clean deposits from fuel injectors
and intake valves. GM Fuel System Treatment PLUS
is the only gasoline additive recommended by General
Motors.
Also, your dealer/retailer has additives that will help
correct and prevent most deposit-related problems.Gasolines containing oxygenates, such as ethers and
ethanol, and reformulated gasolines might be available in
your area. We recommend that you use these gasolines,
if they comply with the specifications described earlier.
However, E85 (85% ethanol) and other fuels containing
more than 10% ethanol must not be used in vehicles that
were not designed for those fuels.
Notice:This vehicle was not designed for fuel that
contains methanol. Do not use fuel containing
methanol. It can corrode metal parts in the fuel
system and also damage plastic and rubber parts.
That damage would not be covered under the
vehicle warranty.
Some gasolines that are not reformulated for
low emissions can contain an octane-enhancing
additive called methylcyclopentadienyl manganese
tricarbonyl (MMT); ask the attendant where you buy
gasoline whether the fuel contains MMT. We recommend
against the use of such gasolines. Fuels containing MMT
can reduce the life of spark plugs and the performance
of the emission control system could be affected.
The malfunction indicator lamp might turn on. If this
occurs, return to your dealer/retailer for service.
5-7