2009 GMC SAVANA PASSENGER instrument cluster
[x] Cancel search: instrument clusterPage 77 of 406

•The right front passenger seat is occupied by a
smaller person, such as a child who has outgrown
child restraints.
•Or, if there is a critical problem with the airbag
system or the passenger sensing system.
When the passenger sensing system has turned off the
right front passenger frontal airbag, the off indicator
will light and stay lit to remind you that the airbag is off.
SeePassenger Airbag Status Indicator on page 3-29.
The passenger sensing system is designed to turn
on (may inflate) the right front passenger frontal airbag
anytime the system senses that a person of adult
size is sitting properly in the right front passenger seat.
When the passenger sensing system has allowed
the airbag to be enabled, the on indicator will light and
stay lit to remind you that the airbag is active.
For some children, including those in child restraints,
and for very small adults, the passenger sensing system
may or may not turn off the right front passenger
frontal airbag, depending upon the person’s seating
posture and body build. Everyone in your vehicle who
has outgrown child restraints should wear a safety
belt properly — whether or not there is an airbag for that
person.
{CAUTION:
If the airbag readiness light in the instrument panel
cluster ever comes on and stays on, it means that
something may be wrong with the airbag system.
If this ever happens, have the vehicle serviced
promptly, because an adult-size person sitting in
the right front passenger’s seat may not have the
protection of the airbag(s). SeeAirbag Readiness
Light on page 3-27for more on this, including
important safety information.
1-73
Page 103 of 406

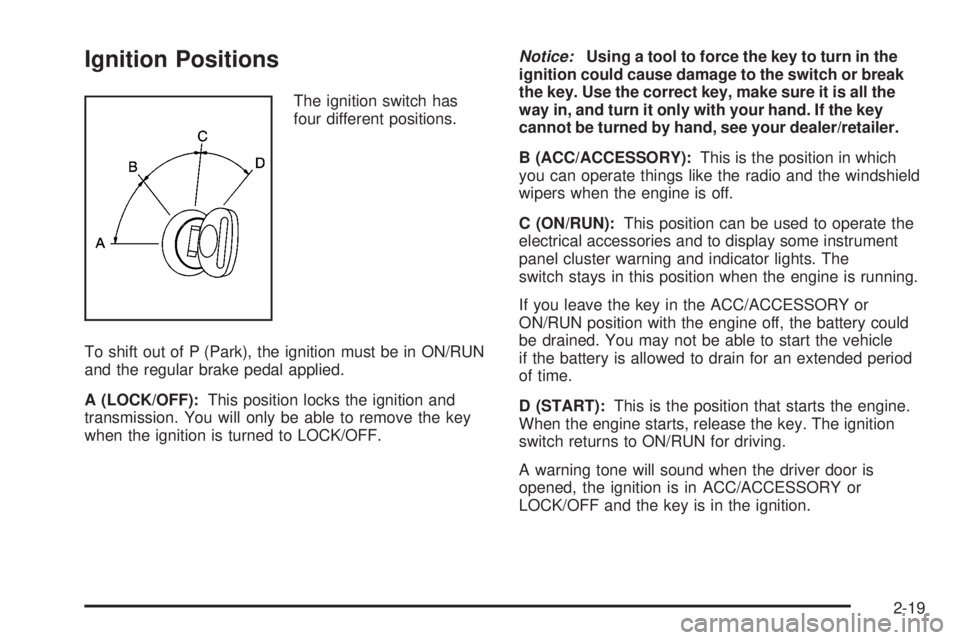
Ignition Positions
The ignition switch has
four different positions.
To shift out of P (Park), the ignition must be in ON/RUN
and the regular brake pedal applied.
A (LOCK/OFF):This position locks the ignition and
transmission. You will only be able to remove the key
when the ignition is turned to LOCK/OFF.Notice:Using a tool to force the key to turn in the
ignition could cause damage to the switch or break
the key. Use the correct key, make sure it is all the
way in, and turn it only with your hand. If the key
cannot be turned by hand, see your dealer/retailer.
B (ACC/ACCESSORY):This is the position in which
you can operate things like the radio and the windshield
wipers when the engine is off.
C (ON/RUN):This position can be used to operate the
electrical accessories and to display some instrument
panel cluster warning and indicator lights. The
switch stays in this position when the engine is running.
If you leave the key in the ACC/ACCESSORY or
ON/RUN position with the engine off, the battery could
be drained. You may not be able to start the vehicle
if the battery is allowed to drain for an extended period
of time.
D (START):This is the position that starts the engine.
When the engine starts, release the key. The ignition
switch returns to ON/RUN for driving.
A warning tone will sound when the driver door is
opened, the ignition is in ACC/ACCESSORY or
LOCK/OFF and the key is in the ignition.
2-19
Page 119 of 406

Instrument Panel Overview...............................3-4
Hazard Warning Flashers................................3-6
Horn .............................................................3-6
Tilt Wheel.....................................................3-6
Turn Signal/Multifunction Lever.........................3-7
Turn and Lane-Change Signals........................3-7
Headlamp High/Low-Beam Changer..................3-8
Flash-to-Pass.................................................3-8
Windshield Wipers..........................................3-8
Windshield Washer.........................................3-9
Cruise Control................................................3-9
Exterior Lamps.............................................3-12
Headlamps on Reminder................................3-13
Daytime Running Lamps (DRL).......................3-14
Automatic Headlamp System..........................3-14
Instrument Panel Brightness...........................3-15
Dome Lamps ...............................................3-15
Dome Lamp Override....................................3-15
Entry/Exit Lighting.........................................3-16
Reading Lamps............................................3-16
Electric Power Management...........................3-16
Battery Run-Down Protection..........................3-17
Accessory Power Outlet(s).............................3-17
Ashtray(s) and Cigarette Lighter......................3-18Climate Controls............................................3-18
Climate Control System.................................3-18
Outlet Adjustment.........................................3-20
Rear Heating System....................................3-21
Rear Air Conditioning and Heating System.......3-22
Warning Lights, Gages, and Indicators............3-23
Instrument Panel Cluster................................3-24
Speedometer and Odometer...........................3-25
Trip Odometer..............................................3-25
Safety Belt Reminders...................................3-26
Airbag Readiness Light
..................................3-27
Airbag Off Light............................................3-28
Passenger Airbag Status Indicator...................3-29
Charging System Light..................................3-30
Voltmeter Gage............................................3-31
Brake System Warning Light..........................3-31
Antilock Brake System (ABS) Warning Light.....3-32
StabiliTrak
®Indicator Light.............................3-33
Engine Coolant Temperature Gage..................3-33
Tire Pressure Light.......................................3-34
Malfunction Indicator Lamp.............................3-34
Oil Pressure Gage........................................3-37
Oil Pressure Light.........................................3-38
Section 3 Instrument Panel
3-1
Page 123 of 406

The main components of the instrument panel are the following:
A.Outlet Adjustment on page 3-20.
B.Driver Information Center (DIC) on page 3-41.
C.Turn Signal/Multifunction Lever on page 3-7.
D.Hazard Warning Flashers on page 3-6.
E.Instrument Panel Cluster on page 3-24.
F. Shift Lever. SeeStarting the Engine on page 2-20.
G.Climate Control System on page 3-18.
H.Audio System(s) on page 3-64.
I.Exterior Lamps on page 3-12.
J.Instrument Panel Brightness on page 3-15.
K.Cruise Control on page 3-9. Fast Idle System
(If Equipped). See Duramax Diesel Manual for more
information.L.Tilt Wheel on page 3-6.
M.Horn on page 3-6.
N.Audio Steering Wheel Controls on page 3-83.
O. Tow/Haul Mode Button. See “Tow/Haul Mode” under
Towing a Trailer on page 4-28.
P.Accessory Power Outlet(s) on page 3-17and
Ashtray(s) and Cigarette Lighter on page 3-18.
Q.StabiliTrak
®System on page 4-6(If Equipped).
R.Airbag Off Switch on page 1-67.
S.Storage Areas on page 2-33.
T.Passenger Airbag Status Indicator on page 3-29.
U.Rear Heating System on page 3-21(If Equipped).
3-5
Page 125 of 406

Turn Signal/Multifunction Lever
The lever on the left side of the steering column
includes the following:
G:Turn and Lane Change Signals.
53:Headlamp High/Low-Beam Changer.
N:Windshield Wipers.
L:Windshield Washer.
Flash-to-Pass Feature.
Information for these features is on the pages following.
Turn and Lane-Change Signals
G:An arrow on the instrument panel cluster flashes
in the direction of the turn or lane change.
To signal a turn, move the lever all the way up or down.
To signal a lane change, raise or lower the lever until
the arrow starts to flash. The turn signal automatically
flashes three times and if the tow-haul mode is active it
flashes six times. Holding the turn signal lever for
more than one second causes the turn signals to flash
continually until the lever is released.
The lever returns to its starting position when released.
If after signaling a turn or lane change the arrow
flashes rapidly or does not come on, a signal bulb may
be burned out.
Have the bulbs replaced. If the bulb is not burned out,
check the fuse. SeeFuses and Circuit Breakers on
page 5-104.
Turn Signal On Chime
If the turn signal is left on for more than 3/4 of a mile
(1.2 km), a chime sounds at each flash of the turn signal
and the message TURN SIGNAL ON also appears in
the Driver Information Center (DIC). SeeDIC Warnings
and Messages on page 3-48. To turn off the chime
and message, move the turn signal lever to the
off position.
3-7
Page 126 of 406

Headlamp High/Low-Beam Changer
23(Headlamp High/Low-Beam Changer):Pull the
turn signal lever all the way toward you to change the
headlamps from low to high beam. Then release it.
This instrument panel cluster light comes on when the
high beam headlamps are on.
Flash-to-Pass
This feature is used to signal to the vehicle ahead that
you want to pass.
If the headlamps are off or in the low-beam position,
pull the turn signal lever toward you to momentarily
switch to high-beams.
Release the lever to turn the high-beam headlamps off.
Windshield Wipers
The windshield wiper control is located on the
multifunction lever on the left side of the steering wheel.
Turn the band with
Non it to the following positions:
8(Mist):For a single wiping cycle, hold the band
on mist until the wipers start, then let go. The wipers will
stop after one wipe. If more wipes are needed, hold
the band on mist longer.
6Delay:Turn the band to adjust the delay time between
wipes. The closer to the top of the lever, the shorter
the delay.
d(Low Speed):For steady wiping at low speed.
a(High Speed):For steady wiping at high speed.
9(Off):Turns the wipers off.
When driving during the day and the wipers are
activated, the head lamps automatically turn on after
completing eight wipe cycles.
Be sure to clear ice and snow from the wiper blades
before using them. If they are frozen to the windshield,
carefully loosen or thaw them. If the blades become
damaged, get new blades or blade inserts.
3-8
Page 128 of 406

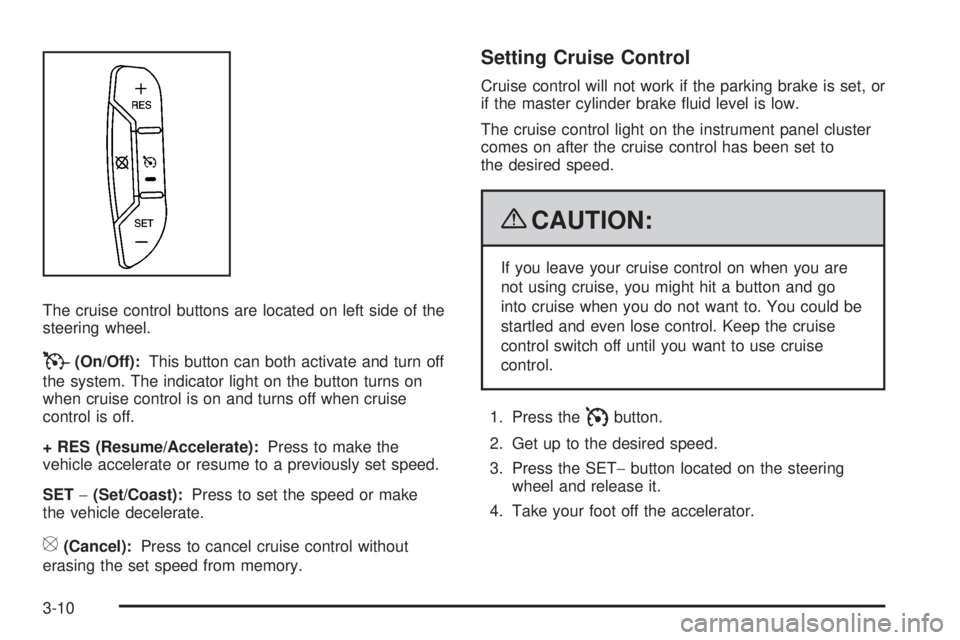
The cruise control buttons are located on left side of the
steering wheel.
T(On/Off):This button can both activate and turn off
the system. The indicator light on the button turns on
when cruise control is on and turns off when cruise
control is off.
+ RES (Resume/Accelerate):Press to make the
vehicle accelerate or resume to a previously set speed.
SET−(Set/Coast):Press to set the speed or make
the vehicle decelerate.
[(Cancel):Press to cancel cruise control without
erasing the set speed from memory.
Setting Cruise Control
Cruise control will not work if the parking brake is set, or
if the master cylinder brake fluid level is low.
The cruise control light on the instrument panel cluster
comes on after the cruise control has been set to
the desired speed.
{CAUTION:
If you leave your cruise control on when you are
not using cruise, you might hit a button and go
into cruise when you do not want to. You could be
startled and even lose control. Keep the cruise
control switch off until you want to use cruise
control.
1. Press the
Ibutton.
2. Get up to the desired speed.
3. Press the SET−button located on the steering
wheel and release it.
4. Take your foot off the accelerator.
3-10
Page 133 of 406

If the vehicle is started in a dark garage, the automatic
headlamp system comes on immediately. Once the
vehicle leaves the garage, it takes approximately
30 seconds for the automatic headlamp system to
change to DRL if it is light outside. During that delay,
the instrument panel cluster may not be as bright
as usual. Make sure the instrument panel brightness
control is in the full bright position. SeeInstrument Panel
Brightness on page 3-15.
Instrument Panel Brightness
The knob for this feature is located next to the exterior
lamps control.
D(Instrument Panel Lights):Push the knob to
extend and then turn clockwise or counterclockwise to
brighten or dim the instrument panel lights and the radio
display. This only works if the headlamps or parking
lamps are on.
To turn on the dome lamps, with the vehicle doors
closed, turn the knob all the way clockwise.
Dome Lamps
The dome lamps come on when any door is opened.
They turn off after all the doors are closed.
The dome lamps can also be turned on by turning the
instrument panel brightness knob, located on the
instrument panel to the left of the steering column,
clockwise to the farthest position. In this position, the
dome lamps remain on whether a door is opened
or closed.
Dome Lamp Override
The dome lamp override button is located next to the
exterior lamps control.
The dome lamp override sets the dome lamps to remain
off or come on automatically when a door is opened.
E(Dome Lamp Override):Press the button in
and the dome lamps remain off when a door is opened.
Press the button again to return it to the extended
position so that the dome lamps come on when a door
is opened.
3-15