2009 GMC SAVANA PASSENGER ignition
[x] Cancel search: ignitionPage 187 of 406
4(Information) (AM-FM Radio and Radio with CD
(Base)):Press to switch the display between the radio
station frequency and the time. While the ignition is
off, press to display the time.
4(Information) (MP3 and RDS Features):Press to
display additional text information related to the current
FM-RDS station or MP3 song. A choice of additional
information such as: Channel, Song, Artist, and
CAT (category) can display. Continue pressing to
highlight the desired label, or press the pushbutton
positioned under any one of the labels and the
information about that label displays.
When information is not available, No Info displays.
H(Clock) (AM-FM Radio and Radio with CD
(Base)):The radio has a clock button for setting the
time. With this type of radio, the clock can be set
with either the radio turned on or off. SeeSetting the
Clock on page 3-65for more information.Speed Compensated Volume (SCV):Radios with
Speed Compensated Volume (SCV) automatically
adjusts the radio volume to compensate for road and
wind noise as you speed up or slow down while driving.
That way, the volume level should sound about the
same as you drive.
To activate SCV:
1. Set the radio volume to the desired level.
2. Press the MENU button to display the radio
setup menu.
3. Press the pushbutton under the AUTO VOLUM
label on the radio display.
4. Press the pushbutton under the desired Speed
Compensated Volume setting (OFF, Low, Med,
or High) to select the level of radio volume
compensation. The display times out after
approximately 10 seconds. Each higher setting
allows for more radio volume compensation at faster
vehicle speeds.
3-69
Page 192 of 406
Playing a CD(s) (Six-Disc CD Player)
LOAD^:Press to load CDs into the CD player.
This CD player holds up to six CDs.
To insert one CD, do the following:
1. Press and release the
^button.
2. Wait for the message to insert the disc.
3. Load a CD. Insert the CD partway into the slot,
label side up. The player pulls the CD in.
To insert multiple CDs, do the following:
1. Press and hold the
^button for two seconds.
A beep sounds and Load All Discs displays.
2. Follow the displayed instruction on when to insert
the discs. The CD player takes up to six CDs.
3. Press the
^button again to cancel loading
more CDs.
Insert a CD partway into the slot, label side up.
The player pulls it in and the CD should begin playing.
If you want to insert a CD with the ignition off, first
press the
Zbutton or the DISP knob.
If the ignition or radio is turned off with a CD in the
player it stays in the player. When the ignition or radio
is turned on, the CD starts to play where it stopped, if it
was the last selected audio source.When the CD is inserted, the CD symbol displays. As
each new track starts to play, the track number displays.
The CD player can play the smaller 3 inch (8 cm)
single CDs with an adapter ring. Full-size CDs and the
smaller CDs are loaded in the same manner.
Care of Your CDs and DVDs
If playing a CD-R, the sound quality can be reduced due
to CD-R or CD-RW quality, the method of recording, the
quality of the music that has been recorded, and the way
the CD-R or CD-RW has been handled. Handle them
carefully. Store CD-R(s) or CD-RW(s) in their original
cases or other protective cases and away from direct
sunlight and dust. The CD or DVD player scans the
bottom surface of the disc. If the surface of a CD is
damaged, such as cracked, broken, or scratched, the CD
does not play properly or not at all. Do not touch the
bottom side of a CD while handling it; this could damage
the surface. Pick up CDs by grasping the outer edges or
the edge of the hole and the outer edge.
If the surface of a CD is soiled, take a soft, lint free
cloth or dampen a clean, soft cloth in a mild, neutral
detergent solution mixed with water, and clean it. Make
sure the wiping process starts from the center to
the edge.
3-74
Page 194 of 406
RDM (Random):Tracks can be listened to in random,
rather than sequential order, on one CD or all CDs
in a six-disc CD player.
To use random on the Base Radio with Single CD
player, do the following:
•Press the RDM button to play tracks from a CD in
random order. The random icon displays. Press
again to turn off random play. The random
icon disappears from the display.
To use random on an Uplevel Radio with a Single CD
player, do the following:
1. Press the CD/AUX button, insert a disc partway into
the slot of the CD player. A RDM label displays.
2. To play the tracks in random order, press the
pushbutton positioned under the RDM label
until Random Current Disc displays. Press the
pushbutton again to turn off random play.
To use random on a Radio with a Six-Disc CD player,
do the following:
1. Press the CD/AUX button, press and hold
^.
A beep sounds and Load All Discs displays.
Insert one or more discs partway into the slot
of the CD player.2. To play tracks from all CDs loaded in random order,
press the pushbutton positioned under the RDM
label until Randomize All Discs displays. Press the
same pushbutton again to turn off random play.
RPT (Repeat (Base Radio with CD):With the repeat
setting, one track can be repeated. To repeat the
track you are listening to, press and release the RPT
button. An arrow symbol displays. Press RPT again
to turn off repeat play.
4(Information) (Base Radio with CD):Press to switch
the display between the track number, elapsed time
of the track, and the time. When the ignition is off, press
to display the time.
BAND:Press to listen to the radio when a CD is
playing. The CD remains inside the radio for future
listening.
CD/AUX (CD/Auxiliary):Press to play a CD when
listening to the radio. The CD icon and a message
showing the disc and/or track number displays when a
CD is in the player. Press again and the system
automatically searches for an auxiliary input device,
such as a portable audio player. If a portable audio
player is not connected, “No Input Device Found” may
display.
3-76
Page 198 of 406
Order of Play
Tracks recorded to the CD-R or CD-RW are played in
the following order:
•Play begins from the first track in the first playlist
and continues sequentially through all tracks in
each playlist. When the last track of the last playlist
has played, play continues from the first track of
the first playlist.
•Play begins from the first track in the first folder and
continues sequentially through all tracks in each
folder. When the last track of the last folder
has played, play continues from the first track of the
first folder.
When play enters a new folder, the display does not
automatically show the new folder name unless
you have chosen the folder mode as the default display.
The new track name displays.
File System and Naming
The song name that displays is the song name that is
contained in the ID3 tag. If the song name is not present
in the ID3 tag, then the radio displays the file name
without the extension (such as .mp3) as the track name.
Track names longer than 32 characters or four pages
are shortened. Parts of words on the last page of
text and the extension of the filename does not display.
Preprogrammed Playlists
Preprogrammed playlists that were created using
WinAmp™, MusicMatch™, or Real Jukebox™ software
can be accessed, however, they cannot be edited
using the radio. These playlists are treated as special
folders containing compressed audio song files.
Playing an MP3
Insert a CD-R or CD-RW partway into the slot (Single
CD Player), or press the load button and wait for
the message to insert disc (Six-Disc CD Player), label
side up. The player pulls it in, and the CD-R or CD-RW
should begin playing.
If the ignition or radio is turned off with a CD-R or
CD-RW in the player, it stays in the player. When the
ignition or radio is turned on, the CD-R or CD-RW starts
to play where it stopped, if it was the last selected
audio source.
As each new track starts to play, the track number and
song title displays.
ZEJECT:Press this button to eject CD-R(s) or
CD-RW(s). To eject the CD-R or CD-RW that is currently
playing, press and release this button. A beep sounds
and Ejecting Disc displays. Once the disc is ejected,
Remove Disc displays. The CD-R or CD-RW can be
removed. If the CD-R or CD-RW is not removed, after
several seconds, the CD-R or CD-RW automatically pulls
back into the player and begins playing.
3-80
Page 217 of 406
{CAUTION:
Coasting downhill in N (Neutral) or with the ignition
off is dangerous. The brakes will have to do all the
work of slowing down and they could get so hot
that they would not work well. You would then
have poor braking or even none going down a hill.
You could crash. Always have the engine running
and the vehicle in gear when going downhill.
•Stay in your own lane. Do not swing wide or cut
across the center of the road. Drive at speeds
that let you stay in your own lane.
•Top of hills: Be alert — something could be in your
lane (stalled car, accident).
•Pay attention to special road signs (falling rocks
area, winding roads, long grades, passing or
no-passing zones) and take appropriate action.
Winter Driving
Driving on Snow or Ice
Drive carefully when there is snow or ice between the
tires and the road, creating less traction or grip. Wet ice
can occur at about 32°F (0°C) when freezing rain
begins to fall, resulting in even less traction. Avoid
driving on wet ice or in freezing rain until roads can be
treated with salt or sand.
Drive with caution, whatever the condition. Accelerate
gently so traction is not lost. Accelerating too quickly
causes the wheels to spin and makes the surface under
the tires slick, so there is even less traction.
Try not to break the fragile traction. If you accelerate too
fast, the drive wheels will spin and polish the surface
under the tires even more.
TheAntilock Brake System (ABS) on page 4-5improves
vehicle stability during hard stops on a slippery roads, but
apply the brakes sooner than when on dry pavement.
Allow greater following distance on any slippery road
and watch for slippery spots. Icy patches can occur on
otherwise clear roads in shaded areas. The surface
of a curve or an overpass can remain icy when
the surrounding roads are clear. Avoid sudden steering
maneuvers and braking while on ice.
Turn off cruise control, if equipped, on slippery surfaces.
4-15
Page 228 of 406
Dolly Towing
Rear Towing (Rear Wheels Off the Ground)
Two-Wheel-Drive Vehicles
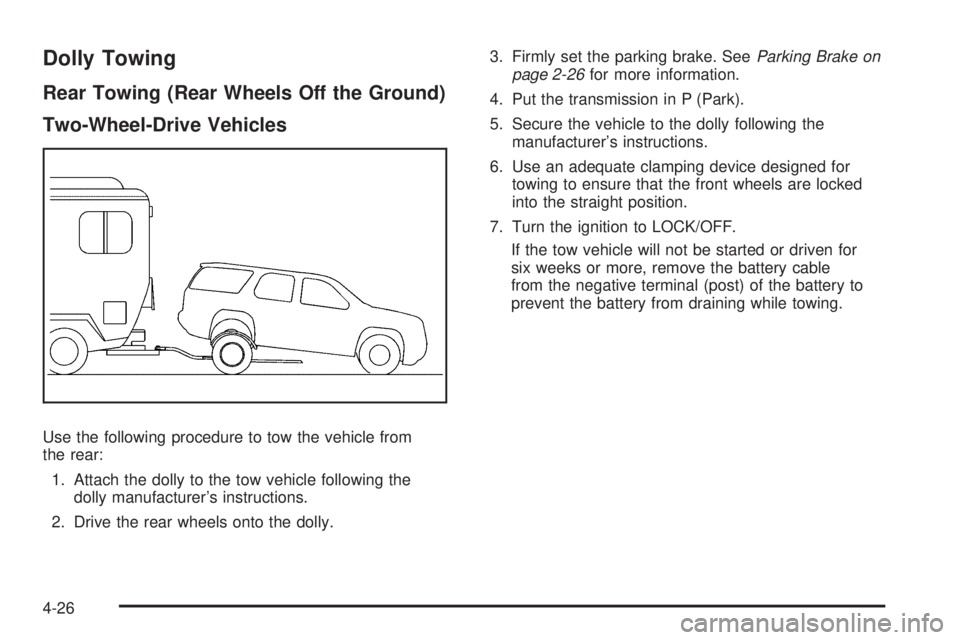
Use the following procedure to tow the vehicle from
the rear:
1. Attach the dolly to the tow vehicle following the
dolly manufacturer’s instructions.
2. Drive the rear wheels onto the dolly.3. Firmly set the parking brake. SeeParking Brake on
page 2-26for more information.
4. Put the transmission in P (Park).
5. Secure the vehicle to the dolly following the
manufacturer’s instructions.
6. Use an adequate clamping device designed for
towing to ensure that the front wheels are locked
into the straight position.
7. Turn the ignition to LOCK/OFF.
If the tow vehicle will not be started or driven for
six weeks or more, remove the battery cable
from the negative terminal (post) of the battery to
prevent the battery from draining while towing.
4-26
Page 261 of 406
How to Reset the Engine Oil Life
System
The Engine Oil Life System calculates when to change
the engine oil and filter based on vehicle use. Whenever
the oil is changed, reset the system so it can calculate
when the next oil change is required. If a situation occurs
where the oil is changed prior to a CHANGE ENGINE OIL
SOON message being turned on, reset the system.
To reset the CHANGE ENGINE OIL SOON message:
1. Turn the ignition key to ON/RUN with the engine off.
2. Fully press and release the accelerator pedal
slowly three times within five seconds.
3. Turn the key to LOCK/OFF.
If the message comes back on when the vehicle
is started, the engine oil life system has not reset.
Repeat the procedure. If it still does not reset,
see your dealer/retailer for service.
What to Do with Used Oil
Used engine oil contains certain elements that can be
unhealthy for your skin and could even cause cancer.
Do not let used oil stay on your skin for very long.
Clean your skin and nails with soap and water,
or a good hand cleaner. Wash or properly dispose
of clothing or rags containing used engine oil. See the
manufacturer’s warnings about the use and disposal
of oil products.
Used oil can be a threat to the environment. If you
change your own oil, be sure to drain all the oil from the
filter before disposal. Never dispose of oil by putting it
in the trash, pouring it on the ground, into sewers, or into
streams or bodies of water. Recycle it by taking it to a
place that collects used oil.
5-19
Page 283 of 406
Notice:If you leave the radio or other accessories
on during the jump starting procedure, they could be
damaged. The repairs would not be covered by the
warranty. Always turn off the radio and other
accessories when jump starting the vehicle.
3. Turn off the ignition on both vehicles. Unplug
unnecessary accessories plugged into the cigarette
lighter or the accessory power outlet. Turn off
the radio and all lamps that are not needed.
This will avoid sparks and help save both batteries.
And it could save the radio!
4. Open the hoods and locate the positive (+) and
negative (−) terminal locations of the other vehicle.
Your vehicle has a remote positive (+) jump
starting terminal and a remote negative (−) jump
starting terminal. You should always use these
remote terminals instead of the terminals on the
battery.The remote positive (+) terminal is located
behind a red plastic cover near the engine accessory
drive bracket on the driver’s side of the engine
compartment, below the alternator. To uncover
the remote positive (+) terminal, open the red
plastic cover.
The remote negative (−) terminal is located on
the engine drive bracket on all V8 engines and is
marked GND (Ground).
On V6 engines the remote negative (−) terminal is
located on a tab attached to the engine accessory
drive bracket and is marked GND (Ground).
5-41