2009 GMC SAVANA PASSENGER stop start
[x] Cancel search: stop startPage 8 of 406
Reclining Seatbacks
{CAUTION:
You can lose control of the vehicle if you try to
adjust a manual driver’s seat while the vehicle is
moving. The sudden movement could startle and
confuse you, or make you push a pedal when you
do not want to. Adjust the driver’s seat only when
the vehicle is not moving.
{CAUTION:
If either seatback is not locked, it could move
forward in a sudden stop or crash. That could cause
injury to the person sitting there. Always push and
pull on the seatbacks to be sure they are locked.
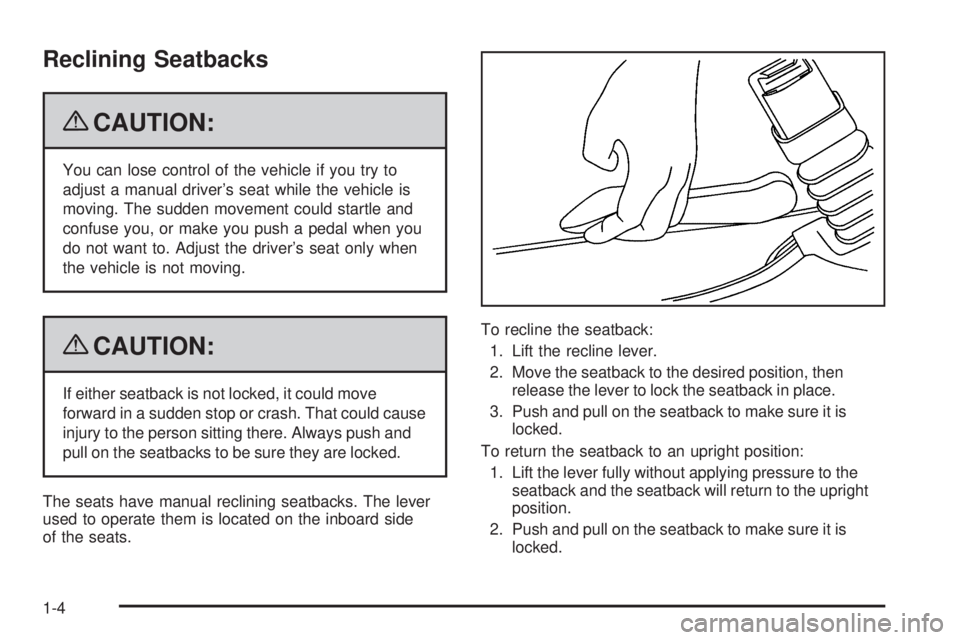
The seats have manual reclining seatbacks. The lever
used to operate them is located on the inboard side
of the seats.To recline the seatback:
1. Lift the recline lever.
2. Move the seatback to the desired position, then
release the lever to lock the seatback in place.
3. Push and pull on the seatback to make sure it is
locked.
To return the seatback to an upright position:
1. Lift the lever fully without applying pressure to the
seatback and the seatback will return to the upright
position.
2. Push and pull on the seatback to make sure it is
locked.
1-4
Page 101 of 406

This device complies with RSS-210 of Industry Canada.
Operation is subject to the following two conditions:
1. This device may not cause interference.
2. This device must accept any interference received,
including interference that may cause undesired
operation of the device.
Changes or modifications to this system by other than
an authorized service facility could void authorization to
use this equipment.
PASS-Key III+ uses a radio frequency transponder in
the key that matches a decoder in the vehicle.
PASS-Key®III+ Electronic
Immobilizer Operation
Your vehicle is equipped with the PASS-Key®III+
(Personalized Automotive Security System)
theft-deterrent system. PASS-Key
®III+ is a passive
theft deterrent system.
The system is automatically armed when the key is
removed from the ignition.
You do not have to manually arm or disarm the system.
The security light will come on if there is a problem
with arming or disarming the theft-deterrent system.When the PASS-Key
®III+ system senses that someone
is using the wrong key, it shuts down the vehicle’s
starter and fuel systems. The starter will not work and
fuel will stop being delivered to the engine. Anyone
using a trial-and-error method to start the vehicle will be
discouraged because of the high number of electrical
key codes.
If the engine does not start and the security message
comes on, the key may have a damaged transponder.
Turn the ignition off and try again.
If the engine still does not start, and the key appears to
be undamaged, try another ignition key. At this time,
you may also want to check the instrument panel PASS
KEY fuse. If the engine still does not start with the
other key, your vehicle needs service. If your vehicle
does start, the first key may be faulty. See your
dealer/retailer or a locksmith who can service the
PASS-Key
®III+ to have a new key made. SeeFuses
and Circuit Breakers on page 5-104.
It is possible for the PASS-Key
®III+ decoder to learn
the transponder value of a new or replacement key. Up
to 10 keys may be programmed for the vehicle. This
procedure is for learning additional keys only. If all the
currently programmed keys are lost or do not operate,
you must see your dealer/retailer or a locksmith who can
service PASS-Key
®III+ to have keys made and
programmed to the system.
2-17
Page 102 of 406
See your dealer/retailer or a locksmith who can service
PASS-Key®III+ to get a new key blank that is cut
exactly as the ignition key that operates the system.
To program the new key:
1. Verify the new key has
1stamped on it.
2. Insert the original, already programmed key into the
ignition lock cylinder and start the engine. If the
engine will not start, see your dealer/retailer
for service.
3. After the engine has started, turn the key to
LOCK/OFF and remove the key.
4. Insert the key to be programmed and turn it to
ON/RUN within 10 seconds of removing the
previous key.
The security message will turn off once the key has
been programmed. It may not be apparent that
the security message went on due to how quickly
the key is programmed.
5. Repeat Steps 1 through 4 if additional keys are to
be programmed.
If you lose or damage a PASS-Key
®III+ key, see your
dealer/retailer or a locksmith who can service
PASS-Key
®III+ to have a new key made.
Do not leave the key or device that disarms or
deactivates the theft deterrent system in the vehicle.
Starting and Operating Your
Vehicle
New Vehicle Break-In
Notice:The vehicle does not need an elaborate
break-in. But it will perform better in the long run if
you follow these guidelines:
Keep your speed at 55 mph (88 km/h) or less for
the �rst 500 miles (805 km).
Do not drive at any one constant speed, fast or
slow, for the �rst 500 miles (805 km). Do not
make full-throttle starts. Avoid downshifting to
brake or slow the vehicle.
Avoid making hard stops for the �rst 200 miles
(322 km) or so. During this time the new brake
linings are not yet broken in. Hard stops
with new linings can mean premature wear and
earlier replacement. Follow this breaking-in
guideline every time you get new brake linings.
Do not tow a trailer during break-in. SeeTowing
a Trailer on page 4-28for the trailer towing
capabilities of the vehicle and more information.
Following break-in, engine speed and load can
be gradually increased.
2-18
Page 104 of 406
Retained Accessory Power (RAP)
These vehicle accessories can be used for up to
10 minutes after the engine is turned off:
•Audio System
•Power Windows (if equipped)
These features will work when the ignition key is in
ON/RUN or ACC/ACCESSORY. Once the key is turned
from ON/RUN to LOCK/OFF, power to the radio will
continue to work 10 minutes or until the driver door is
opened. The power windows will continue to work for up
to 10 minutes or until any door is opened.
Starting the Engine
If the vehicle has the DURAMAX®Diesel engine, see
the DURAMAX®Diesel manual for more information.
To place the transmission in the proper gear:
Move the shift lever to P (Park) or N (Neutral). The
engine will not start in any other position. To restart the
engine when the vehicle is already moving, use
N (Neutral) only.
Starting Procedure
1. With your foot off the accelerator pedal, turn the
ignition key to START. When the engine starts,
let go of the key. The idle speed will go down as
your engine gets warm. Do not race the engine
immediately after starting it. Operate the engine and
transmission gently to allow the oil to warm up
and lubricate all moving parts.
The vehicle has a Computer-Controlled Cranking
System. This feature assists in starting the engine
and protects components. If the ignition key is turned
to the START position, and then released when the
engine begins cranking, the engine will continue
cranking for a few seconds or until the vehicle starts.
If the engine does not start and the key is held in
START for many seconds, cranking will be stopped
after 15 seconds to prevent cranking motor damage.
To prevent gear damage, this system also prevents
cranking if the engine is already running. Engine
cranking can be stopped by turning the ignition
switch to the ACC/ACCESSORY or LOCK/OFF
position.
Notice:Cranking the engine for long periods of
time, by returning the key to the START position
immediately after cranking has ended, can overheat
and damage the cranking motor, and drain the
battery. Wait at least 15 seconds between each try,
to let the cranking motor cool down.
2-20
Page 105 of 406
2. If the engine does not start after 5-10 seconds,
especially in very cold weather (below 0°F or−18°C),
it could be flooded with too much gasoline. Try
pushing the accelerator pedal all the way to the floor
and holding it there as you hold the key in START for
up to 15 seconds. Wait at least 15 seconds between
each try, to allow the cranking motor to cool down.
When the engine starts, let go of the key and
accelerator. If the vehicle starts briefly but then stops
again, do the same thing. This clears the extra
gasoline from the engine. Do not race the engine
immediately after starting it. Operate the engine and
transmission gently until the oil warms up and
lubricates all moving parts.
Notice:The engine is designed to work with the
electronics in the vehicle. If you add electrical parts
or accessories, you could change the way the
engine operates. Before adding electrical equipment,
check with your dealer/retailer. If you do not, the
engine might not perform properly. Any resulting
damage would not be covered by the vehicle
warranty.Fast Idle System
Fast Idle System with Switch
If the vehicle has this feature it is available only with
cruise control. The manual fast idle switch is operated
using the cruise control buttons located on the left
hand side of the steering wheel.
This system can be used to increase engine idle speed
whenever the following conditions are met:
•The park brake is set.
•The brake pedal is not pressed.
•The vehicle must not be moving and the accelerator
must not be pressed.
To control the fast idle:
•To Enable the Fast idle, press and release the
Cruise Control On/Off button and ensure that
the LED is lit.
•For the preset Fast Idle, press and release the
cruise set switch. This will set the preset fast
idle speed.
•For the variable fast idle, press and hold the
accelerator at the desired RPM, then press
and release the cruise control cruise set switch to
set the desired idle speed.
2-21
Page 108 of 406
R (Reverse):Use this gear to back up.
Notice:Shifting to R (Reverse) while the vehicle is
moving forward could damage the transmission.
The repairs would not be covered by the vehicle
warranty. Shift to R (Reverse) only after the vehicle
is stopped.
To rock the vehicle back and forth to get out of snow,
ice or sand without damaging the transmission, see
If Your Vehicle is Stuck in Sand, Mud, Ice, or Snow on
page 4-17.
N (Neutral):In this position, the engine does not
connect with the wheels. To restart the engine when the
vehicle is already moving, use N (Neutral) only. Also,
use N (Neutral) when the vehicle is being towed.
{CAUTION:
Shifting into a drive gear while the engine is
running at high speed is dangerous. Unless your
foot is firmly on the brake pedal, the vehicle could
move very rapidly. You could lose control and hit
people or objects. Do not shift into a drive gear
while the engine is running at high speed.Notice:Shifting out of P (Park) or N (Neutral) with
the engine running at high speed may damage
the transmission. The repairs would not be covered
by the vehicle warranty. Be sure the engine is
not running at high speed when shifting the vehicle.
D (Drive):This position is for normal driving. It
provides the best fuel economy. If you need more
power for passing, and you are:
•Going less than about 35 mph (55 km/h), push the
accelerator pedal about halfway down.
•Going about 35 mph (55 km/h) or more, push the
accelerator all the way down.
You will shift down to the next gear and have more
power.
Downshifting the transmission in slippery road conditions
could result in skidding, see “Skidding” underLoss of
Control on page 4-11.
3 (Third):This position is also used for normal driving.
However it reduces vehicle speed more than D (Drive)
without using the brakes. You might choose 3 (Third)
instead of D (Drive) when driving on hilly, winding roads,
when towing a trailer, so there is less shifting between
gears and when going down a steep hill.
You should use 3 (Third) (or a lower gear as needed)
when towing a trailer to minimize heat build-up and
extend the life of the transmission.
2-24
Page 109 of 406
2 (Second):This position reduces vehicle speed even
more than 3 (Third) without using the brakes. You
can use 2 (Second) on hills. It can help control vehicle
speed as you go down steep mountain roads, but
then you would also want to use the brakes off and on.
You may use this feature for reducing torque to the
rear wheels when you are trying to start the vehicle from
a stop on slippery road surfaces.
1 (First):This position reduces vehicle speed even
more than 2 (Second) without using the brakes. You can
use it on very steep hills, or in deep snow or mud. If
the shift lever is put in 1 (First) while the vehicle
is moving forward, the transmission will not shift into
first gear until the vehicle is going slowly enough.
Notice:Spinning the tires or holding the vehicle in
one place on a hill using only the accelerator
pedal may damage the transmission. The repair will
not be covered by the vehicle warranty. If you
are stuck, do not spin the tires. When stopping on a
hill, use the brakes to hold the vehicle in place.Tow/Haul Mode
Tow/haul is designed to assist while the vehicle is
pulling a large or heavy load or trailer. Tow/haul is most
useful while pulling such a load in rolling terrain, in
stop-and-go traffic, or when you need improved
low-speed control, such as when parking. The purpose
of the tow/haul mode is to:
•Reduce the frequency and improve the predictability
of transmission shifts,
•provide the same solid shift feel when pulling a
heavy load as when the vehicle is unloaded,
•improve control of vehicle speed while requiring
less throttle pedal activity.
Press this button located
to the right of the steering
wheel on the instrument
panel to turn tow/haul
mode on and off.
2-25
Page 126 of 406

Headlamp High/Low-Beam Changer
23(Headlamp High/Low-Beam Changer):Pull the
turn signal lever all the way toward you to change the
headlamps from low to high beam. Then release it.
This instrument panel cluster light comes on when the
high beam headlamps are on.
Flash-to-Pass
This feature is used to signal to the vehicle ahead that
you want to pass.
If the headlamps are off or in the low-beam position,
pull the turn signal lever toward you to momentarily
switch to high-beams.
Release the lever to turn the high-beam headlamps off.
Windshield Wipers
The windshield wiper control is located on the
multifunction lever on the left side of the steering wheel.
Turn the band with
Non it to the following positions:
8(Mist):For a single wiping cycle, hold the band
on mist until the wipers start, then let go. The wipers will
stop after one wipe. If more wipes are needed, hold
the band on mist longer.
6Delay:Turn the band to adjust the delay time between
wipes. The closer to the top of the lever, the shorter
the delay.
d(Low Speed):For steady wiping at low speed.
a(High Speed):For steady wiping at high speed.
9(Off):Turns the wipers off.
When driving during the day and the wipers are
activated, the head lamps automatically turn on after
completing eight wipe cycles.
Be sure to clear ice and snow from the wiper blades
before using them. If they are frozen to the windshield,
carefully loosen or thaw them. If the blades become
damaged, get new blades or blade inserts.
3-8