2009 FORD SUPER DUTY maintenance schedule
[x] Cancel search: maintenance schedulePage 24 of 418

Fuel gauge:Indicates
approximately how much fuel is left
in the fuel tank (when the ignition
is in the on position). The fuel
gauge may vary slightly when the
vehicle is in motion or on a grade.
The FUEL icon and arrow indicates
which side of the vehicle the fuel
filler door is located.
Refer toFilling the tankin theMaintenance and Specifications
chapter for more information.
Battery voltage gauge (manual
transmission only):Indicates the
battery voltage when the ignition is
in the on position. If the pointer
moves and stays outside the normal
operating range, have the vehicle’s
electrical system checked as soon as
possible.
Transmission fluid temperature gauge (automatic transmission
only):If the gauge is in the:
Normal area(normal) - the
transmission fluid is within the
normal operating temperature
(between “H” and “C”).
Yellow area(warning) — the
transmission fluid is higher than
normal operating temperature. This
can be caused by special operation
conditions (i.e. snowplowing, towing
or off road use). Refer toSpecial
Operating Conditionsin the
scheduled maintenance
informationfor instructions. Operating the transmission for extended
periods of time with the gauge in the yellow area may cause internal
transmission damage.
2009 F-250/350/450/550(f23)
Owners Guide, 1st Printing
USA(fus)
Instrument Cluster
24
Page 235 of 418
The tires should also be balanced periodically. An unbalanced tire and
wheel assembly may result in irregular tire wear.
Tire rotation
Rotating your tires at the recommended interval (as indicated in the
scheduled maintenance informationthat comes with your vehicle) will
help your tires wear more evenly, providing better tire performance and
longer tire life.
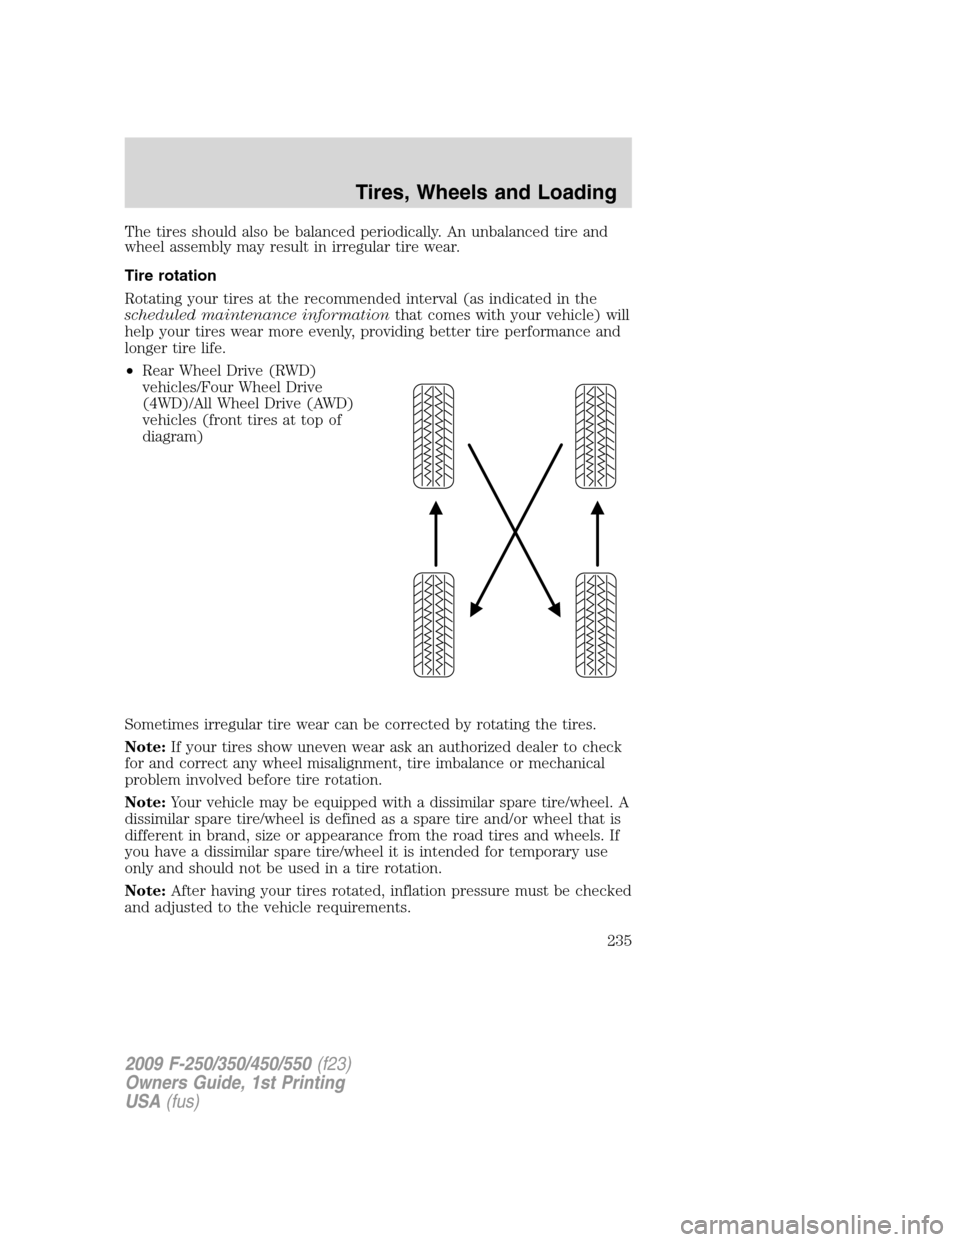
•Rear Wheel Drive (RWD)
vehicles/Four Wheel Drive
(4WD)/All Wheel Drive (AWD)
vehicles (front tires at top of
diagram)
Sometimes irregular tire wear can be corrected by rotating the tires.
Note:If your tires show uneven wear ask an authorized dealer to check
for and correct any wheel misalignment, tire imbalance or mechanical
problem involved before tire rotation.
Note:Your vehicle may be equipped with a dissimilar spare tire/wheel. A
dissimilar spare tire/wheel is defined as a spare tire and/or wheel that is
different in brand, size or appearance from the road tires and wheels. If
you have a dissimilar spare tire/wheel it is intended for temporary use
only and should not be used in a tire rotation.
Note:After having your tires rotated, inflation pressure must be checked
and adjusted to the vehicle requirements.
2009 F-250/350/450/550(f23)
Owners Guide, 1st Printing
USA(fus)
Tires, Wheels and Loading
235
Page 269 of 418
Servicing after towing
If you tow a trailer for long distances, your vehicle will require more
frequent service intervals. Refer to yourscheduled maintenance
informationfor more information.
Trailer towing safety tips
General
•Ensure that the trailer, safety chains and 7–pin electrical connectors
are securely fastened.
•Make sure the truck receiver, draw bar, and coupler are properly
connected and adjusted.
•Check rear view and side mirrors for proper visibility especially when
towing trailer wider than the truck.
•When towing, operate the vehicle at lower speeds than you would
when not towing a trailer. The likelihood of trailer sway is greater at
higher speeds.
•If you will be towing a trailer frequently in hot weather, hilly
conditions, at GCWR, or any combination of these factors, consider
refilling your rear axle with synthetic gear lubricant if not already so
equipped. Refer toMaintenance Product Specifications and
Capacitiesin theMaintenance and Specificationschapter for the
proper axle lubricant. Remember that regardless of the rear axle
lubricant used, do not tow a trailer for the first 500 miles (800 km) of
a new vehicle, and that the first 500 miles of towing be done at no
faster than 70 mph (113 km/h) with no full-throttle starts.
•When turning make wide turns to allow trailer tires to properly clear
any obstacles.
•Be prepared for trailer sway due to buffeting when larger vehicles
pass in either direction.
Loading
•Keep the center-of-gravity low for best handling.
•Trailer loads should be evenly distributed front to back and left to
right.
•The load distribution within the trailer should be such that 10%–15%
of the trailer weight is on the hitch. (15%–25% for fifth-wheel or
gooseneck towing.)
•Never exceed truck, trailer, receiver, ball, tongue, tire or coupler
loading recommendations.
2009 F-250/350/450/550(f23)
Owners Guide, 1st Printing
USA(fus)
Tires, Wheels and Loading
269
Page 311 of 418
•The snow plow prep package includes a unique powertrain control
strategy which is required for diesel engine cooling during highway
driving with the snowplow raised.
Operating the vehicle with the snowplow attached
Do not use your vehicle for snow removal until it has been driven at
least 500 miles (800 km).
The attached snowplow blade restricts airflow to the radiator, and may
cause the engine to run at a higher temperature: Attention to engine
temperature is especially important when outside temperatures are
above freezing. Angle the blade to maximize airflow to the radiator and
monitor engine temperature to determine whether a left or right angle
provides the best performance.
Follow the severe duty schedule in yourscheduled maintenance
informationfor engine oil and transmission fluid change intervals.
Snowplowing with your airbag-equipped vehicle
Your vehicle is equipped with a driver and passenger airbag
Supplemental Restraint System (SRS) The SRS is designed to activate in
certain frontal and offset frontal collisions when the vehicle sustains
sufficient longitudinal deceleration.
Careless or high speed driving while plowing snow which results in
sufficient vehicle decelerations can deploy the airbag. Such driving also
increases the risk of accidents.
WARNING:All occupants of the vehicle, including the driver,
should always properly wear their safety belts, even when an air
bag supplemental restraint system (SRS) is provided.
Never remove or defeat the “tripping mechanisms” designed into the
snow removal equipment by its manufacturer. Doing so may cause
damage to the vehicle and the snow removal equipment as well as
possible airbag deployment.
WARNING:Do not attempt to service, repair, or modify the air
bag supplemental restraint system (SRS) or its fuses. See your
Ford or Lincoln Mercury dealer.
2009 F-250/350/450/550(f23)
Owners Guide, 1st Printing
USA(fus)
Driving
311
Page 341 of 418
5. Repeat this tightness check procedure when servicing the spare tire
pressure (every six months, perscheduled maintenance information),
or at any time that the spare tire is disturbed through service of other
components.
6. If removed, install the spare tire lock (if equipped) into the bumper
drive tube with the spare tire lock key (if equipped) and jack handle.
WHEEL LUG NUT TORQUE SPECIFICATIONS
On vehicles equipped with single rear wheels, retighten the lug nuts to
the specified torque at 500 miles (800 km) after any wheel disturbance
(tire rotation, changing a flat tire, wheel removal, etc.).
On vehicles equipped with dual rear wheels, retighten the wheel lug nuts
to the specified torque at 100 miles (160 km), and again at 500 miles
(800 km) of new vehicle operation and after any wheel disturbance (tire
rotation, changing a flat tire, wheel removal, etc.).
Bolt size Wheel lug nut torque*
lb.ft. N•m
M14 x 1.5 165 224
* Torque specifications are for nut and bolt threads free of dirt and
rust. Use only Ford recommended replacement fasteners.
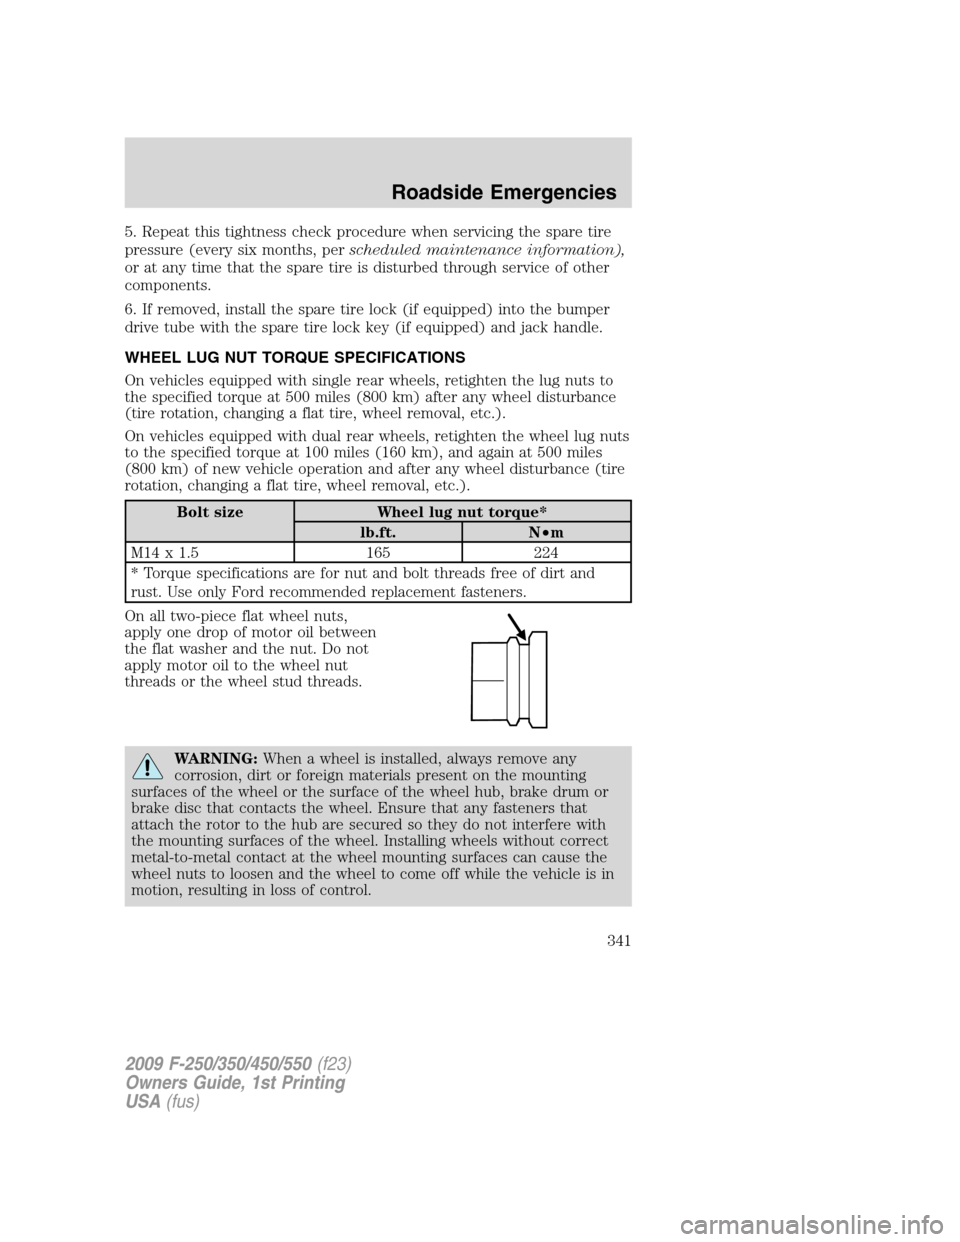
On all two-piece flat wheel nuts,
apply one drop of motor oil between
the flat washer and the nut. Do not
apply motor oil to the wheel nut
threads or the wheel stud threads.
WARNING:When a wheel is installed, always remove any
corrosion, dirt or foreign materials present on the mounting
surfaces of the wheel or the surface of the wheel hub, brake drum or
brake disc that contacts the wheel. Ensure that any fasteners that
attach the rotor to the hub are secured so they do not interfere with
the mounting surfaces of the wheel. Installing wheels without correct
metal-to-metal contact at the wheel mounting surfaces can cause the
wheel nuts to loosen and the wheel to come off while the vehicle is in
motion, resulting in loss of control.
2009 F-250/350/450/550(f23)
Owners Guide, 1st Printing
USA(fus)
Roadside Emergencies
341
Page 349 of 418
GETTING THE SERVICES YOU NEED
Warranty repairs to your vehicle must be performed by an authorized
Ford, Lincoln, or Mercury dealer. While any authorized dealer handling
your vehicle line will provide warranty service, we recommend you
return to your selling authorized dealer who wants to ensure your
continued satisfaction.
Please note that certain warranty repairs require special training and/or
equipment, so not all authorized dealers are authorized to perform all
warranty repairs. This means that, depending on the warranty repair
needed, you may have to take your vehicle to another authorized dealer.
A reasonable time must be allowed to perform a repair after taking your
vehicle to the authorized dealer. Repairs will be made using Ford or
Motorcraft parts, or remanufactured or other parts that are authorized by
Ford.
Away from home
If you are away from home when your vehicle needs service, contact the
Ford Customer Relationship Center or use the online resources listed
below to find the nearest authorized dealer.
In the United States:
Mailing Address
Ford Motor Company
Customer Relationship Center
P.O. Box 6248
Dearborn, MI 48121
Telephone
1-800-392-3673 (FORD)
(TDD for the hearing impaired: 1-800-232-5952)
Online
Additional information and resources are available online at
www.genuineservice.com.
•U.S. dealer locator by Dealer Name, City/State, or Zip Code
•Owner Guides
•Maintenance Schedules
•Recalls
•Ford Extended Service Plans
•Ford Genuine Accessories
•Service specials and promotions.
2009 F-250/350/450/550(f23)
Owners Guide, 1st Printing
USA(fus)
Customer Assistance
349
Page 367 of 418

SERVICE RECOMMENDATIONS
To help you service your vehicle, we providescheduled maintenance
informationwhich makes tracking routine service easy.
If your vehicle requires professional service, your authorized dealer can
provide the necessary parts and service. Check yourWarranty
Guide/Customer Information Guideto find out which parts and
services are covered.
Use only recommended fuels, lubricants, fluids and service parts
conforming to specifications. Motorcraft parts are designed and built to
provide the best performance in your vehicle.
PRECAUTIONS WHEN SERVICING YOUR VEHICLE
•Do not work on a hot engine.
•Make sure that nothing gets caught in moving parts.
•Do not work on a vehicle with the engine running in an enclosed
space, unless you are sure you have enough ventilation.
•Keep all open flames and other burning (cigarettes) material away
from the battery and all fuel related parts.
Working with the engine off
•Automatic transmission:
1. Set the parking brake and shift to P (Park).
2. Turn off the engine and remove the key.
3. Block the wheels.
•Manual transmission:
1. Set the parking brake, depress the clutch and place the gearshift in 1
(First).
2. Turn off the engine and remove the key.
3. Block the wheels.
Working with the engine on
•Automatic transmission:
1. Set the parking brake and shift to P (Park).
2. Block the wheels.
•Manual transmission:
1. Set the parking brake, depress the clutch pedal, place the gearshift in
N (Neutral), and release the clutch pedal.
2009 F-250/350/450/550(f23)
Owners Guide, 1st Printing
USA(fus)
Maintenance and Specifications
367
Page 372 of 418
CHANGING THE WIPER BLADES
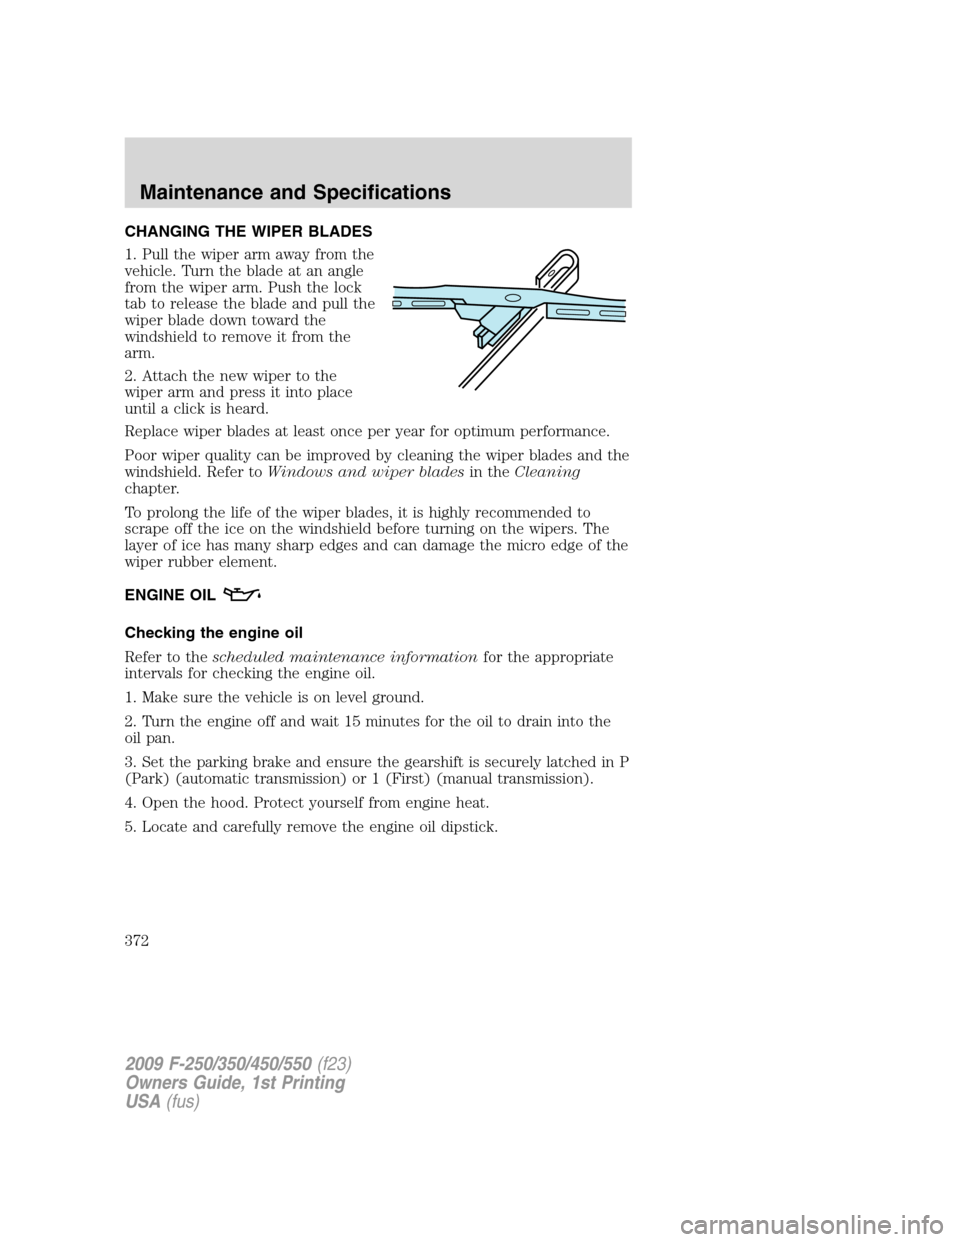
1. Pull the wiper arm away from the
vehicle. Turn the blade at an angle
from the wiper arm. Push the lock
tab to release the blade and pull the
wiper blade down toward the
windshield to remove it from the
arm.
2. Attach the new wiper to the
wiper arm and press it into place
until a click is heard.
Replace wiper blades at least once per year for optimum performance.
Poor wiper quality can be improved by cleaning the wiper blades and the
windshield. Refer toWindows and wiper bladesin theCleaning
chapter.
To prolong the life of the wiper blades, it is highly recommended to
scrape off the ice on the windshield before turning on the wipers. The
layer of ice has many sharp edges and can damage the micro edge of the
wiper rubber element.
ENGINE OIL
Checking the engine oil
Refer to thescheduled maintenance informationfor the appropriate
intervals for checking the engine oil.
1. Make sure the vehicle is on level ground.
2. Turn the engine off and wait 15 minutes for the oil to drain into the
oil pan.
3. Set the parking brake and ensure the gearshift is securely latched in P
(Park) (automatic transmission) or 1 (First) (manual transmission).
4. Open the hood. Protect yourself from engine heat.
5. Locate and carefully remove the engine oil dipstick.
2009 F-250/350/450/550(f23)
Owners Guide, 1st Printing
USA(fus)
Maintenance and Specifications
372